The Heights Golf Course

# 1 /
Par: 4
Handicaps:
Men's 3
Women's 11
Yardage by Tee:
BLUE 434
WHITE 403
GOLD 357
RED 340
TEAL 298
Slope:
Blue-130 | Silver-126 | White-124 | Green-121 | Gold-119 | Red-127 | Purple-122| Teal-118
Pro Tips
| The ideal tee shot is down the center right side of the fairway as long left may bring trees into play on your approach shot. Long hitters may take a more aggressive and riskier line over the bunker in hopes for a shorter club in. Play your approach shot a few yards longer and remember, middle of this larger green is a good place to put from on your opening hole. |
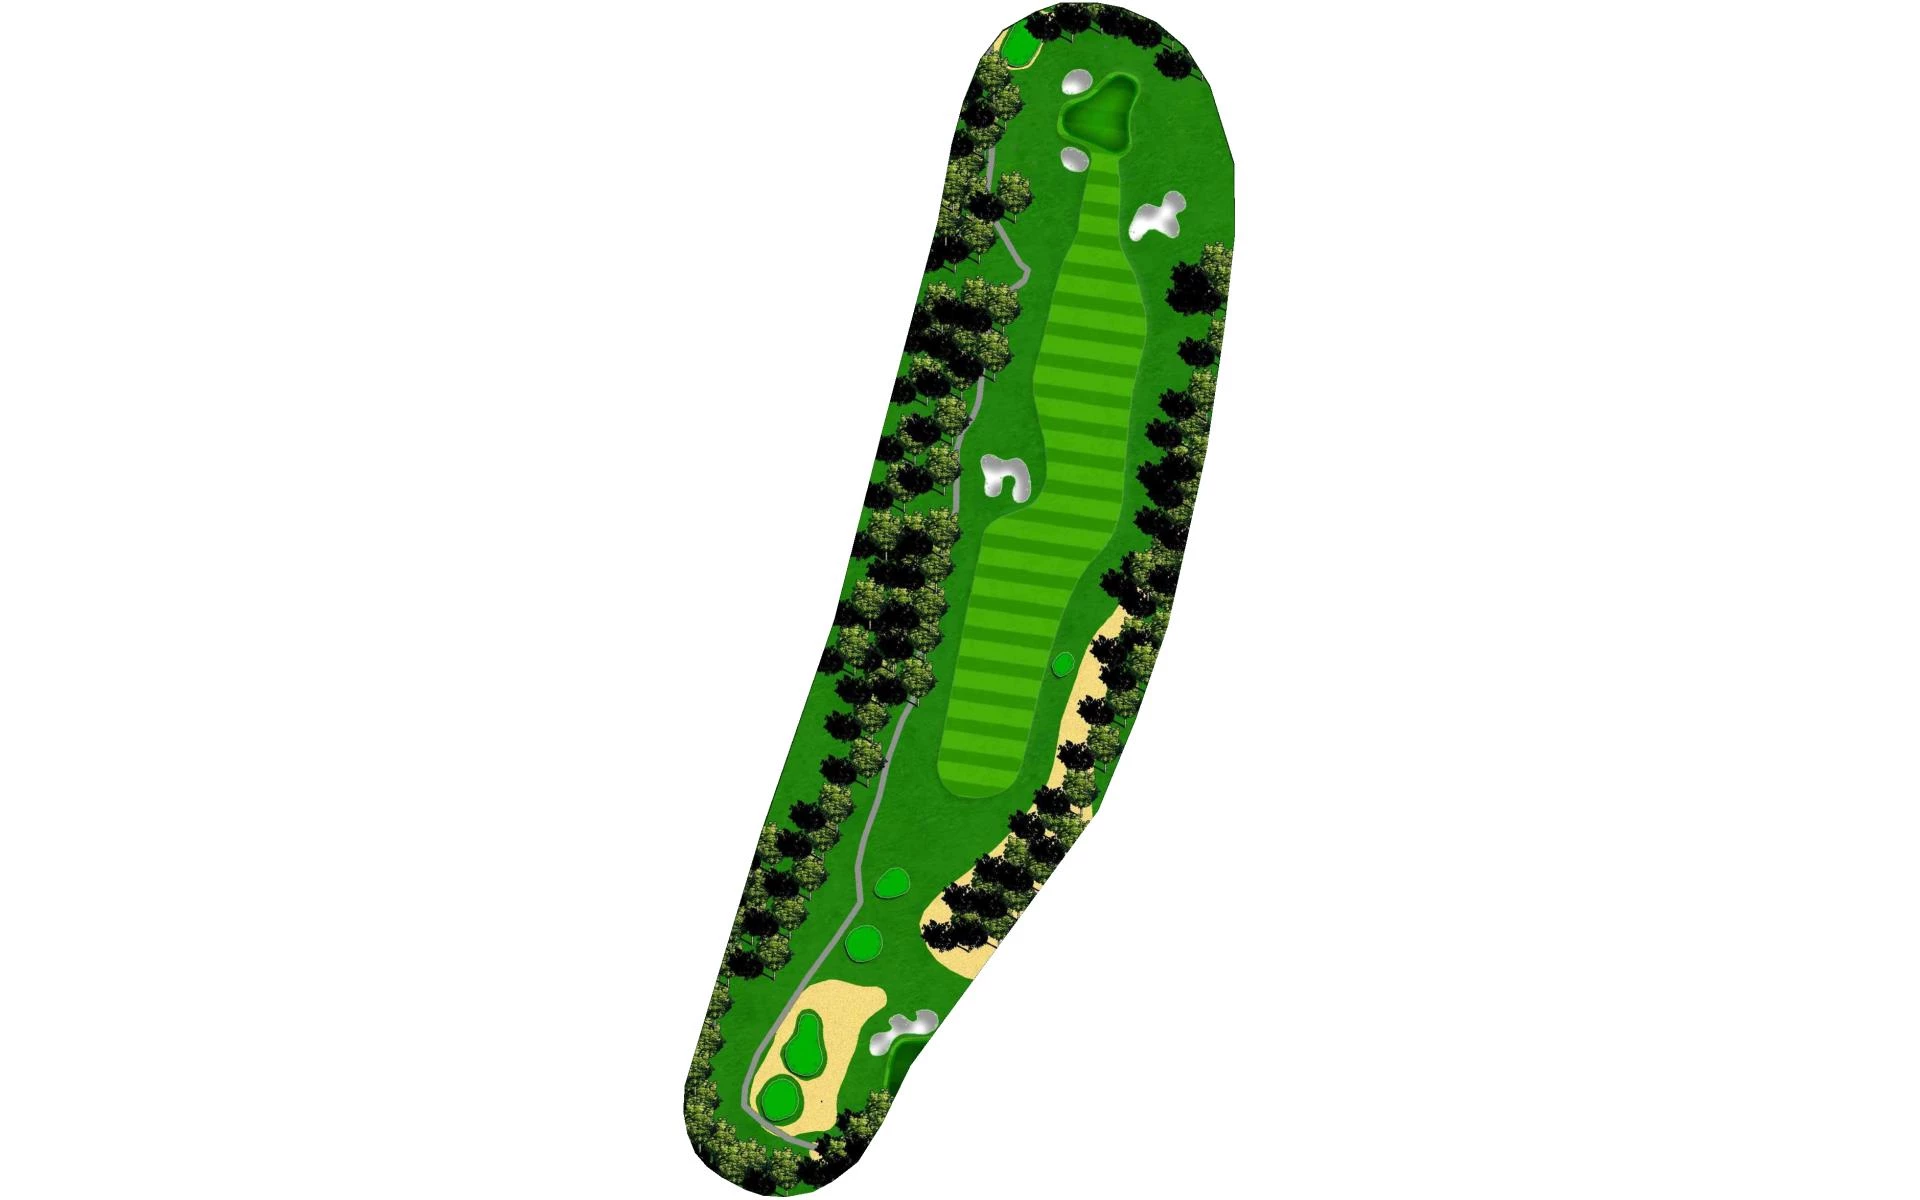
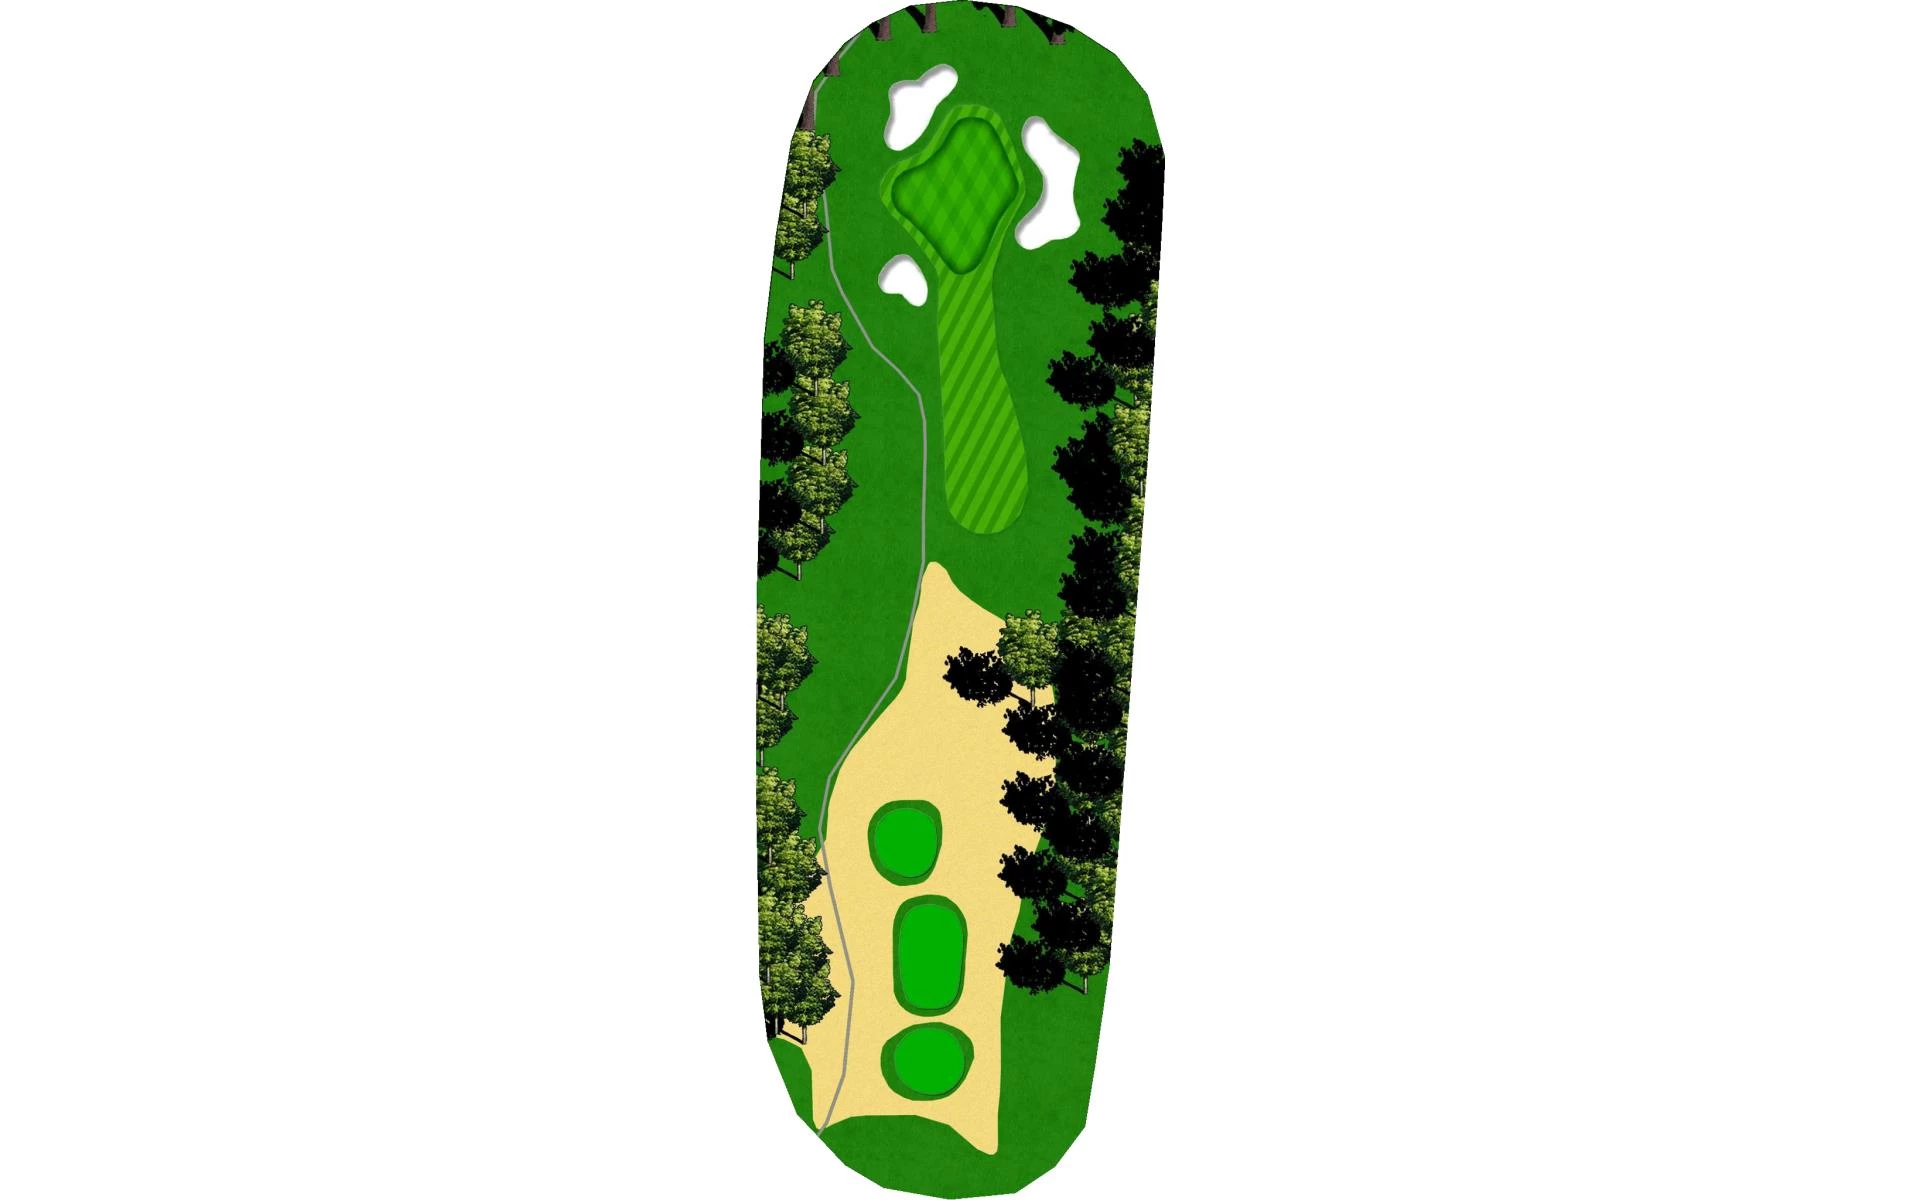
# 2 /
Par: 5
Handicaps:
Men's 17
Women's 13
Yardage by Tee:
BLUE 470
WHITE 467
GOLD 444
RED 414
TEAL 414
Slope:
Blue-130 | Silver-126 | White-124 | Green-121 | Gold-119 | Red-127 | Purple-122| Teal-118
Pro Tips
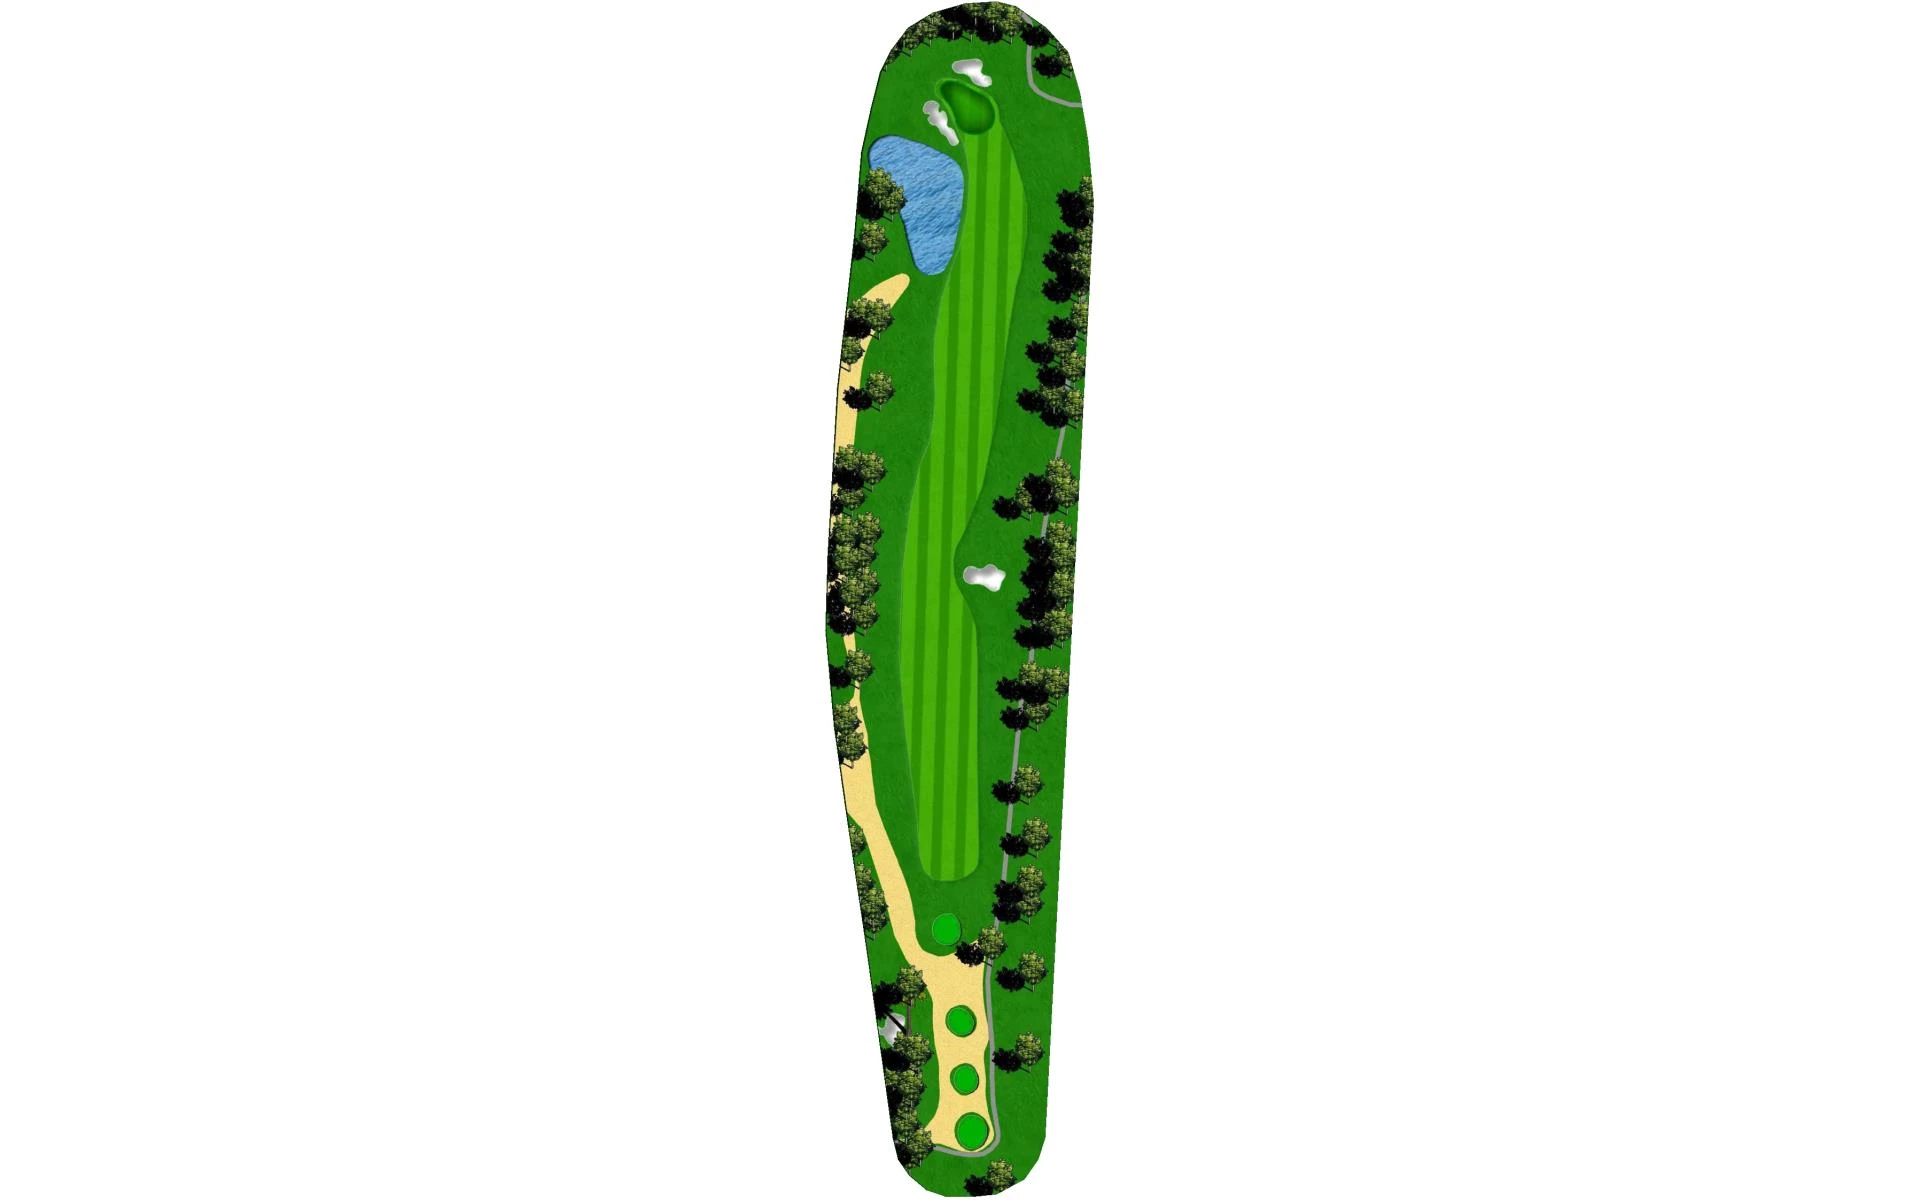
| Aim your drive down the center left of the fairway to avoid the right bunker. On your second shot you may have a decision to make as there is water along the approach to the green from 100 yards and in. If you are laying up like most mere mortals, keep you shot to the right side of the fairway this takes the water left out of play, and leaves you a good angle into the diagonal green. If you are going for the green in two, crisp contact will be required to carry the distance and still hold the green. Either way you play it, a birdie could be in your grasp! |
# 3 /
Par: 3
Handicaps:
Men's 15
Women's 17
Yardage by Tee:
BLUE 170
WHITE 144
GOLD 140
RED 124
TEAL 124
Slope:
Blue-130 | Silver-126 | White-124 | Green-121 | Gold-119 | Red-127 | Purple-122| Teal-118
Pro Tips
| If you feel a little wind, do not be afraid to play the full carry distance. Playing to the middle of the green will provide a birdie putt to any pin position. |

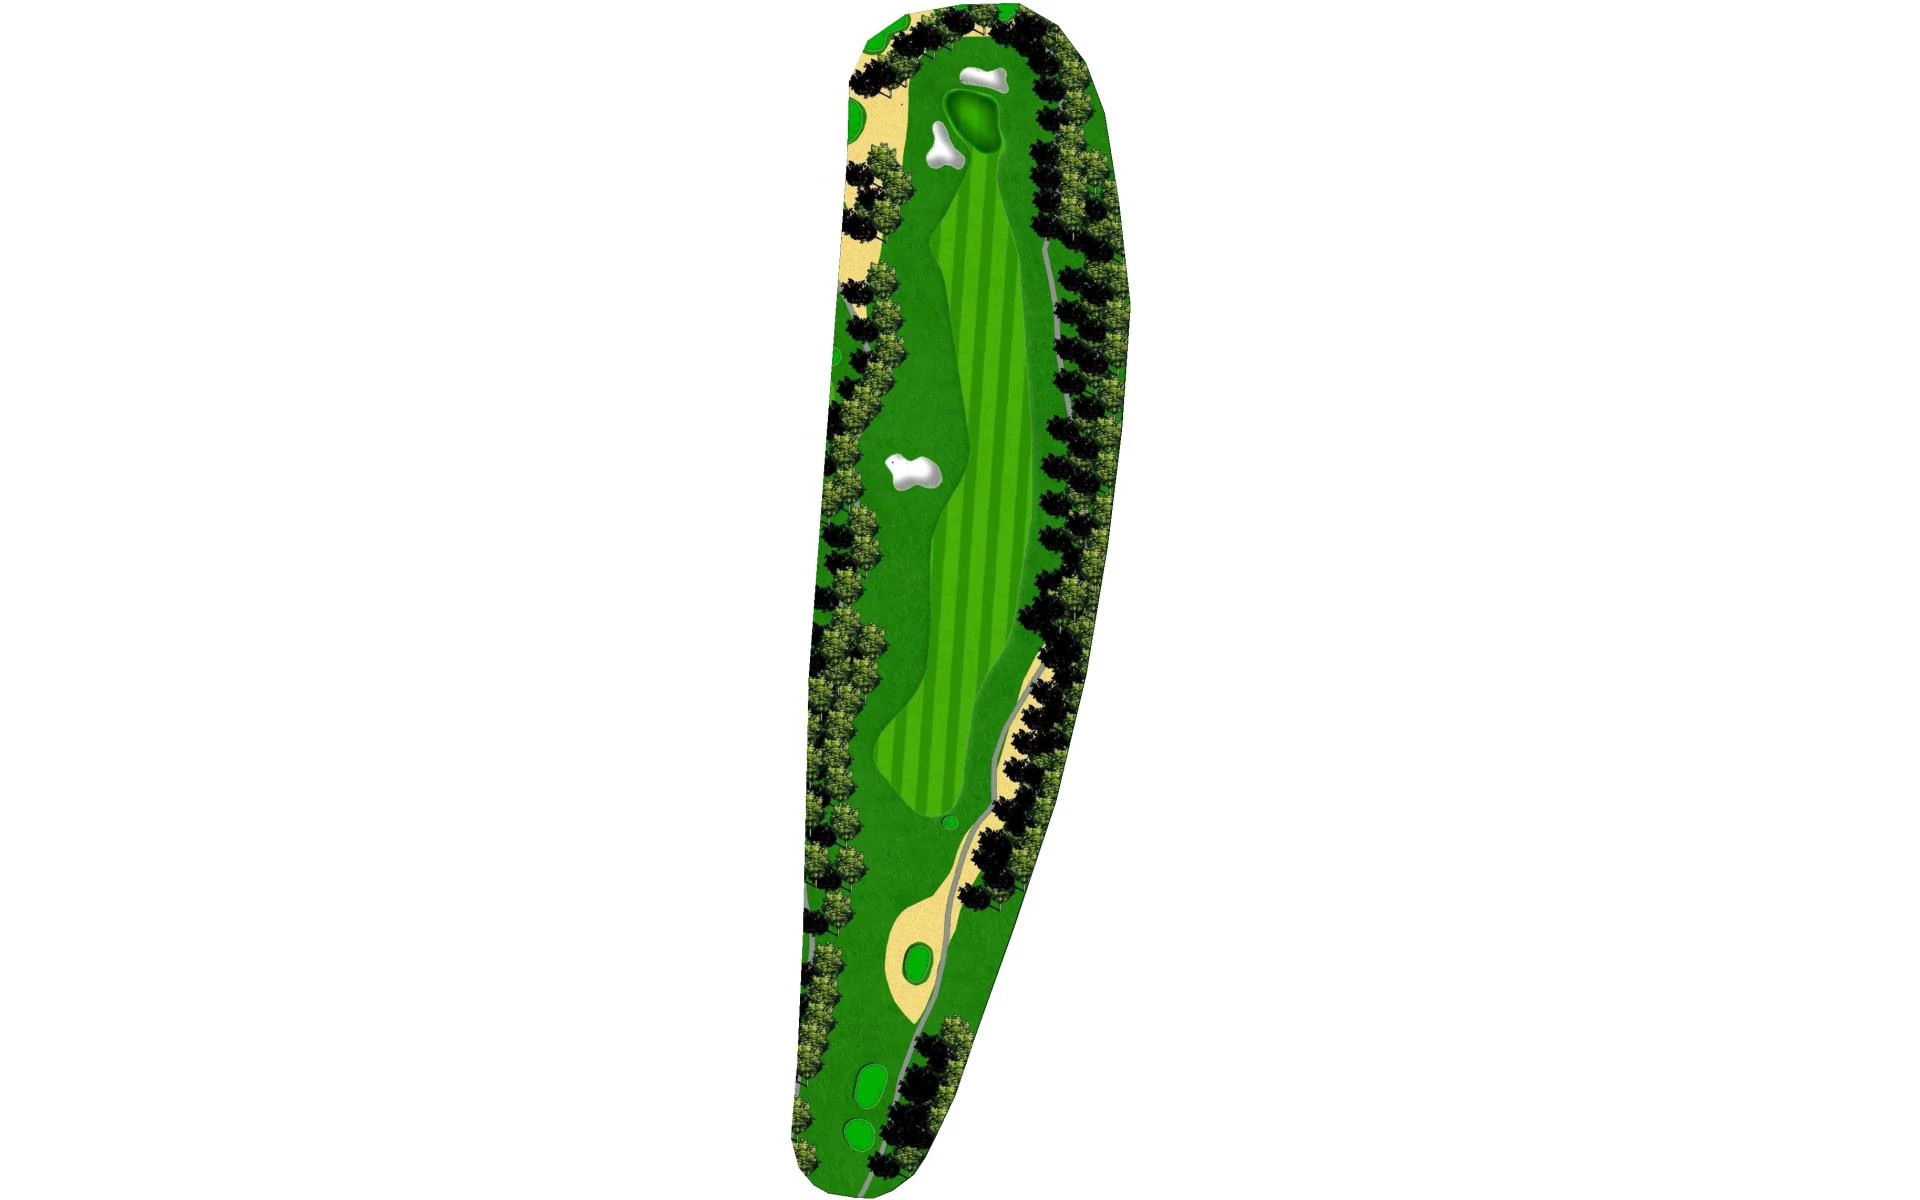
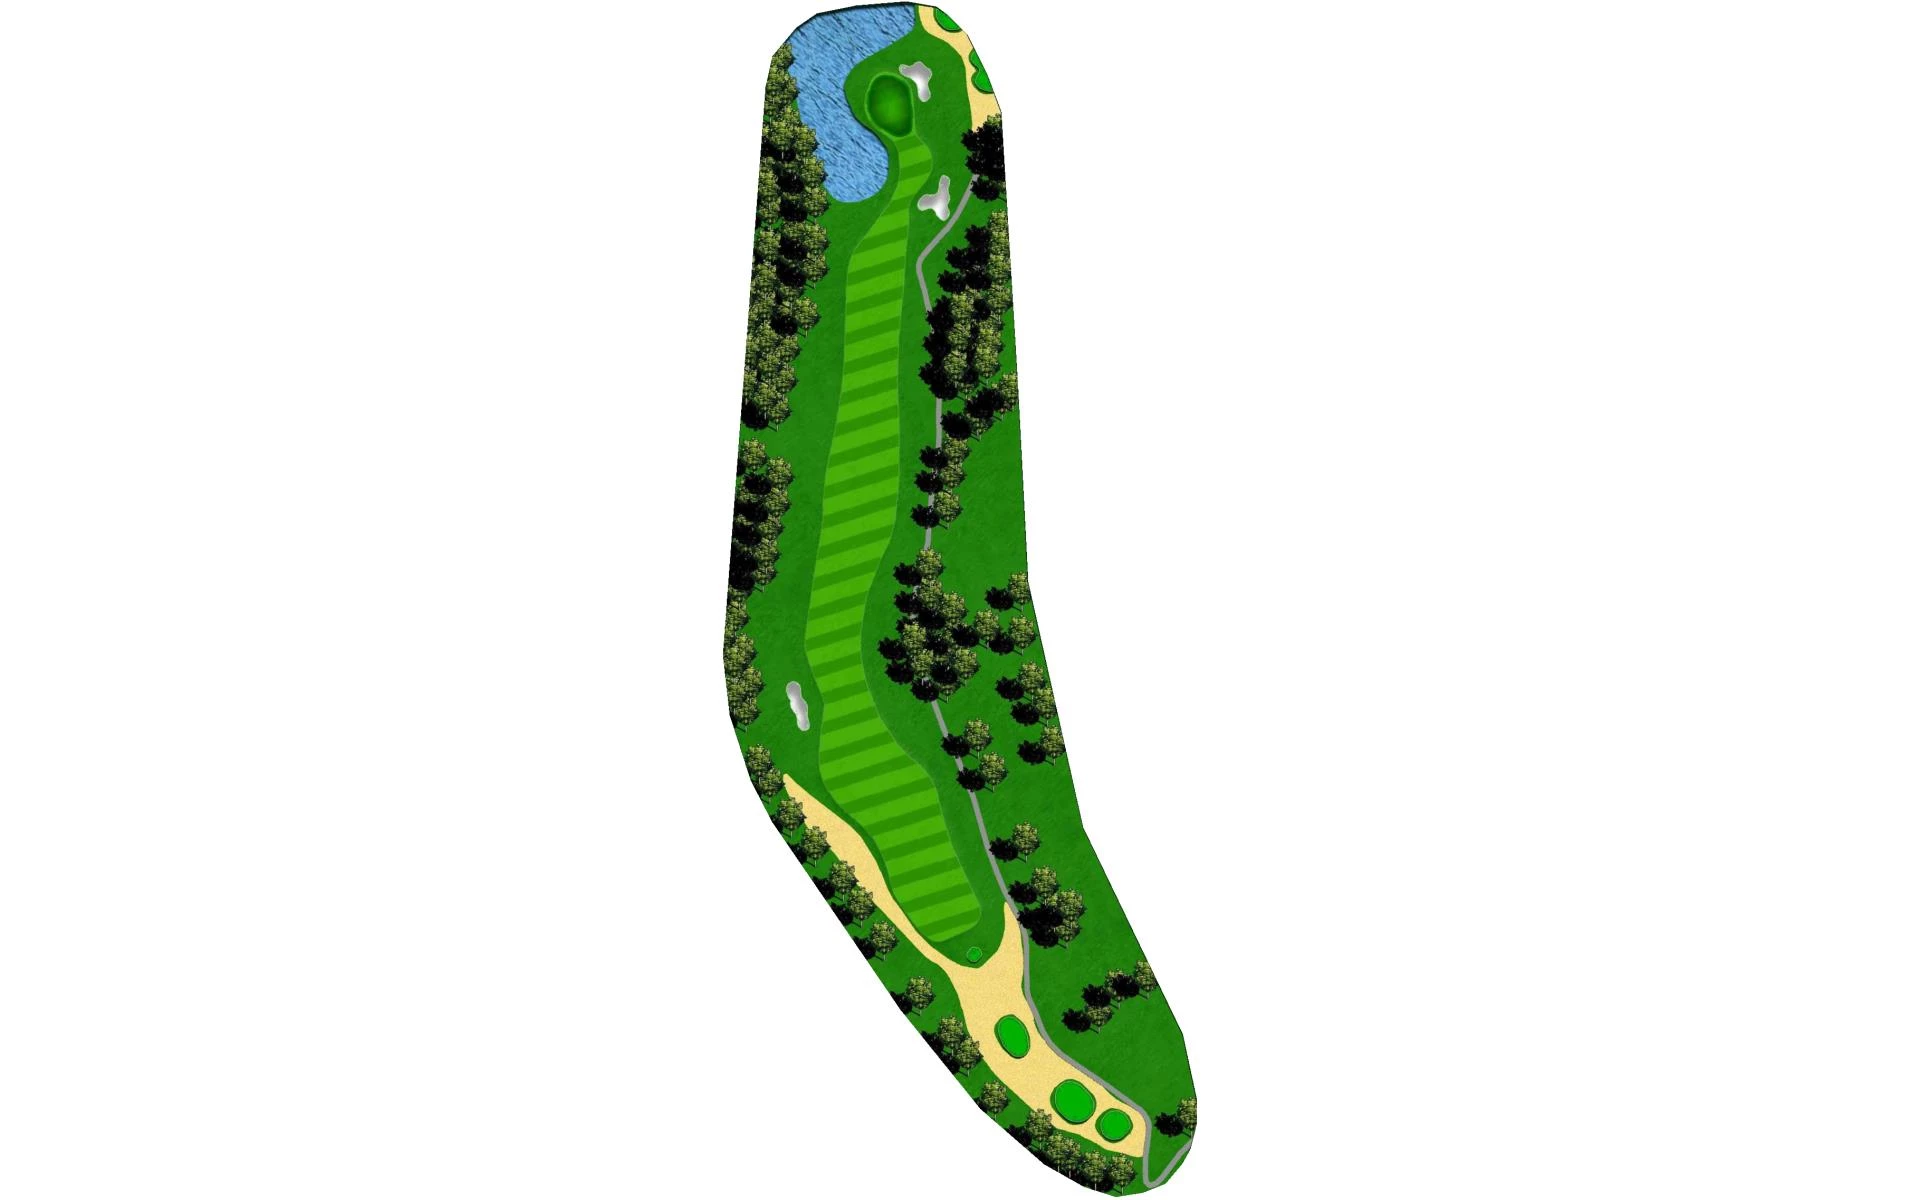
# 4 /
Par: 5
Handicaps:
Men's 7
Women's 5
Yardage by Tee:
BLUE 551
WHITE 524
GOLD 503
RED 465
TEAL 423
Slope:
Blue-130 | Silver-126 | White-124 | Green-121 | Gold-119 | Red-127 | Purple-122| Teal-118
Pro Tips
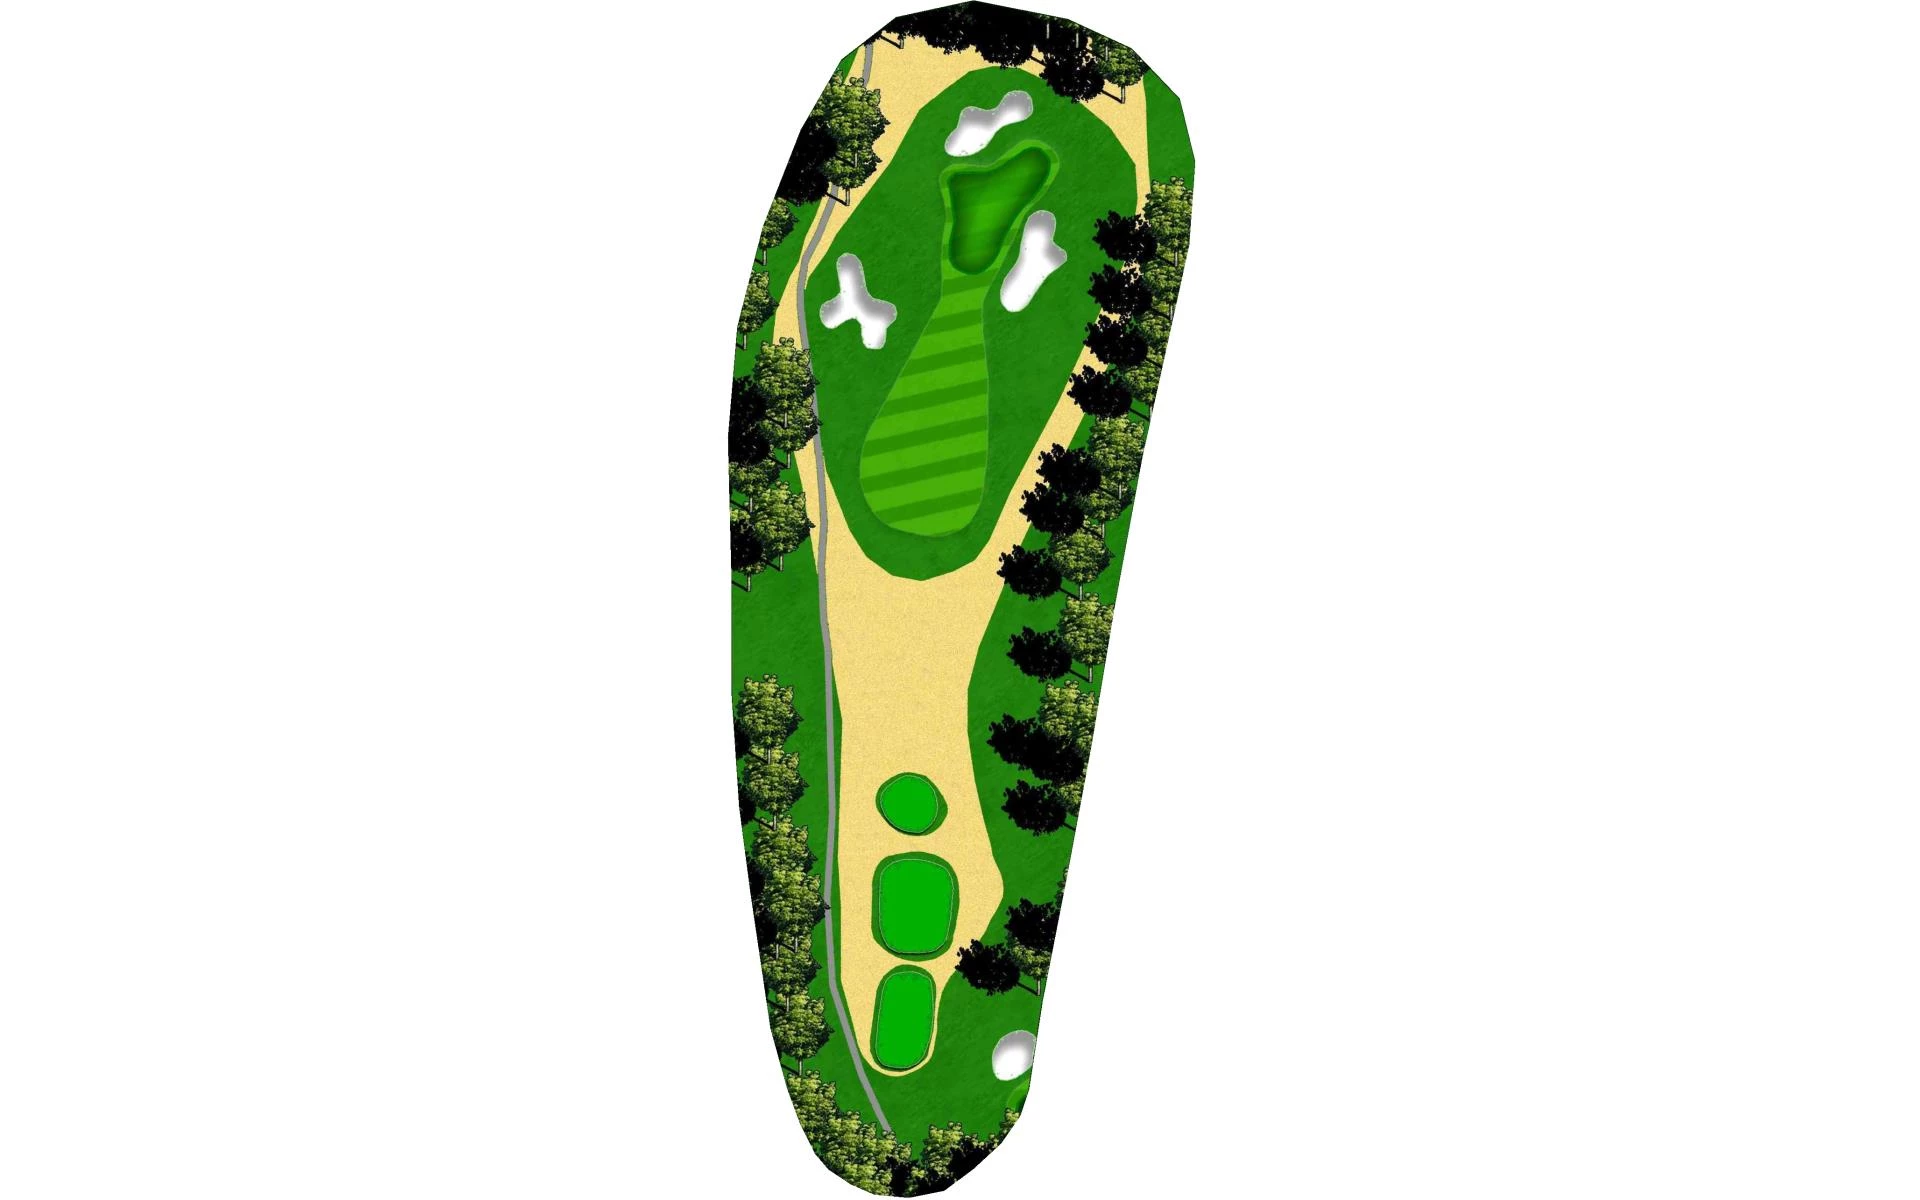
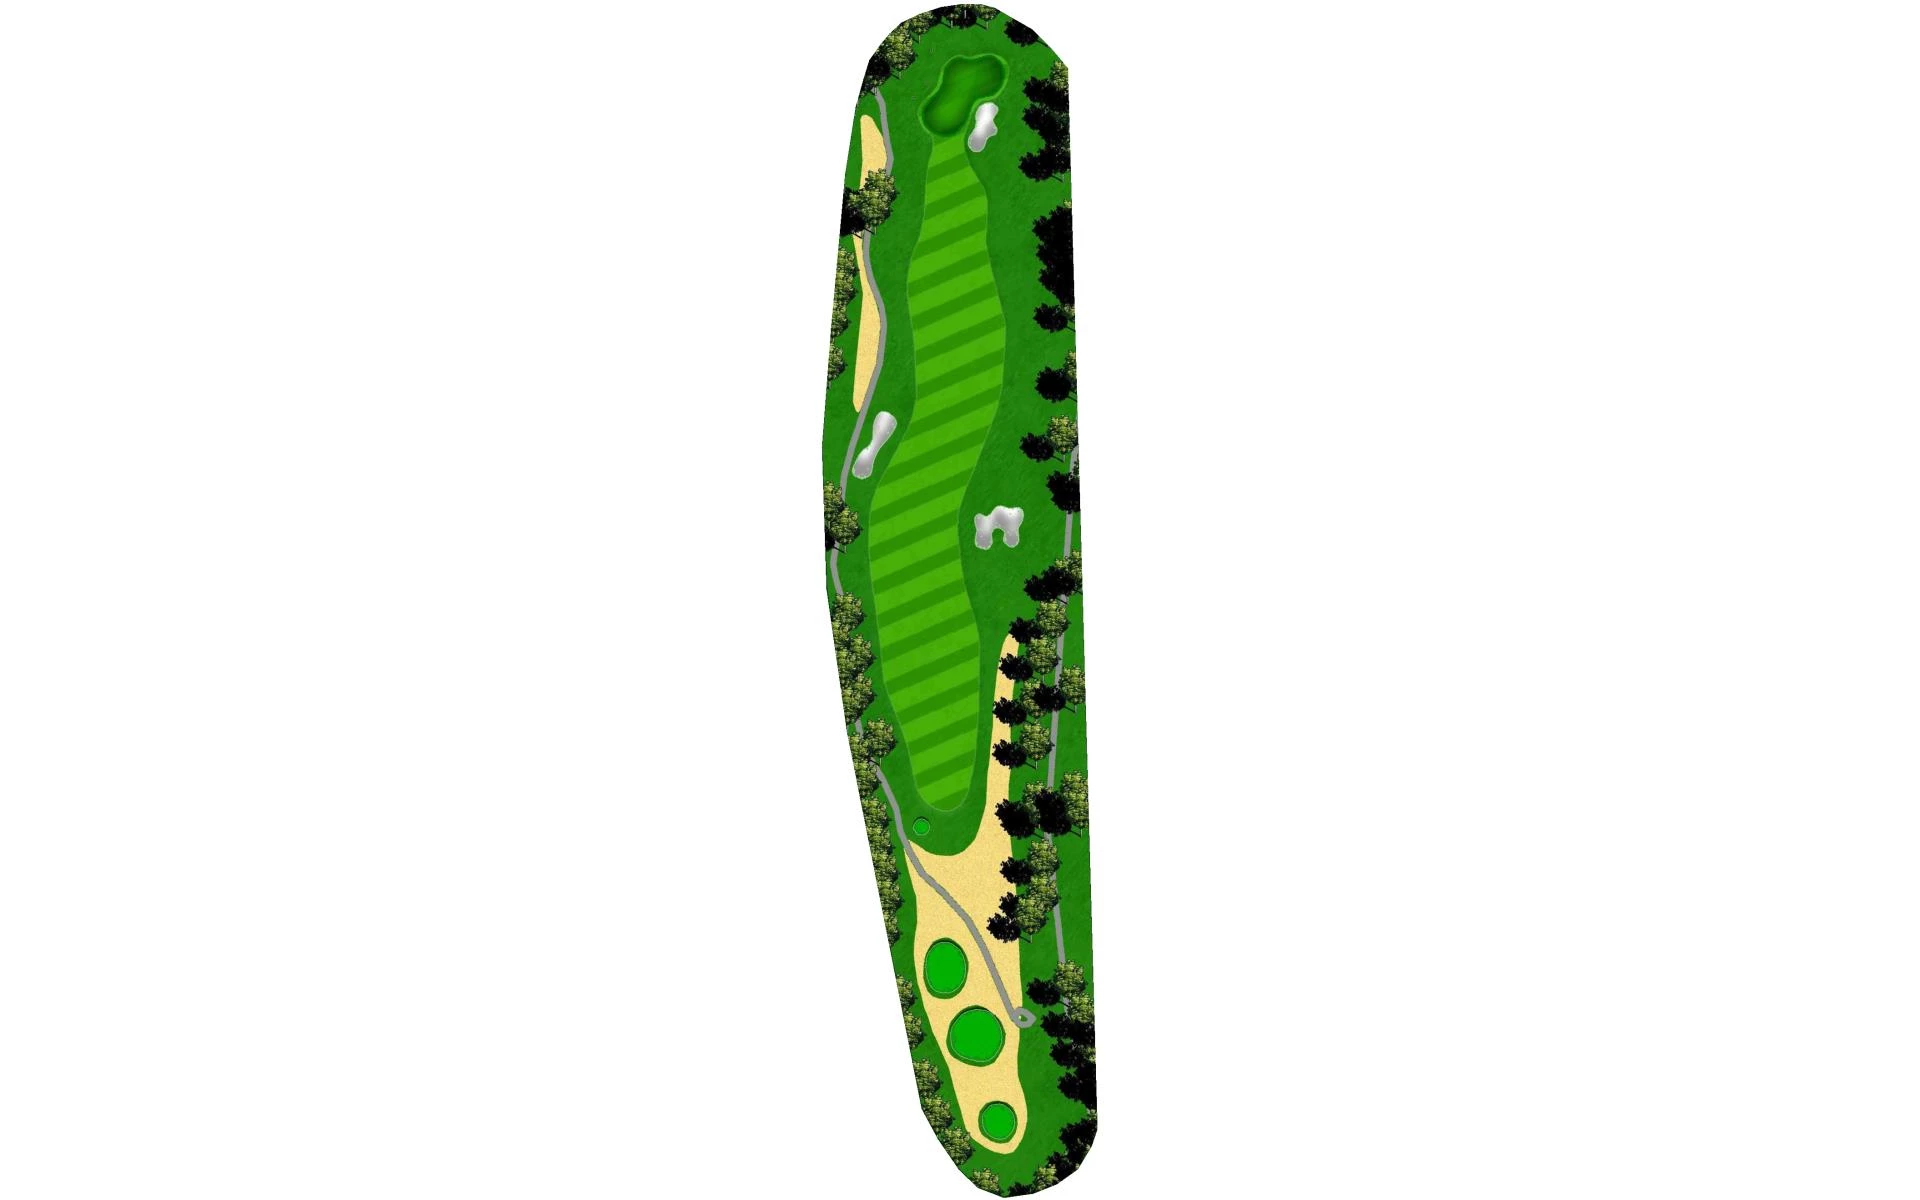
| Focus on this tee shot as accuracy off the tee is the most paramount on this downhill par 5 with out of bound in play left and right. Aim shots down the left side of the fairway as everything will feed right from there. This narrow green slopes from back to front so it is ideal to stay below the hole if possible. |
# 5 /
Par: 4
Handicaps:
Men's 9
Women's 1
Yardage by Tee:
BLUE 396
WHITE 361
GOLD 342
RED 337
TEAL 276
Slope:
Blue-130 | Silver-126 | White-124 | Green-121 | Gold-119 | Red-127 | Purple-122| Teal-118
Pro Tips
| This beautiful par 4 plays differently from all angles. There are bunkers left and right that come in to play for most players and aiming at the right edge of the left bunker is a sound play. On your approach shot to green, it is good to know that the hole plays about a half club less. Middle of the green is good here as all bunkers are in play. Avoid being long in the back bunker or par will be hard to come by. |
# 6 /
Par: 4
Handicaps:
Men's 11
Women's 9
Yardage by Tee:
BLUE 350
WHITE 333
GOLD 306
RED 300
TEAL 300
Slope:
Blue-130 | Silver-126 | White-124 | Green-121 | Gold-119 | Red-127 | Purple-122| Teal-118
Pro Tips
| This slightly uphill par 4 requires a solid tee shot down the center right of the fairway. The fairway bunker on the right side is treacherous and can make it difficult to make par. Play your approach shot at least a half club more to this elevated green. |

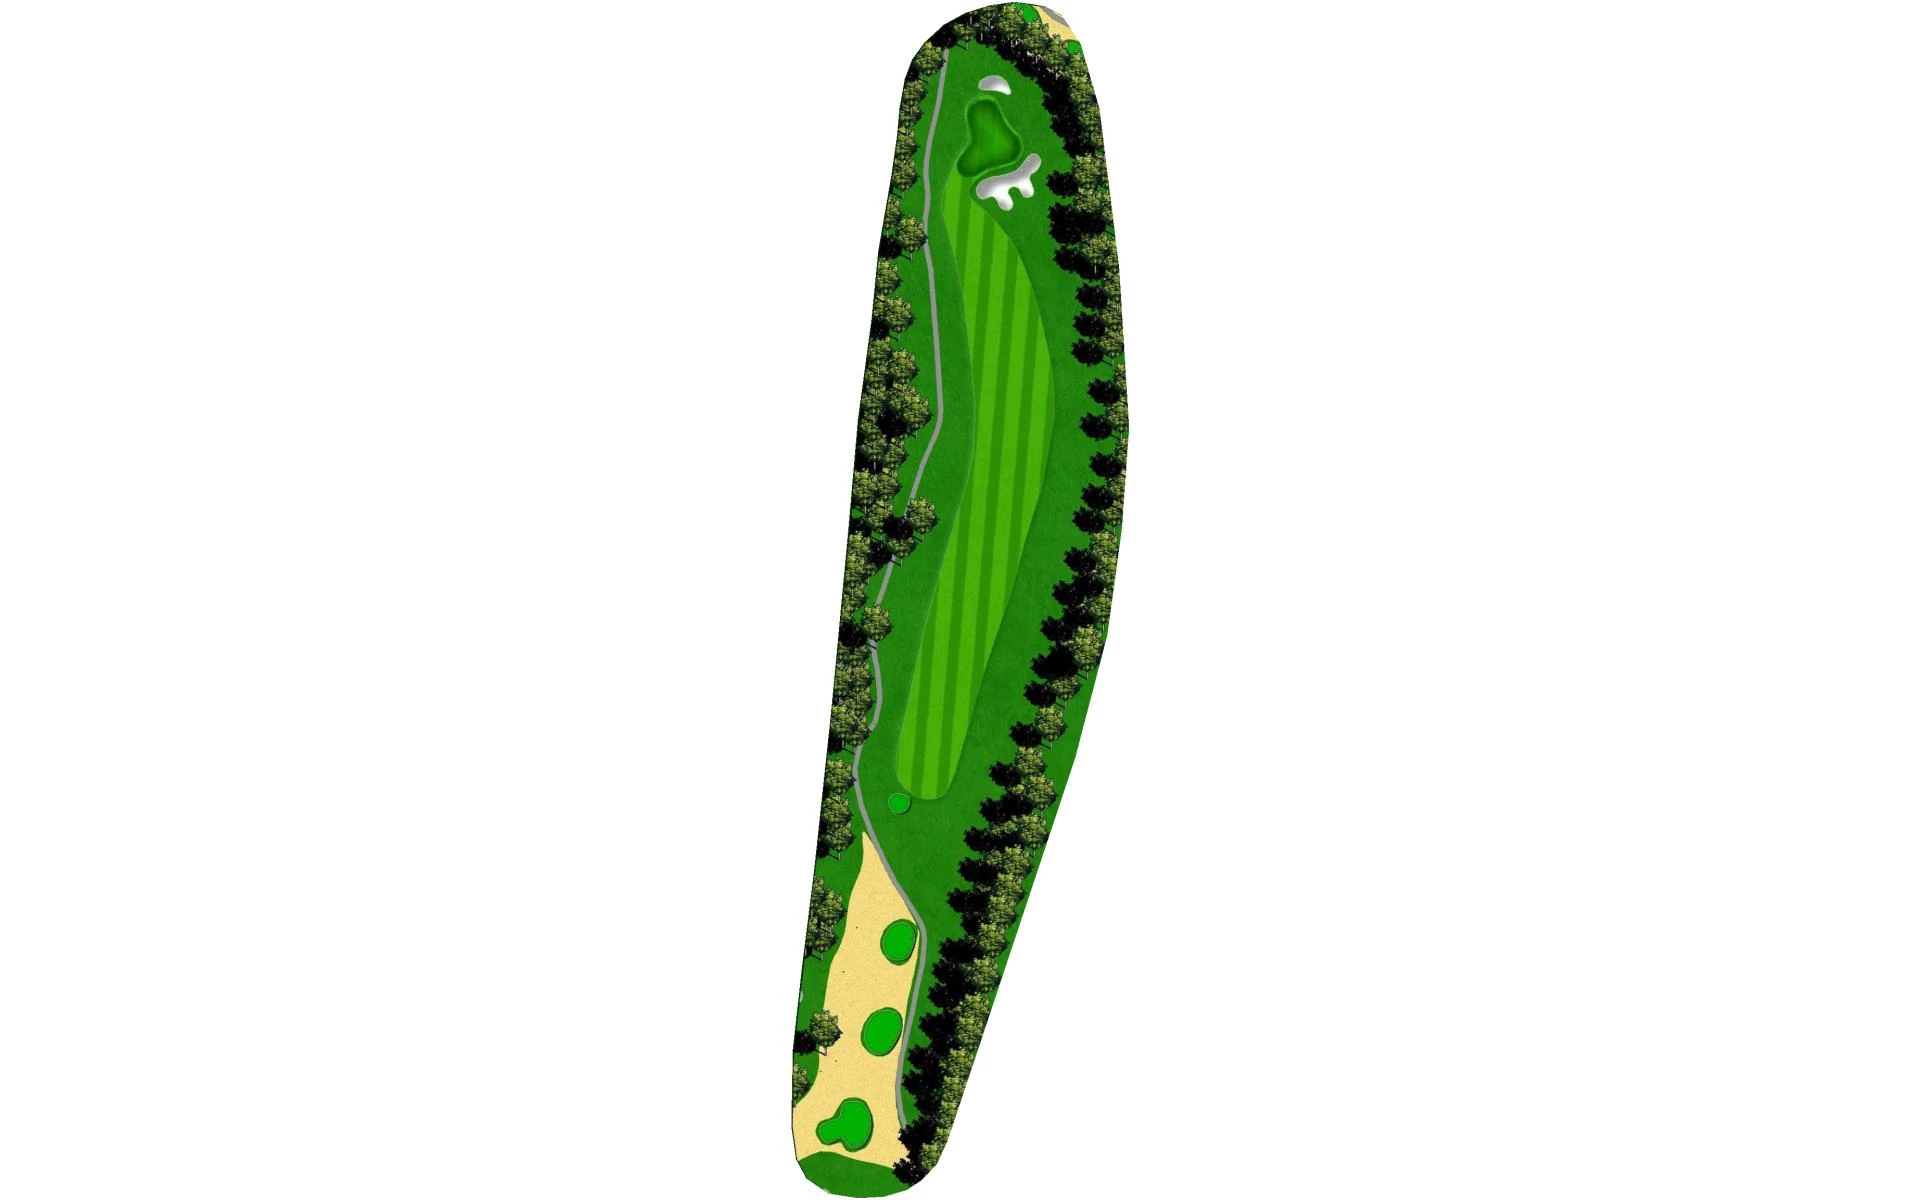
# 7 /
Par: 4
Handicaps:
Men's 1
Women's 3
Yardage by Tee:
BLUE 383
WHITE 362
GOLD 328
RED 324
TEAL 257
Slope:
Blue-130 | Silver-126 | White-124 | Green-121 | Gold-119 | Red-127 | Purple-122| Teal-118
Pro Tips
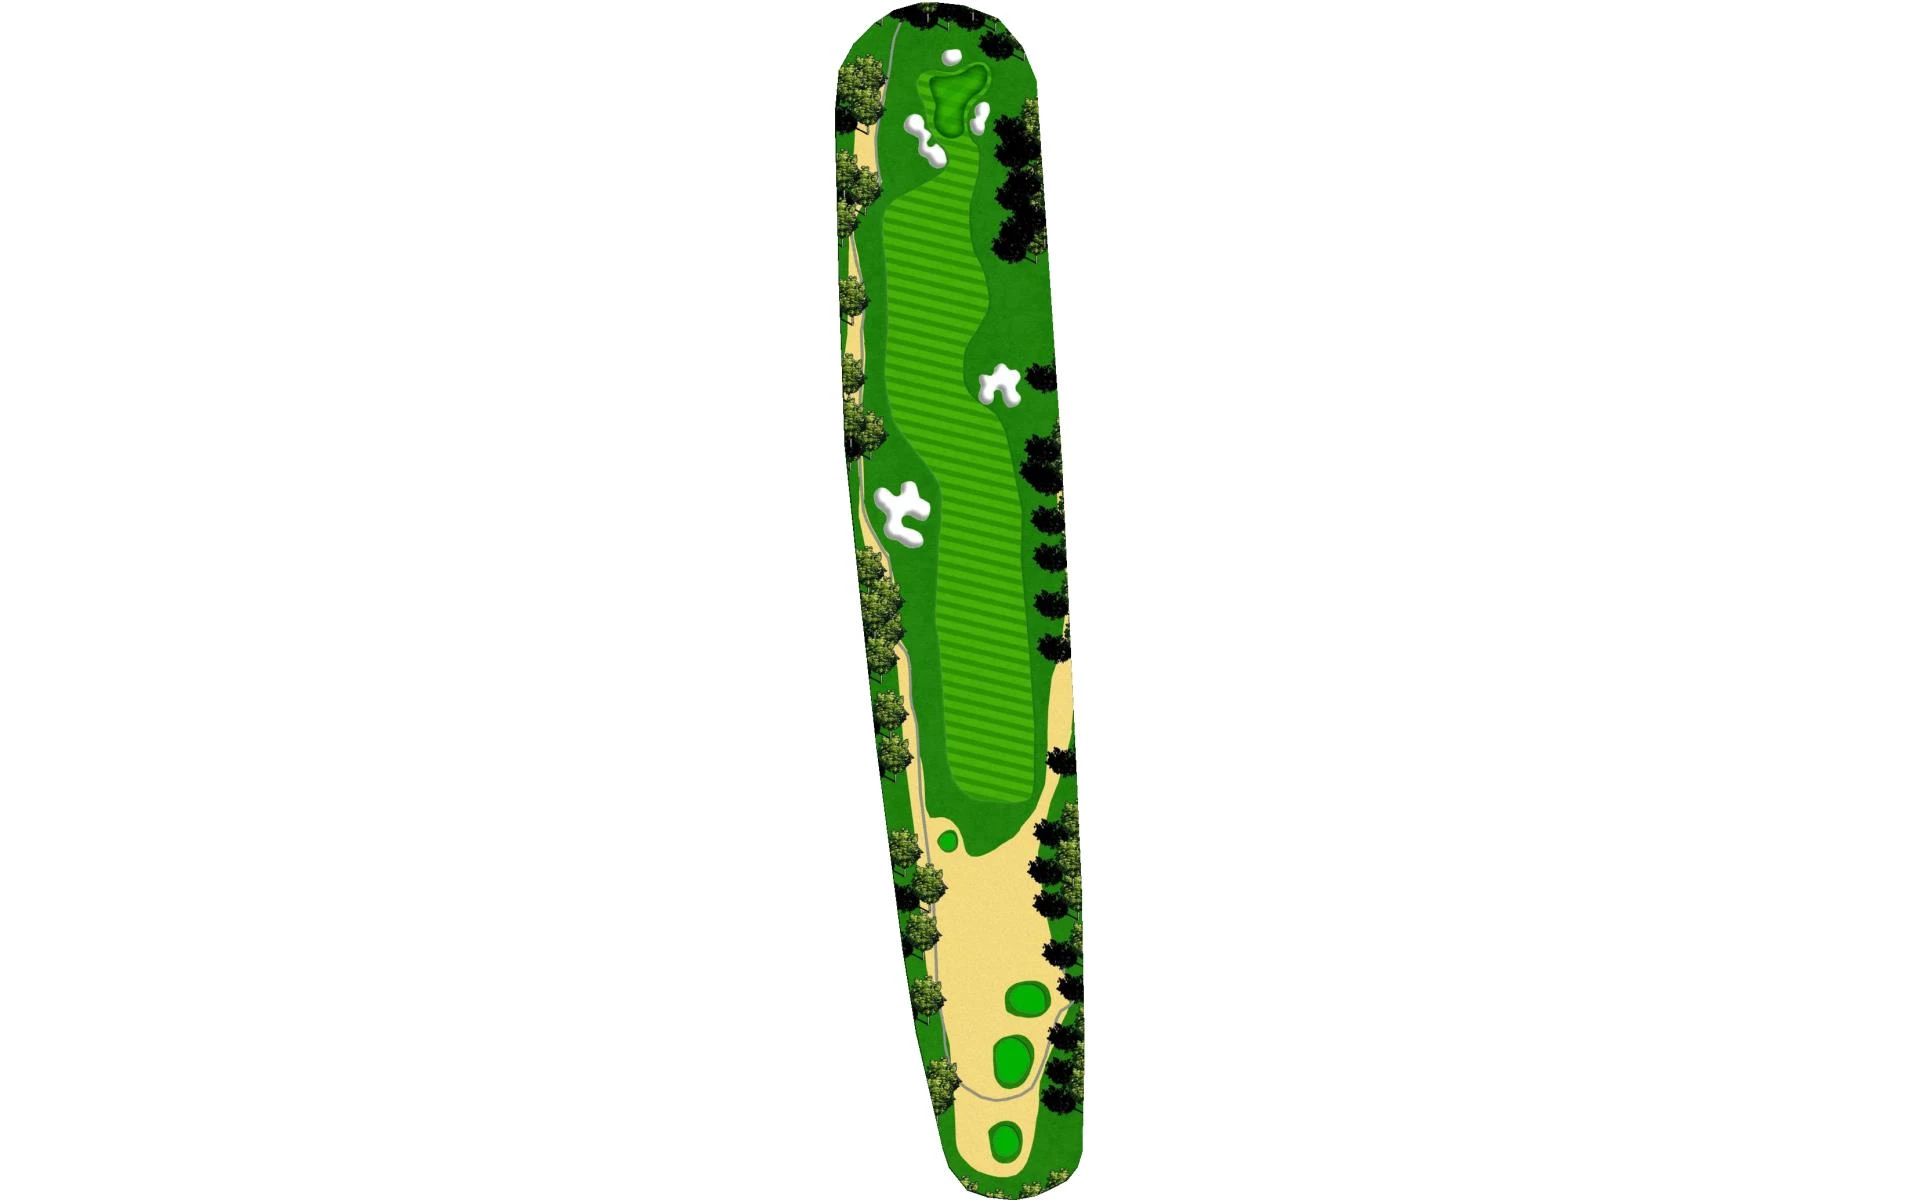
| A straight uphill par 4 with a narrow fairway sloping right to left and bunker left, this will challenge your focus! Playing up the right center is an ideal tee shot that will leave you in the fairway with a good iron in to this elevated two-tiered green. Play your approach shot a full club up. The left green side bunker is an avoid-at-all-cost bunker, as your will most likely bring an over par score. |
# 8 /
Par: 4
Handicaps:
Men's 5
Women's 7
Yardage by Tee:
BLUE 376
WHITE 353
GOLD 346
RED 315
TEAL 293
Slope:
Blue-130 | Silver-126 | White-124 | Green-121 | Gold-119 | Red-127 | Purple-122| Teal-118
Pro Tips
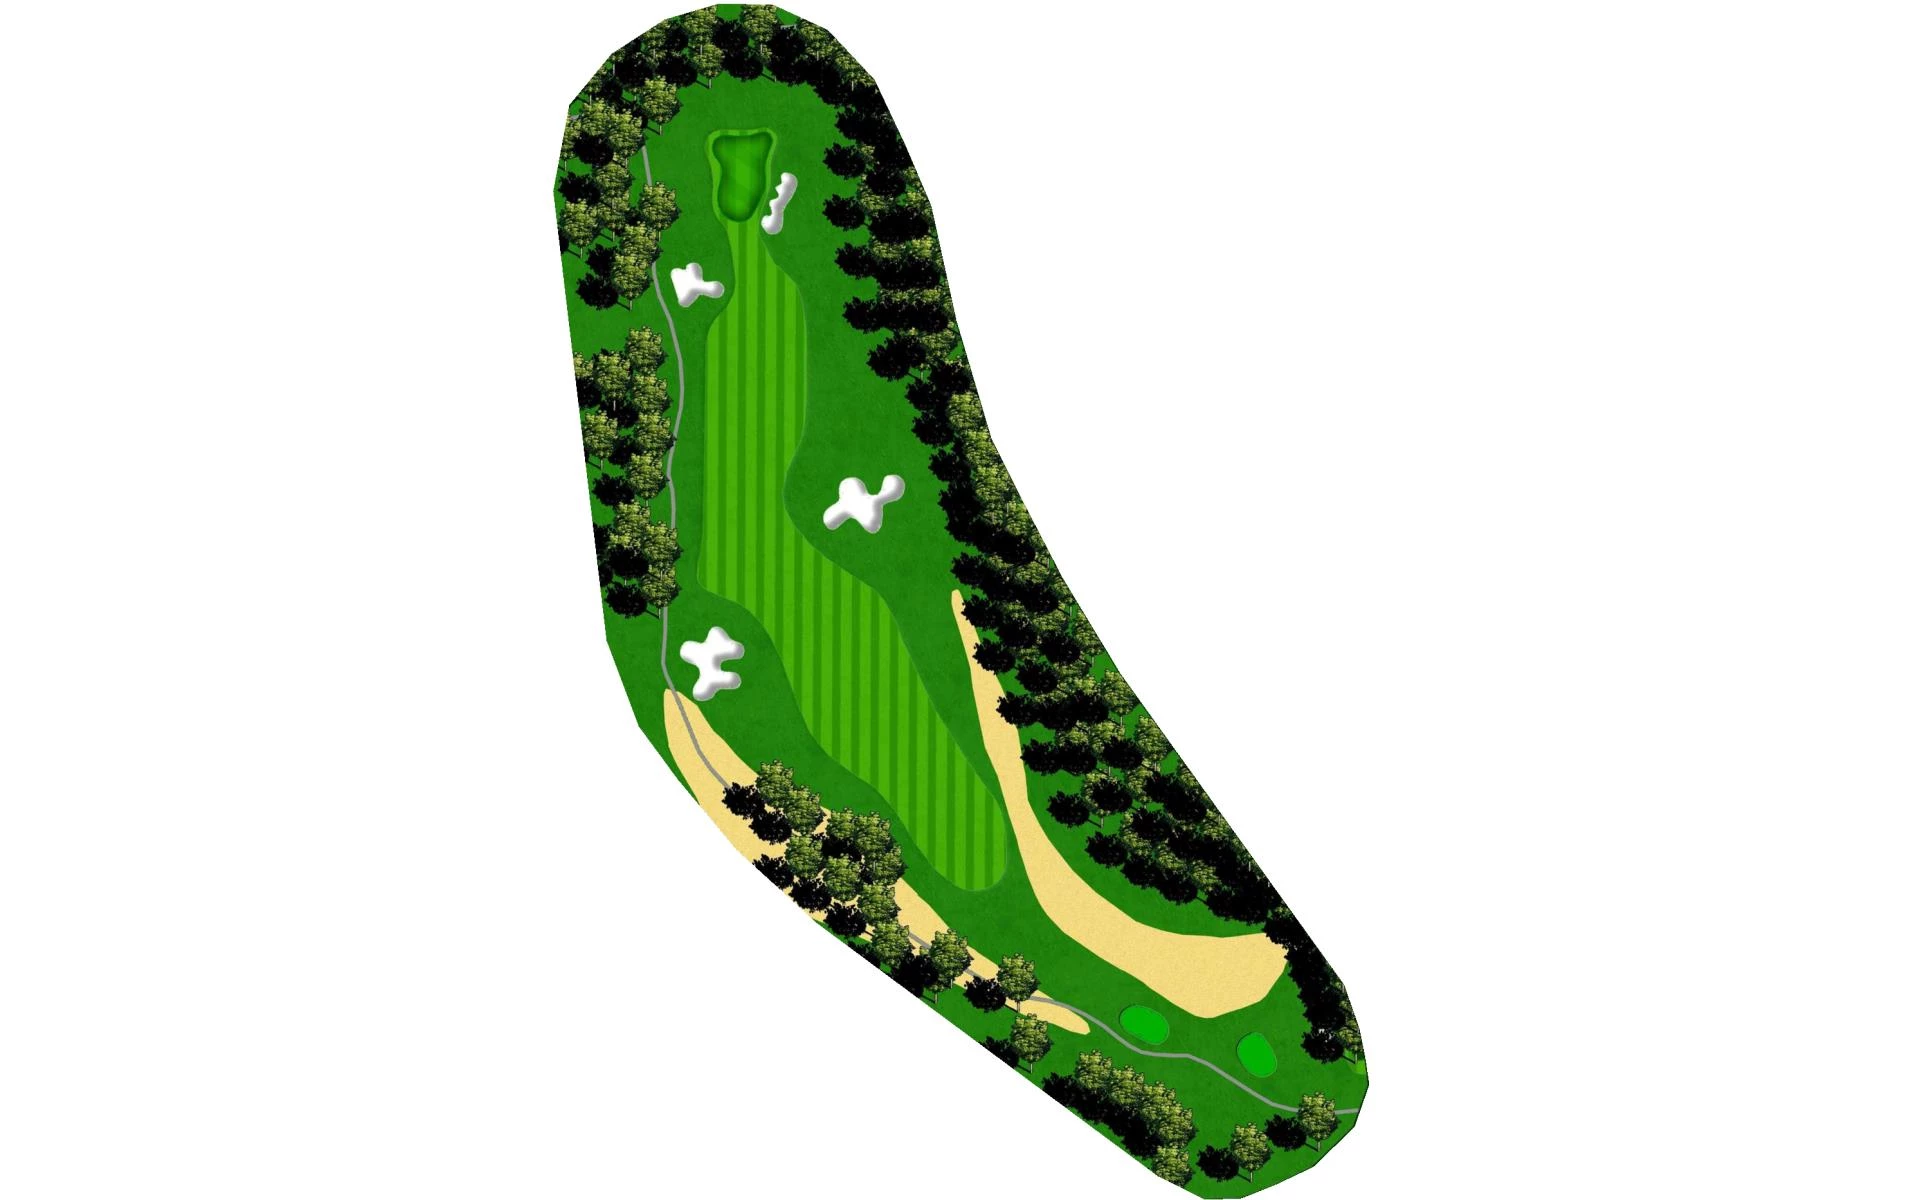
| One of the tougher holes on the course, this slight dogleg left par 4 is made tougher if this fairway is missed. Right side of the left bunker is a good aim point take, and playing with less than driver may help take the left fairway bunker out of play. This is another two-tiered green that will require about a half a club extra on your approach shot. |
# 9 /
Par: 3
Handicaps:
Men's 13
Women's 15
Yardage by Tee:
BLUE 184
WHITE 155
GOLD 136
RED 130
TEAL 115
Slope:
Blue-130 | Silver-126 | White-124 | Green-121 | Gold-119 | Red-127 | Purple-122| Teal-118
Pro Tips
| Our signature hole and this long par 3 is a beauty! A three-tiered green that you will want to play to the middle for front pin, back for middle pin, and a little long for that back-tier pin location. Par is always a great score here and do not let the distractions get in your head. Enjoy the beauty in this beast of a hole. |
# 10 /
Par: 4
Handicaps:
Men's 6
Women's 12
Yardage by Tee:
BLUE 411
WHITE 389
GOLD 348
RED 340
TEAL 283
Slope:
Blue-130 | Silver-126 | White-124 | Green-121 | Gold-119 | Red-127 | Purple-122| Teal-118
Pro Tips
| Favor the left side of this fairway as the fairway will push balls right on this slightly downhill par 4. From the top of the hill the play will be a half club less. If your drive makes is down the slope, then your approach shot will play the true distance. This larger green slopes from back to front so it pays to stay below the hole. |
# 11 /
Par: 4
Handicaps:
Men's 8
Women's 14
Yardage by Tee:
BLUE 412
WHITE 378
GOLD 361
RED 336
TEAL 315
Slope:
Blue-130 | Silver-126 | White-124 | Green-121 | Gold-119 | Red-127 | Purple-122| Teal-118
Pro Tips
| This challenging par 4 typically plays straight into the wind. Left of center is a good aim point for your tee shot and will help you avoid the fairway bunker on the right. Your approach shot distance will be a half club shorter lest there is wind in your face; then play the distance or more depending on the severity. The green in larger and slopes from back to front and slightly left to right. |
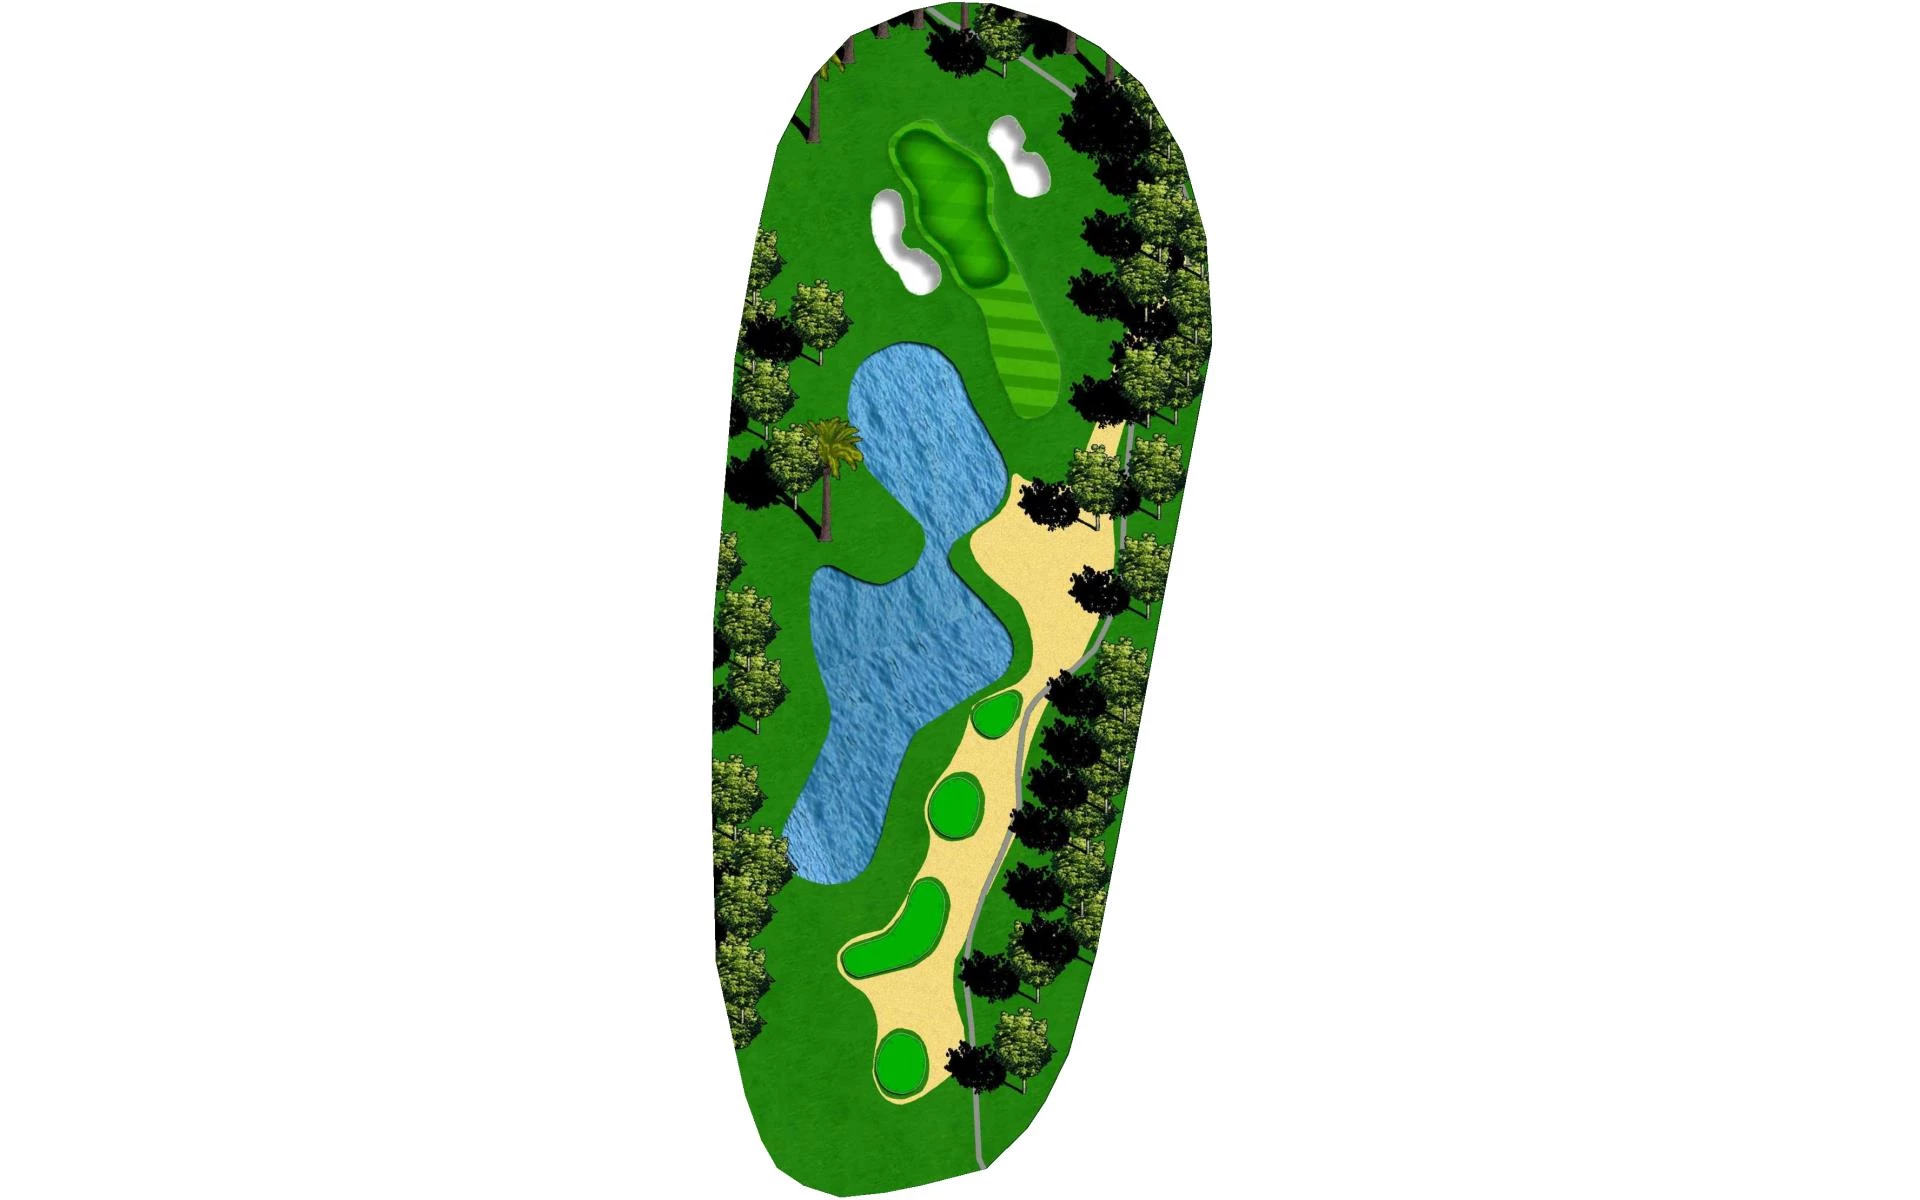
# 12 /
Par: 3
Handicaps:
Men's 12
Women's 16
Yardage by Tee:
BLUE 202
WHITE 166
GOLD 155
RED 146
TEAL 110
Slope:
Blue-130 | Silver-126 | White-124 | Green-121 | Gold-119 | Red-127 | Purple-122| Teal-118
Pro Tips
| If ever there was an argument to have two signature holes at a course, then The Heights would be the Club and this longer par 3 protected by water in front and on the left would be our second one! Playing the upper back tee, play this hole the true distance. Playing all other tees, you want to club up as there will be wind you typically will not feel from these tees. This hole is pretty to look at, but it will bite back. Make sure you do your best to get on the narrow green as there is no guarantee of an up and down. |
# 13 /
Par: 5
Handicaps:
Men's 16
Women's 4
Yardage by Tee:
BLUE 486
WHITE 459
GOLD 445
RED 413
TEAL 278
Slope:
Blue-130 | Silver-126 | White-124 | Green-121 | Gold-119 | Red-127 | Purple-122| Teal-118
Pro Tips
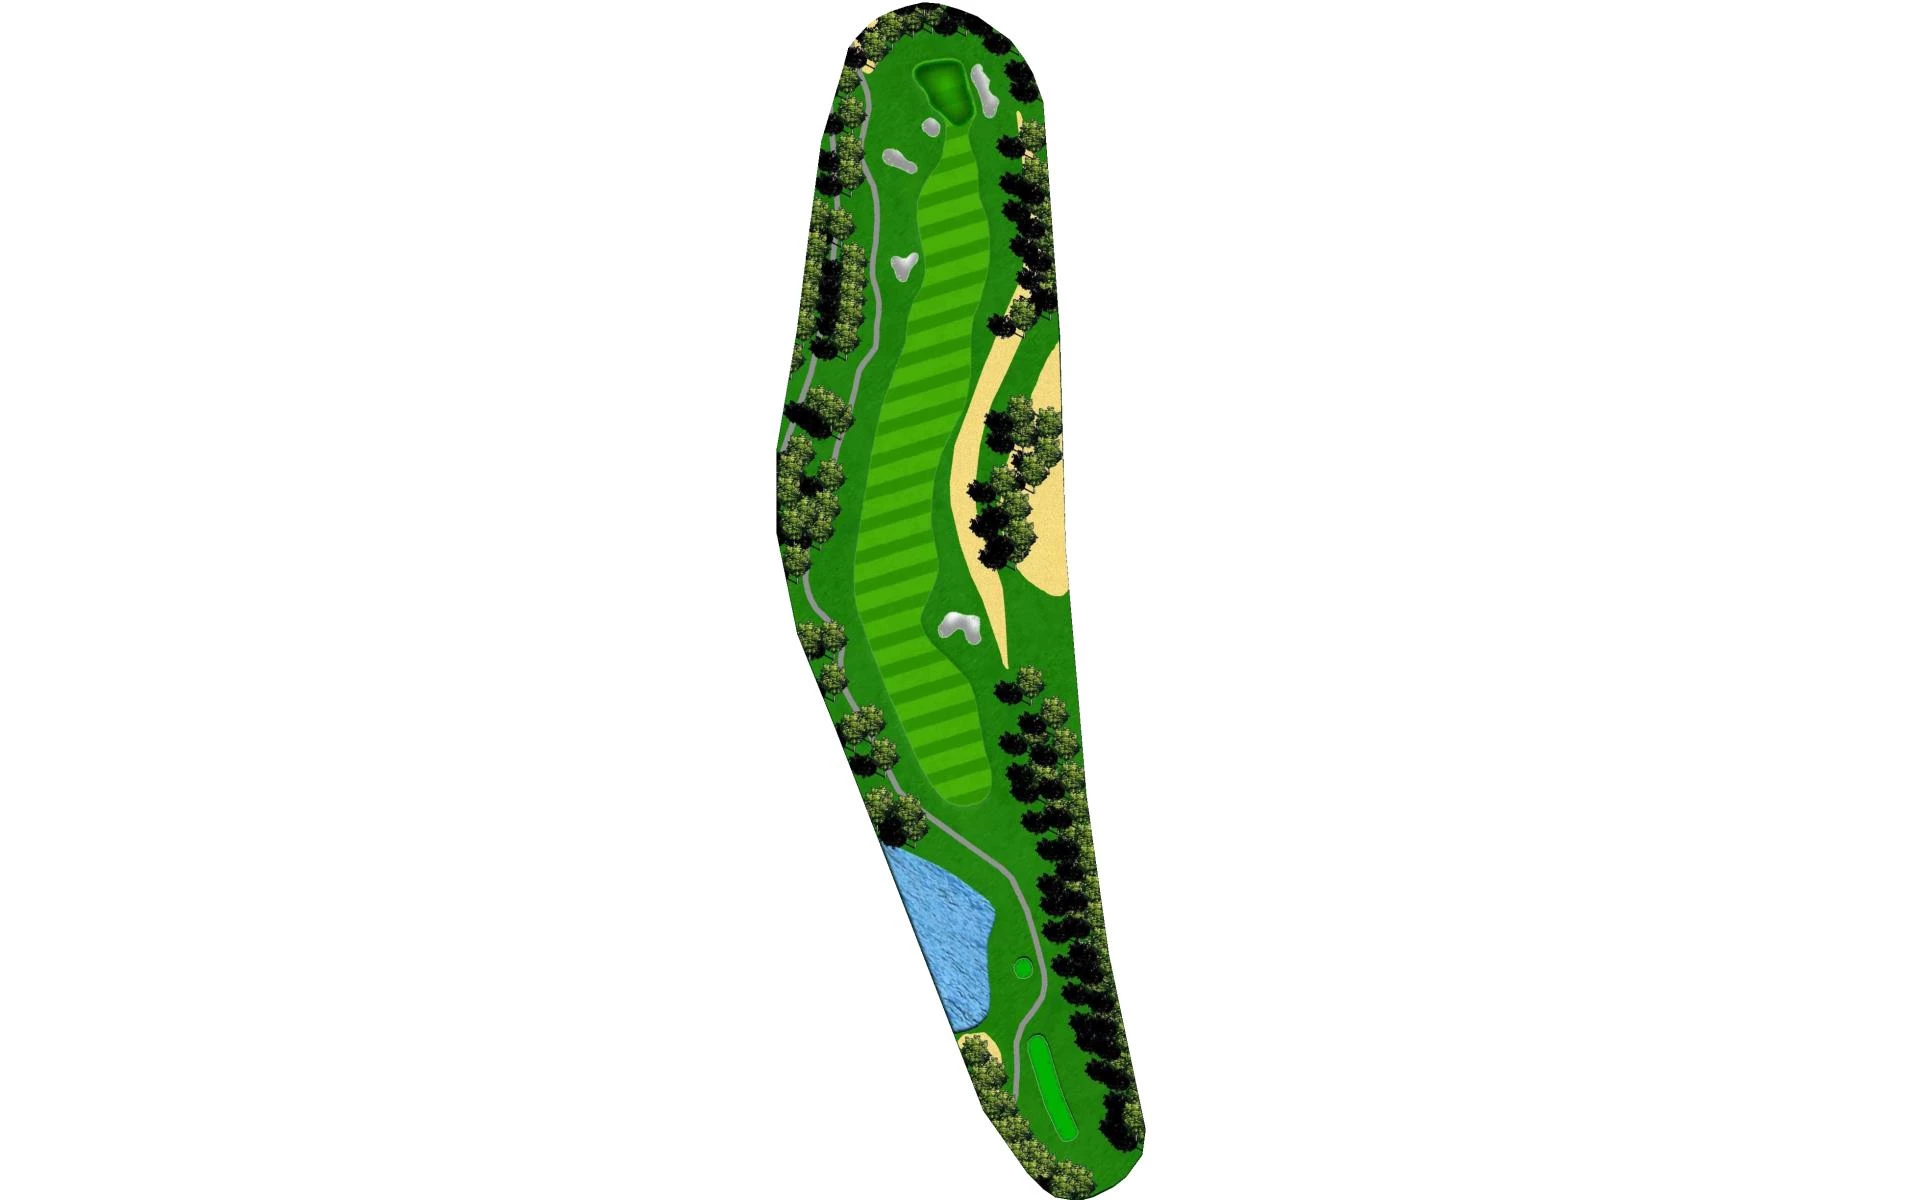
| This uphill par 5 offers a chance to gain a stroke back with a solid tee shot up the slope. Stay focused and play down the right side of the fairway as balls will be pushed left. Long hitters may decide to carry the bunker right, but make sure you can carry it as the uphill requires a little bit extra. If you decide to go for it, the right front of the green is a great aim point. If you are laying up, again, favor the right side of the fairway and land in a wedge distance you like. The two-tiered green is challenging, but a well-played wedge in may give a good chance at birdie. |
# 14 /
Par: 4
Handicaps:
Men's 10
Women's 8
Yardage by Tee:
BLUE 401
WHITE 365
GOLD 371
RED 339
TEAL 290
Slope:
Blue-130 | Silver-126 | White-124 | Green-121 | Gold-119 | Red-127 | Purple-122| Teal-118
Pro Tips
| This straightforward par 4 plays slightly uphill. You will want to split the fairway bunkers to avoid trouble. On your approach take half a club less as wind is usually behind you. This can be a good birdie hole, but do not disrespect the contours of this green or over par maybe your score. |
# 15 /
Par: 4
Handicaps:
Men's 14
Women's 10
Yardage by Tee:
BLUE 412
WHITE 392
GOLD 371
RED 366
TEAL 321
Slope:
Blue-130 | Silver-126 | White-124 | Green-121 | Gold-119 | Red-127 | Purple-122| Teal-118
Pro Tips
| A dogleg left, slightly downhill par 4 with a fairway bunker on the left that is reachable by all. The mountain peak in the distance is a great aim point or you can favor the right side as your drive will go left. Take one less club on your approach but stay out of the front greenside bunker if the hole location is up front. |
# 16 /
Par: 3
Handicaps:
Men's 18
Women's 18
Yardage by Tee:
BLUE 168
WHITE 146
GOLD 142
RED 129
TEAL 129
Slope:
Blue-130 | Silver-126 | White-124 | Green-121 | Gold-119 | Red-127 | Purple-122| Teal-118
Pro Tips
| This easy looking par 3 with a larger green can change your perspective quickly if you miss the green. This hole usually requires a half a club extra. Play to the center of the green and you will have a putt to any hole location. However, miss this green and your short game will be tested to save par. |
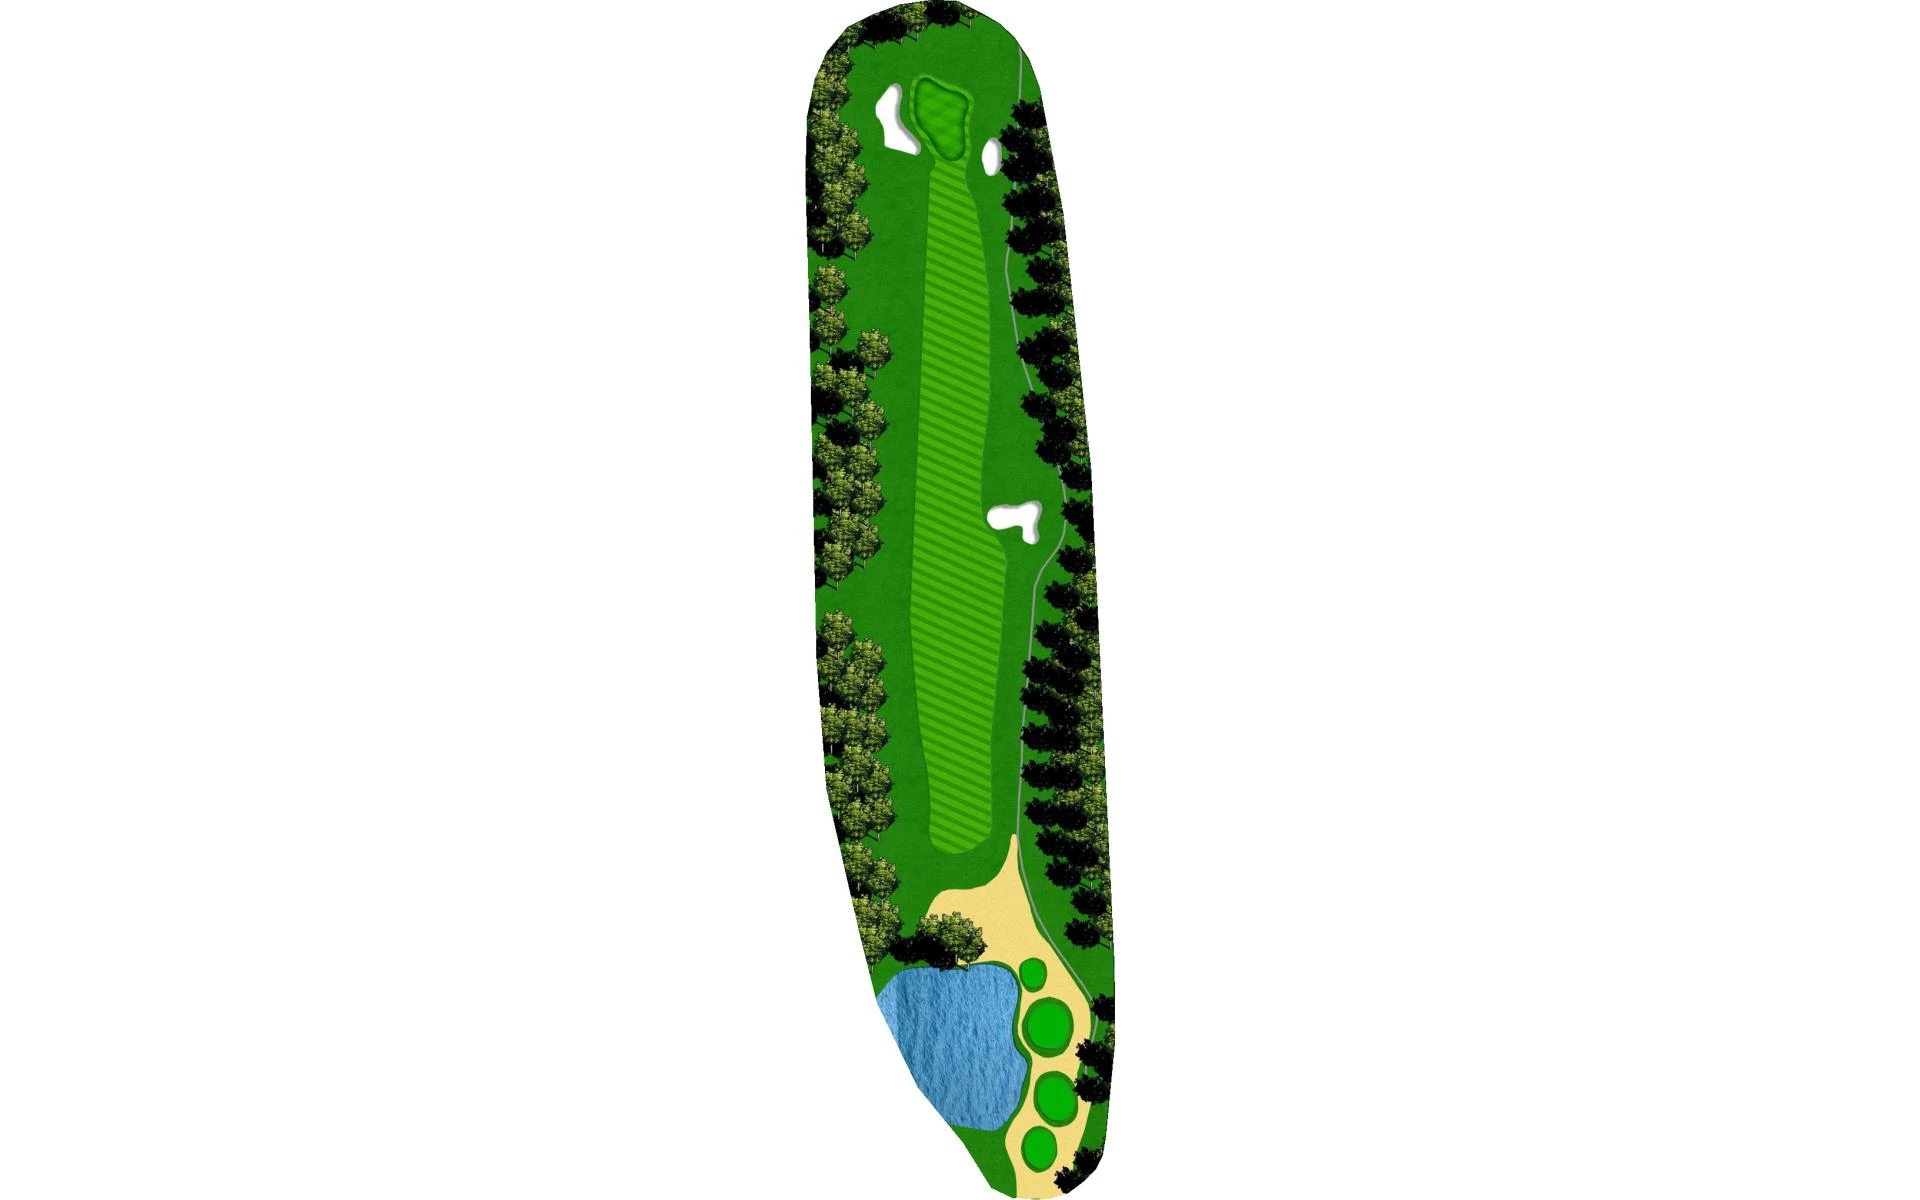
# 17 /
Par: 5
Handicaps:
Men's 2
Women's 2
Yardage by Tee:
BLUE 501
WHITE 487
GOLD 454
RED 449
TEAL 405
Slope:
Blue-130 | Silver-126 | White-124 | Green-121 | Gold-119 | Red-127 | Purple-122| Teal-118
Pro Tips
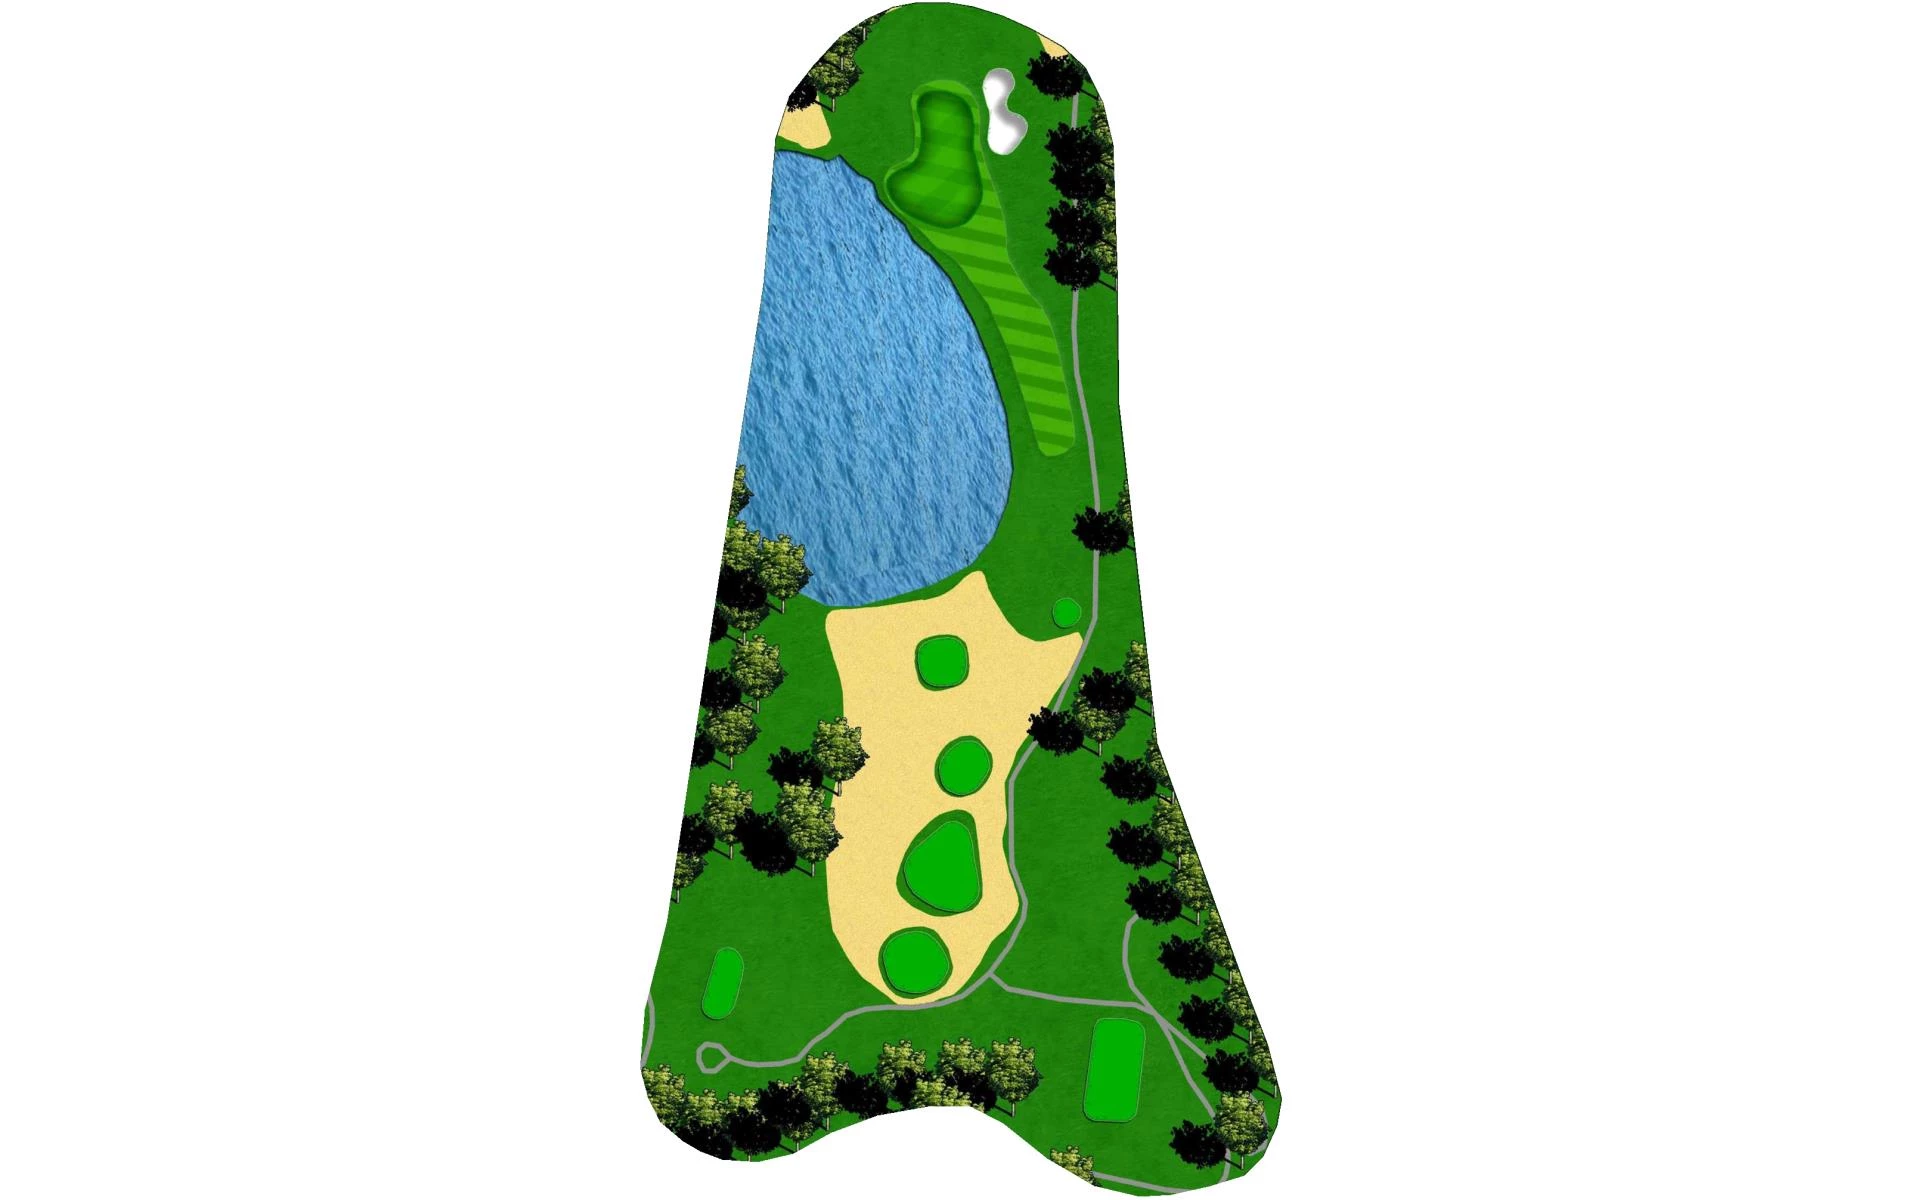
| Another great risk reward par 5 that will test your skill. This dogleg right is typically a three-shot hole that requires good aim and quality ball striking to a green protected on three sides by water. From the tee, take less than driver and play towards the left fairway bunker to help make your layup angle better. With driver in hand a fade off the tee will keep you in the fairway, but out of bounds lingers both left and right. For your second shot, a layup focused down the middle right side will roll to within a wedge distance. On your approach shot, stay focused from this downhill lie as clean contact will help you control the ball flight into this well protected green. If your nerves are a little high, stay right and middle of the green to keep the water out of play. If you decide to go for it, play the distance as you cannot often feel the wind near the green. |
# 18 /
Par: 4
Handicaps:
Men's 4
Women's 6
Yardage by Tee:
BLUE 415
WHITE 371
GOLD 339
RED 334
TEAL 287
Slope:
Blue-130 | Silver-126 | White-124 | Green-121 | Gold-119 | Red-127 | Purple-122| Teal-118
Pro Tips
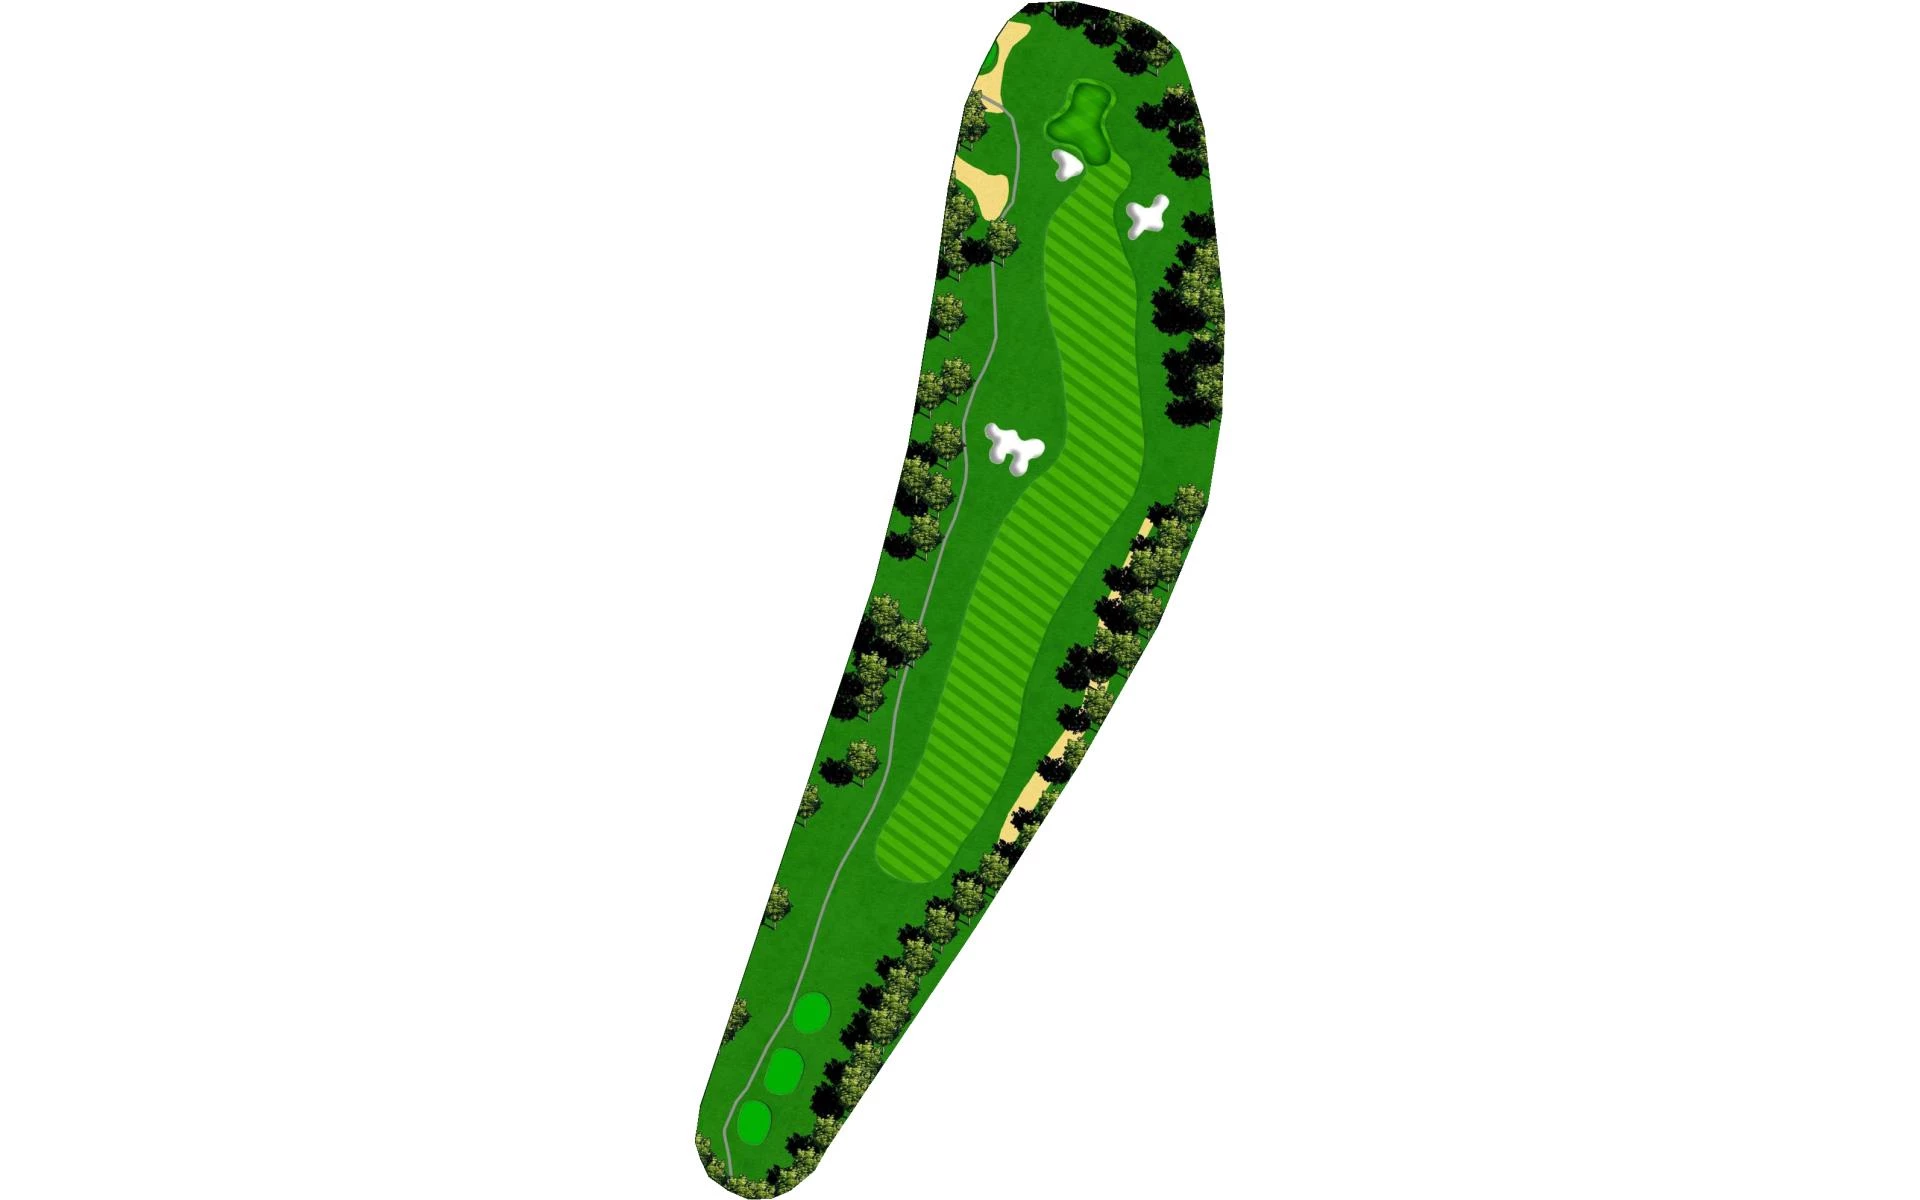
| This uphill, dogleg left par 4 is a fun way to finish your round at Bernardo Heights Country Club. A good tee shot here will set you up for one last birdie chance. The approach shot to this green will require your full attention as the complex is well protected by bunkers and rough. Take one half to a full club more than you think on your approach to the green so you carry the front bunker from an uphill lie in the fairway. The green slopes heavily from front to back and left to right. Keep your approach shot below the hole location and you will have a good chance of finishing with a one-putt! |