Chantilly National Golf Course
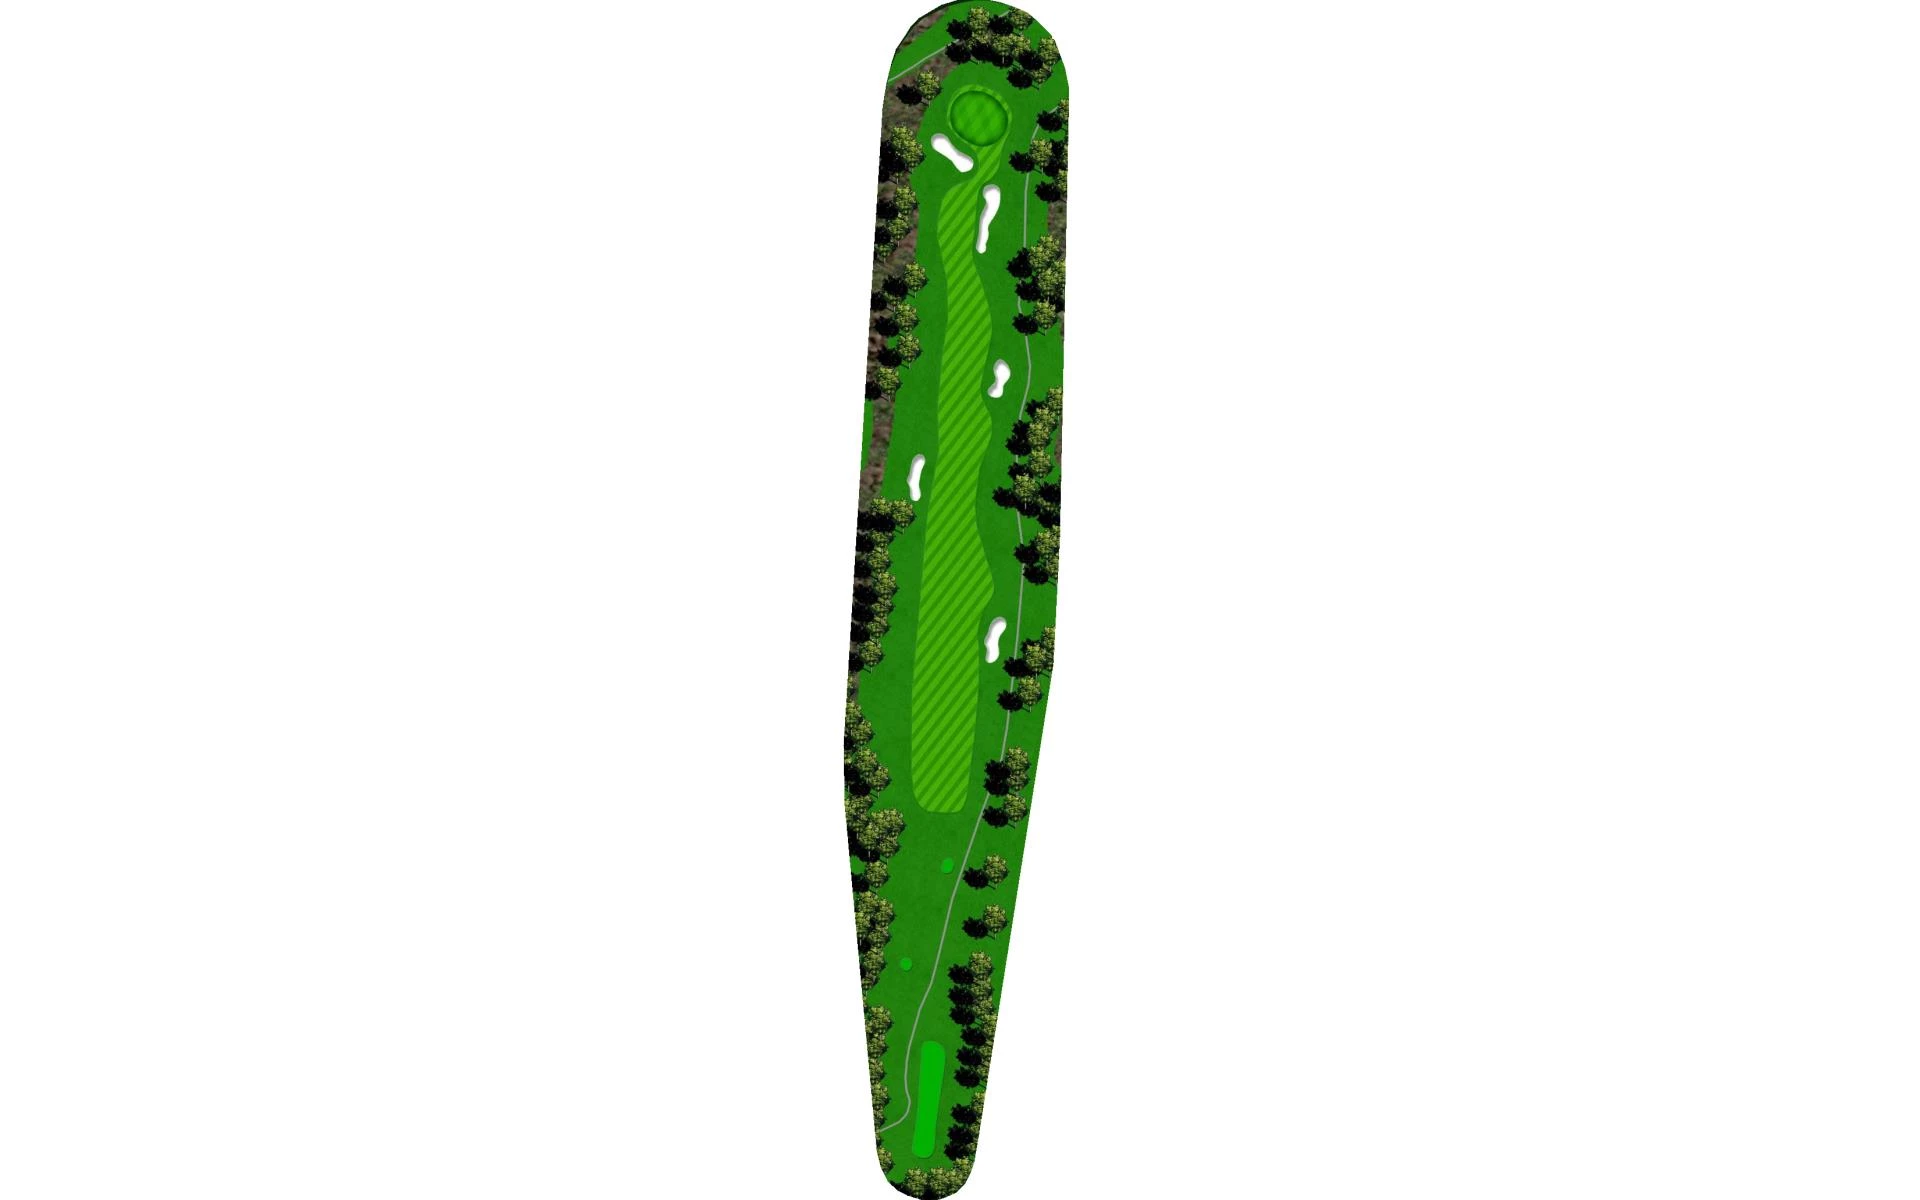
# 1 /
Par: 4
Handicaps:
Men's 13
Women's 13
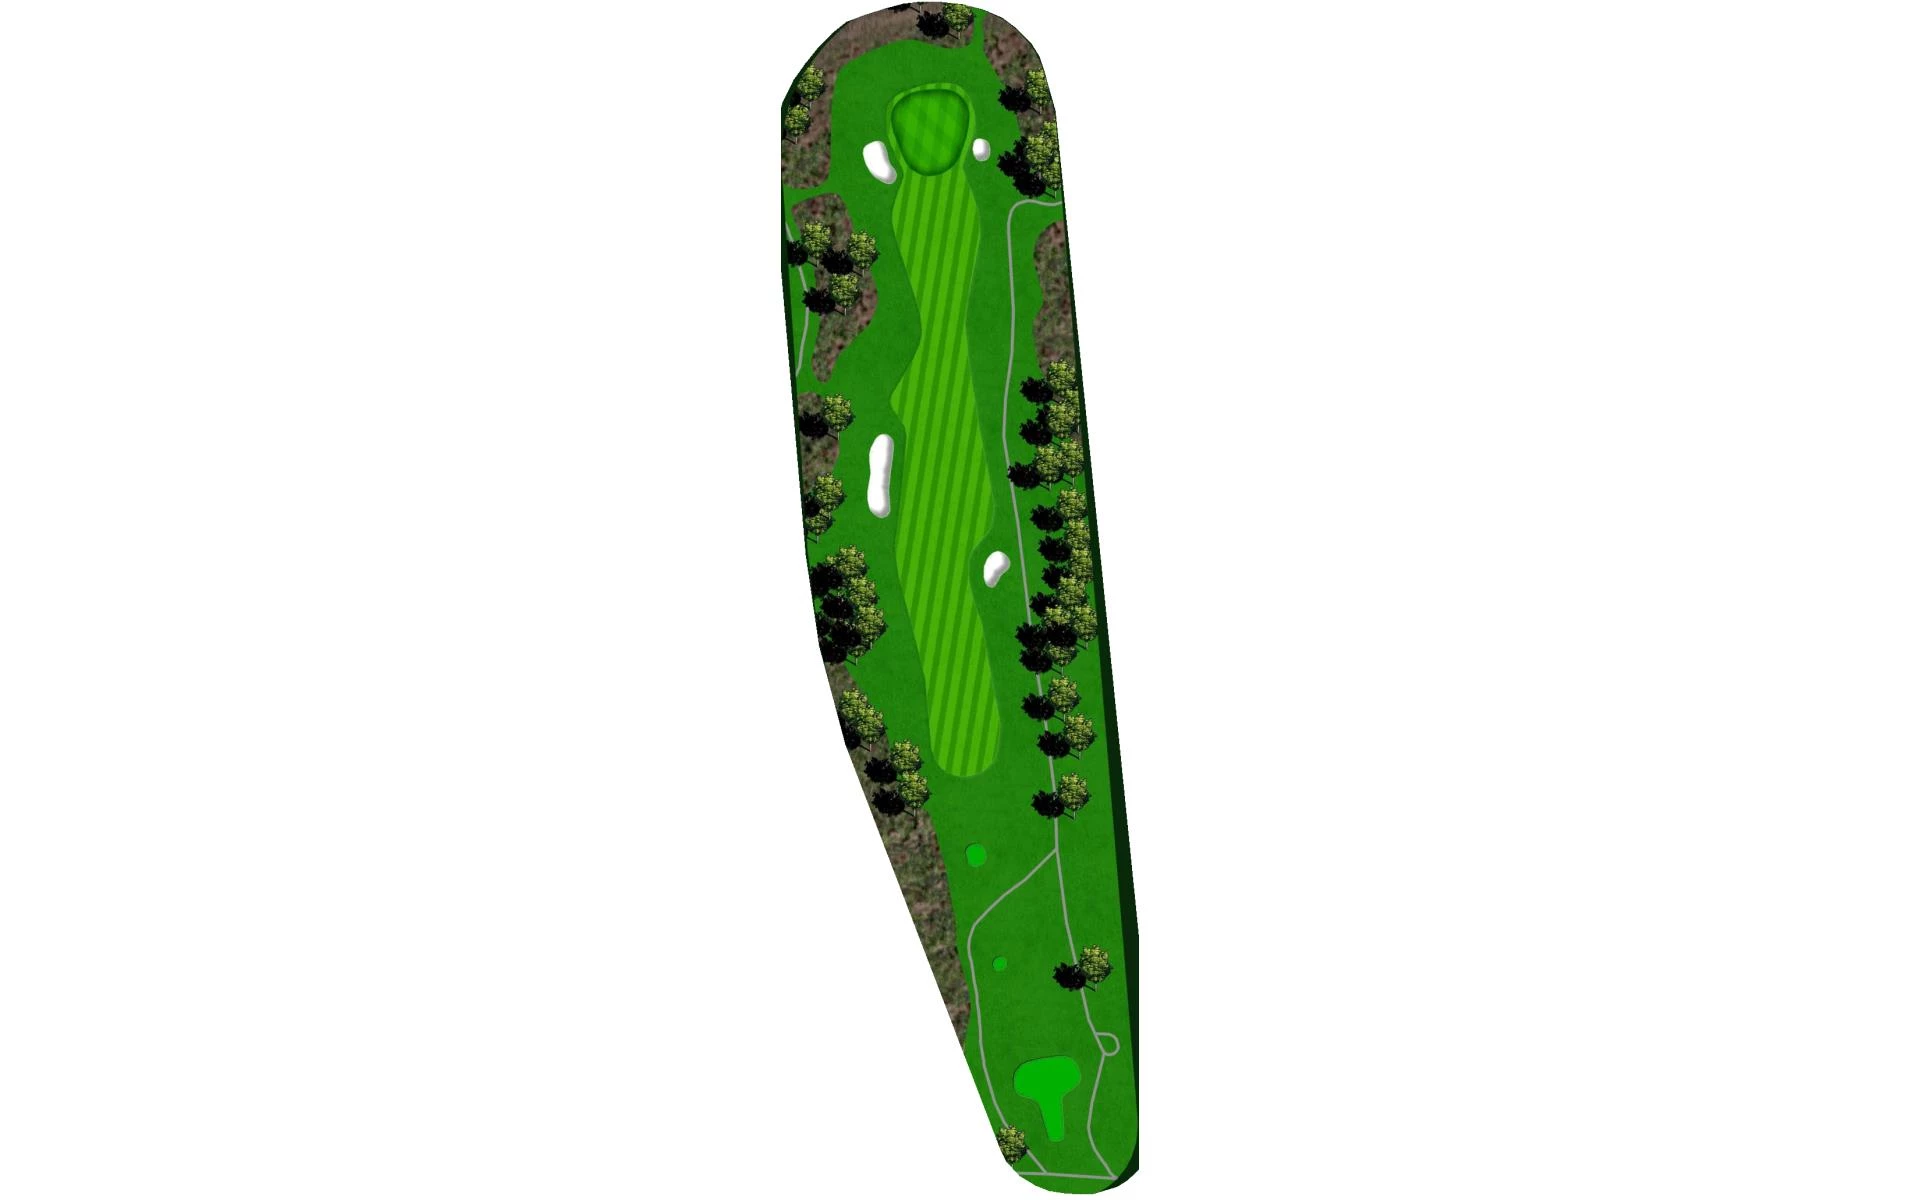
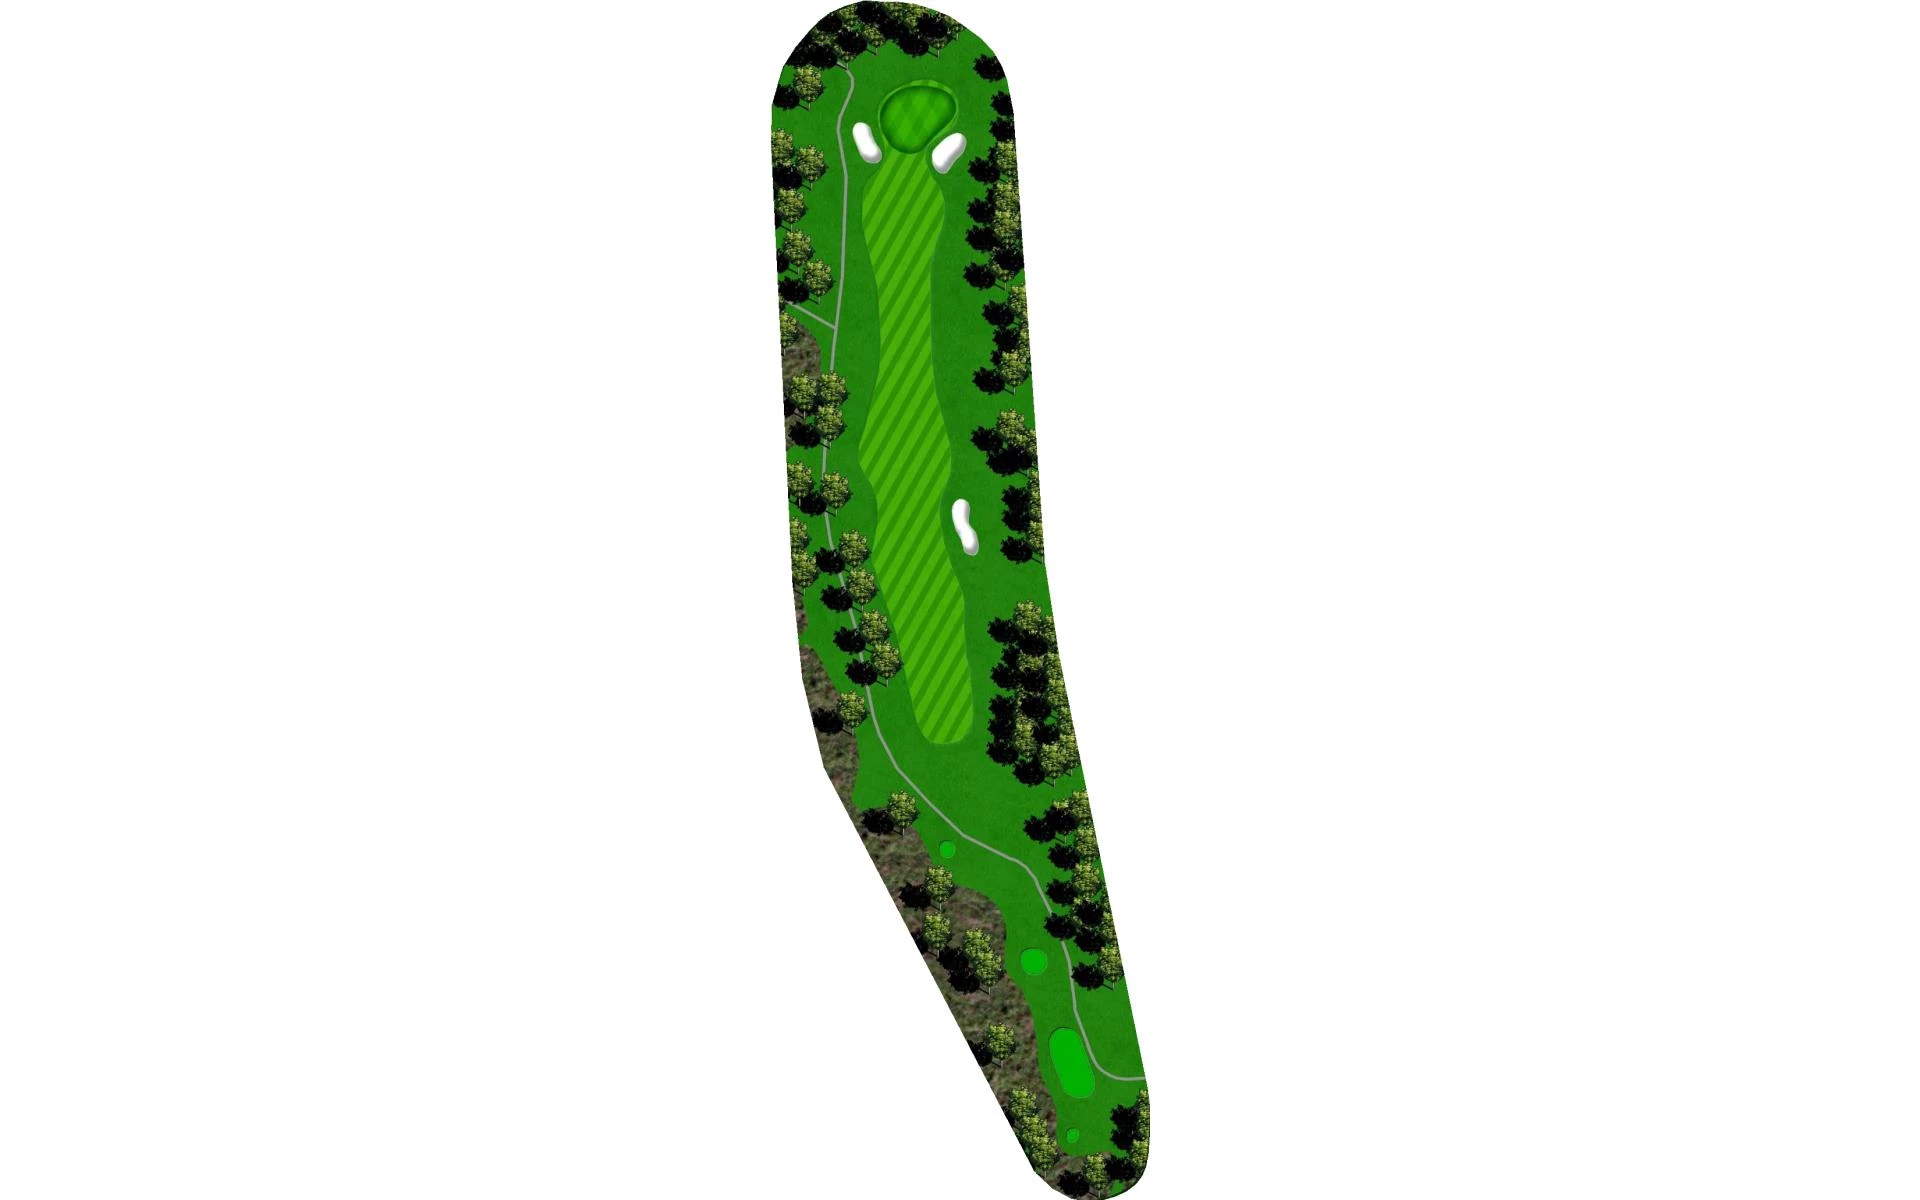
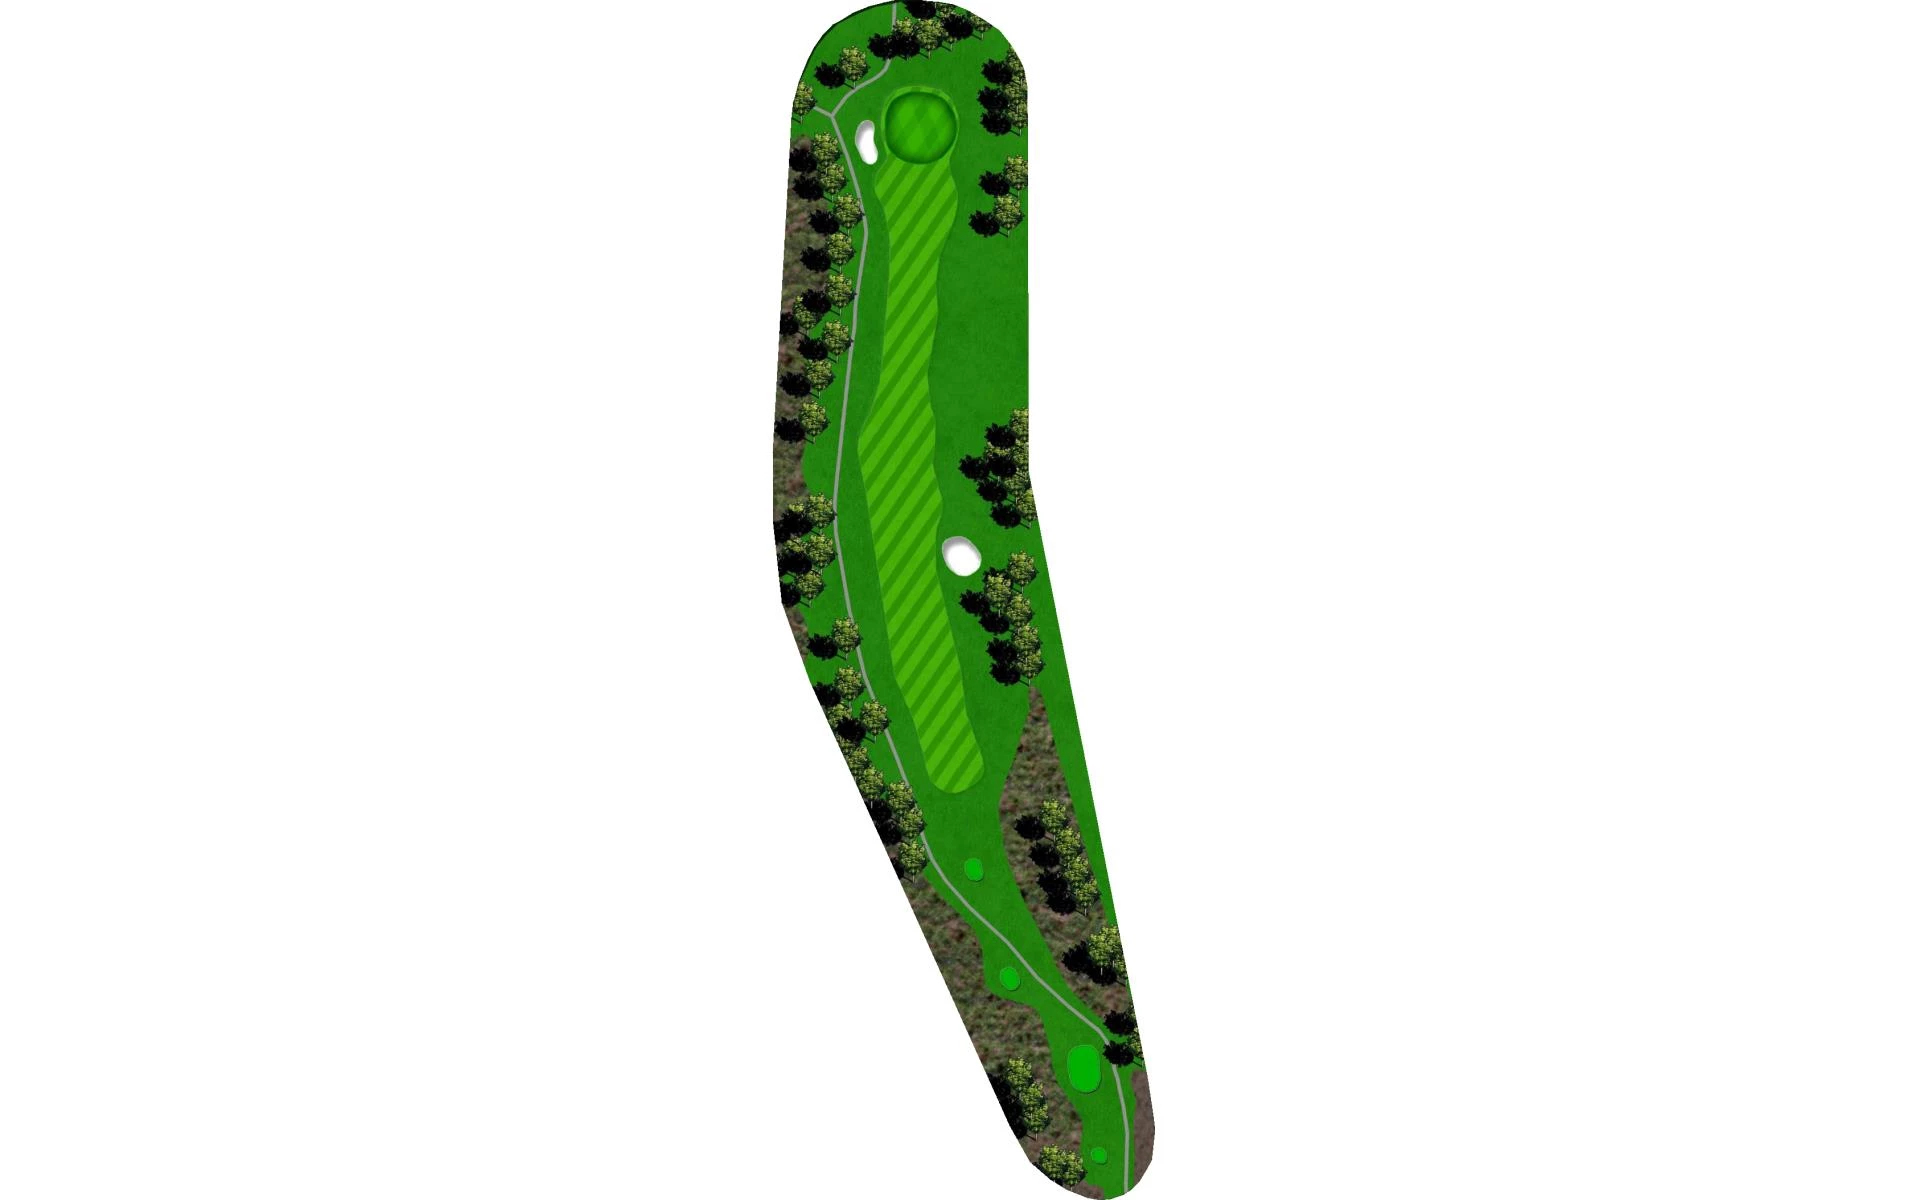
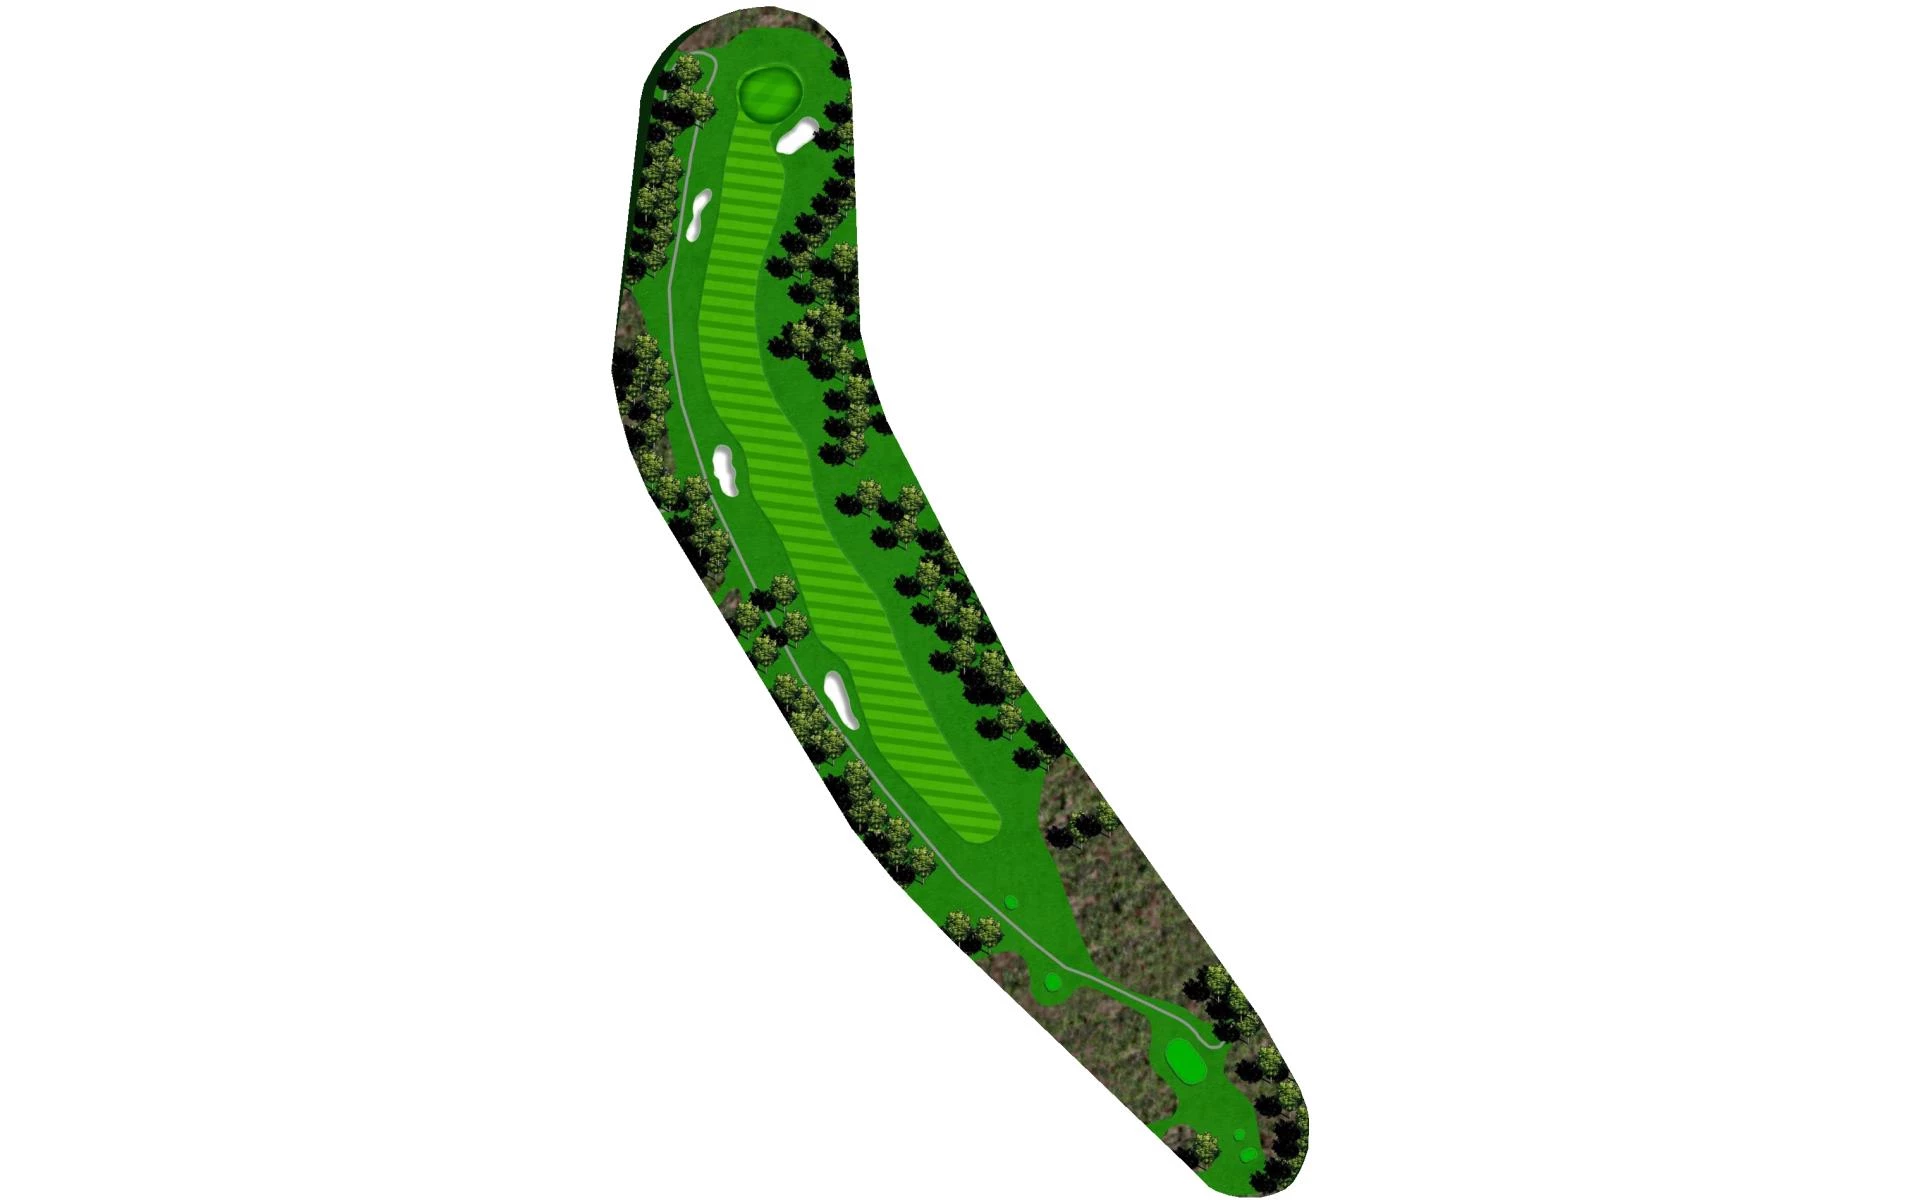
A mid-length par 4 that requires an accurate tee shot to have a chance for a birdie. Avoid the two fairway bunkers guarding both the right a…
A mid-length par 4 that requires an accurate tee shot to have a chance for a birdie. Avoid the two fairway bunkers guarding both the right and left side of the fairway. Big hitters can carry the fairway bunker on the right while putting the left fairway bunker in play. Play your drive down the right center of the fairway to have a short to mid iron into the gently sloping green. Avoid the greenside bunkers on the left or right or you will have a difficult attempt to get up and down to save your par.
Yardage by Tee:
BLACK 408
BLUE 398
WHITE 381
ORANGE 381
GREEN 335
LIGHT BLUE 335
YELLOW 289
Pro Tips
A mid-length par 4 that requires an accurate tee shot to have a chance for a birdie. Avoid the two fairway bunkers guarding both the right and left sides of the fairway. Big hitters can carry the fairway bunker on the right while putting the left fairway bunker in play. Play your drive down the right-center of the fairway to have a short to mid-iron into the gently sloping green. Avoid the greenside bunkers on the left or right or you will have a difficult attempt to get up and down to save your par.
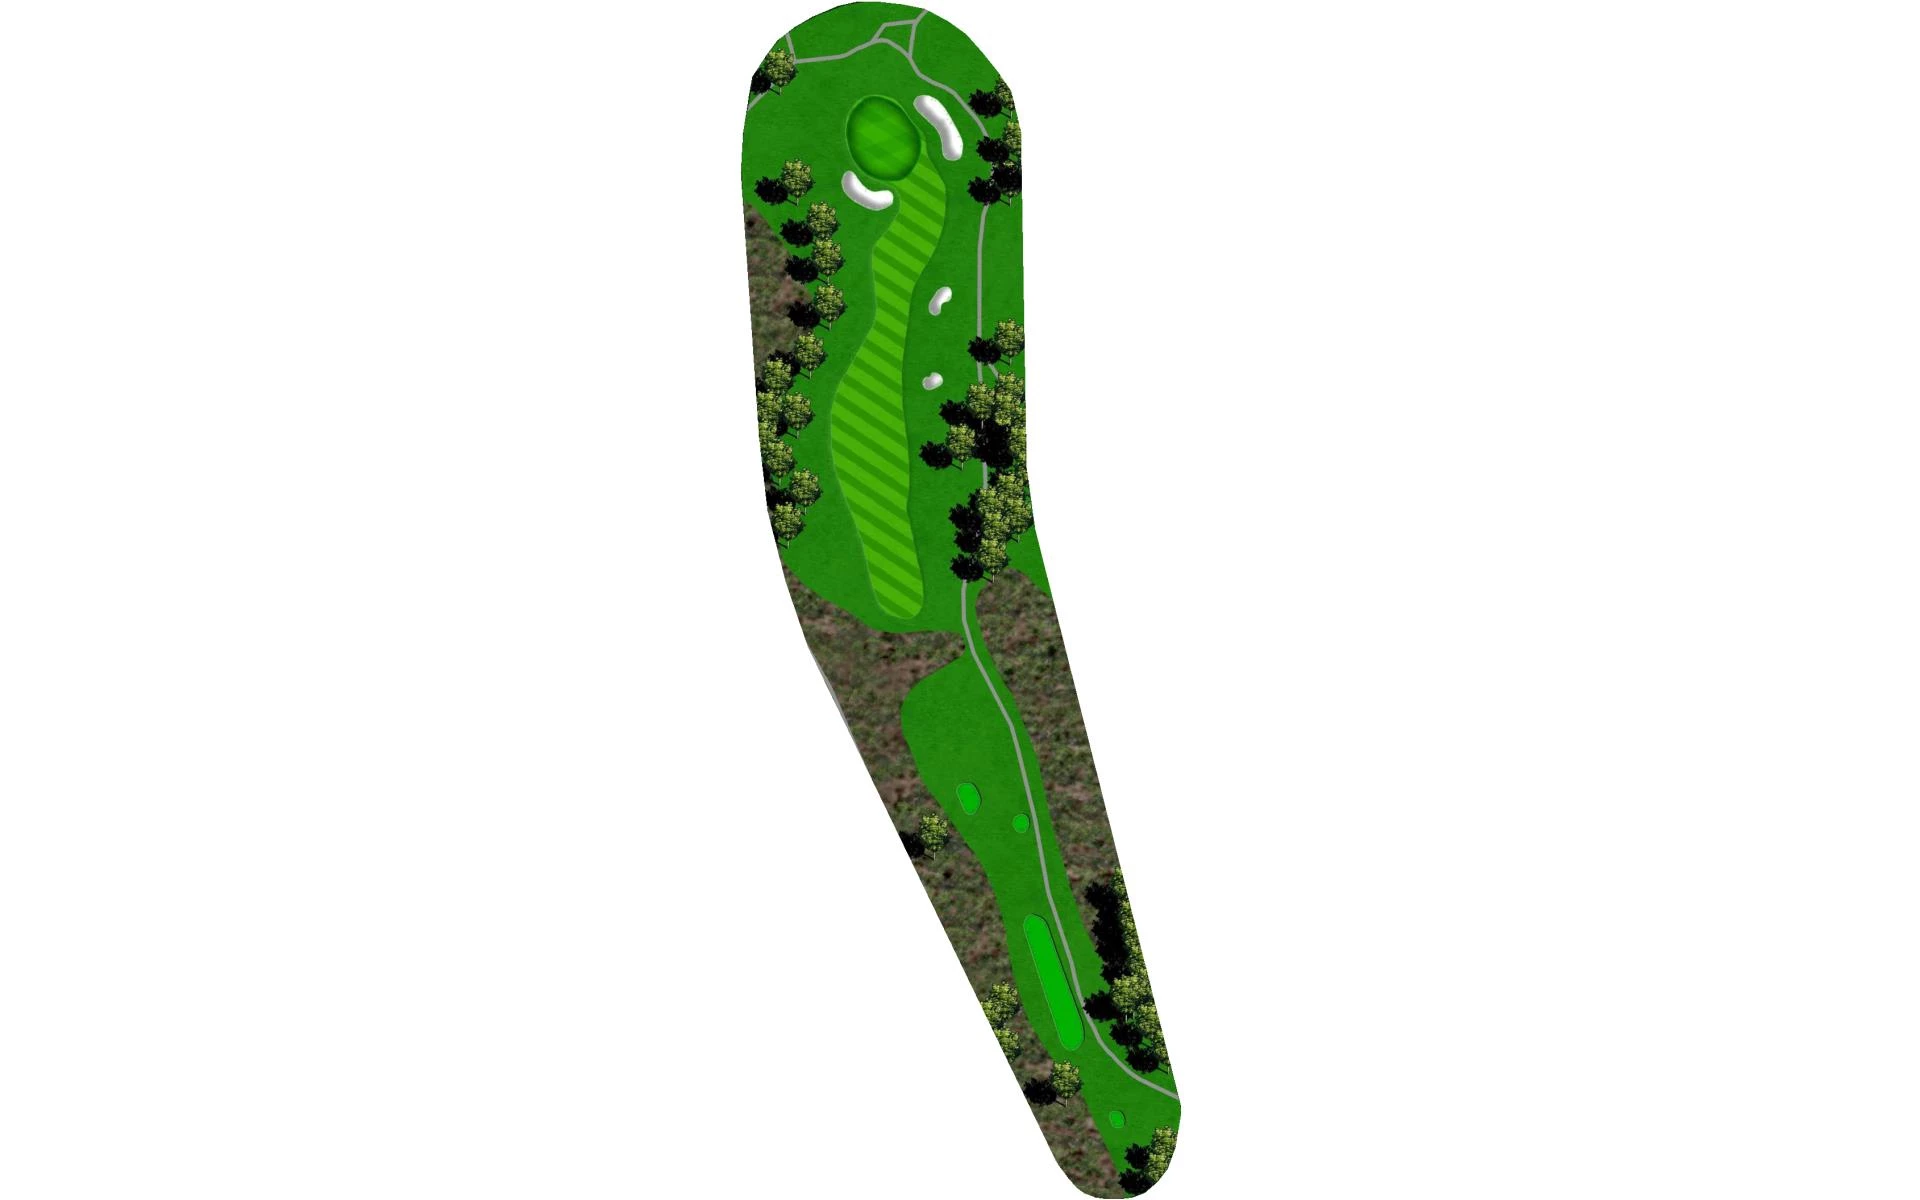
# 2 /
Par: 4
Handicaps:
Men's 9
Women's 11
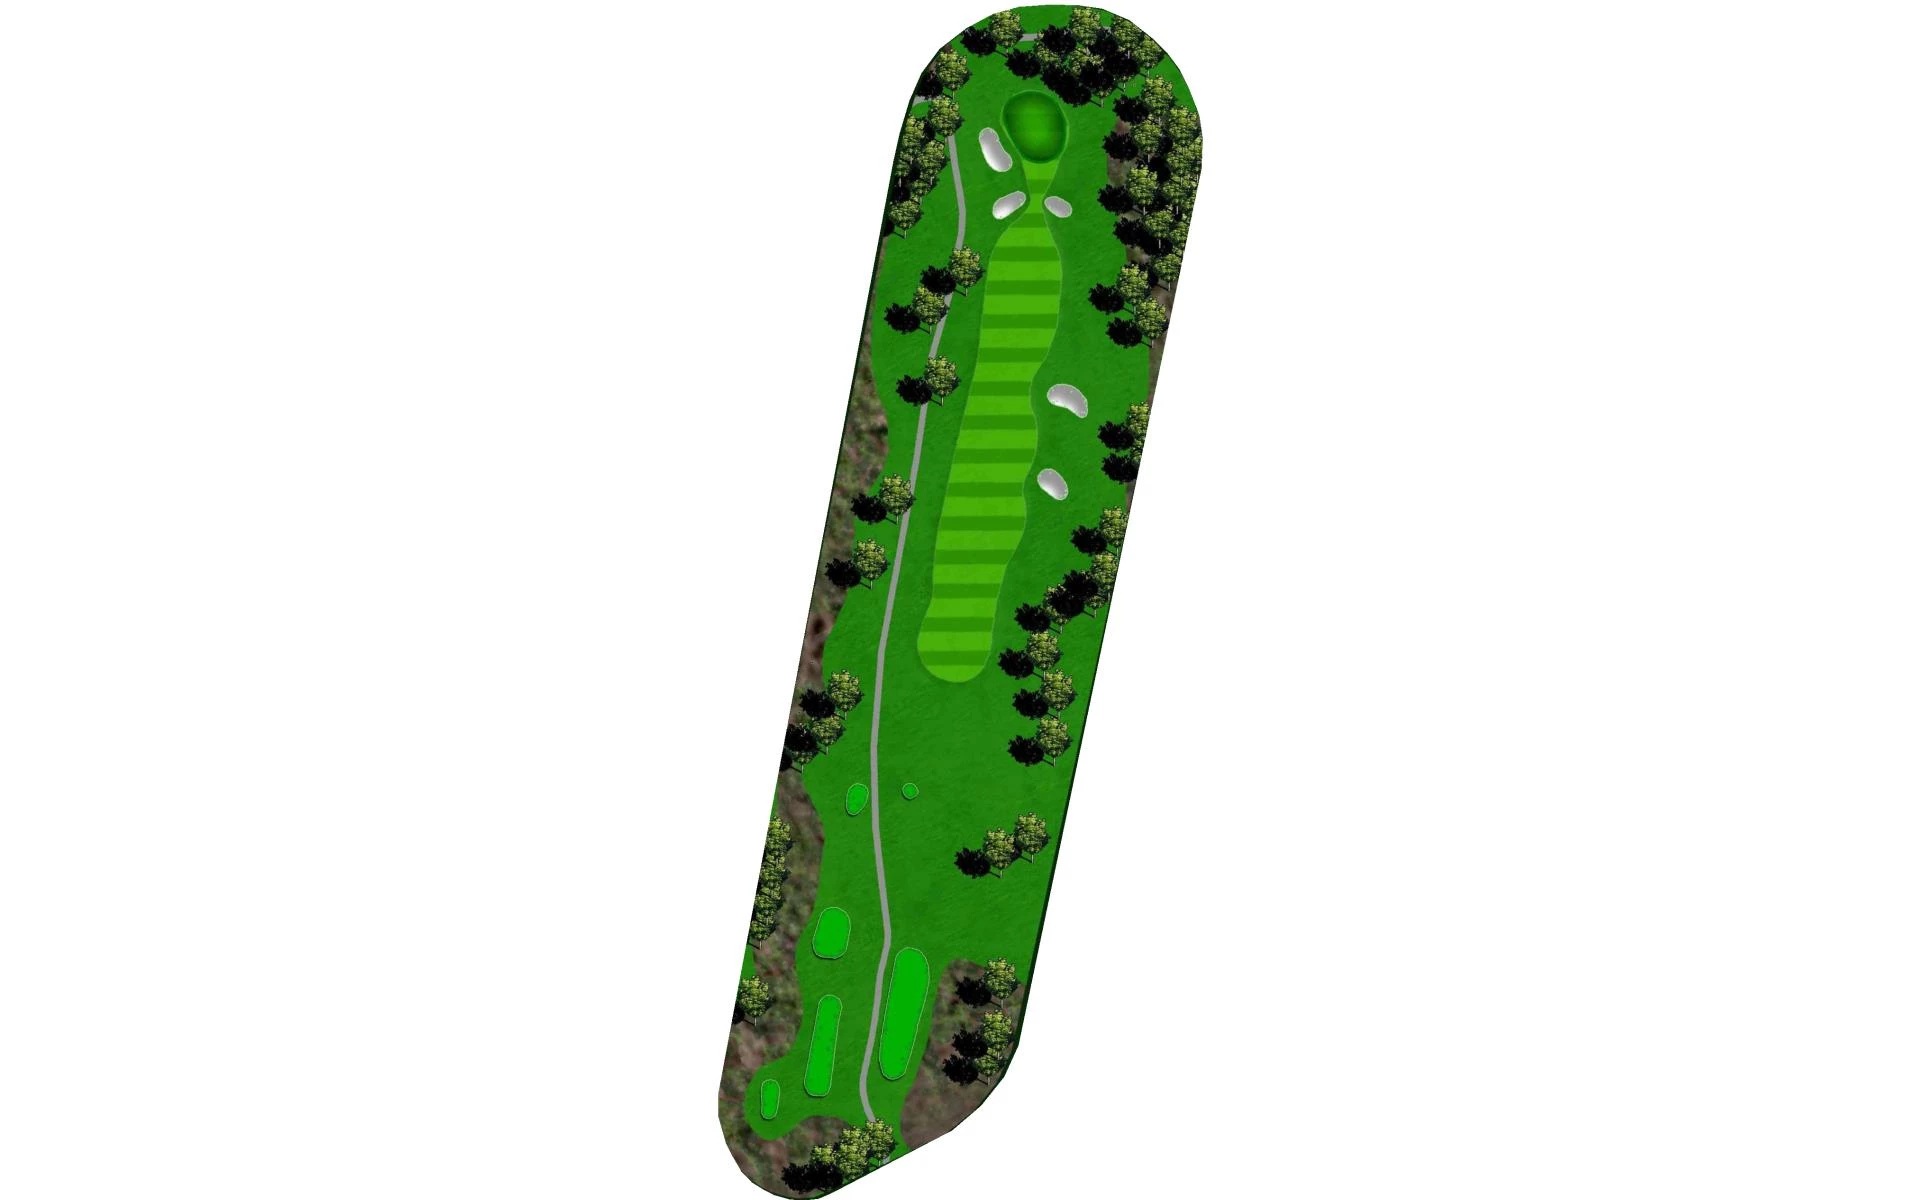
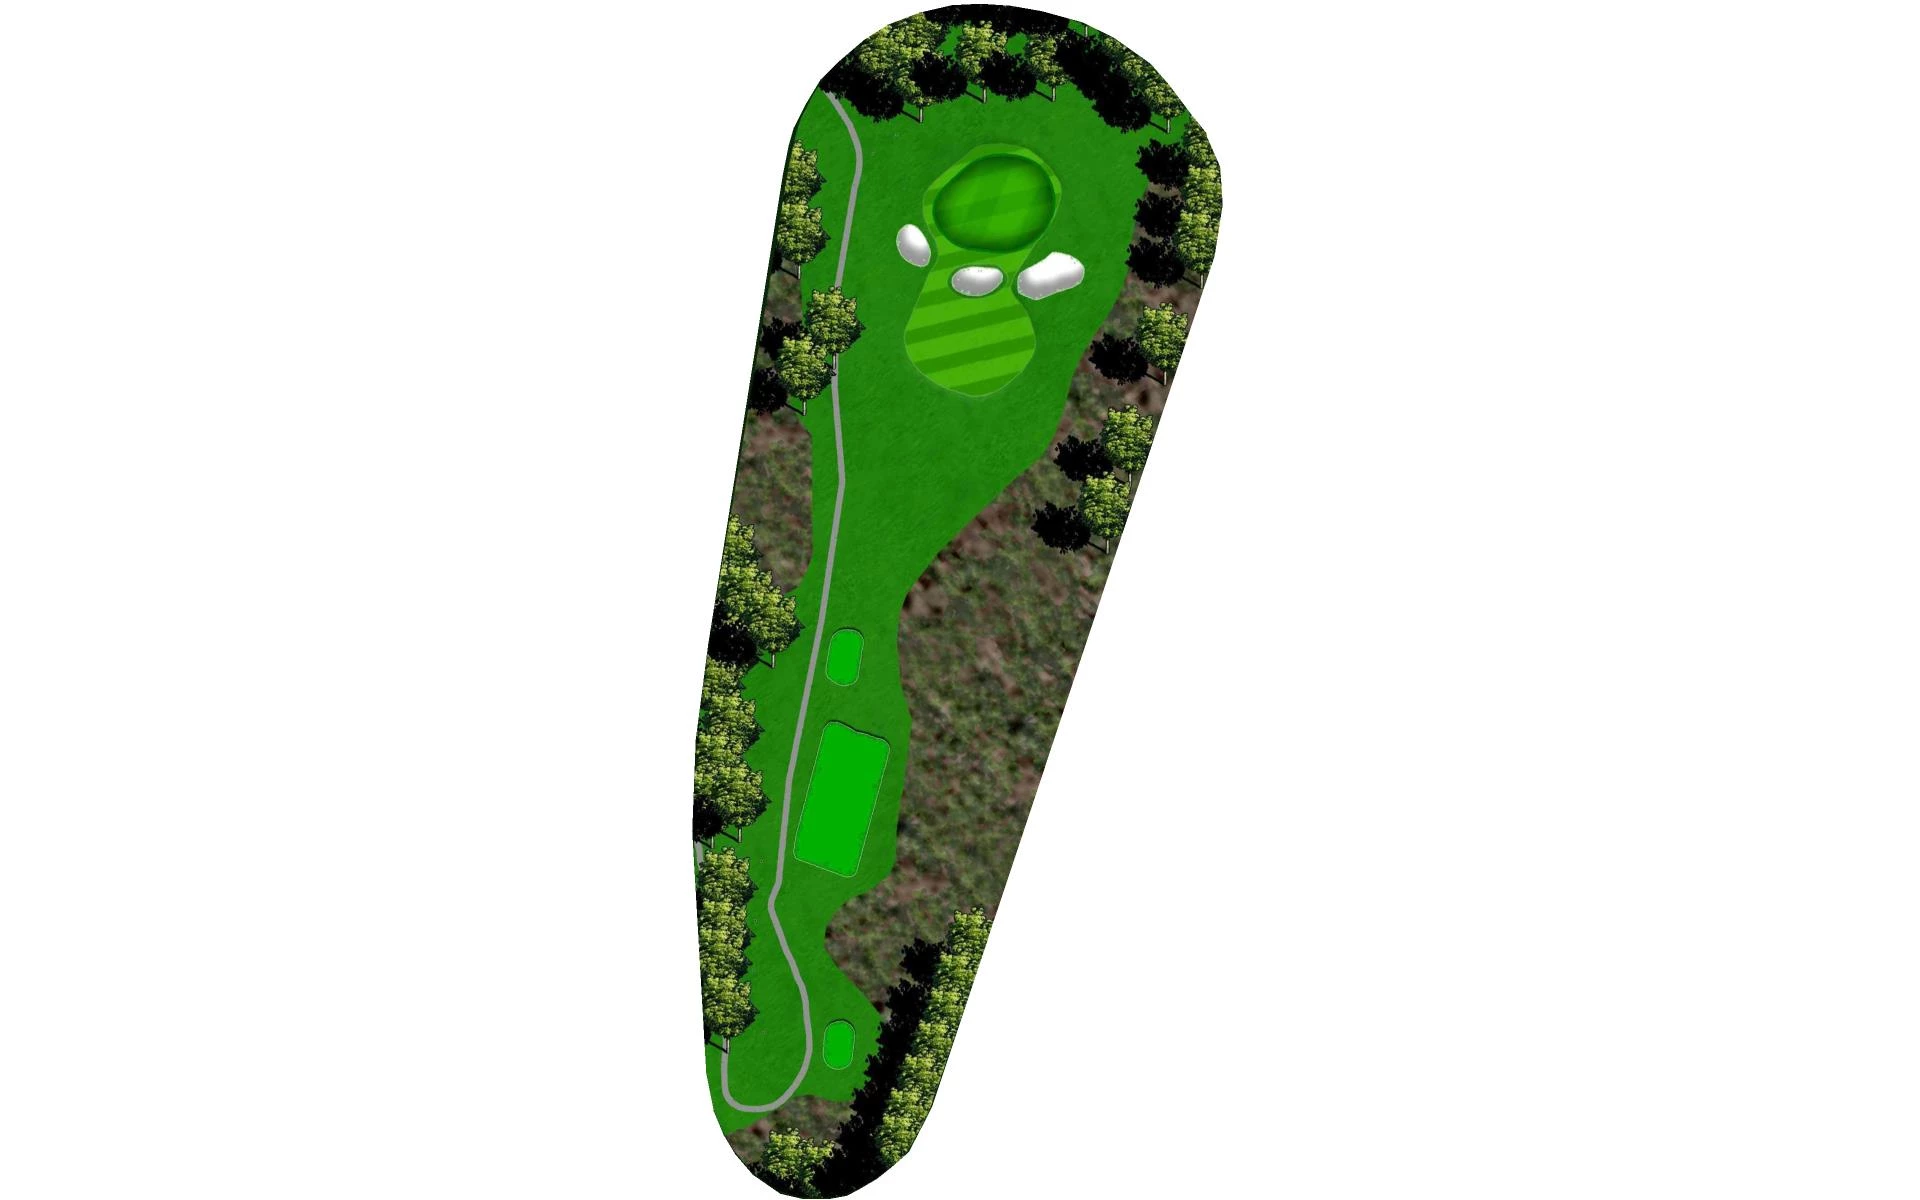
The shortest par 4 on the course, but don’t let the distance fool you! A precise tee shot to the right center of the fairway avoids a tree i…
The shortest par 4 on the course, but don’t let the distance fool you! A precise tee shot to the right center of the fairway avoids a tree in the left rough that can make for a tricky approach shot. The key to the second shot is playing to the front third of this green as the back third of the green slopes away from your incoming approach shot causing many a great approach shot to roll of the back of the green.
Yardage by Tee:
BLACK 376
BLUE 361
WHITE 335
ORANGE 335
GREEN 310
LIGHT BLUE 310
YELLOW 258
Pro Tips
The shortest par 4 on the course, but don’t let the distance fool you! A precise tee shot to the right-center of the fairway avoids a tree in the left rough that can make for a tricky approach shot. The key to the second shot is playing to the front third of this green as the back third of the green slopes away from your incoming approach shot causing many a great approach shot to roll of the back of the green.
# 3 /
Par: 5
Handicaps:
Men's 11
Women's 7
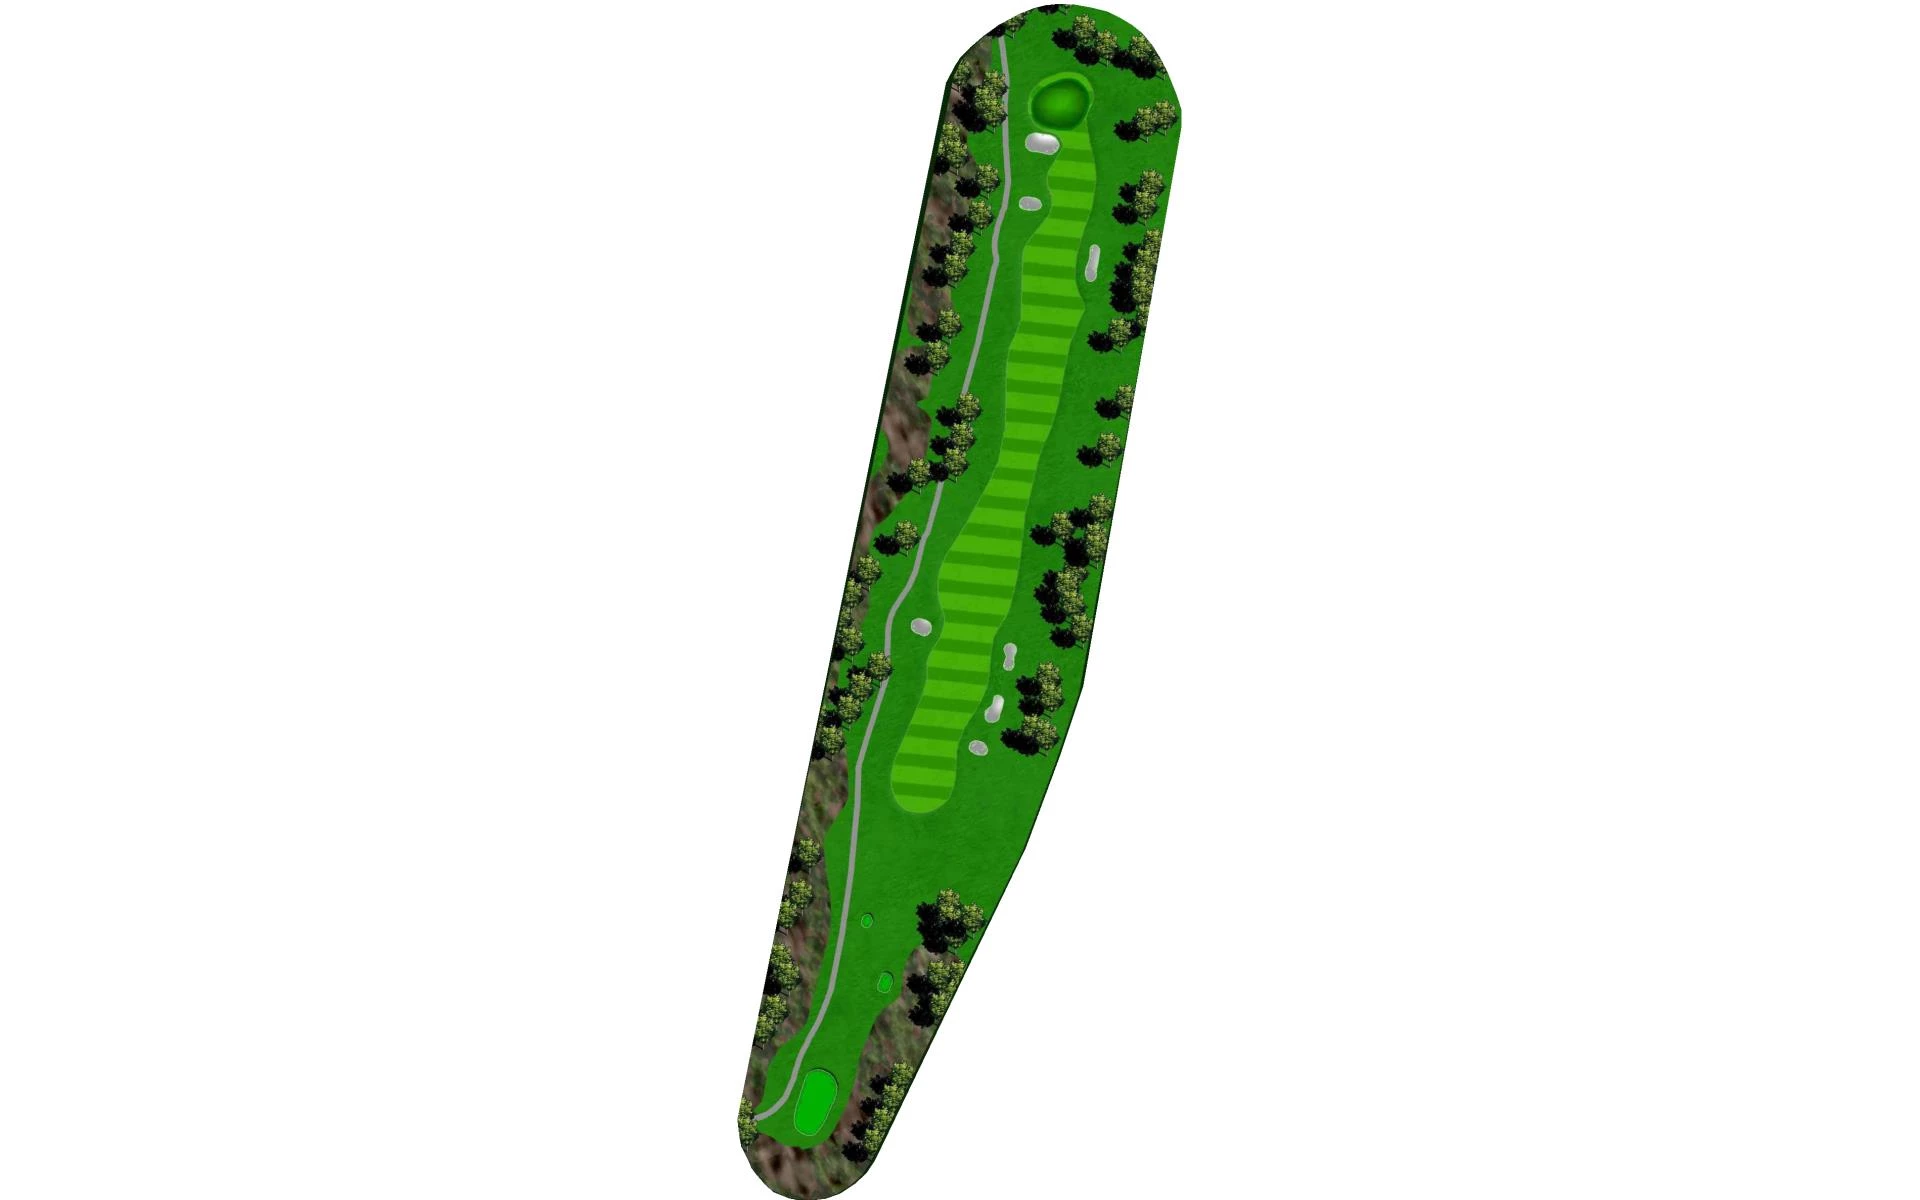
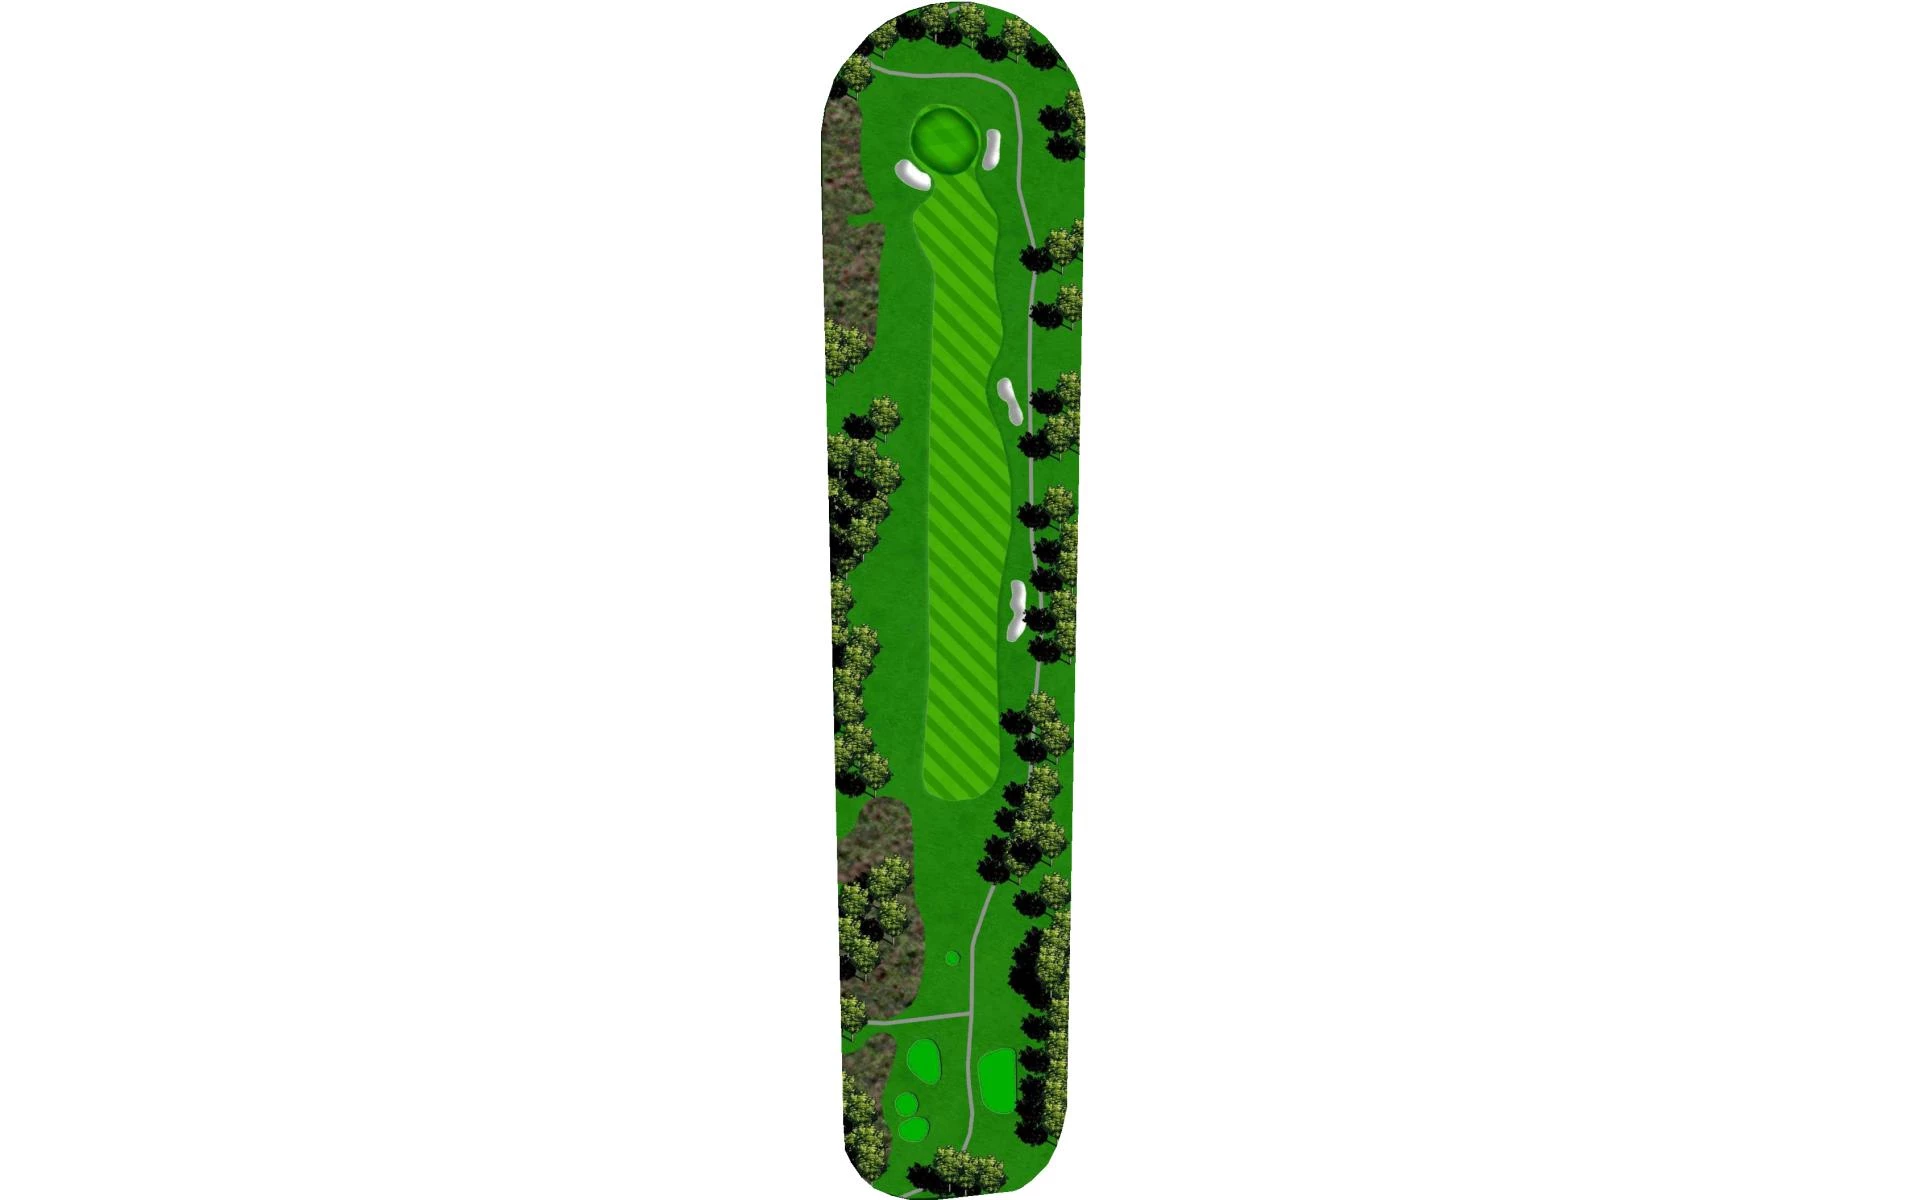
This par 5 may be reachable for some long hitters. Fairway bunkers can come into play off the tee on the right and left. Play your drive dow…
This par 5 may be reachable for some long hitters. Fairway bunkers can come into play off the tee on the right and left. Play your drive down the right center of the fairway. A well played second shot is key to avoid a giant oak tree that guards the left side of the green. The green is protected in front by a bunker and has severe sloping at the front and back that will feed even the best played approach shots off of the green.
Yardage by Tee:
BLACK 534
BLUE 526
WHITE 513
ORANGE 463
GREEN 463
LIGHT BLUE 463
YELLOW 427
Pro Tips
This par 5 may be reachable for some long hitters. Fairway bunkers can come into play off the tee on the right and left. Play your drive down the right-center of the fairway. A well-played second shot is key to avoid a giant oak tree that guards the left side of the green. The green is protected in front by a bunker and has severe sloping at the front and back that will feed even the best-played approach shots off of the green.
# 4 /
Par: 3
Handicaps:
Men's 15
Women's 15
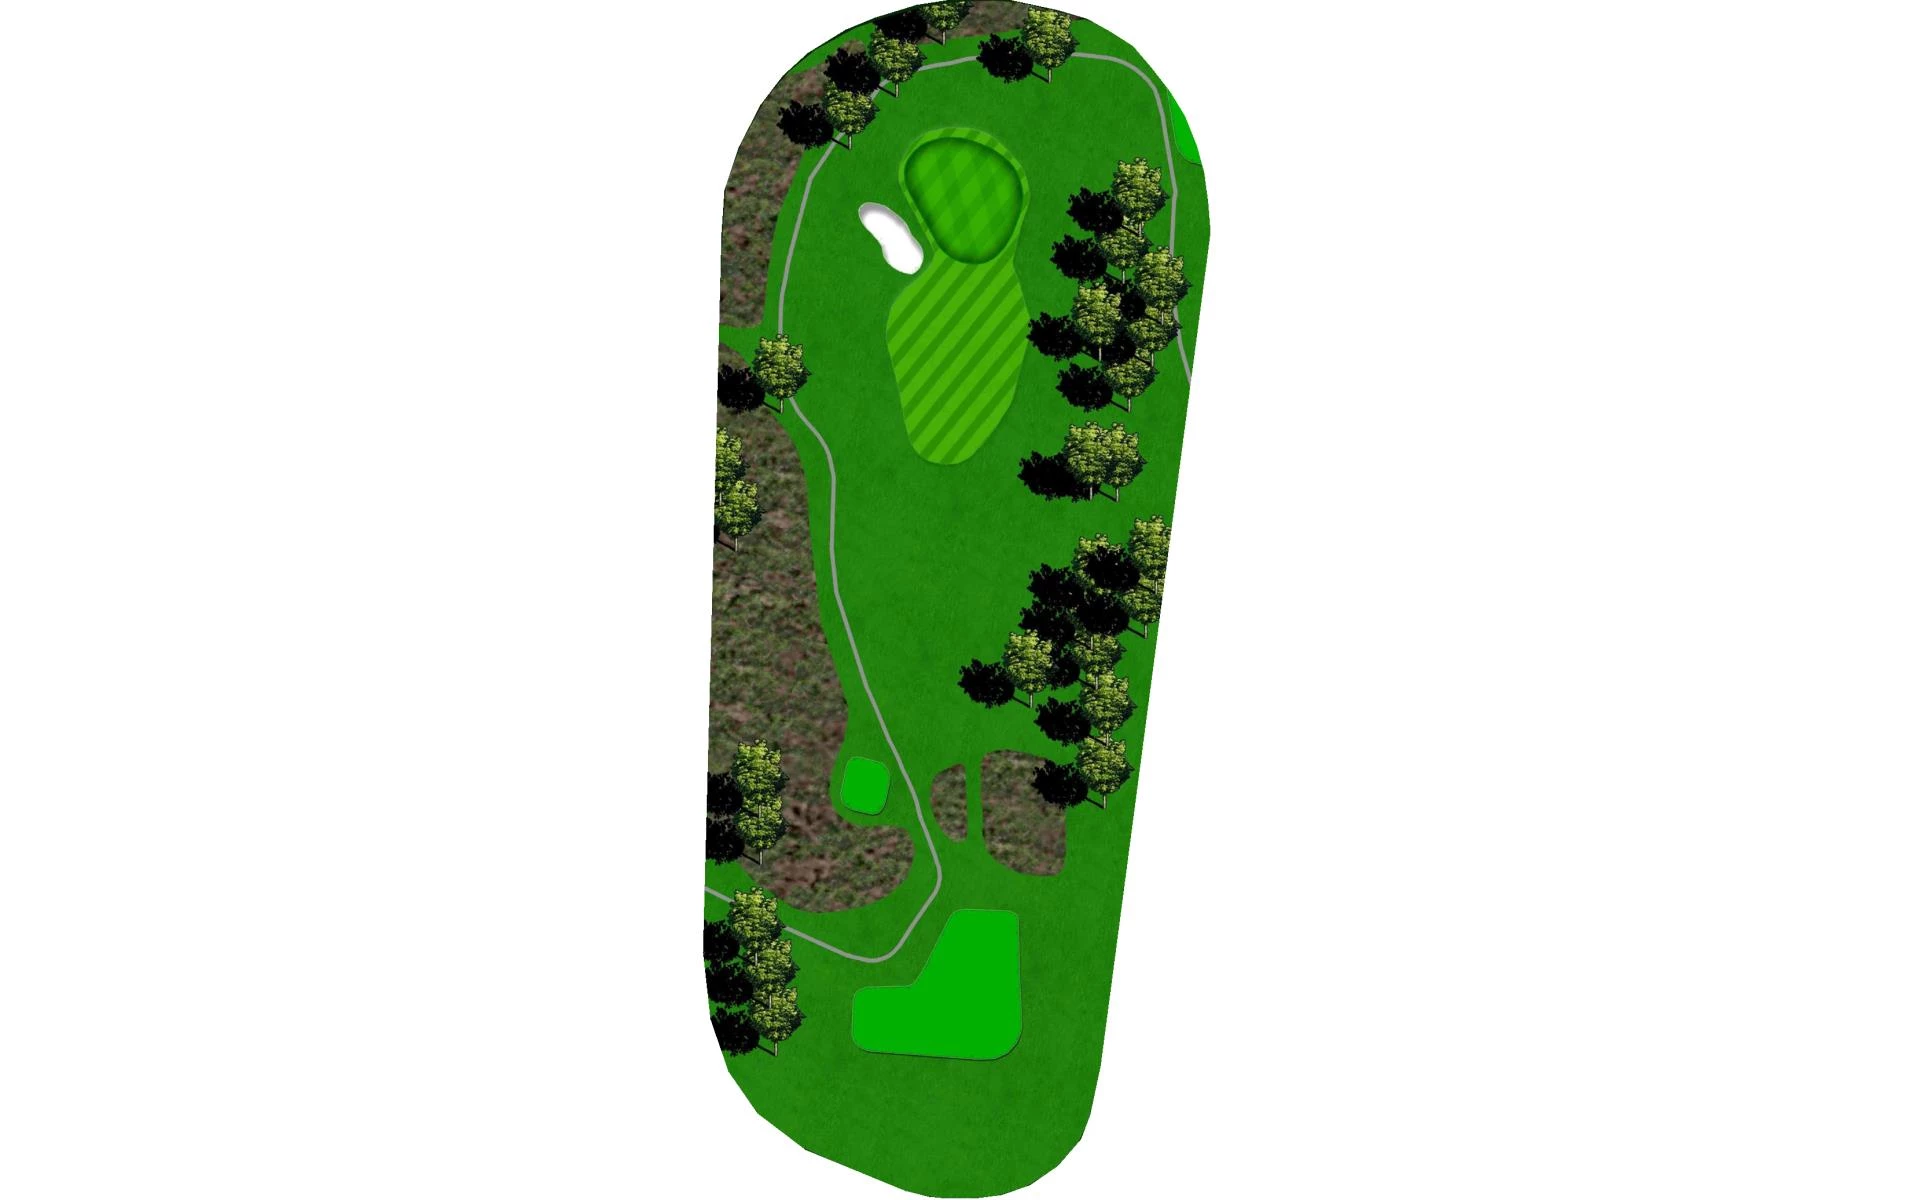
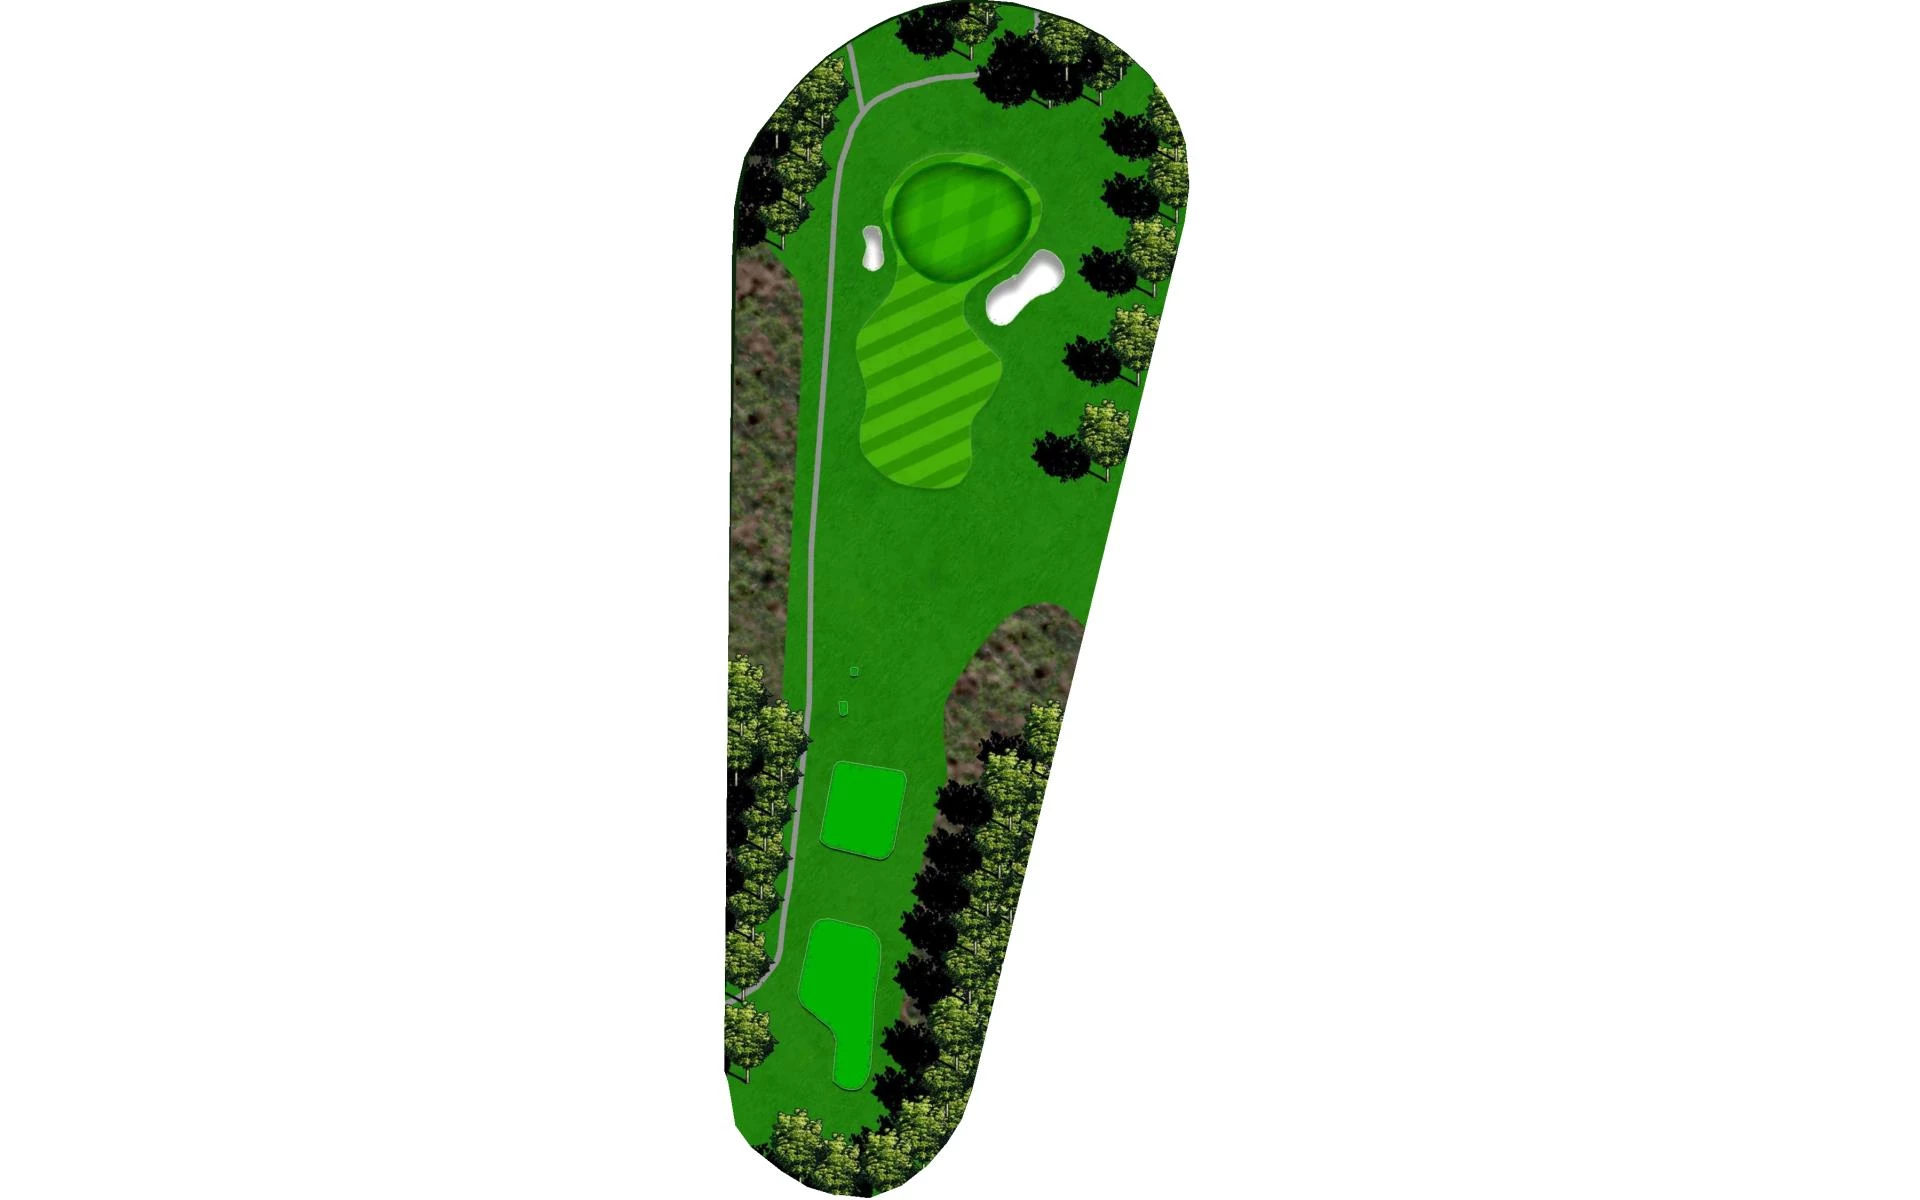
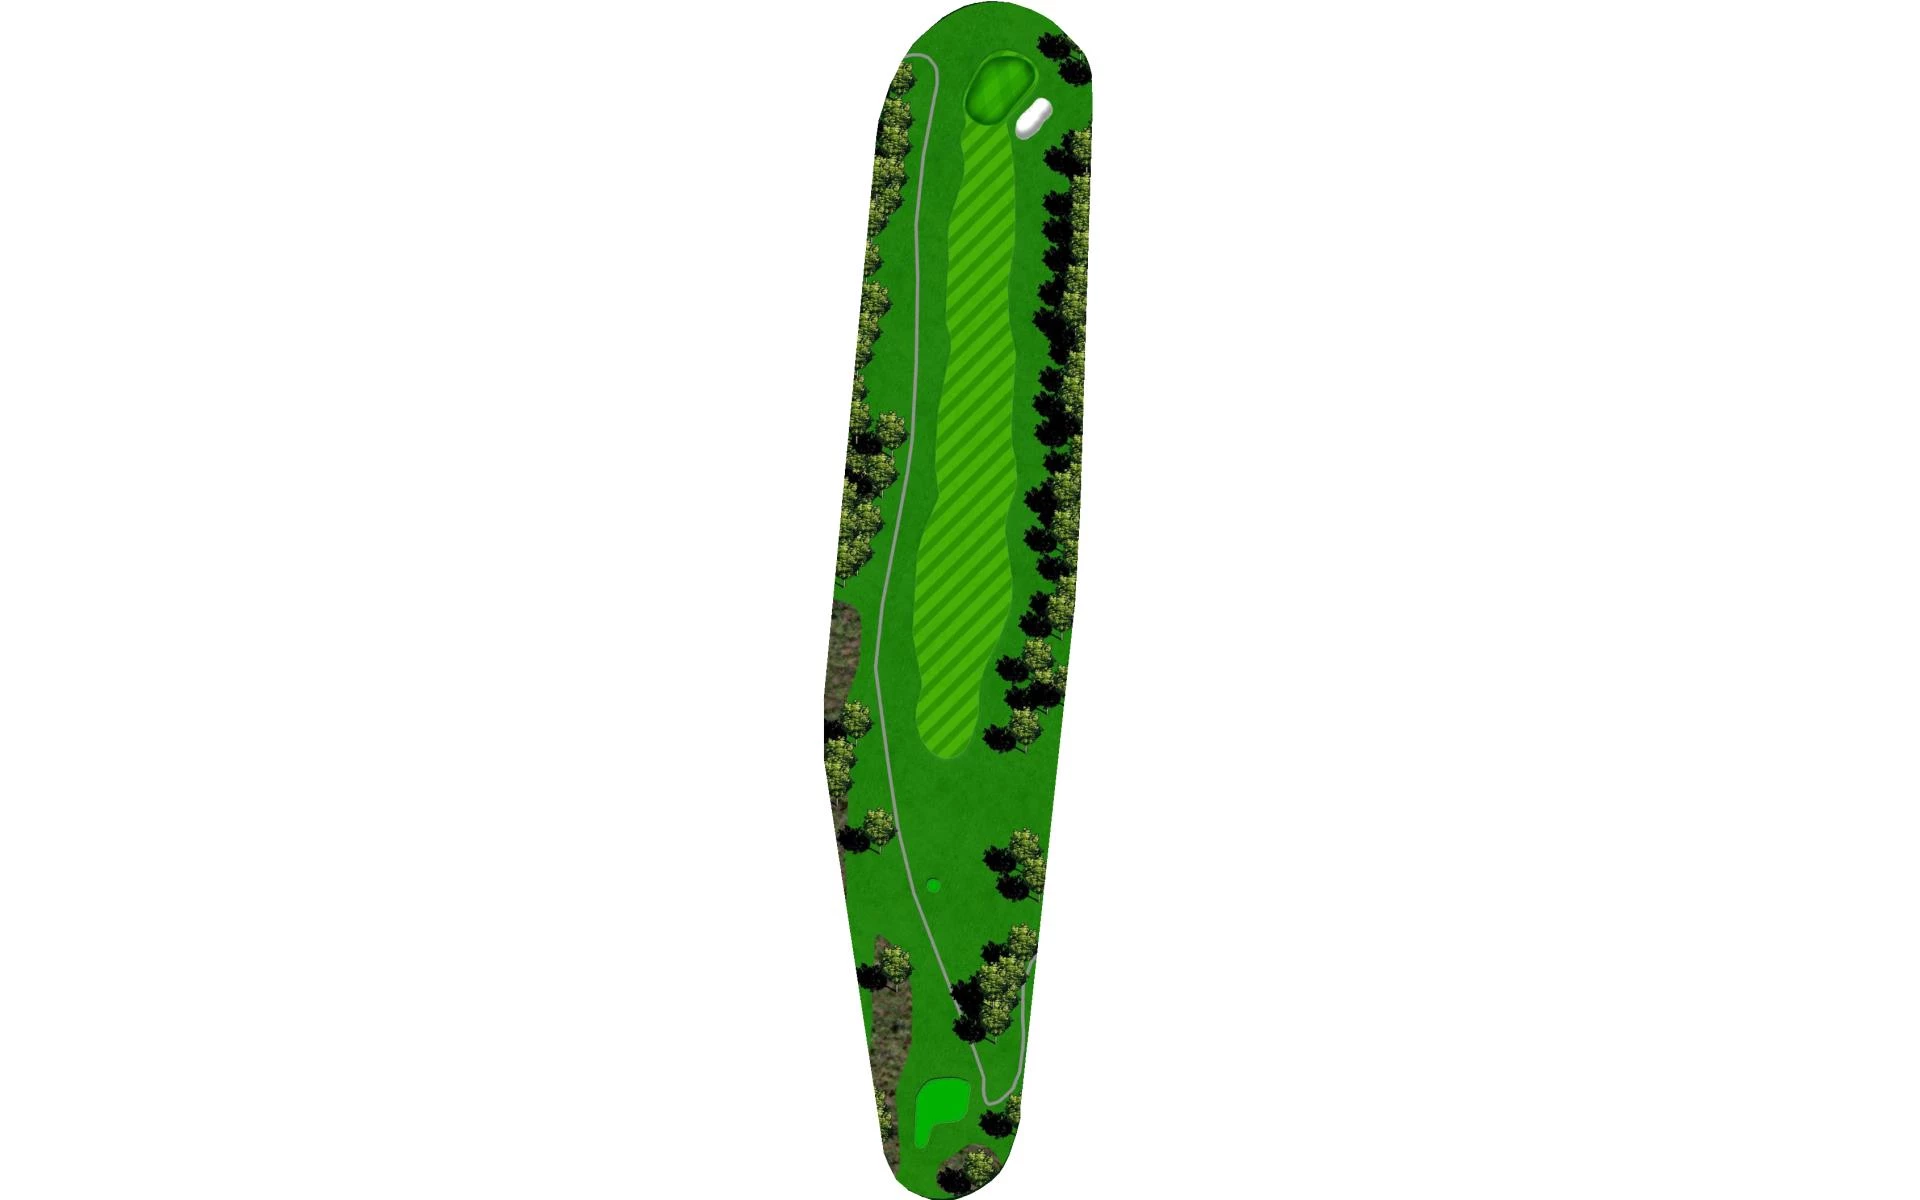
The wind can create a par 3 with multiple personalities here. Gauge the wind correctly and a generous putting surface awaits. Par is a great…
The wind can create a par 3 with multiple personalities here. Gauge the wind correctly and a generous putting surface awaits. Par is a great score on this hole.
Yardage by Tee:
BLACK 196
BLUE 186
WHITE 179
ORANGE 179
GREEN 172
LIGHT BLUE 139
YELLOW 139
Pro Tips
The wind can create a par 3 with multiple personalities here. Gauge the wind correctly and a generous putting surface awaits. Par is a great score on this hole.
# 5 /
Par: 4
Handicaps:
Men's 5
Women's 5
A slightly uphill tee shot is what you will find here. Avoid the fairway bunker on the right and use the slope of the fairway to kick your b…
A slightly uphill tee shot is what you will find here. Avoid the fairway bunker on the right and use the slope of the fairway to kick your ball down the fairway leaving a short iron approach into the green. The right side of the green is guarded by a greenside bunker. It can be difficult to get close to the pin on your approach shot, depending upon where the pin placement is.
Yardage by Tee:
BLACK 422
BLUE 402
WHITE 390
ORANGE 350
GREEN 350
LIGHT BLUE 297
YELLOW 297
Pro Tips
A slightly uphill tee shot is what you will find here. Avoid the fairway bunker on the right and use the slope of the fairway to kick your ball down the fairway leaving a short iron approach into the green. The right side of the green is guarded by a greenside bunker. It can be difficult to get close to the pin on your approach shot, depending upon where the pin placement is.
# 6 /
Par: 5
Handicaps:
Men's 1
Women's 7
An accurate tee shot is required on this Par 5 especially if you are looking to go for it in two – hitting the left center of fairway here i…
An accurate tee shot is required on this Par 5 especially if you are looking to go for it in two – hitting the left center of fairway here is a must! Setting yourself up for your third shot is key as the fairway runs out just shy of 100 yards from the green. Deep greenside bunkers protect this smaller green that is sloped from back to front.
Yardage by Tee:
BLACK 525
BLUE 510
WHITE 497
ORANGE 497
GREEN 462
LIGHT BLUE 415
YELLOW 415
Pro Tips
An accurate tee shot is required on this Par 5 especially if you are looking to go for it in two – hitting the left-center of the fairway here is a must! Setting yourself up for your third shot is key as the fairway runs out just shy of 100 yards from the green. Deep greenside bunkers protect this smaller green that is sloped from back to front.
# 7 /
Par: 3
Handicaps:
Men's 17
Women's 17
Club selection on this par 3 is key. The hole tends to look shorter from the elevated tee but play too far right or left and the golfer find…
Club selection on this par 3 is key. The hole tends to look shorter from the elevated tee but play too far right or left and the golfer finds sand. Too deep and they will have a difficult downhill chip to the hole. Smart golfers play to the middle and hope for a two-putt par.
Yardage by Tee:
BLACK 193
BLUE 179
WHITE 170
ORANGE 137
GREEN 137
LIGHT BLUE 137
YELLOW 131
Pro Tips
Club selection on this par 3 is key. The hole tends to look shorter from the elevated tee but play too far right or left and the golfer finds sand. Too deep and they will have a difficult downhill chip to the hole. Smart golfers play to the middle and hope for a two-putt par.
# 8 /
Par: 4
Handicaps:
Men's 1
Women's 3
Hole #8 starts a four-hole stretch that our Members affectionately call the “Chantilly Mile.” The longest par 4 on the course requires two g…
Hole #8 starts a four-hole stretch that our Members affectionately call the “Chantilly Mile.” The longest par 4 on the course requires two good shots to hit the green. Your drive must miss fairway bunkers guarding both the right and left sides. This hole has a medium-sized, well-bunkered green that is very difficult to read.
Yardage by Tee:
BLACK 460
BLUE 437
WHITE 425
ORANGE 397
GREEN 387
LIGHT BLUE 342
YELLOW 337
Pro Tips
Hole #8 starts a four-hole stretch that our Members affectionately call the “Chantilly Mile.” The longest par 4 on the course requires two good shots to hit the green. Your drive must miss fairway bunkers guarding both the right and left sides. This hole has a medium-sized, well-bunkered green that is very difficult to read.
# 9 /
Par: 4
Handicaps:
Men's 3
Women's 9
The second longest Par 4 at Chantilly requires a good drive off the tee. Avoid the left side of the hole as it will make your approach into …
The second longest Par 4 at Chantilly requires a good drive off the tee. Avoid the left side of the hole as it will make your approach into this hole even longer. Play your drive down the right center of the fairway, since the fairway should feed to the left. Big hitters will challenge the fairway bunker to the right, leaving a much shorter approach if you find the fairway on the other side. A well-played second shot doesn’t necessarily leave the player with a good birdie opportunity as this green includes a false front and, depending on the pin location, some very difficult putts.
Yardage by Tee:
BLACK 454
BLUE 420
WHITE 425
ORANGE 397
GREEN 387
LIGHT BLUE 342
YELLOW 319
Pro Tips
The second-longest Par 4 at Chantilly requires a good drive off the tee. Avoid the left side of the hole as it will make your approach into this hole even longer. Play your drive down the right-center of the fairway, since the fairway should feed to the left. Big hitters will challenge the fairway bunker to the right, leaving a much shorter approach if you find the fairway on the other side. A well-played second shot doesn’t necessarily leave the player with a good birdie opportunity as this green includes a false front and, depending on the pin location, some very difficult putts.
# 10 /
Par: 4
Handicaps:
Men's 6
Women's 4
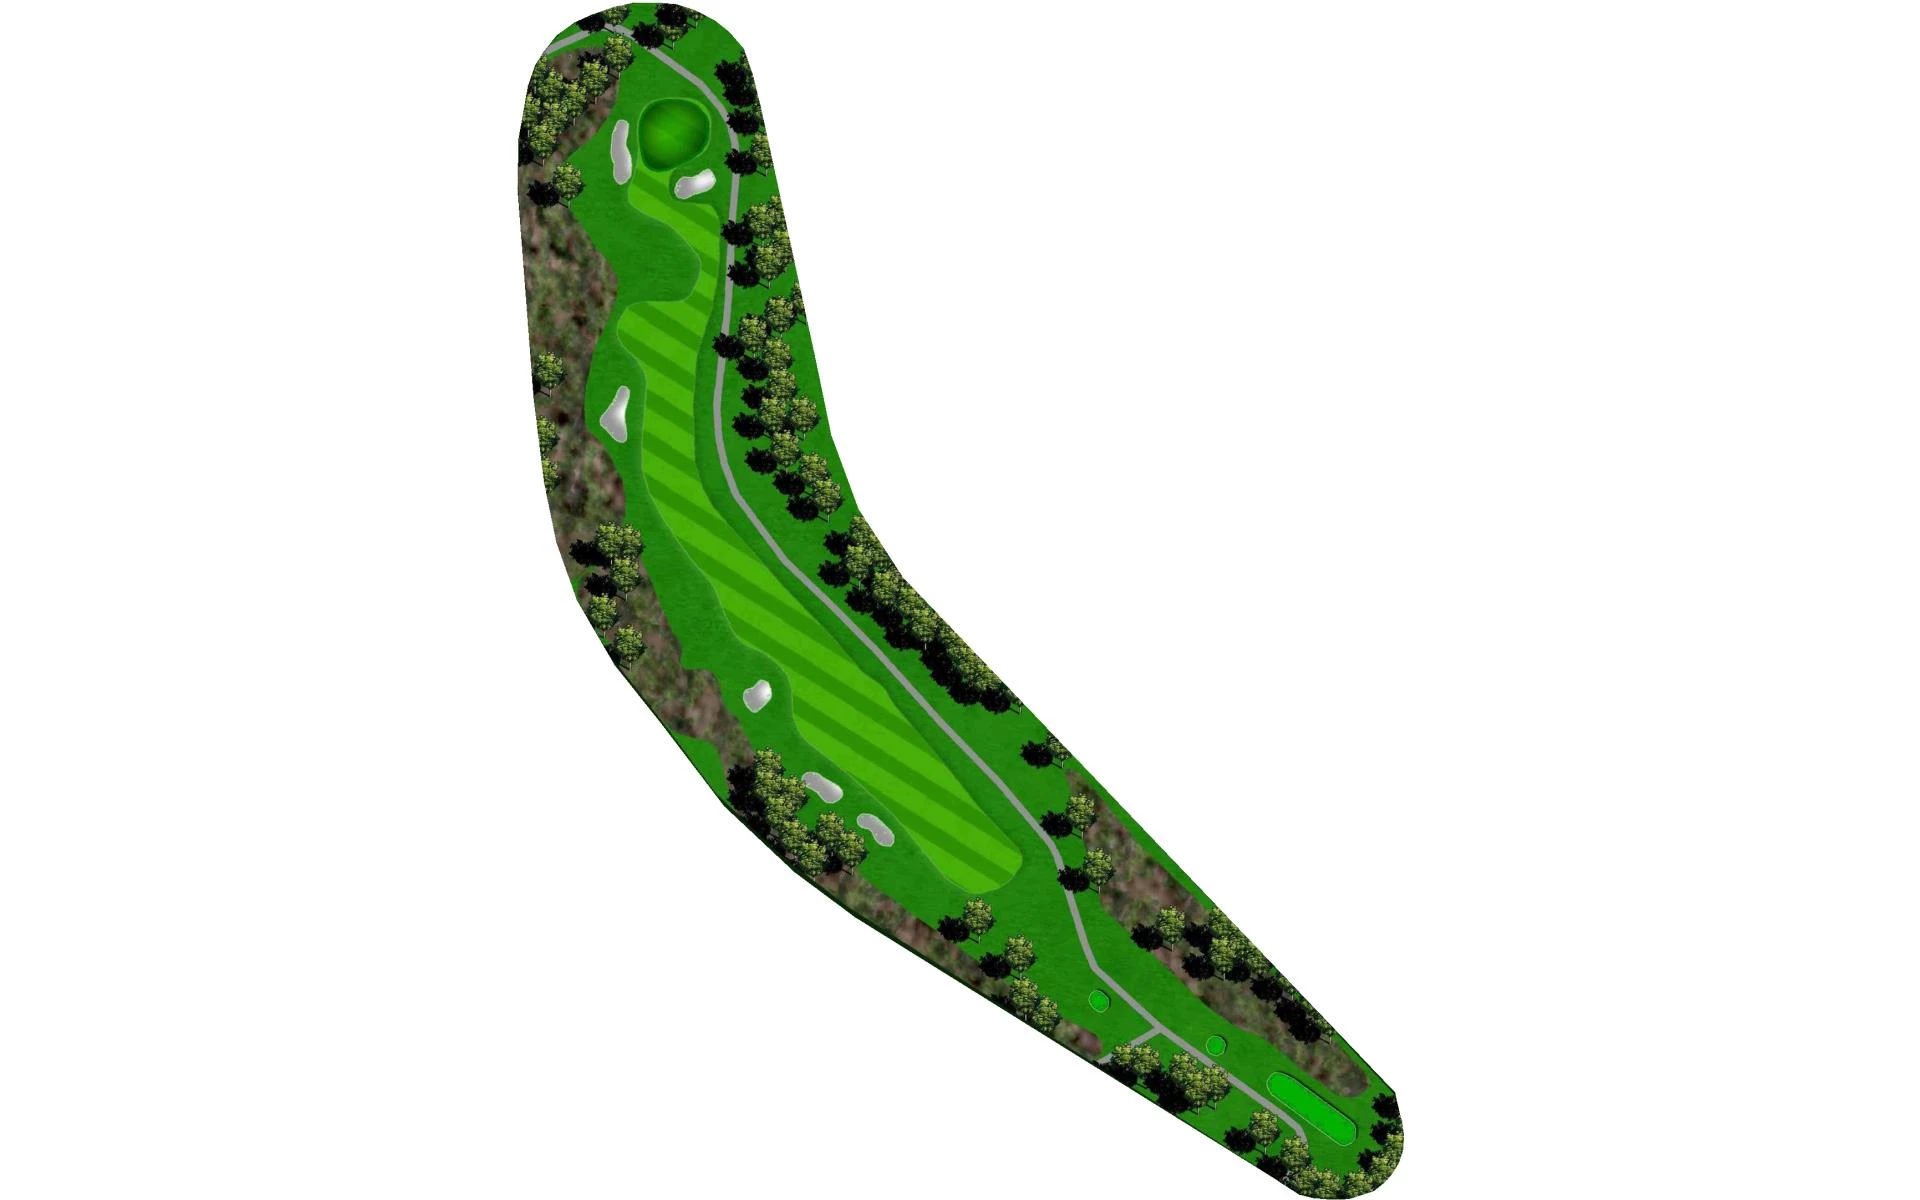
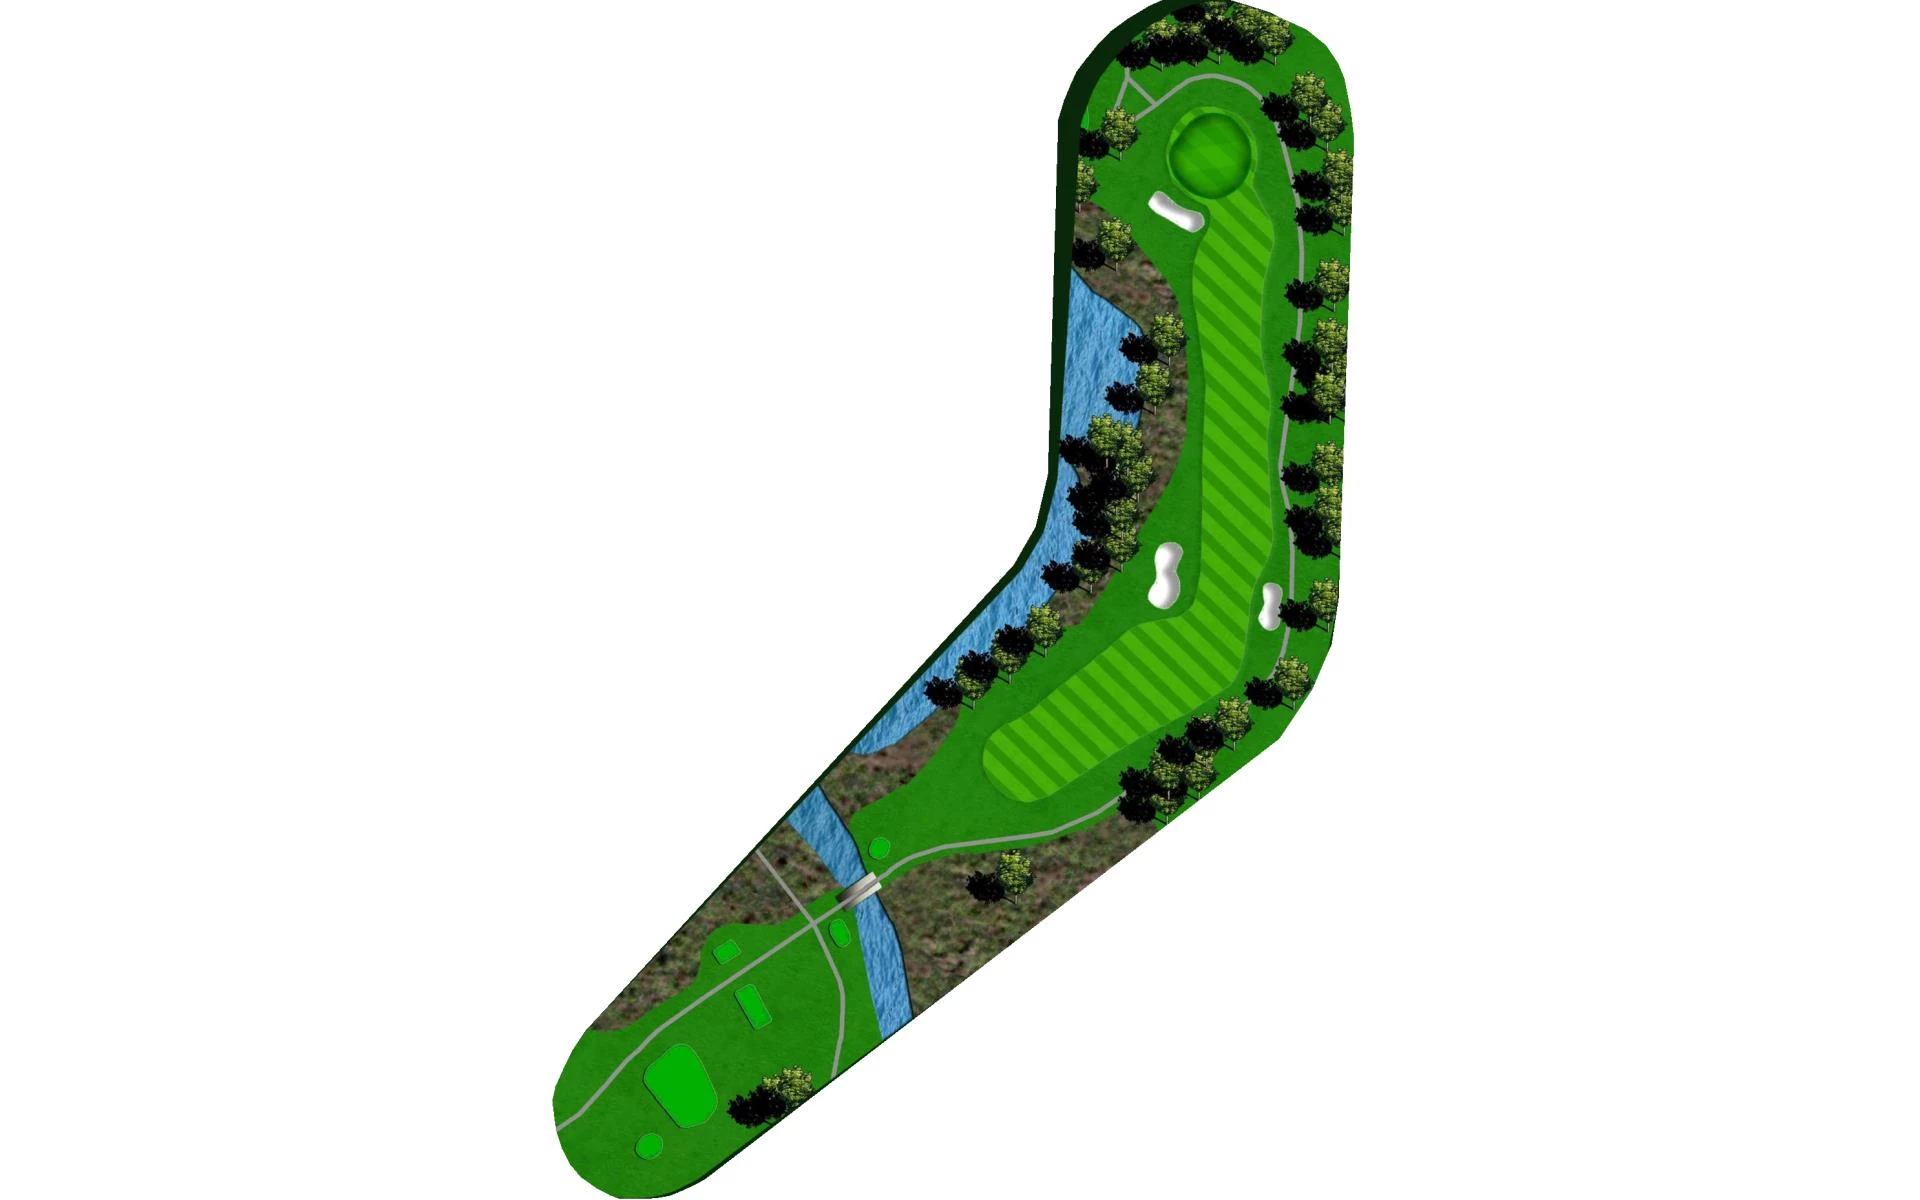
The back nine welcomes golfers with a beautiful but demanding dogleg-left par 4. Place your tee shot between the left and right fairway bunk…
The back nine welcomes golfers with a beautiful but demanding dogleg-left par 4. Place your tee shot between the left and right fairway bunkers, though big hitters can cut the dogleg by challenging the left fairway bunker, leaving a short iron-to-wedge approach to the green. Avoid going left as Lake Chantilly awaits to collect errant shots.
Yardage by Tee:
BLACK 422
BLUE 404
WHITE 388
ORANGE 356
GREEN 356
LIGHT BLUE 322
YELLOW 296
Pro Tips
The back nine welcomes golfers with a beautiful but demanding dogleg-left par 4. Place your tee shot between the left and right fairway bunkers, though big hitters can cut the dogleg by challenging the left fairway bunker, leaving a short iron-to-wedge approach to the green. Avoid going left as Lake Chantilly awaits to collect errant shots.
# 11 /
Par: 4
Handicaps:
Men's 2
Women's 14
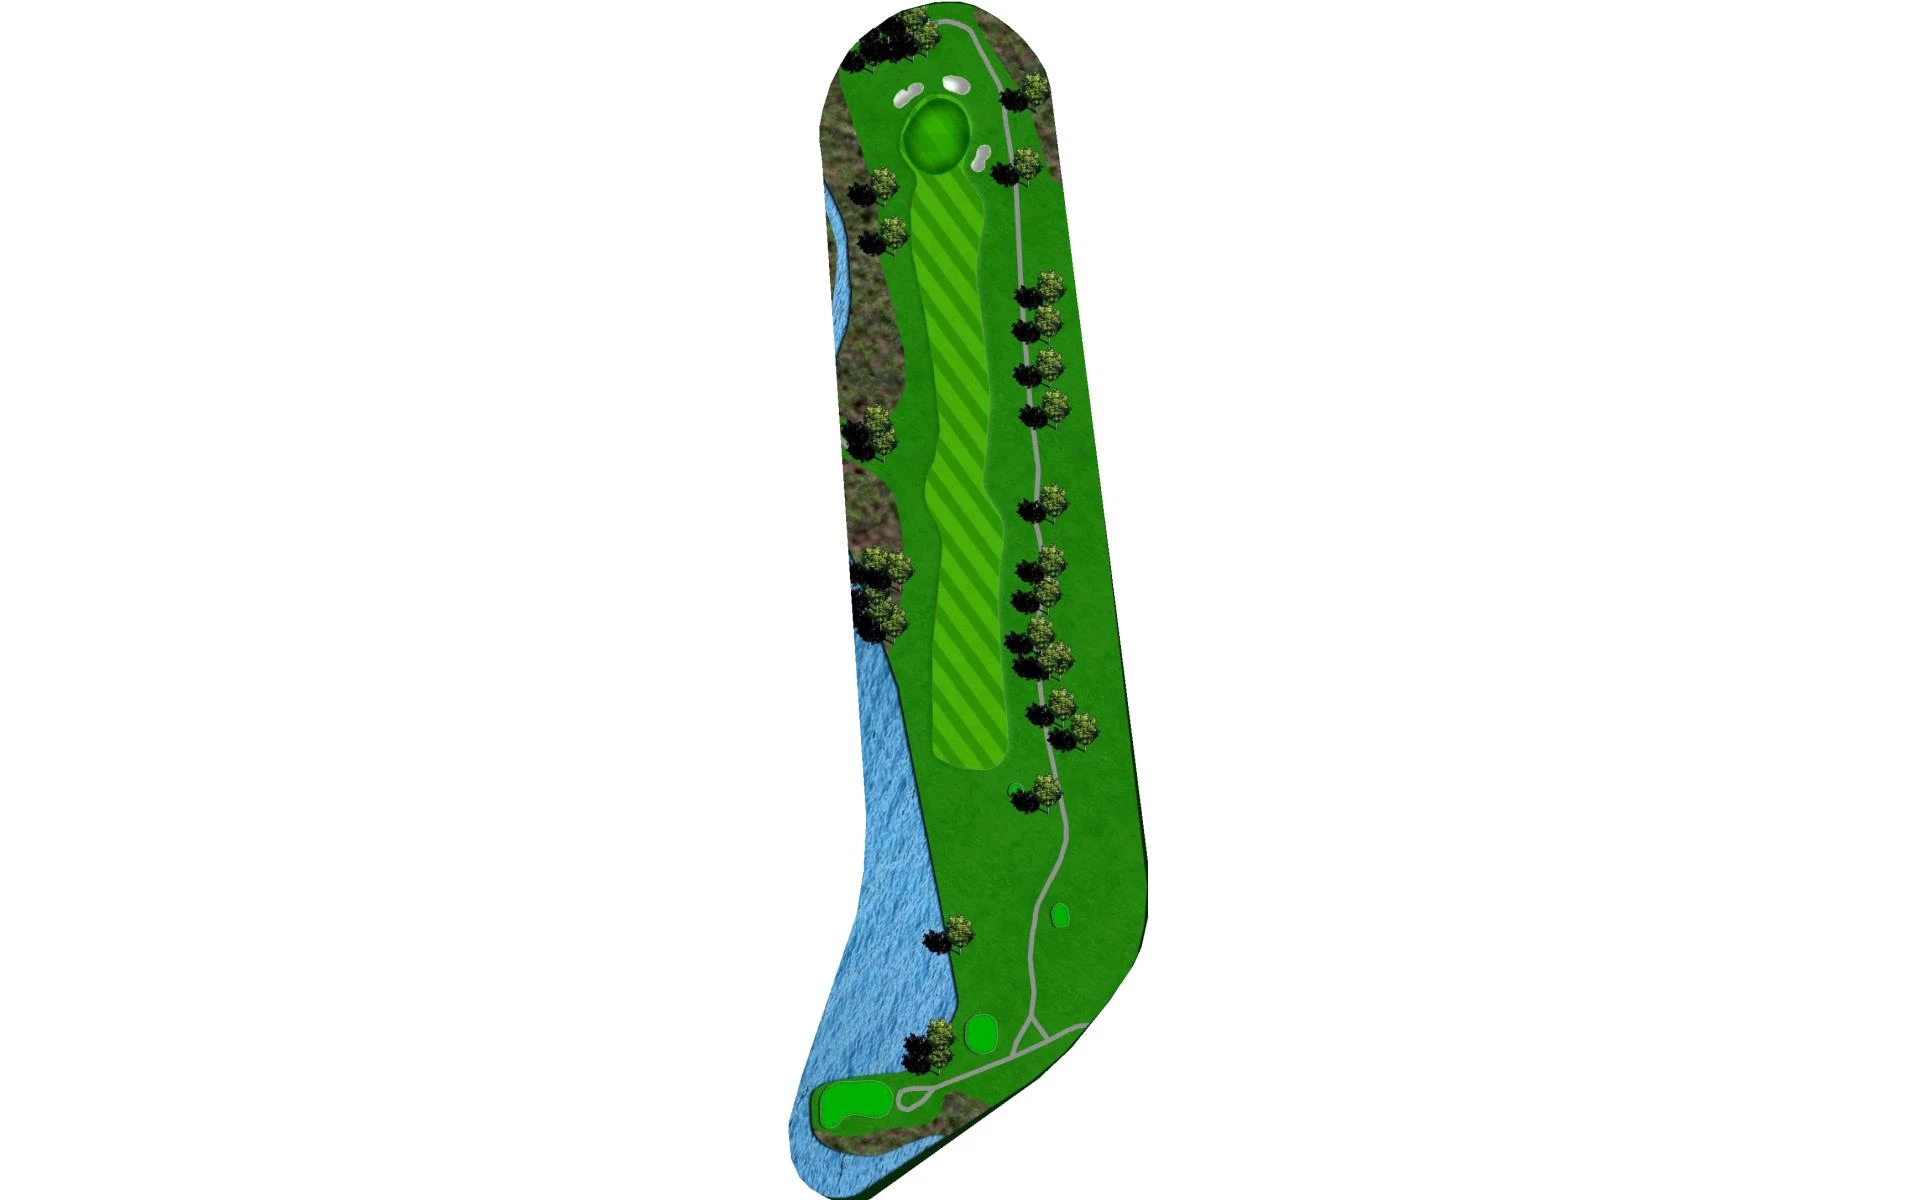
Tee box selection is critical on the last hole of the “Chantilly Mile.” The Black and Blue tee boxes make the hole dogleg left with a diffic…
Tee box selection is critical on the last hole of the “Chantilly Mile.” The Black and Blue tee boxes make the hole dogleg left with a difficult tee shot that requires the golfer to negotiate a portion of Lake Chantilly. More forward tees make this hole a demanding straight-away par 4. Trees down the right side of the fairway and Lake Chantilly to the left make accuracy a must on your tee shot here. Find the fairway and a large green awaits your approach shot.
Yardage by Tee:
BLACK 452
BLUE 439
WHITE 407
ORANGE 365
GREEN 365
LIGHT BLUE 365
YELLOW 299
Pro Tips
Tee box selection is critical on the last hole of the “Chantilly Mile.” The Black and Blue tee boxes make the hole dogleg left with a difficult tee shot that requires the golfer to negotiate a portion of Lake Chantilly. More forward tees make this hole a demanding straight-away par 4. Trees down the right side of the fairway and Lake Chantilly to the left make accuracy a must on your tee shot here. Find the fairway and a large green awaits your approach shot.
# 12 / / Signature Hole
Par: 3
Handicaps:
Men's 12
Women's 18
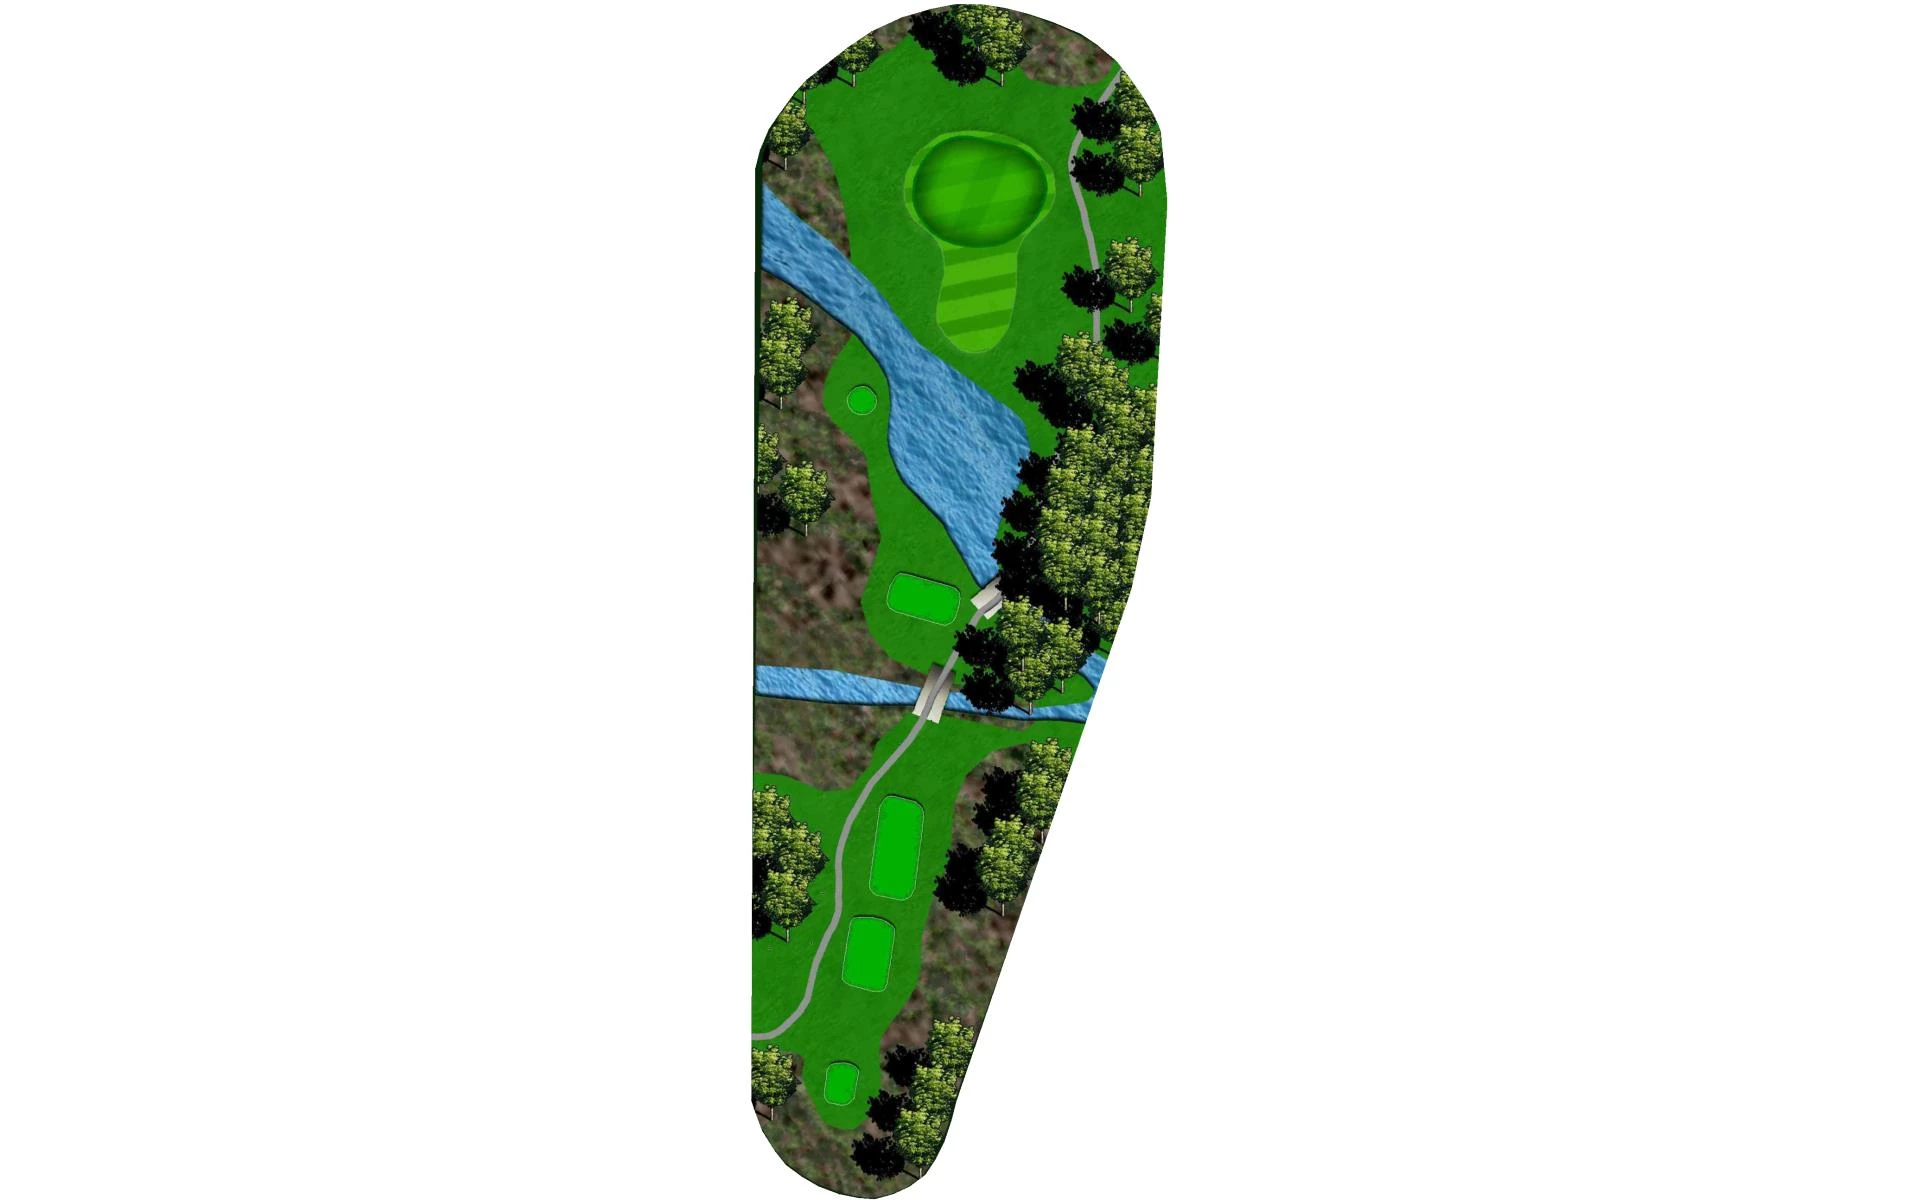
Chantilly’s Signature Hole - This par 3 is set on the bottom side of Lake Chantilly and plays over the creek that is created by the lake's s…
Chantilly’s Signature Hole - This par 3 is set on the bottom side of Lake Chantilly and plays over the creek that is created by the lake's spillway. A tree guards the right side of this generous green that slopes from back to front. The large green makes three putting a possibility.
Yardage by Tee:
BLACK 222
BLUE 192
WHITE 187
ORANGE 187
GREEN 163
LIGHT BLUE 102
YELLOW 102
Pro Tips
Chantilly’s Signature Hole - This par 3 is set on the bottom side of Lake Chantilly and plays over the creek that is created by the lake's spillway. A tree guards the right side of this generous green that slopes from back to front. The large green makes three putting a possibility.
# 13 /
Par: 5
Handicaps:
Men's 8
Women's 12
Big drivers can try to unleash one here. Play to the left center of the fairway off the tee of this monster par 5 for a better angle on your…
Big drivers can try to unleash one here. Play to the left center of the fairway off the tee of this monster par 5 for a better angle on your second shot. Big hitters can carry it over the hill of the landing area leaving them with an opportunity for reaching the green in two. The smart play is laying up to just past the dogleg for your second shot, leaving you a wedge into this green. The green has a large mound in the back of it making back pin locations difficult to putt to.
Yardage by Tee:
BLACK 568
BLUE 525
WHITE 521
ORANGE 458
GREEN 458
LIGHT BLUE 458
YELLOW 417
Pro Tips
Big drivers can try to unleash one here. Play to the left-center of the fairway off the tee of this monster par 5 for a better angle on your second shot. Big hitters can carry it over the hill of the landing area leaving them with an opportunity for reaching the green in two. The smart play is laying up to just past the dogleg for your second shot, leaving you a wedge into this green. The green has a large mound in the back of it making back pin locations difficult to putt to.
# 14 /
Par: 3
Handicaps:
Men's 18
Women's 16
The shortest par 3 here can play both easy and hard depending on your tee shot. The green is protected in front by three large bunkers that …
The shortest par 3 here can play both easy and hard depending on your tee shot. The green is protected in front by three large bunkers that gobble up tee shots that were not struck properly. Fly the ball too deep into the green and your ball will roll off the back of a green that slopes away from you. The easiest hole on the golf course by handicap but be careful! There are a number of difficult pin placements that could stretch that birdie into a bogie.
Yardage by Tee:
BLACK 193
BLUE 146
WHITE 138
ORANGE 138
GREEN 130
LIGHT BLUE 108
YELLOW 108
Pro Tips
The shortest par 3 here can play both easy and hard depending on your tee shot. The green is protected in front by three large bunkers that gobble up tee shots that were not struck properly. Fly the ball too deep into the green and your ball will roll off the back of a green that slopes away from you. The easiest hole on the golf course by handicap but be careful! There are a number of difficult pin placements that could stretch that birdie into a bogie.
# 15 /
Par: 4
Handicaps:
Men's 10
Women's 2
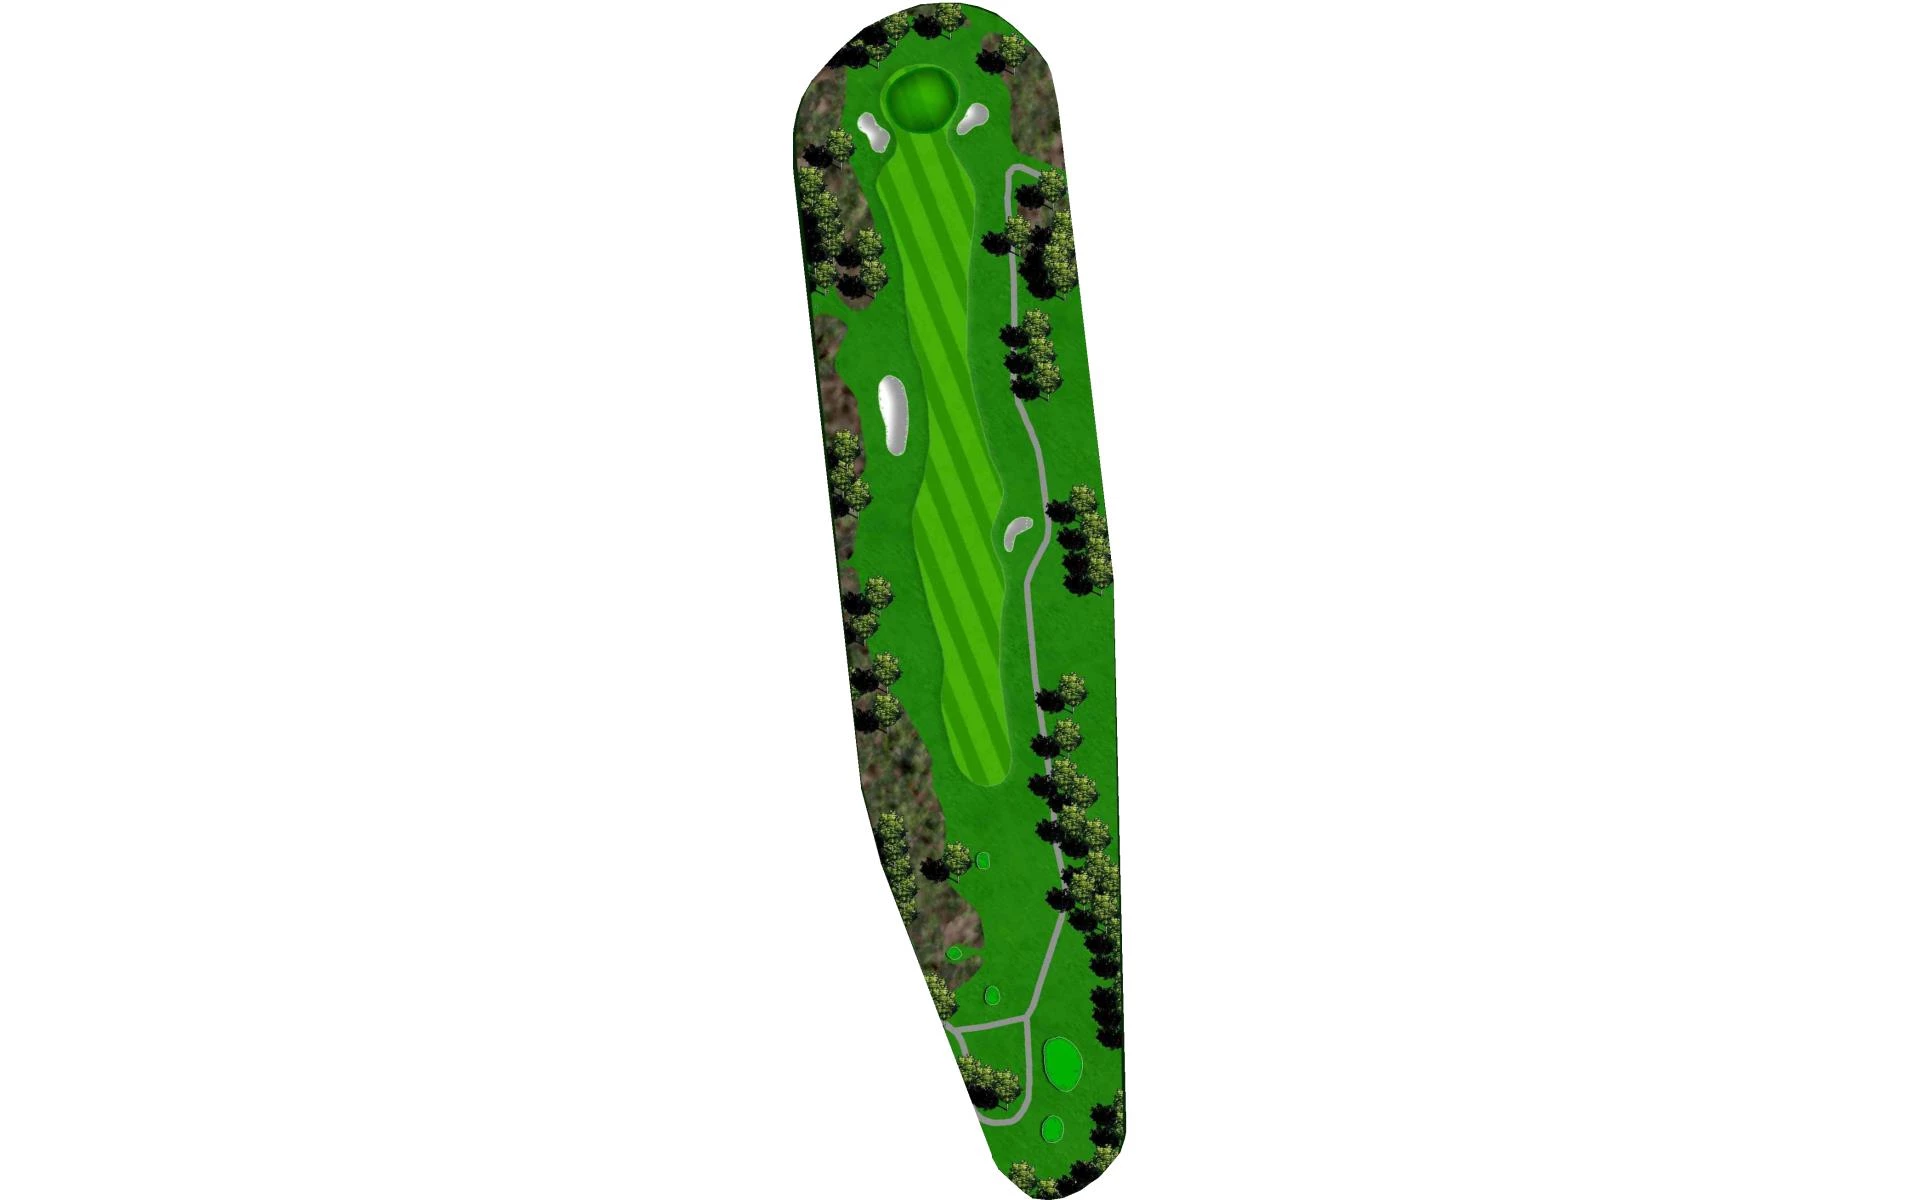
Trees line both sides of the entire length of this par 4. A generous fairway allows you to “grip it and rip it.” Fairway bunkers guard the r…
Trees line both sides of the entire length of this par 4. A generous fairway allows you to “grip it and rip it.” Fairway bunkers guard the right side. The key to this hole is a successful uphill approach shot to a well-guarded green. Play enough club to get to the center for a chance at a par.
Yardage by Tee:
BLACK 392
BLUE 382
WHITE 368
ORANGE 368
GREEN 317
LIGHT BLUE 291
YELLOW 291
Pro Tips
Trees line both sides of the entire length of this par 4. A generous fairway allows you to “grip it and rip it.” Fairway bunkers guard the right side. The key to this hole is a successful uphill approach shot to a well-guarded green. Play enough club to get to the center for a chance at par.
# 16 /
Par: 4
Handicaps:
Men's 4
Women's 8
Hole location will dramatically dictate which side of the fairway you will favor with your tee shot. Trees line both sides of the fairway ag…
Hole location will dramatically dictate which side of the fairway you will favor with your tee shot. Trees line both sides of the fairway again making finding the fairway here key to a successful approach shot to a severely sloped green. Par here is a good score.
Yardage by Tee:
BLACK 448
BLUE 417
WHITE 401
ORANGE 401
GREEN 365
LIGHT BLUE 315
YELLOW 315
Pro Tips
Hole location will dramatically dictate which side of the fairway you will favor with your tee shot. Trees line both sides of the fairway again making finding the fairway here key to a successful approach shot to a severely sloped green. Par here is a good score.
# 17 /
Par: 5
Handicaps:
Men's 14
Women's 6
The tee shot on this par five is best kept to the left side of the fairway. Only the longest hitters can reach this green in two, but they m…
The tee shot on this par five is best kept to the left side of the fairway. Only the longest hitters can reach this green in two, but they must avoid a fairway bunker 60 yards short of the green and a deep greenside bunker to reach the front of the green. The smart play is laying back to a comfortable wedge shot to a relative large flat green.
Yardage by Tee:
BLACK 530
BLUE 501
WHITE 486
ORANGE 486
GREEN 445
LIGHT BLUE 437
YELLOW 384
Pro Tips
The tee shot on this par five is best kept to the left side of the fairway. Only the longest hitters can reach this green in two, but they must avoid a fairway bunker 60 yards short of the green and a deep greenside bunker to reach the front of the green. The smart play is laying back to a comfortable wedge shot to a relative large flat green.
# 18 /
Par: 4
Handicaps:
Men's 16
Women's 10
The home hole is a gentle dogleg right par 4. The drive is played over a marsh area before the start of the fairway. The smart play on this …
The home hole is a gentle dogleg right par 4. The drive is played over a marsh area before the start of the fairway. The smart play on this hole is playing a tee shot to the landing area on the top plateau of the fairway. This leaves a short iron to wedge approach to the green. Big hitters will be tempted to carry the right fairway bunkers leaving a much shorter approach. Miss the fairway here and par is no easy score. The generously sized green allows for a number of pin placements. And if negotiating this finishing hole is not hard enough - did we mention the added pressure of everyone dining on patio watching you finish your round.
Yardage by Tee:
BLACK 406
BLUE 365
WHITE 344
ORANGE 284
GREEN 284
LIGHT BLUE 284
YELLOW 265
Pro Tips
The home hole is a gentle dogleg right par 4. The drive is played over a marsh area before the start of the fairway. The smart play on this hole is playing a tee shot to the landing area on the top plateau of the fairway. This leaves a short iron to wedge approach to the green. Big hitters will be tempted to carry the right fairway bunkers leaving a much shorter approach. Miss the fairway here and par is no easy score. The generously sized green allows for a number of pin placements. And if negotiating this finishing hole is not hard enough - did we mention the added pressure of everyone dining on the patio watching you finish your round.