Cherry Valley Country Club Golf Course
Designer: Rees Jones
Cherry Valley is home to an 18-hole Rees Jones designed golf course. Known for its undulated greens, contoured fairways, and pristine condit…
Cherry Valley is home to an 18-hole Rees Jones designed golf course. Known for its undulated greens, contoured fairways, and pristine condition, Cherry Valley leaves a lasting impression on all who tee it up. The course offers a great combination of challenge and enjoyment for players of all skill levels. You’ll find plenty of opportunities to take some risks and experience the reward of a great shot.
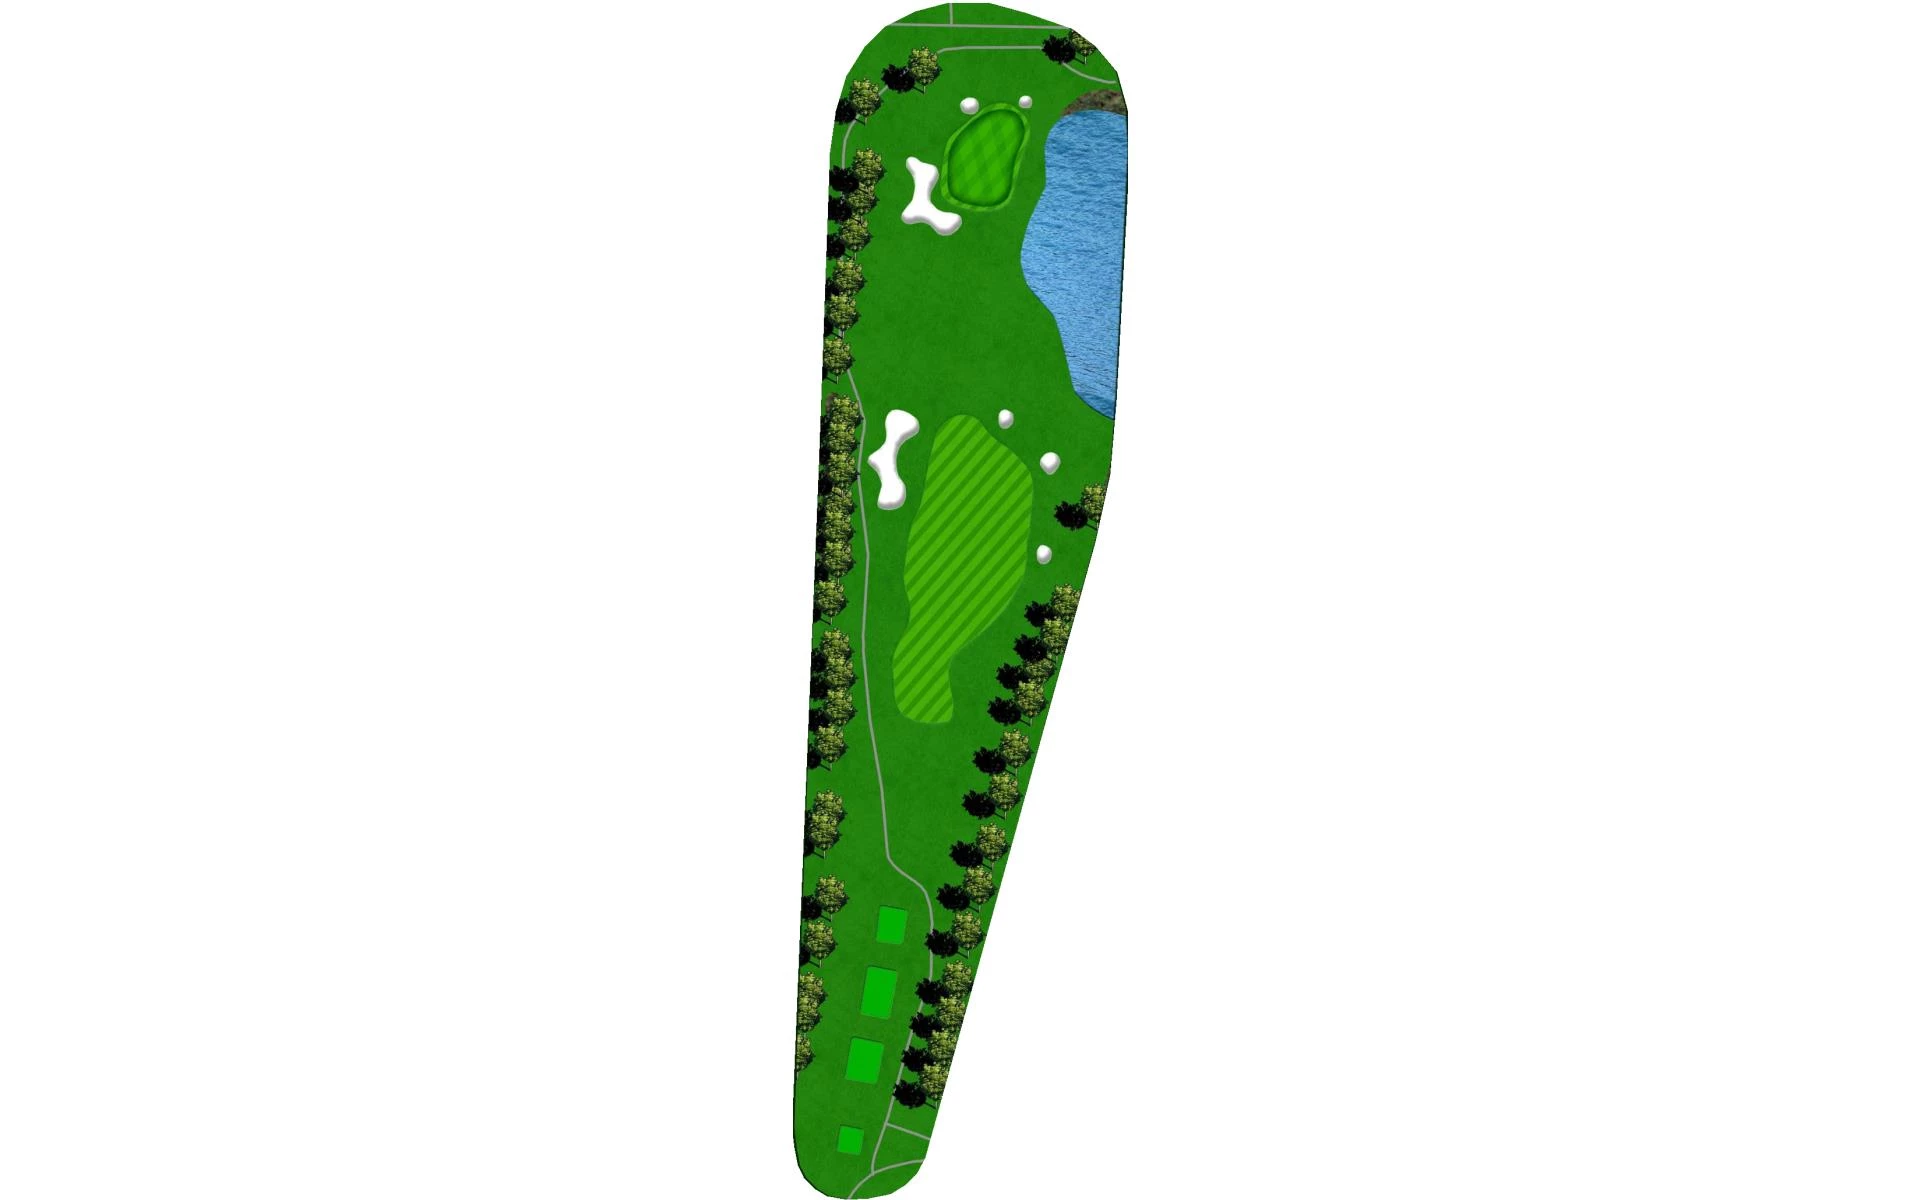
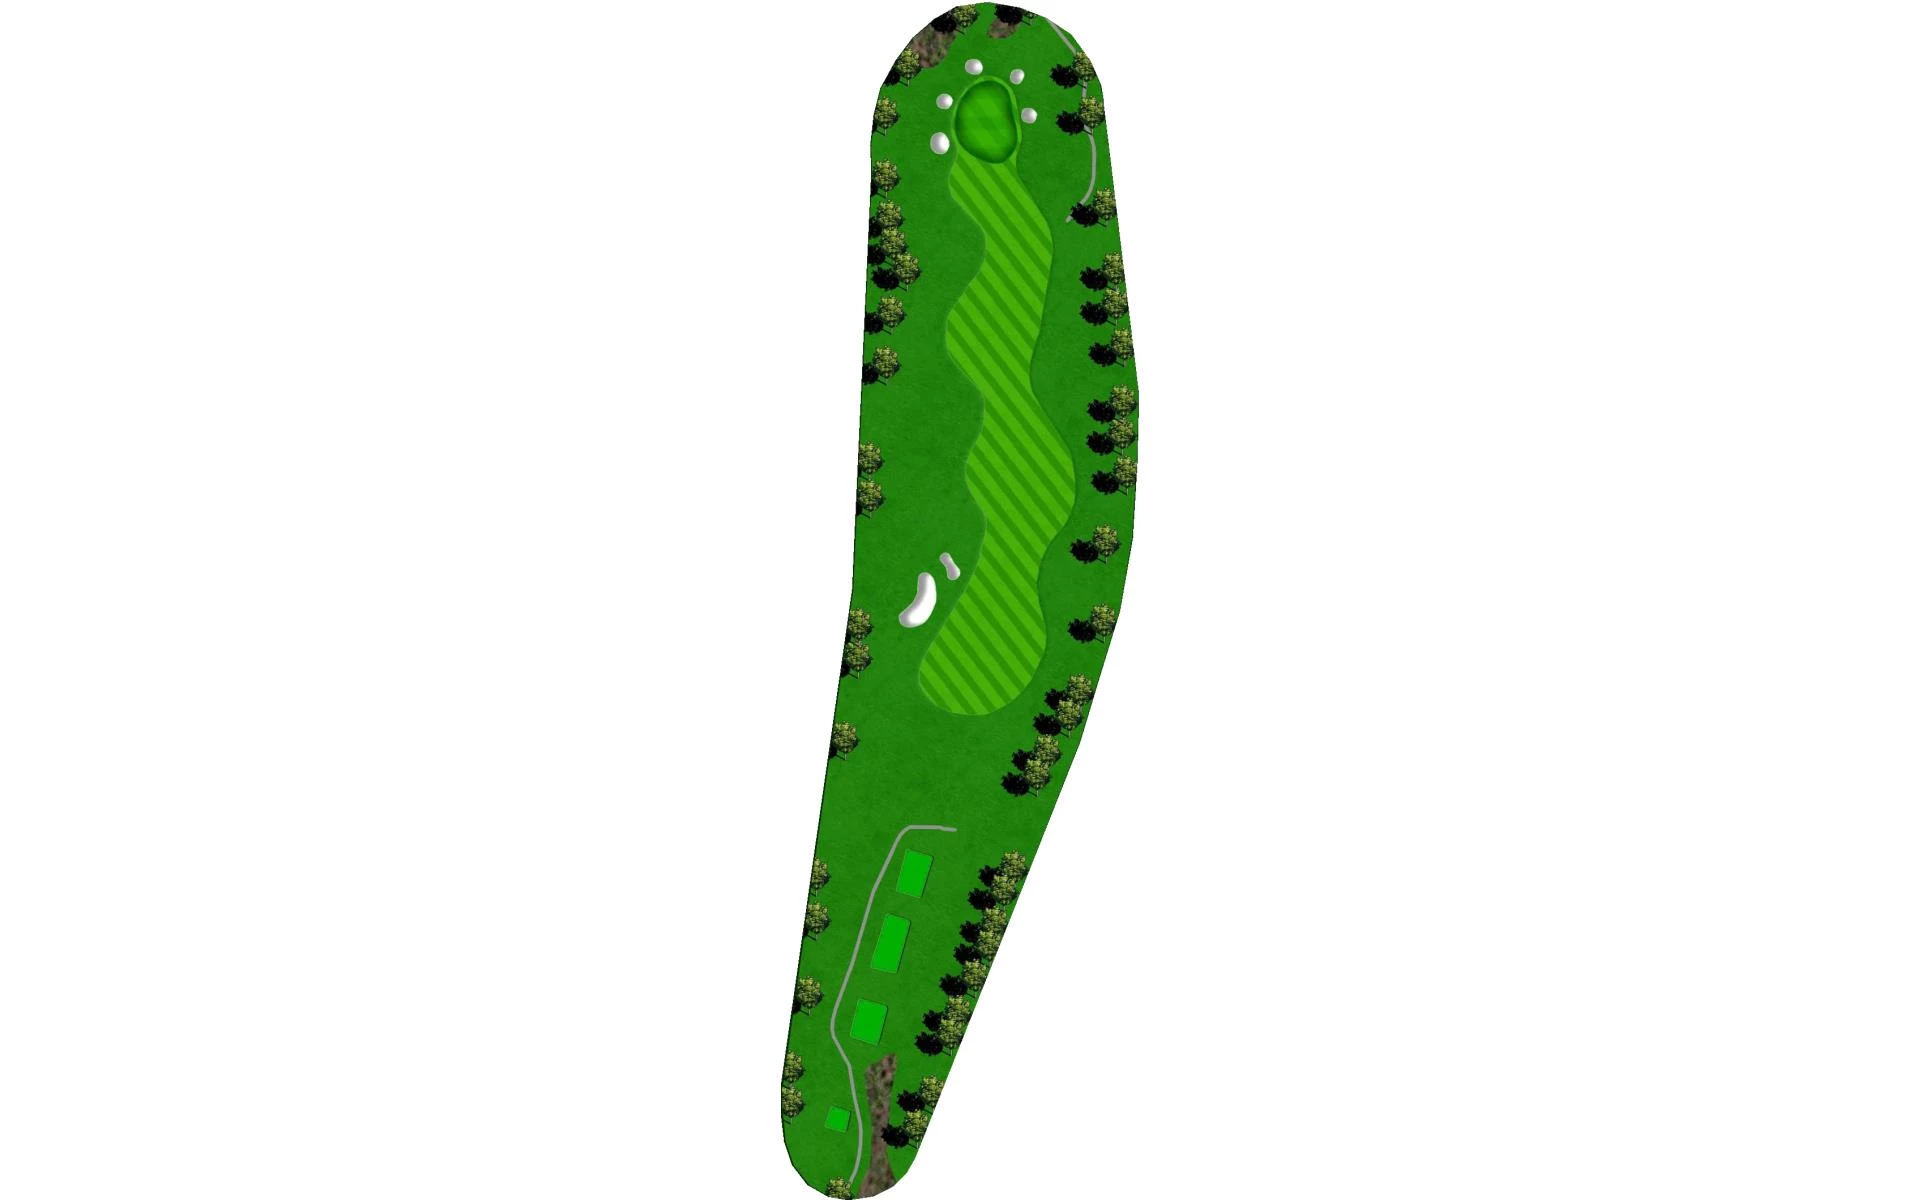
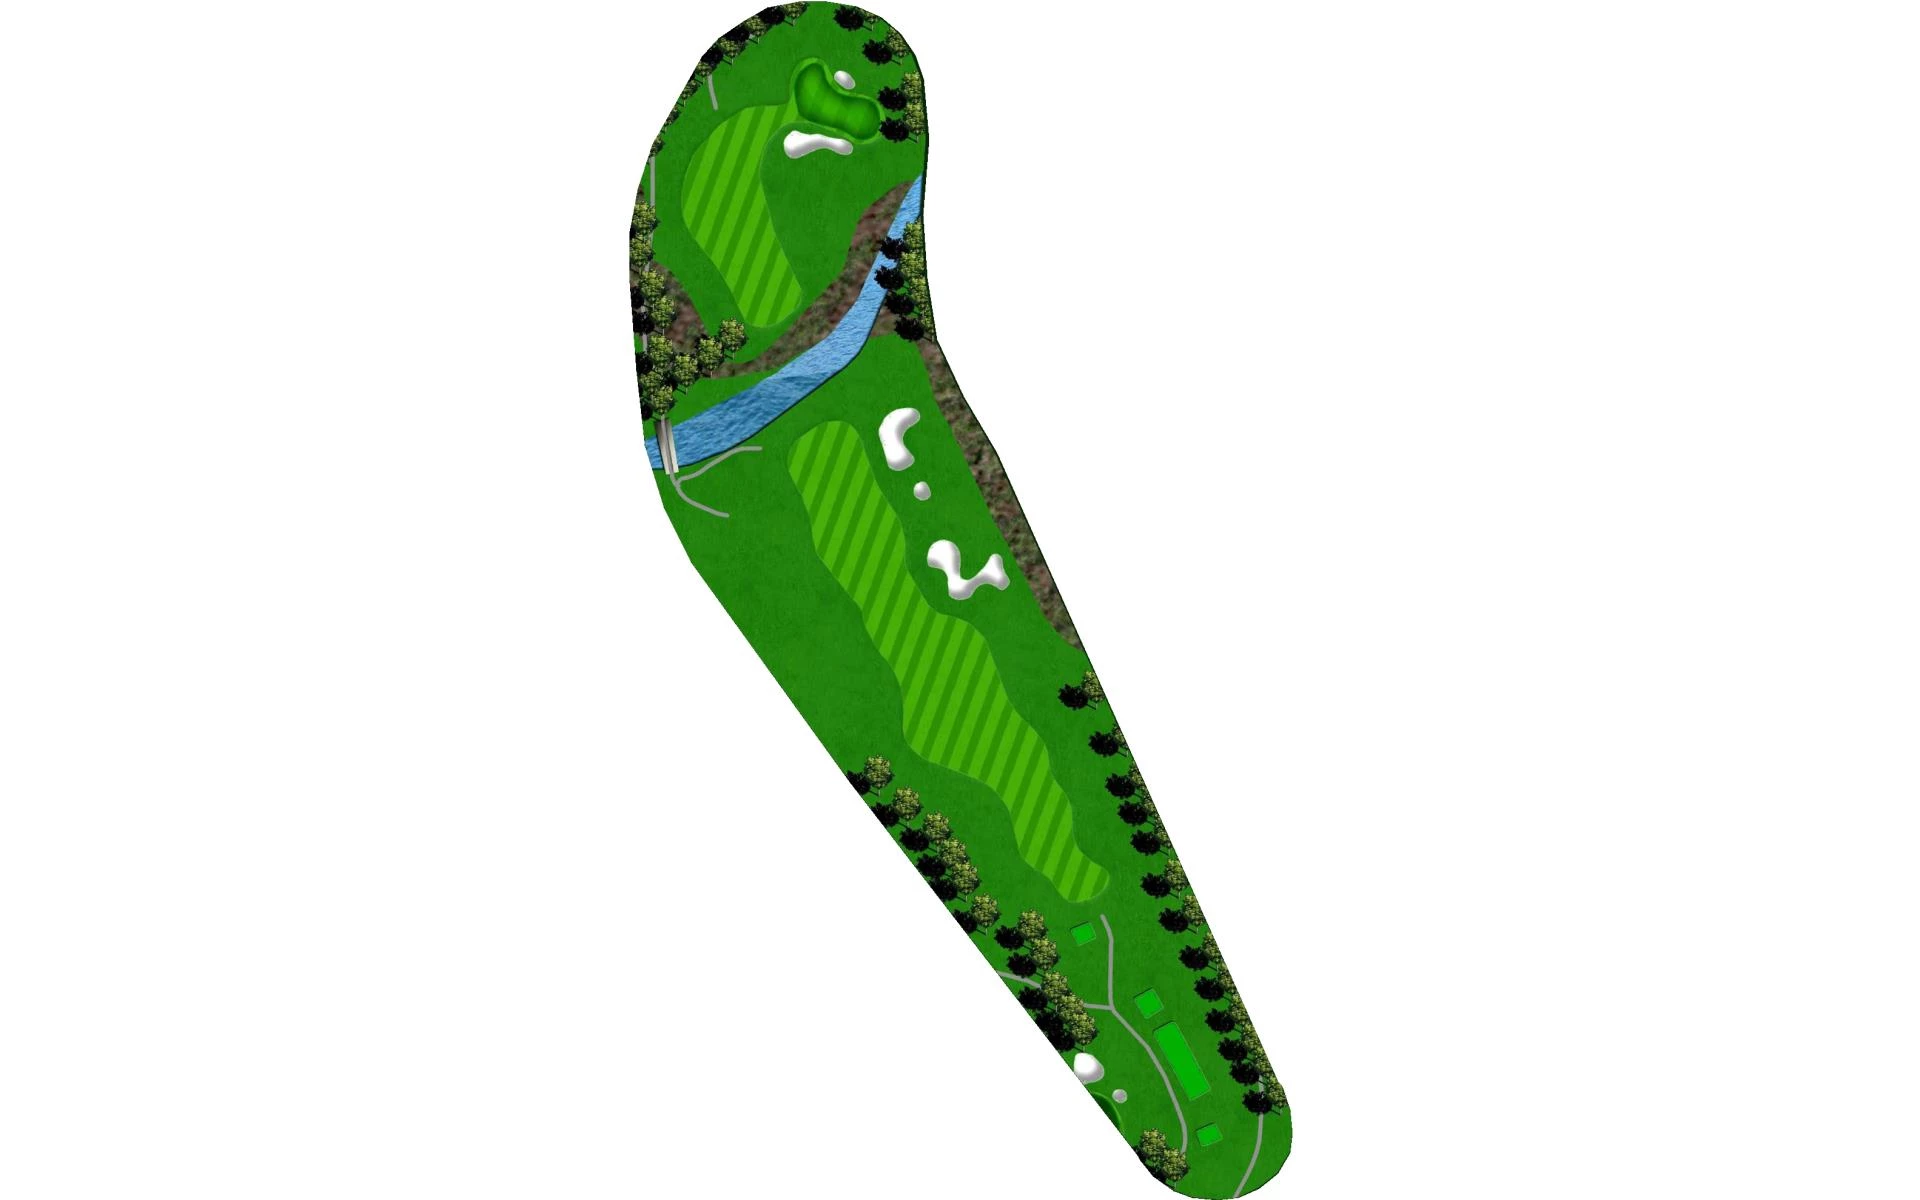
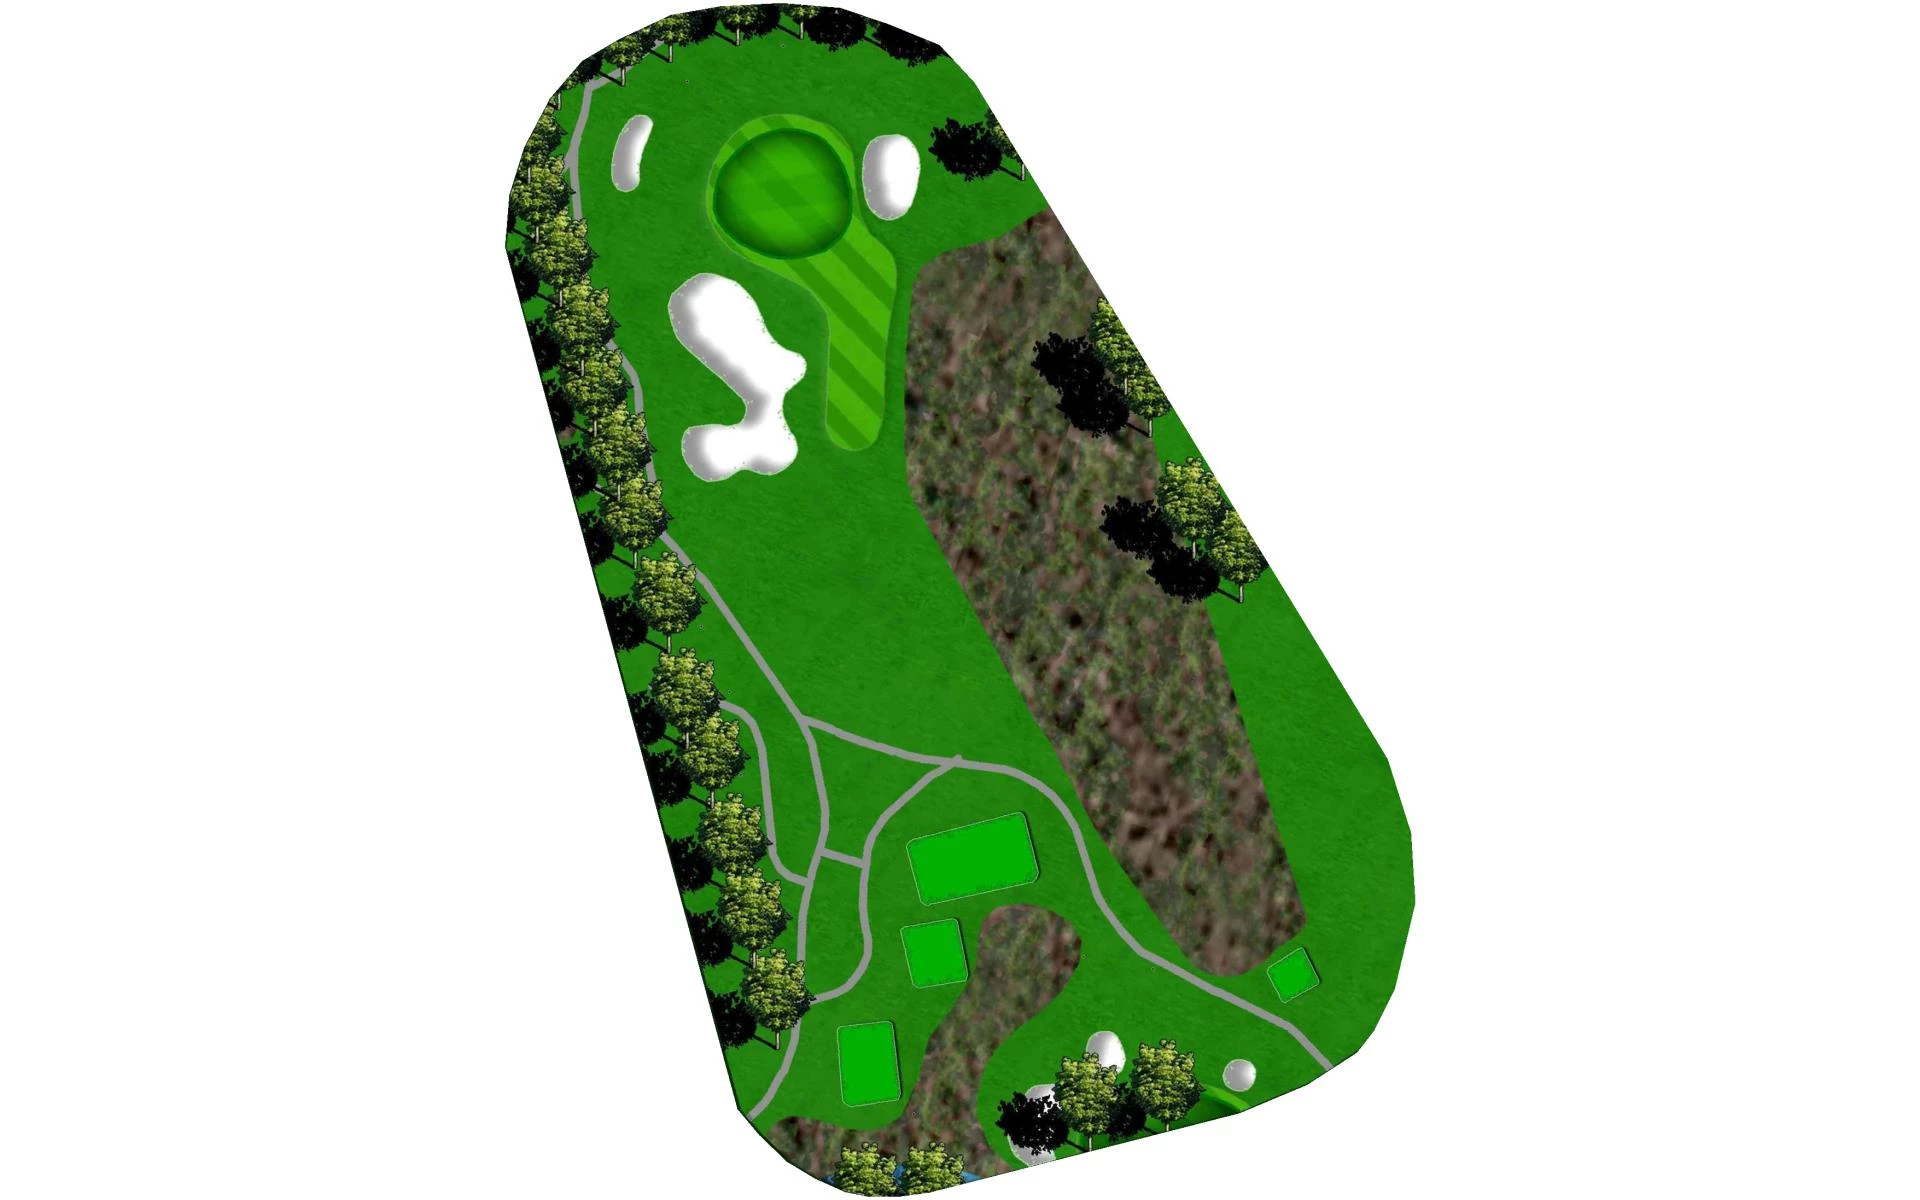
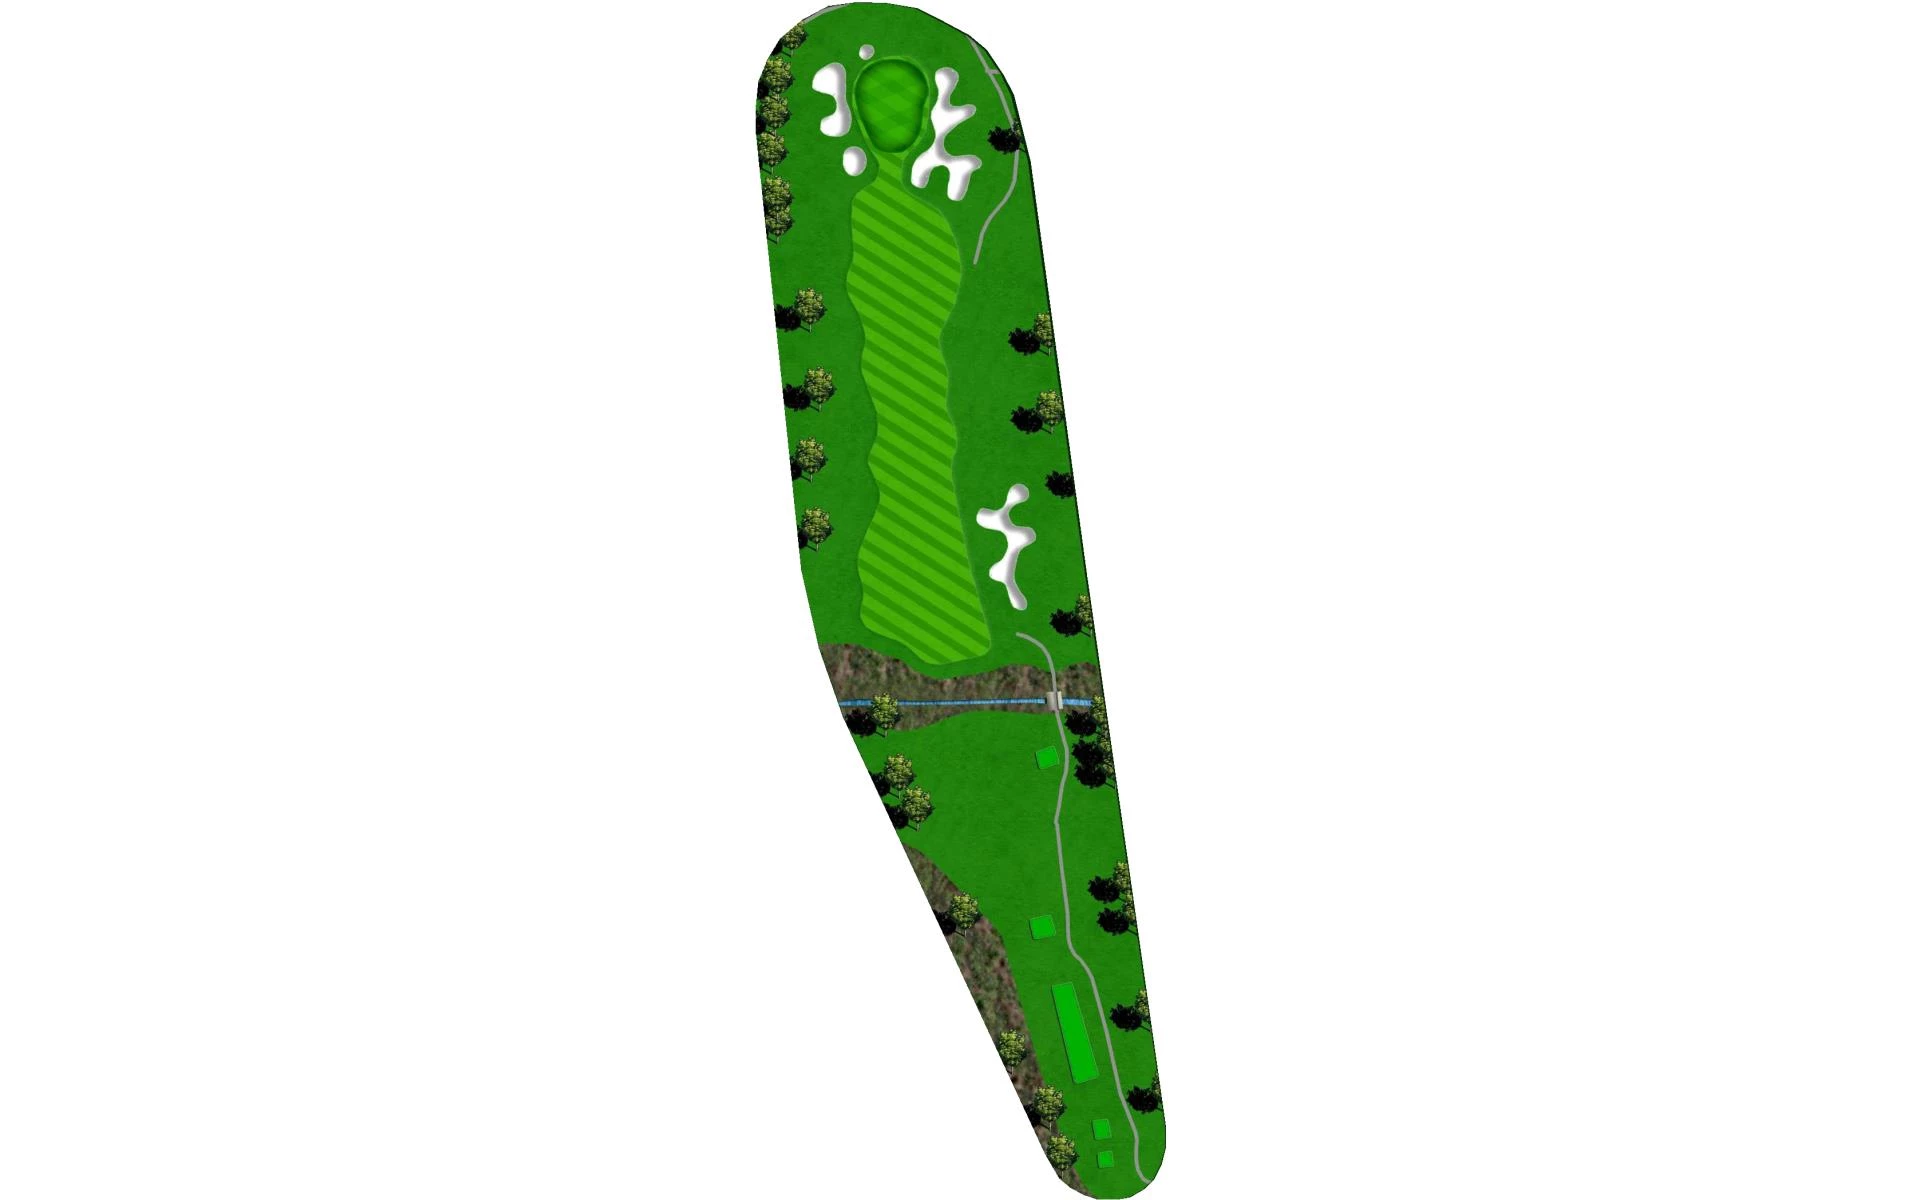
# 1 / Hole #1
Par: 4
Handicaps:
Men's 14
Women's 14
Yardage by Tee:
BLUE 391
GREEN 332
RED 303
REES 391
WHITE 358
Pro Tips
The opening hole eases you into the round with a straightforward par 4 that can easily be reached by longer hitters with a long iron off the tee. Your approach shot will require you to avoid both bunkers and a pond off to the right side of the green.
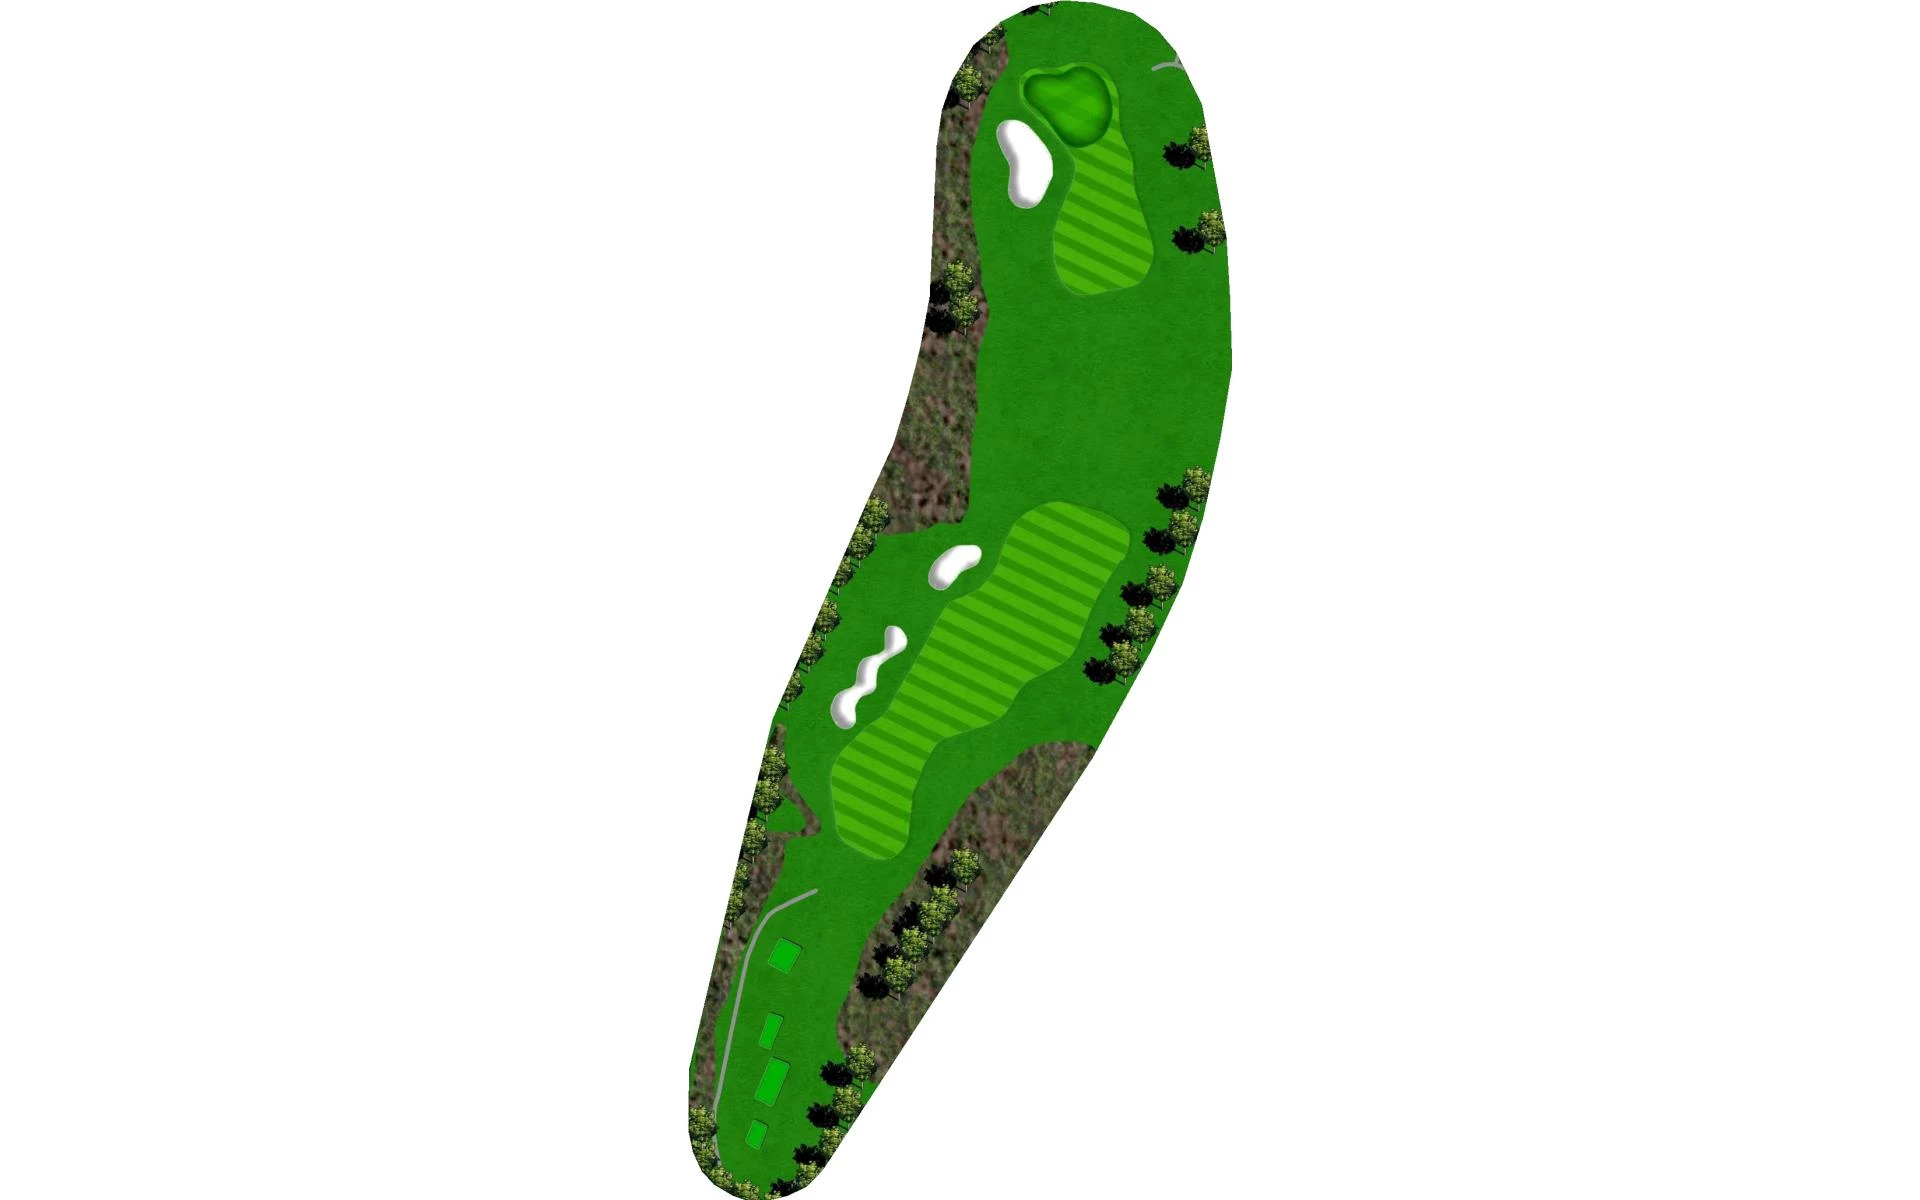
# 2 / Hole #2
Par: 3
Handicaps:
Men's 8
Women's 18
Yardage by Tee:
BLUE 211
GREEN 179
RED 100
REES 211
WHITE 187
Pro Tips
The best strategy on this long par 3 is to stay below the hole to leave yourself a manageable putt at birdie. If you do miss the green, make sure it’s not long and left, because you’ll have a challenging up-and-down to save par.
# 3 / Hole #3
Par: 5
Handicaps:
Men's 10
Women's 4
Yardage by Tee:
BLUE 545
GREEN 487
RED 439
REES 545
WHITE 526
Pro Tips
Reaching this par 5 in two proves to be a challenge for most players due to the mounds featured throughout. On your second shot, be sure to avoid a large bunker down the right side, as that will complicate your third. The green on this hole is the largest on the course, but has a sizeable ridge which makes for some tricky pins.
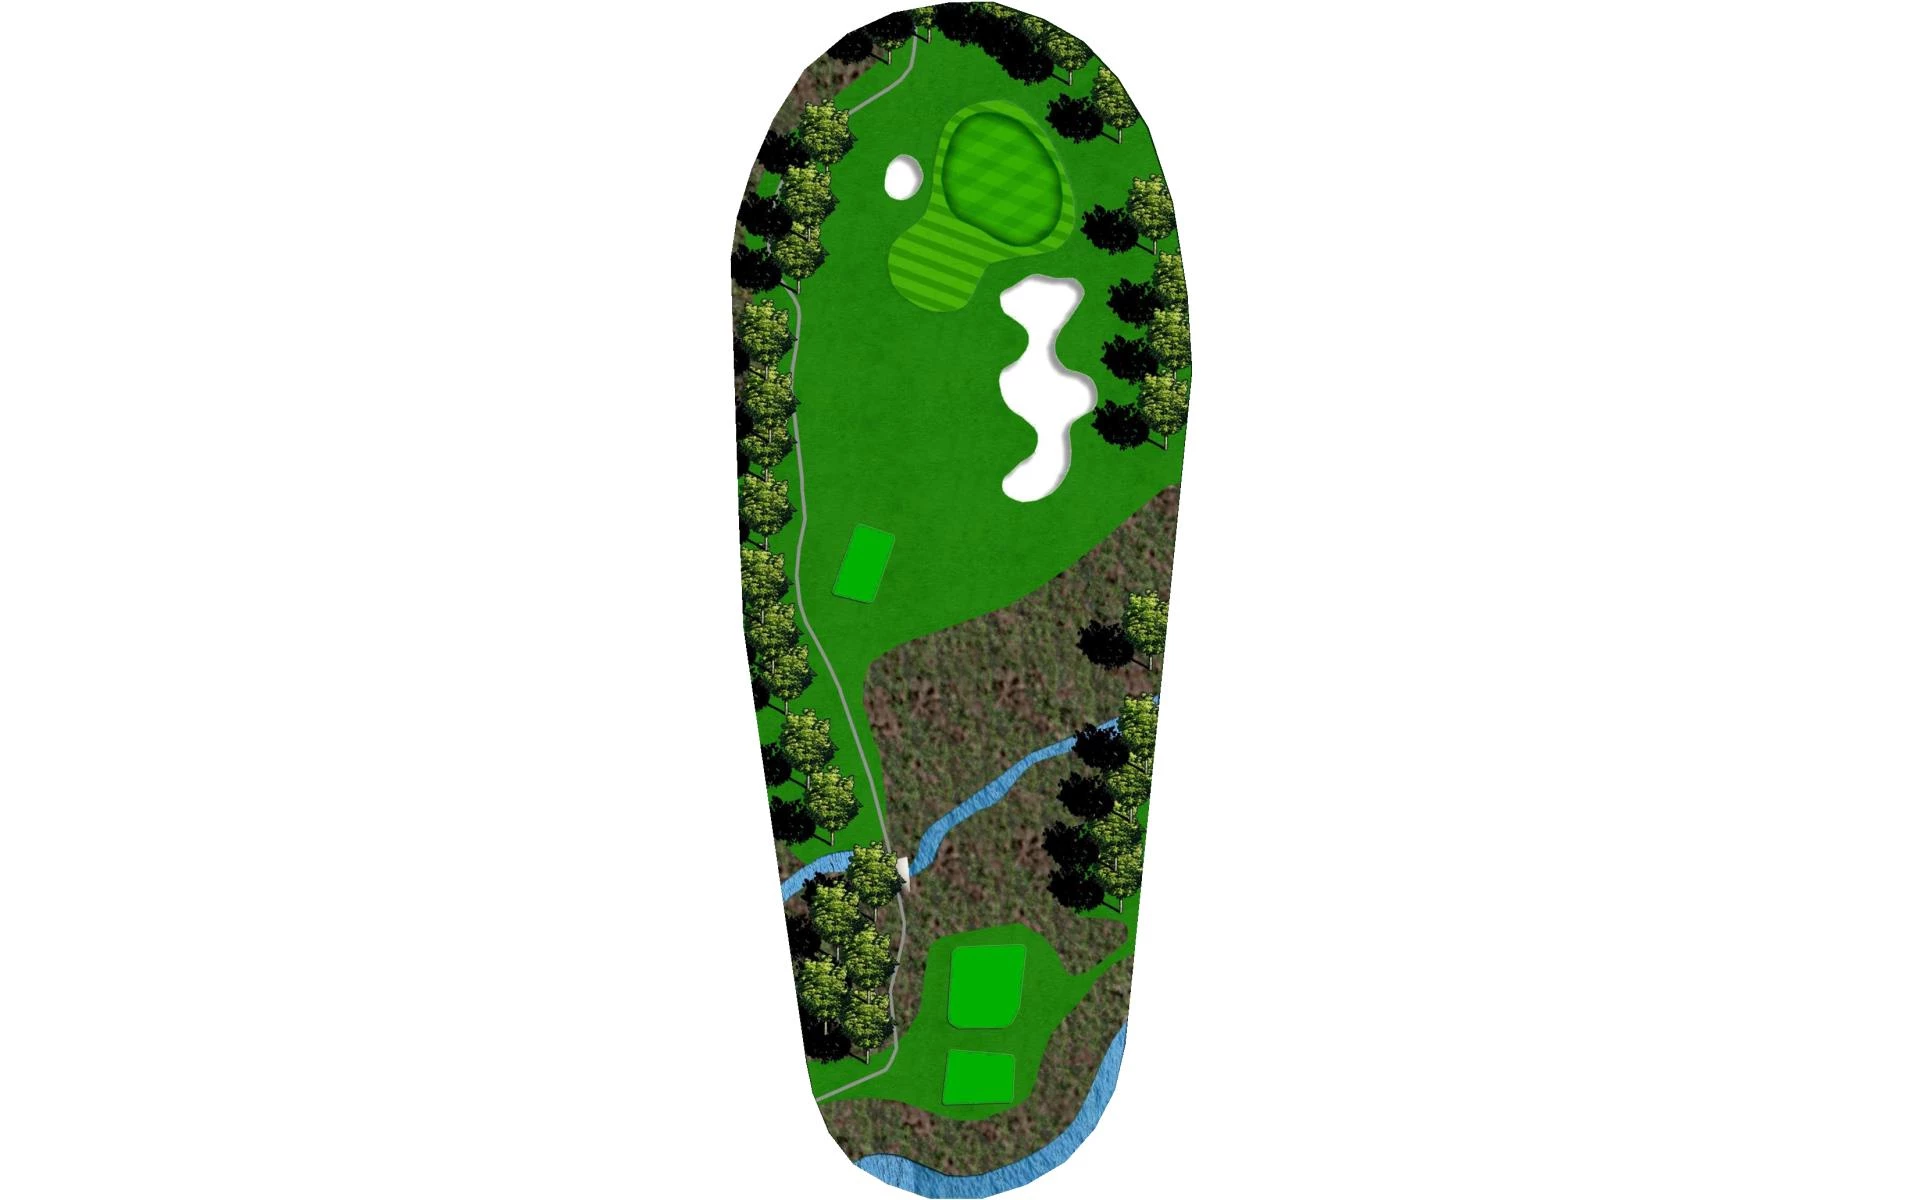
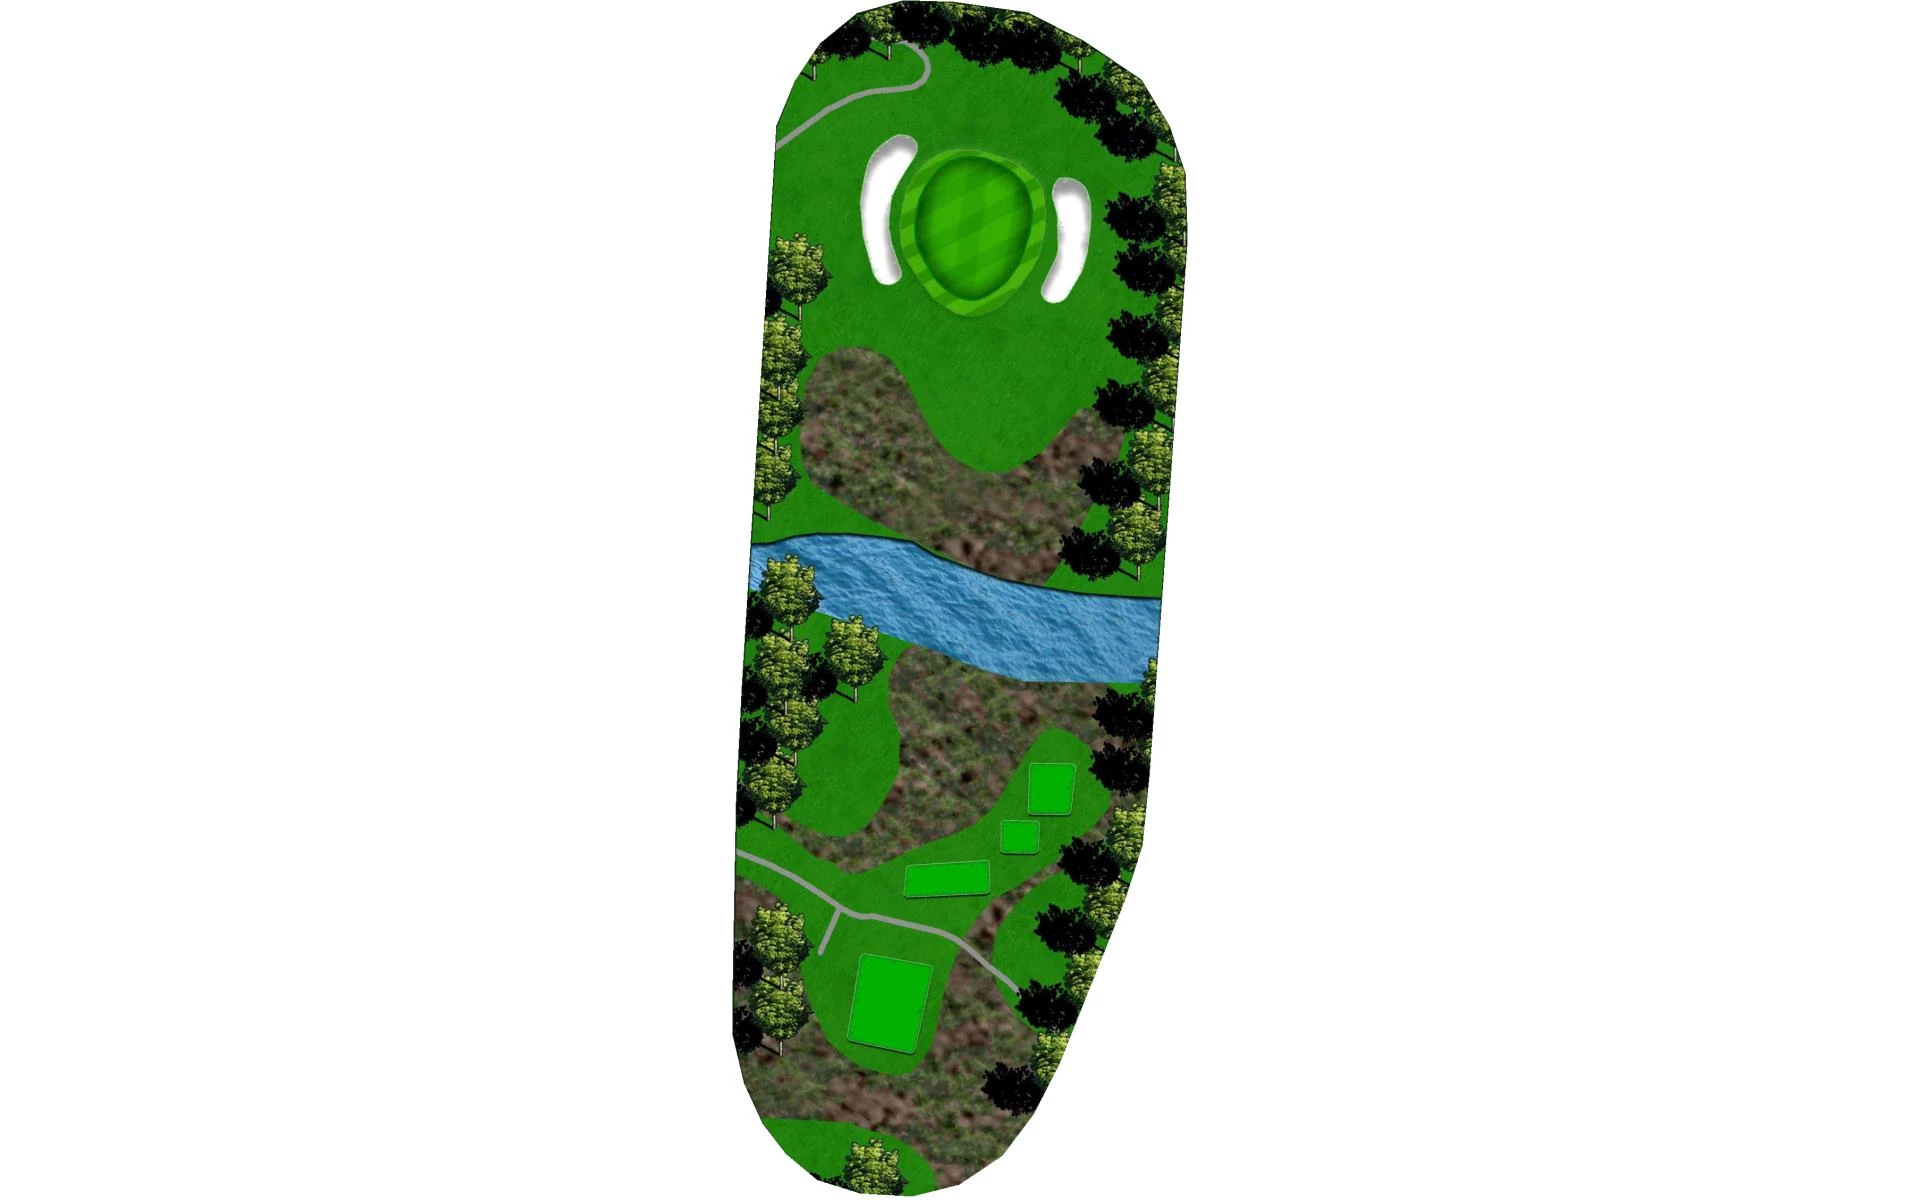
# 4 / Hole #4
Par: 4
Handicaps:
Men's 2
Women's 6
Yardage by Tee:
BLUE 429
GREEN 383
RED 321
REES 429
WHITE 407
Pro Tips
On this stunning par 4, you’ll notice two large oak trees that frame the tee shot. The landing area is fairly generous, but is guarded by two ponds running down the left side of the hole. Your approach shot will require you to carry a small creek on the way to an elevated green that has a deep bunker protecting its right side.

# 5 / Hole #5
Par: 4
Handicaps:
Men's 16
Women's 12
Yardage by Tee:
BLUE 358
GREEN 307
RED 282
REES 358
WHITE 315
Pro Tips
This short, dogleg par 4 is made easier by hitting your drive down the left side of the fairway. Your approach shot will require you avoid four greenside bunkers surrounding a two-tiered green.
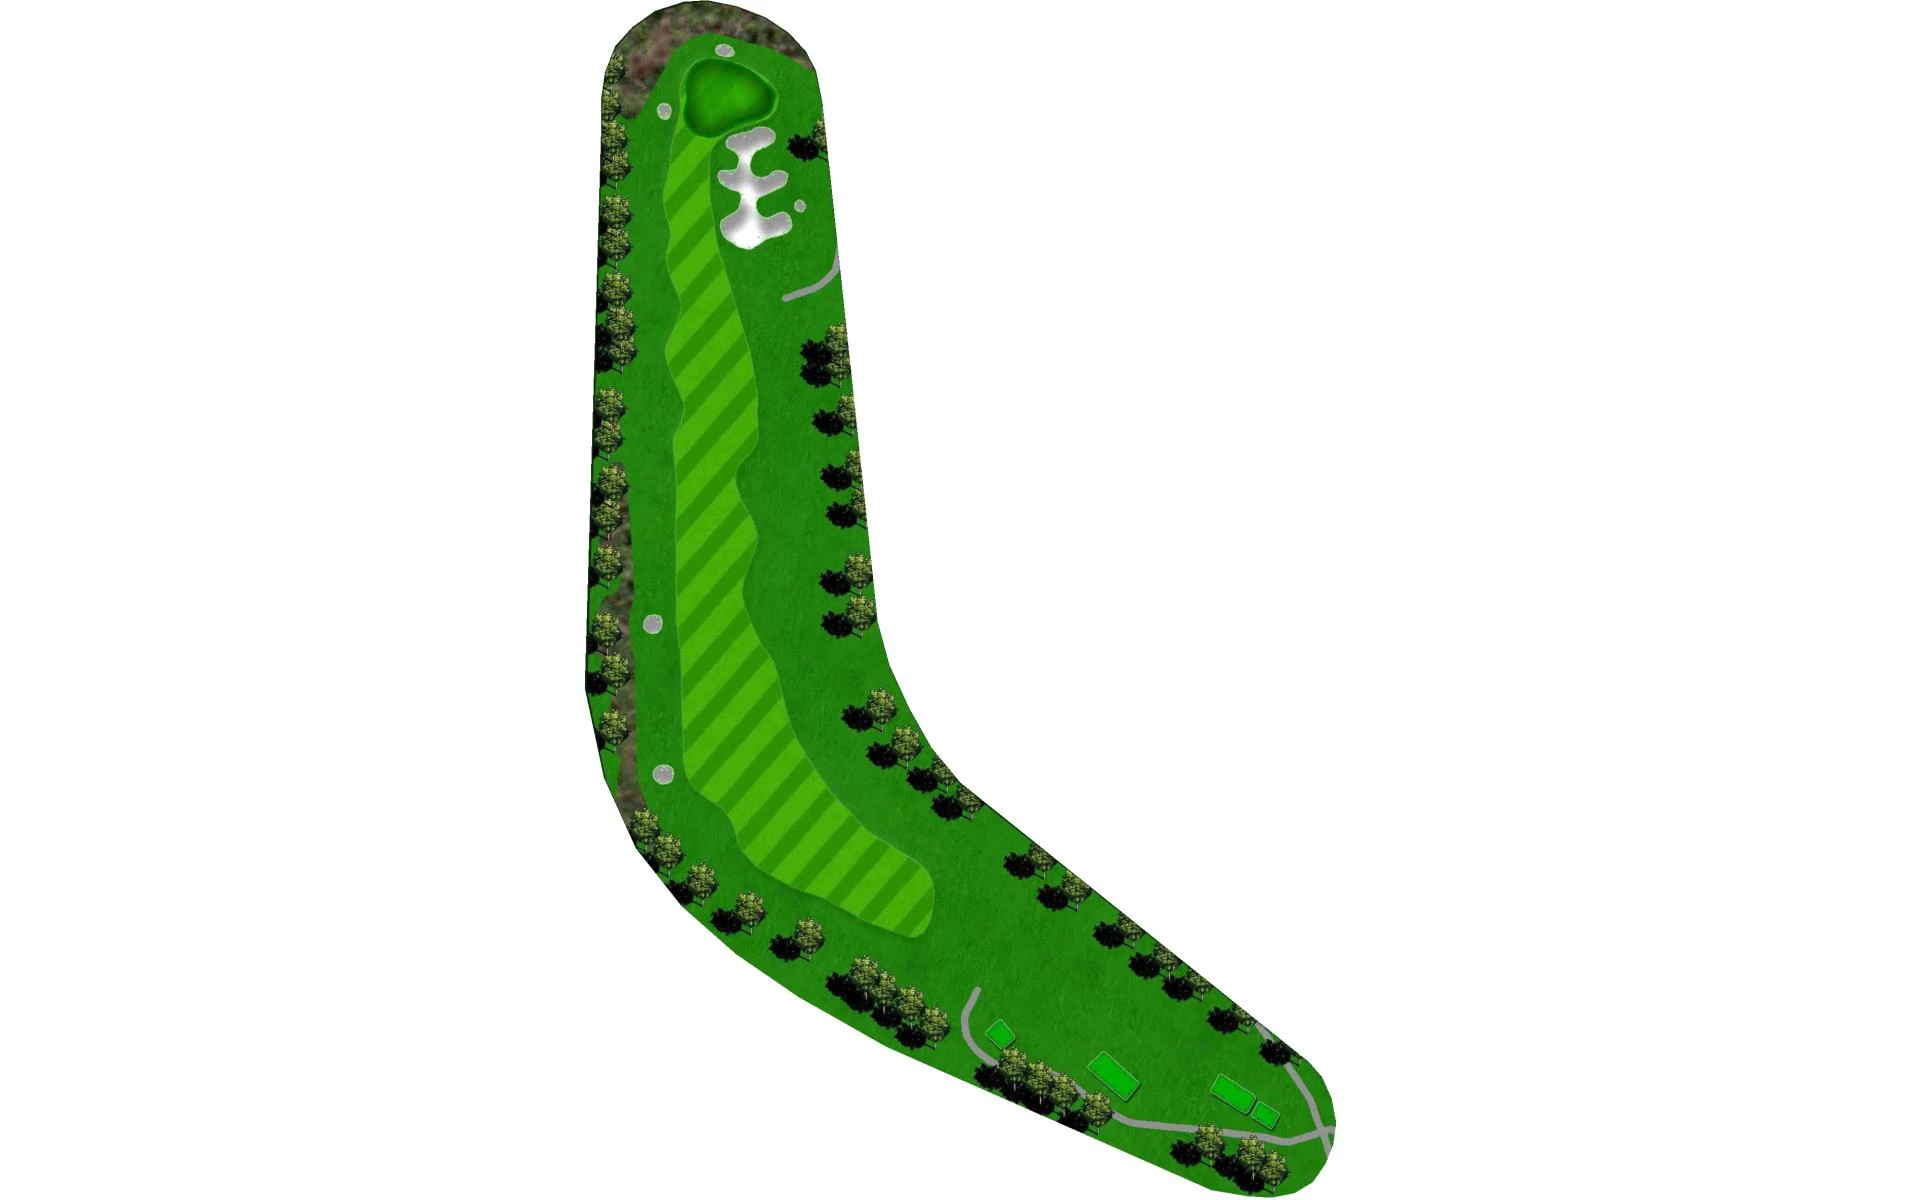
# 6 / Hole #6
Par: 4
Handicaps:
Men's 6
Women's 8
Yardage by Tee:
BLUE 434
GREEN 392
RED 358
REES 484
WHITE 414
Pro Tips
Your tee shot will want to steer clear of the mounds down the right side of this slight dogleg left. The approach on the sixth features five greenside pot bunkers that will attract an errant approach. Another two-tiered green means you’ll want your ball to find the correct level.
# 7 / Hole #7
Par: 4
Handicaps:
Men's 12
Women's 10
Yardage by Tee:
BLUE 408
GREEN 366
RED 337
REES 441
WHITE 396
Pro Tips
The seventh hole is one of the easiest and most beautiful holes on the golf course. On this downhill par 4, you’ll want to make sure you have a short shot into the green that’s surrounded by a large bunker on the left and a pond to the right.
# 8 / Hole #8
Par: 3
Handicaps:
Men's 18
Women's 16
Yardage by Tee:
BLUE 156
GREEN 131
RED 115
REES 196
WHITE 138
Pro Tips
Even though it’s the shortest on the course, this hole still plays a bit tricky. The elevated tee box means it should play less than the actual yardage, but add in the typical headwind and selecting the right club can prove difficult. The green slopes from back to front and features a mound in the center.
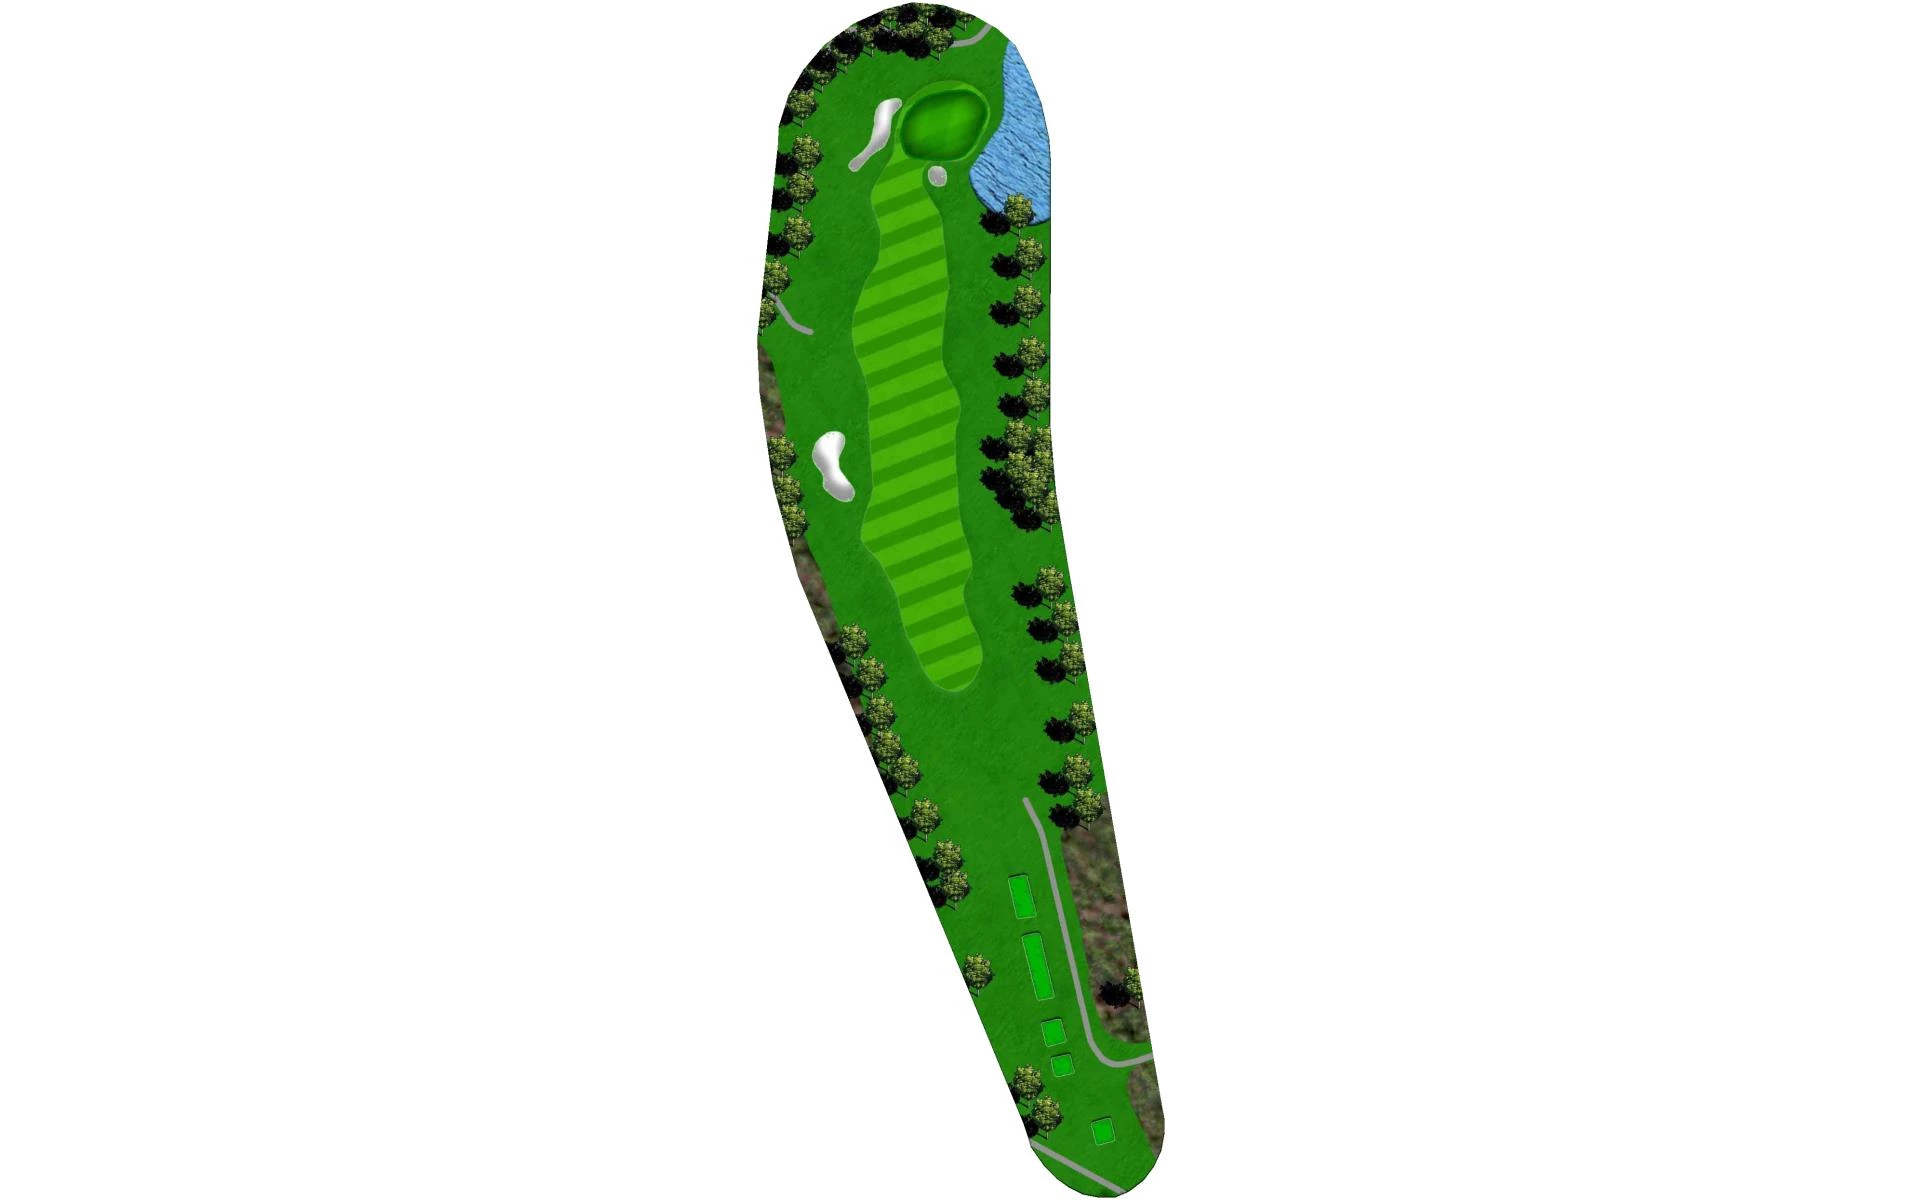
# 9 / Hole #9 / Signature Hole
Par: 5
Handicaps:
Men's 4
Women's 2
Yardage by Tee:
BLUE 550
GREEN 511
RED 444
REES 589
WHITE 538
Pro Tips
The front nine ends with its signature hole; a par 5 that’s the longest on the entire course. On your second shot, you’ll want to avoid the large pond that extends down the left side of the hole. As you approach the green, bunkers guard the putting surface.
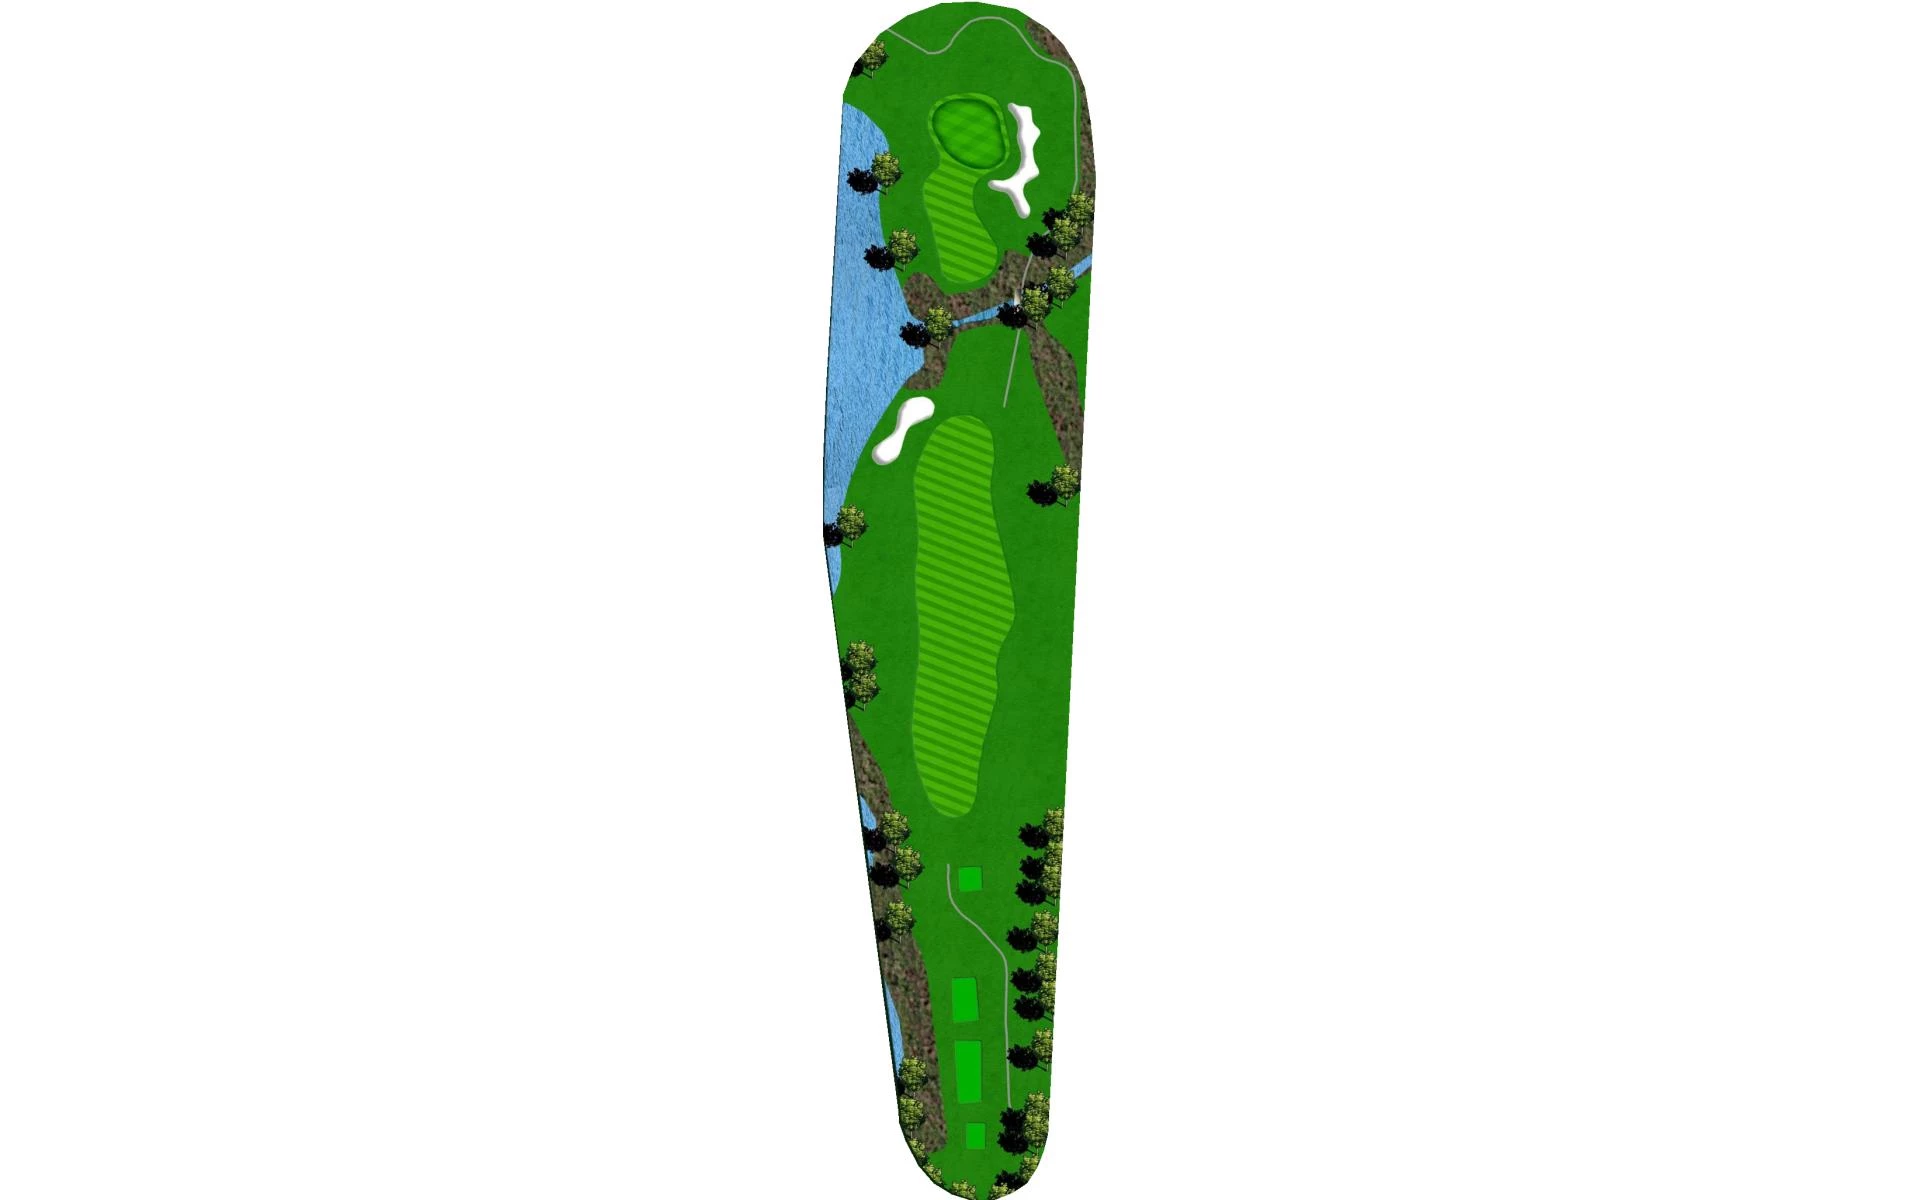
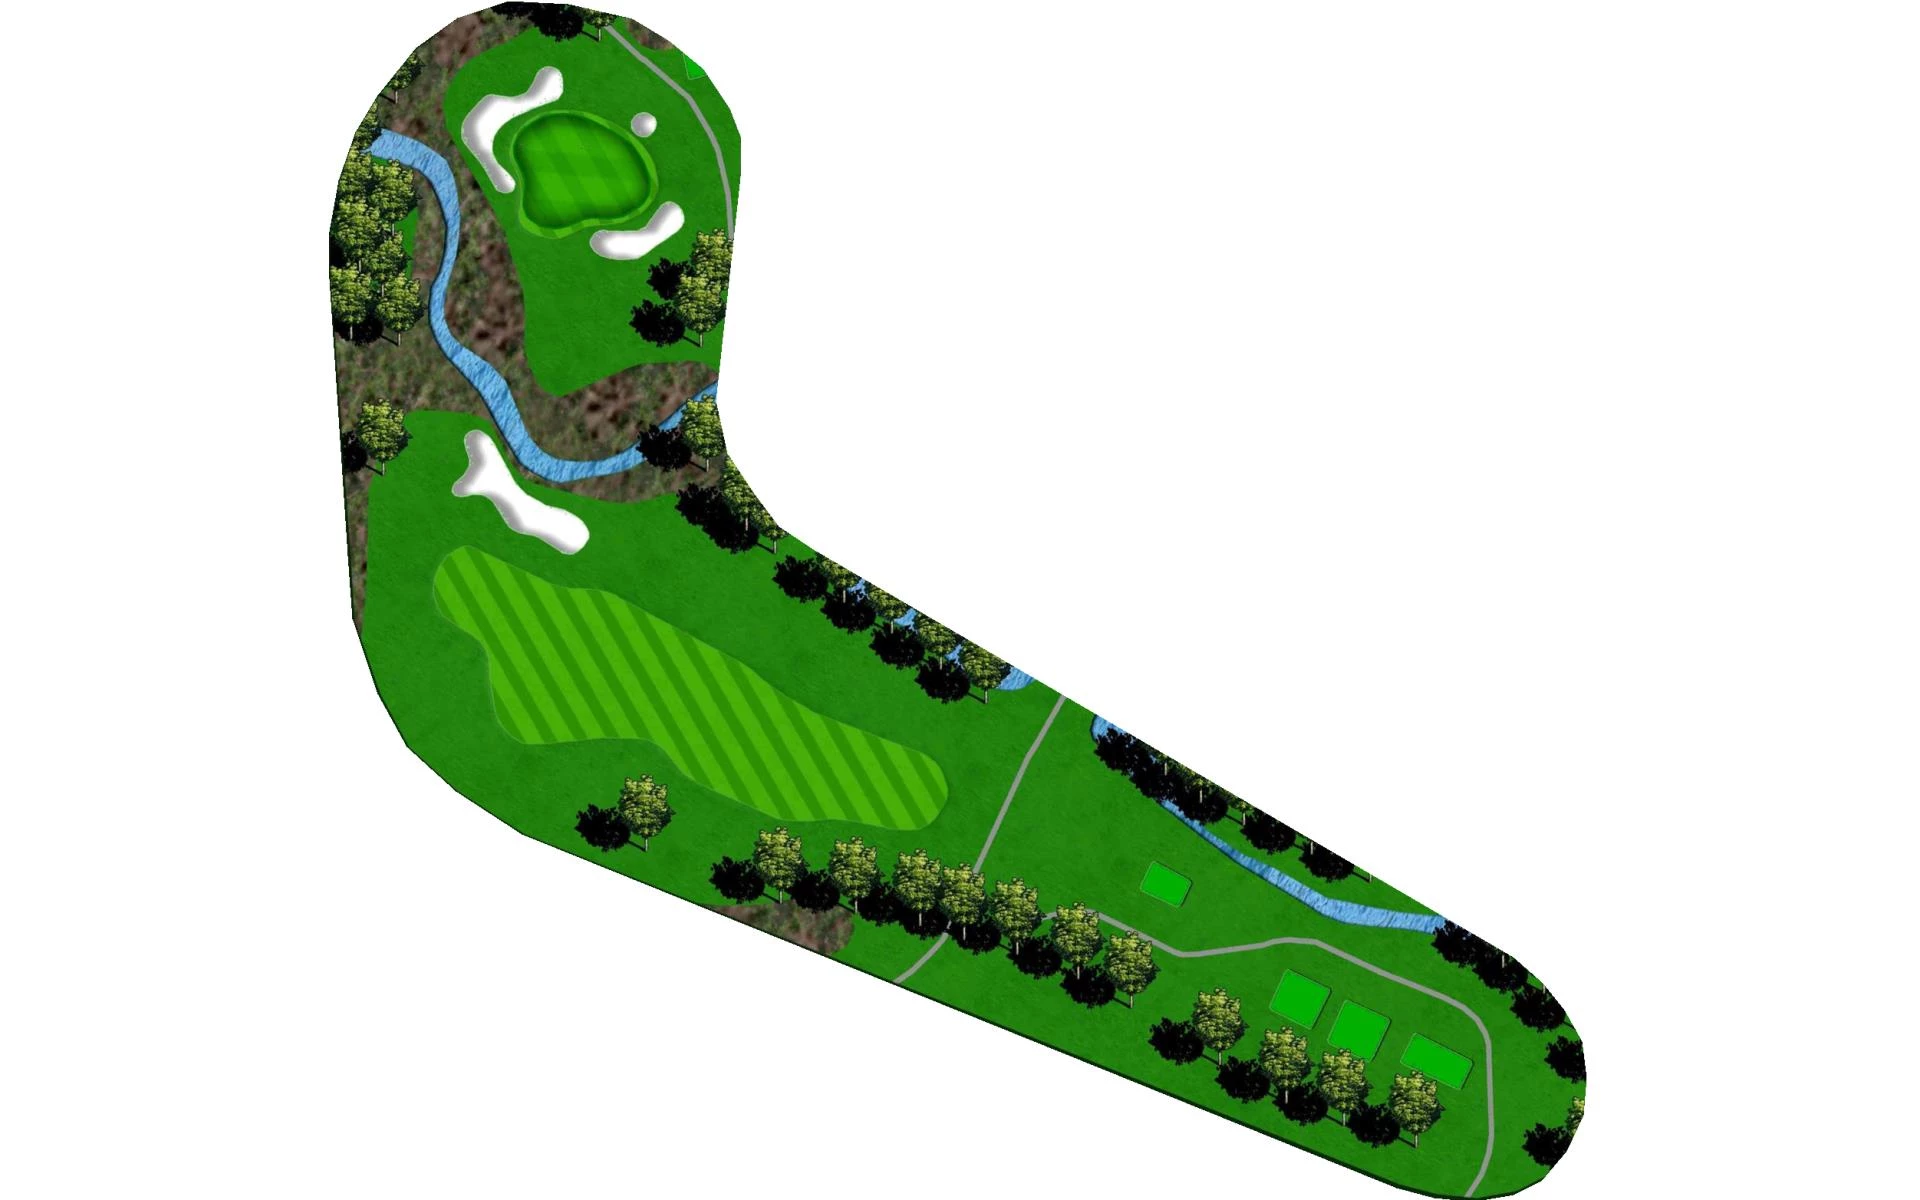
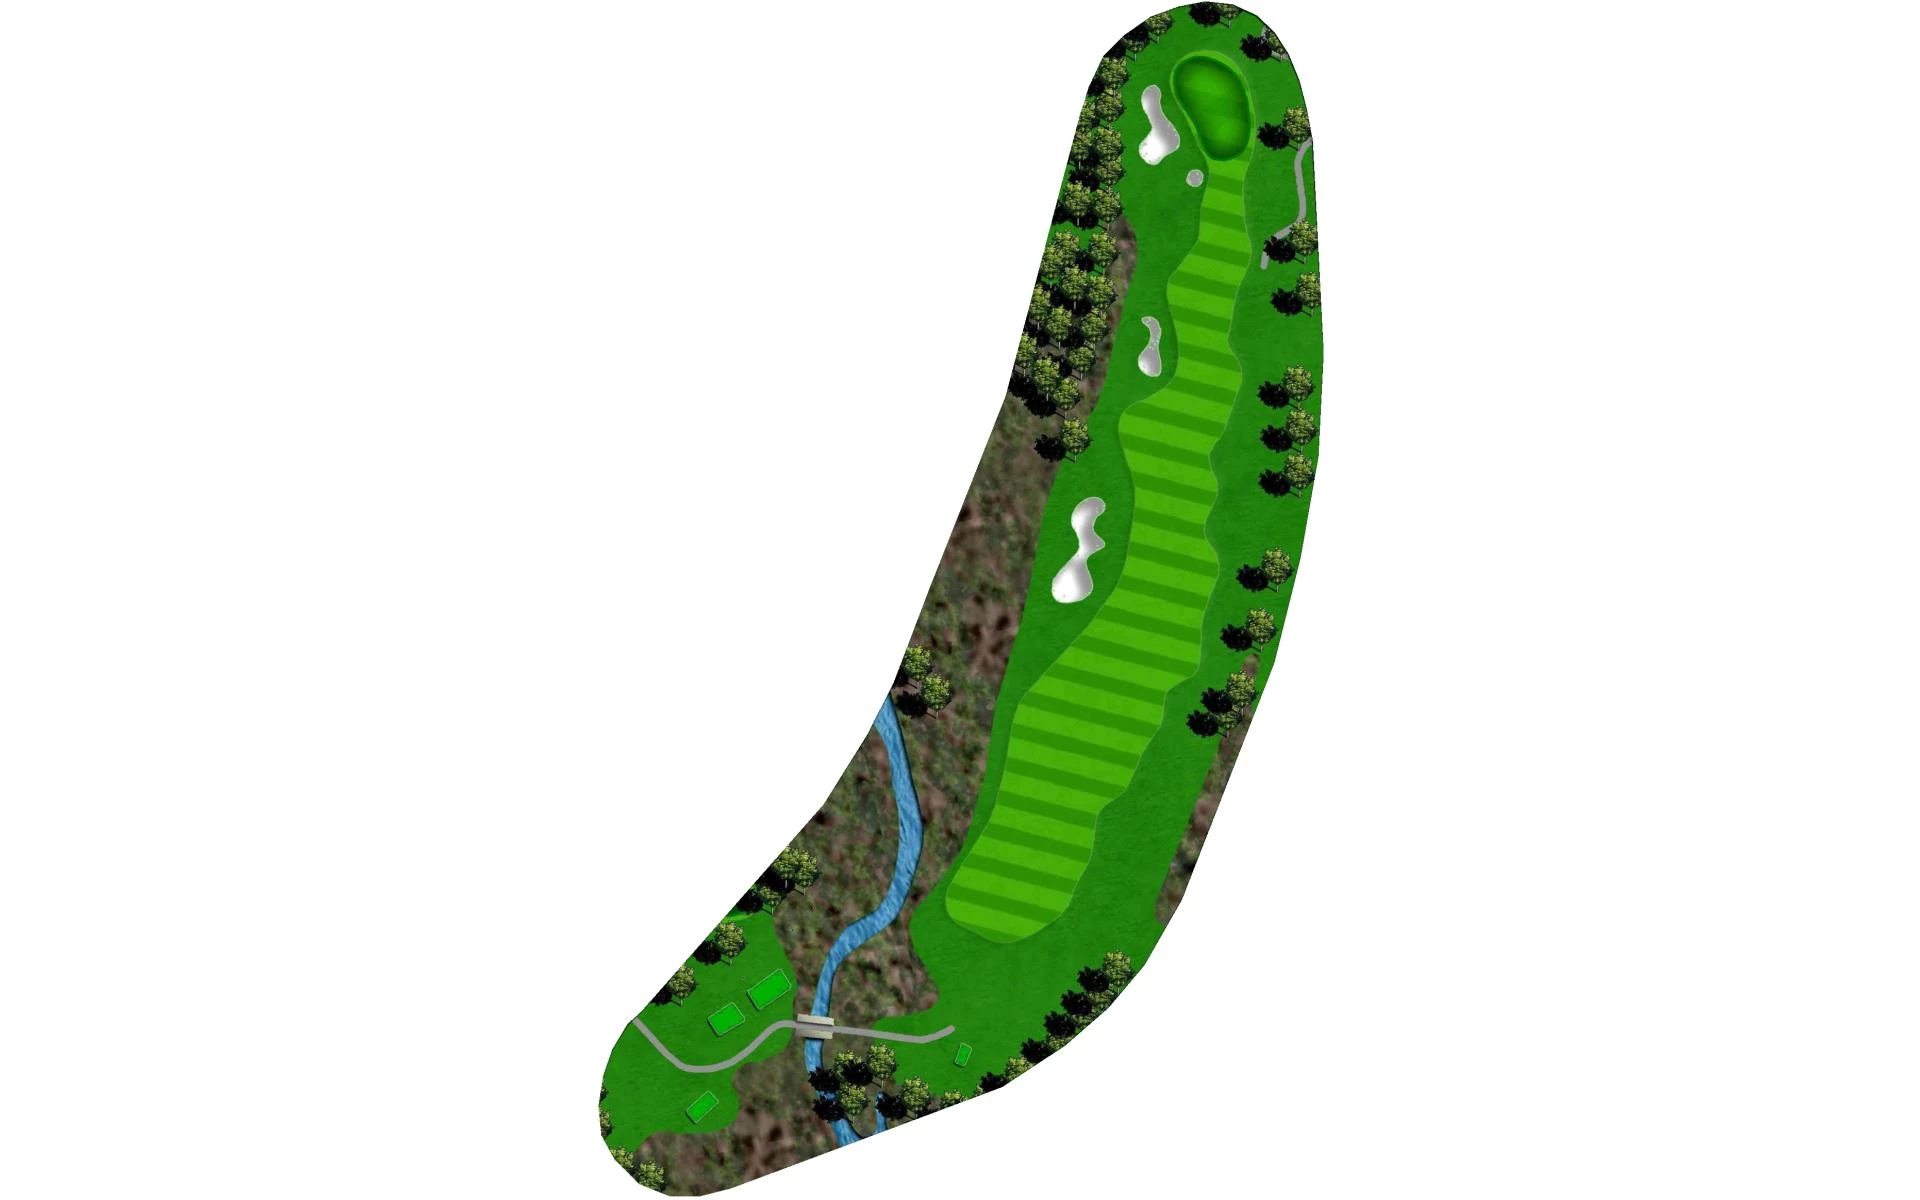
# 10 / Hole #10
Par: 5
Handicaps:
Men's 5
Women's 1
Yardage by Tee:
BLUE 524
GREEN 485
RED 428
REES 542
WHITE 501
Pro Tips
A wide-open landing area is the first thing that greets you as you begin the back nine. This downhill par 5 is bisected by Beden’s Brook, a creek that’ll come into play on your second shot. Carrying the water will set up a short iron shot into the green for your third.
# 11 / Hole #11
Par: 3
Handicaps:
Men's 15
Women's 15
Yardage by Tee:
BLUE 177
GREEN 137
RED 122
REES 177
WHITE 162
Pro Tips
This par 3, named “Rees’ Surprise,” features an elevated green with two large kidney-shaped bunkers on both sides. You also might recognize a familiar sycamore on the left side, which is also found on the course logo.
# 12 / Hole #12
Par: 4
Handicaps:
Men's 3
Women's 5
Yardage by Tee:
BLUE 391
GREEN 361
RED 327
REES 391
WHITE 374
Pro Tips
The twelfth is a difficult hole that begins with a tee shot through a shoot of trees and over a brook. You’ll want to keep to the left side of the fairway to set up an uphill approach that avoids the large bunker to the front right of the green.
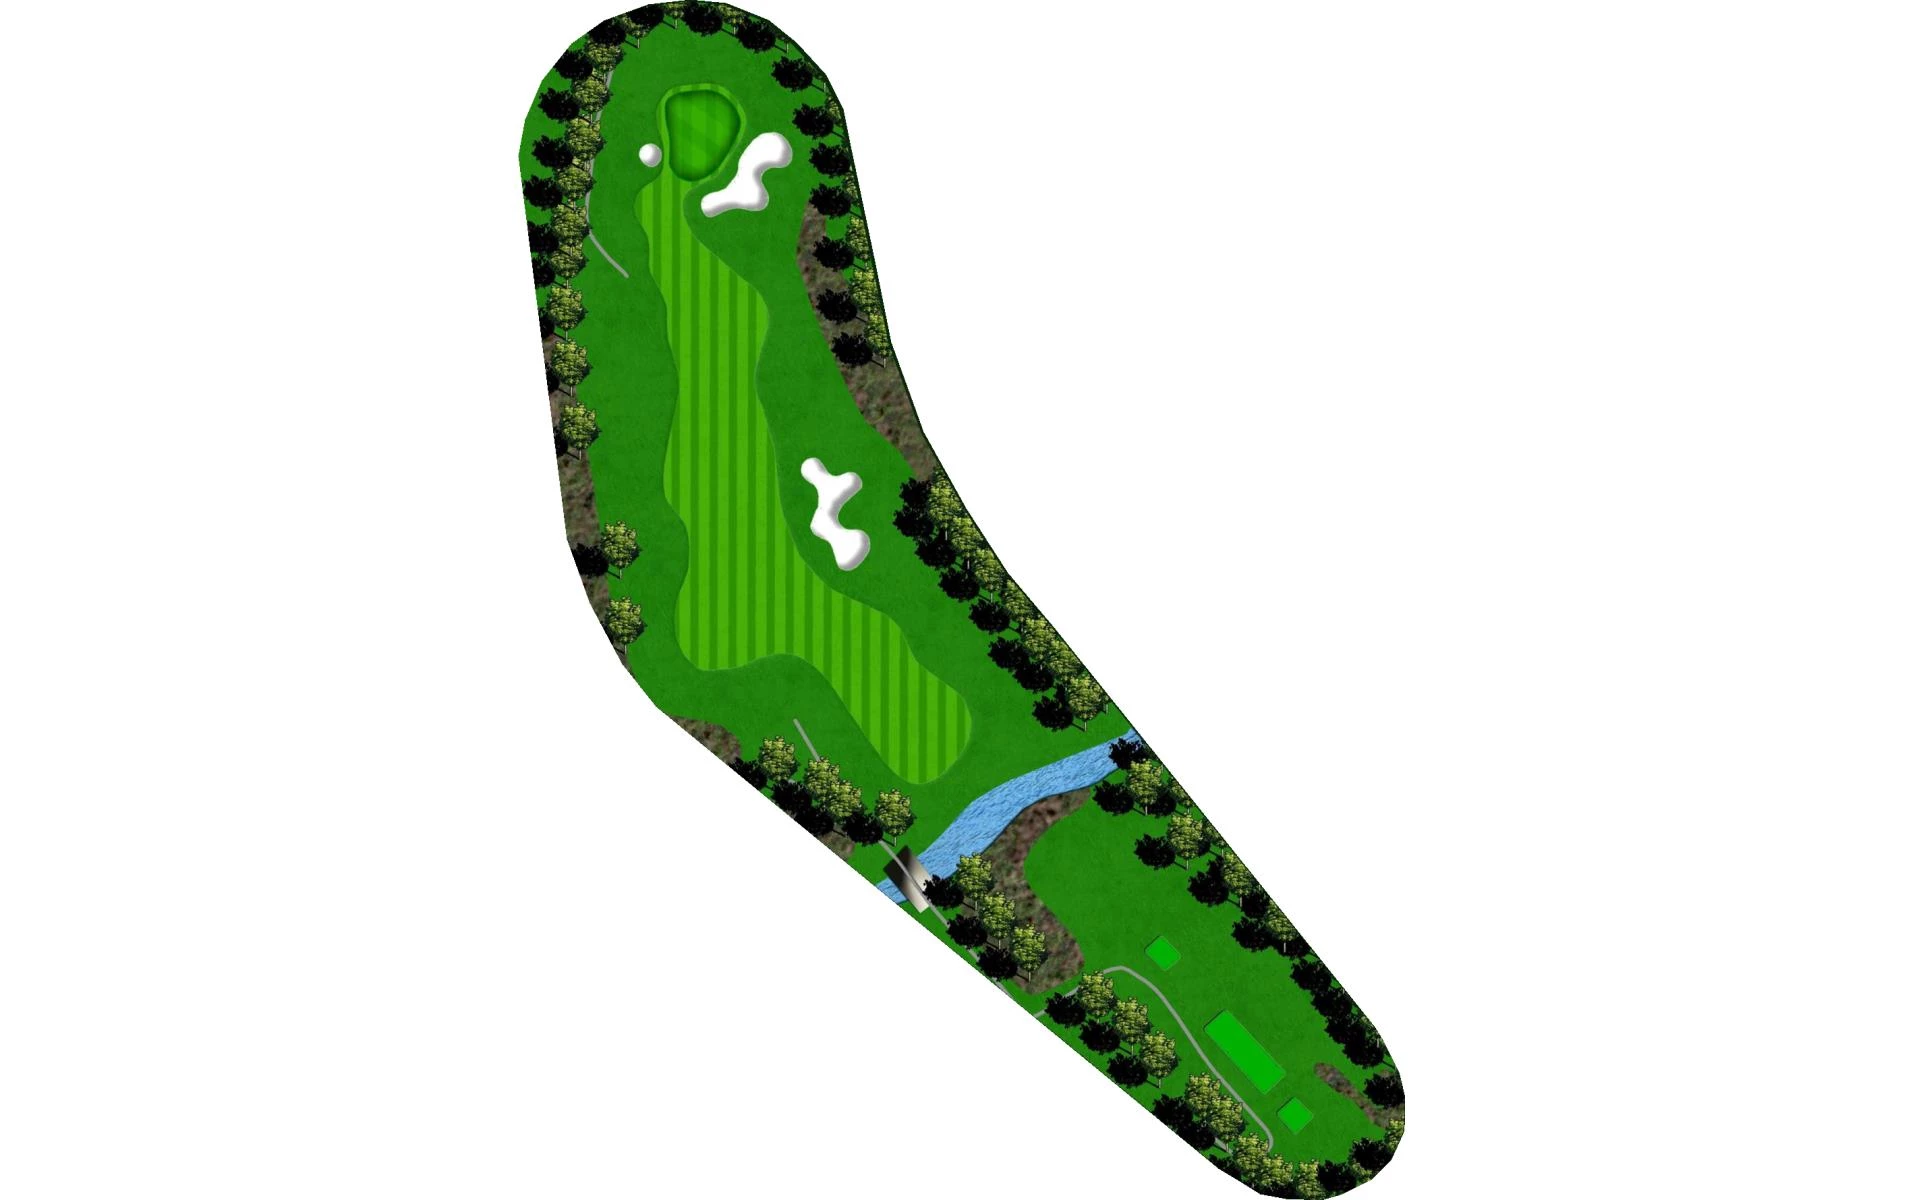
# 13 / Hole #13
Par: 4
Handicaps:
Men's 13
Women's 9
Yardage by Tee:
BLUE 356
GREEN 333
RED 277
REES 356
WHITE 339
Pro Tips
Your tee shot is of utmost importance due to the small landing area. Execute it successfully and you’ll have a short iron into the elevated green. You’ll notice a large bunker guarding the front right that should be avoided.
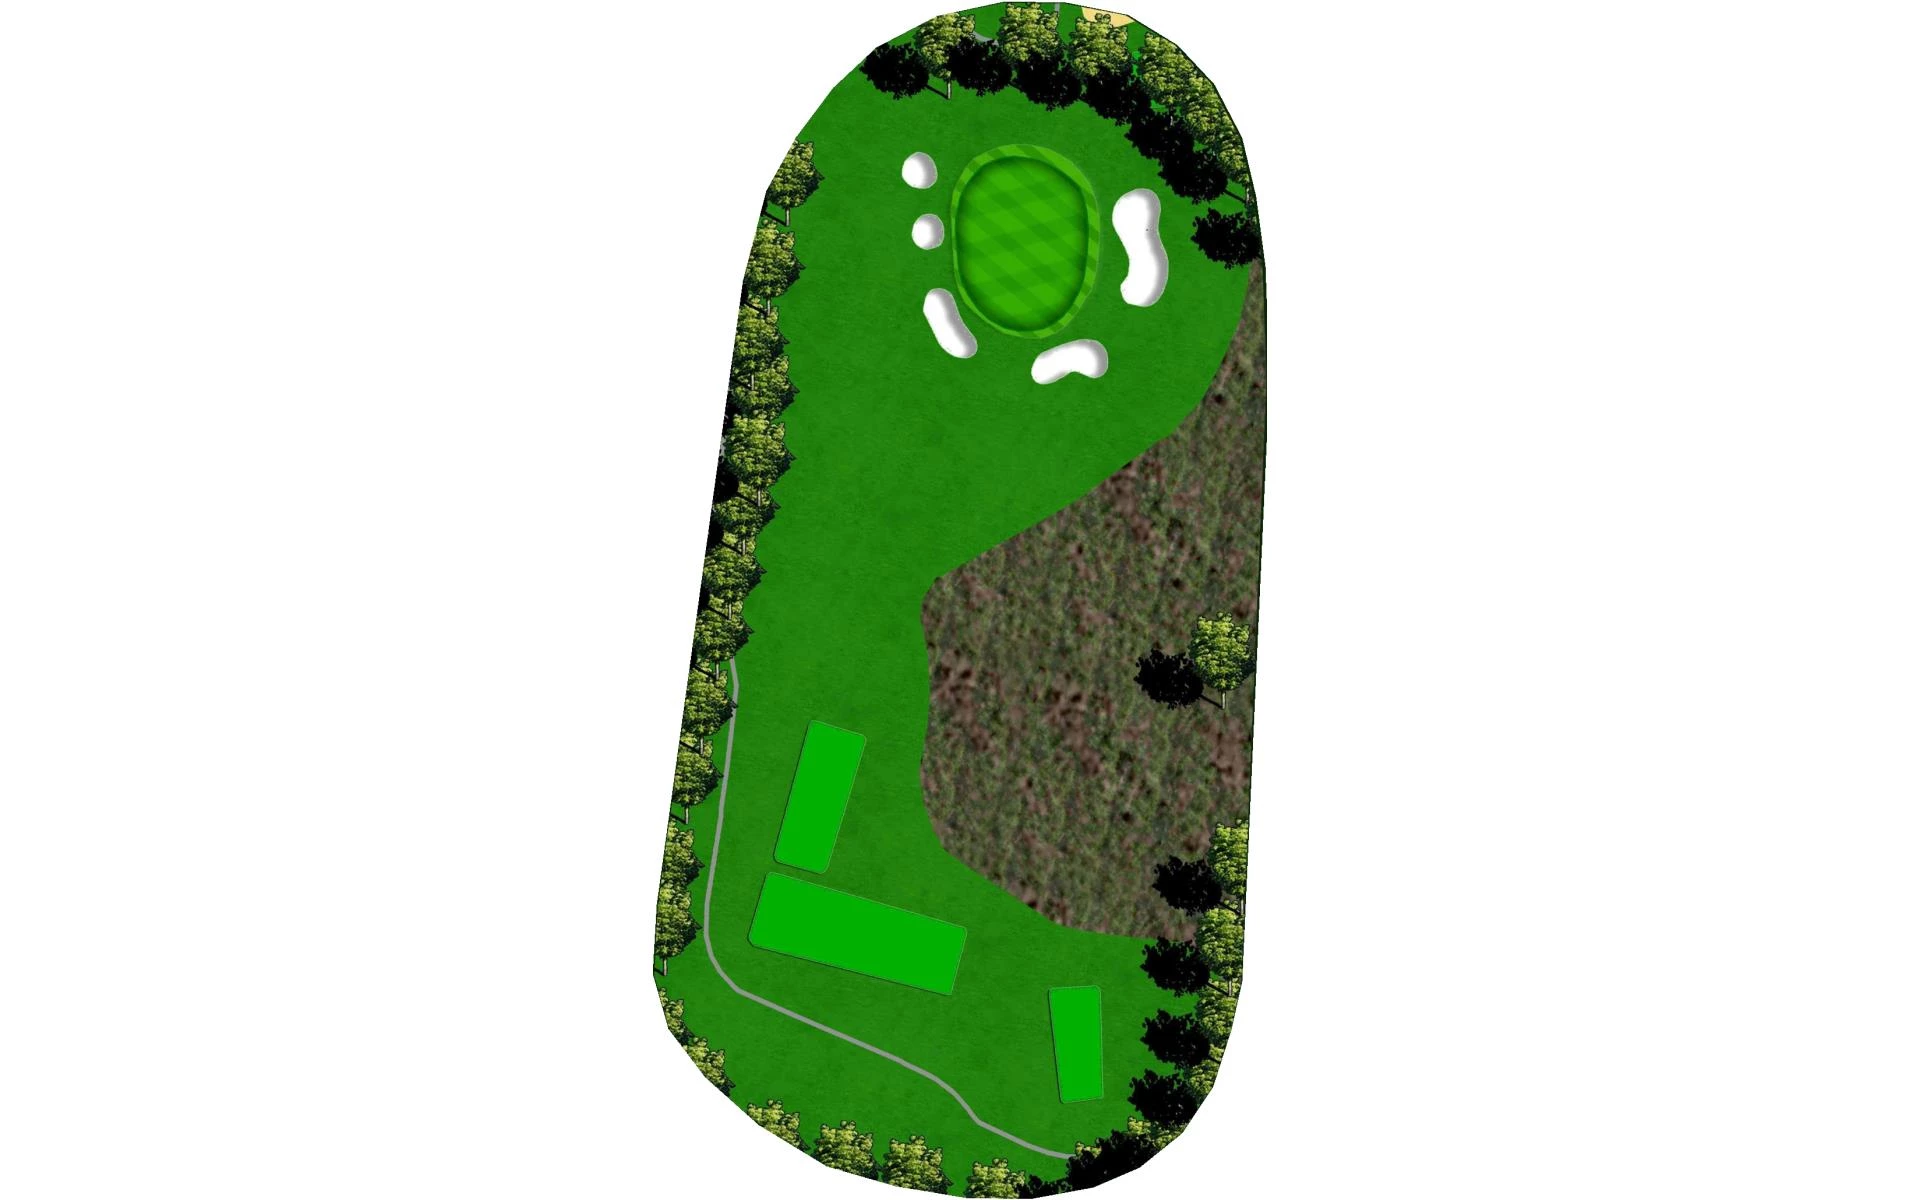
# 14 / Hole #14
Par: 3
Handicaps:
Men's 17
Women's 17
Yardage by Tee:
BLUE 175
GREEN 149
RED 131
REES 175
WHITE 158
Pro Tips
The final par 3 on the course features the largest network of tees, designed around a series of berms. The green is fairly small, and thus can be difficult to hit, with a reverse-C-shaped bunker short and left.
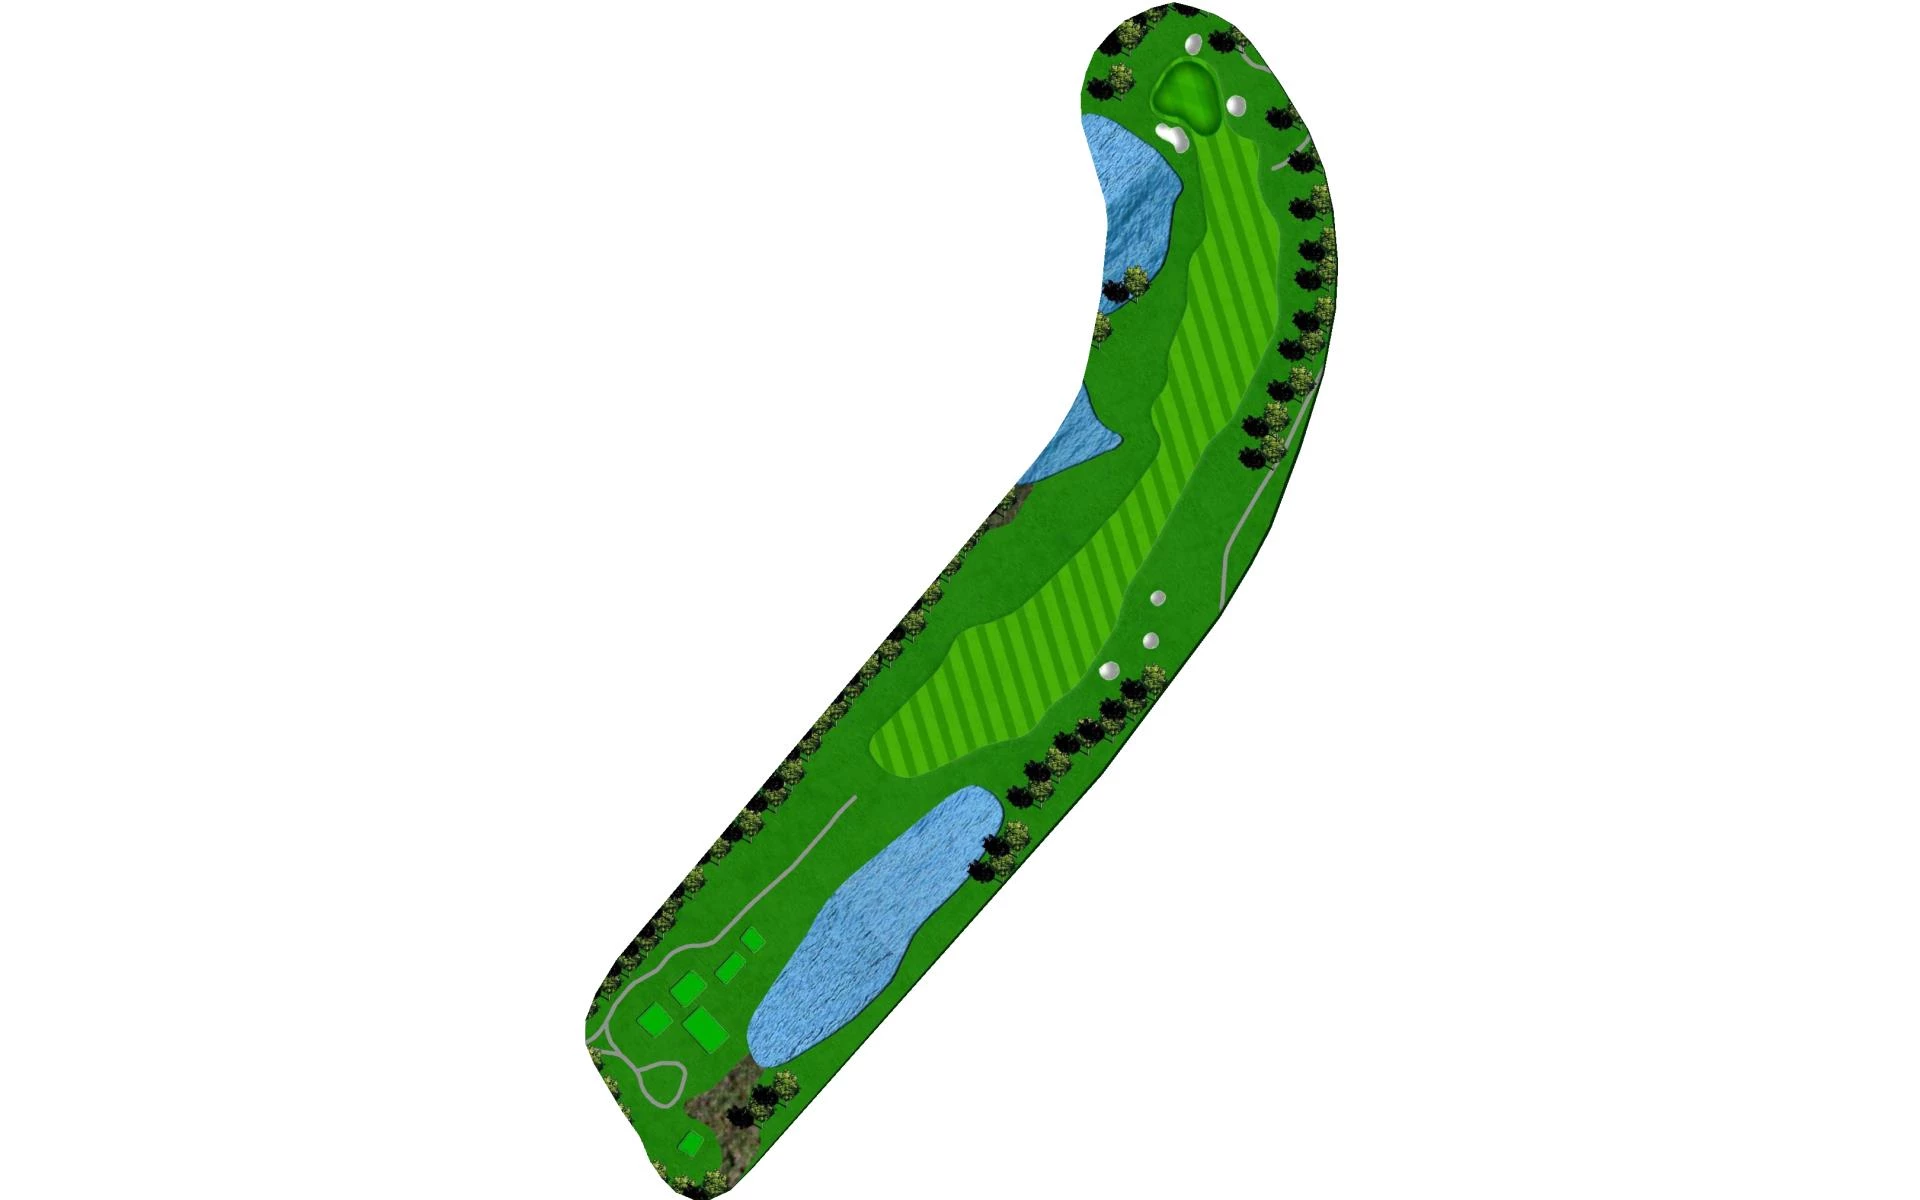
# 15 / Hole #15
Par: 4
Handicaps:
Men's 1
Women's 3
Yardage by Tee:
BLUE 452
GREEN 413
RED 378
REES 452
WHITE 428
Pro Tips
A long, scenic par 4, the fifteenth features Beden’s Brook and bunkers down the left, calling for a drive down the right side. The approach shot will want to steer clear of the wetland and bunker to the left of the green. The option to roll the ball up to the green is also given, with a fairway landing area short of the green.
# 16 / Hole #16
Par: 5
Handicaps:
Men's 11
Women's 7
Yardage by Tee:
BLUE 494
GREEN 453
RED 404
REES 494
WHITE 455
Pro Tips
One of the most talked-about holes on the course, this uphill par 5 features a historic dairy barn that served as Cherry Valley’s sales and information center. This scenic hole also features bold mounds up to the green, which is situated next to an 18thcentury cemetery.
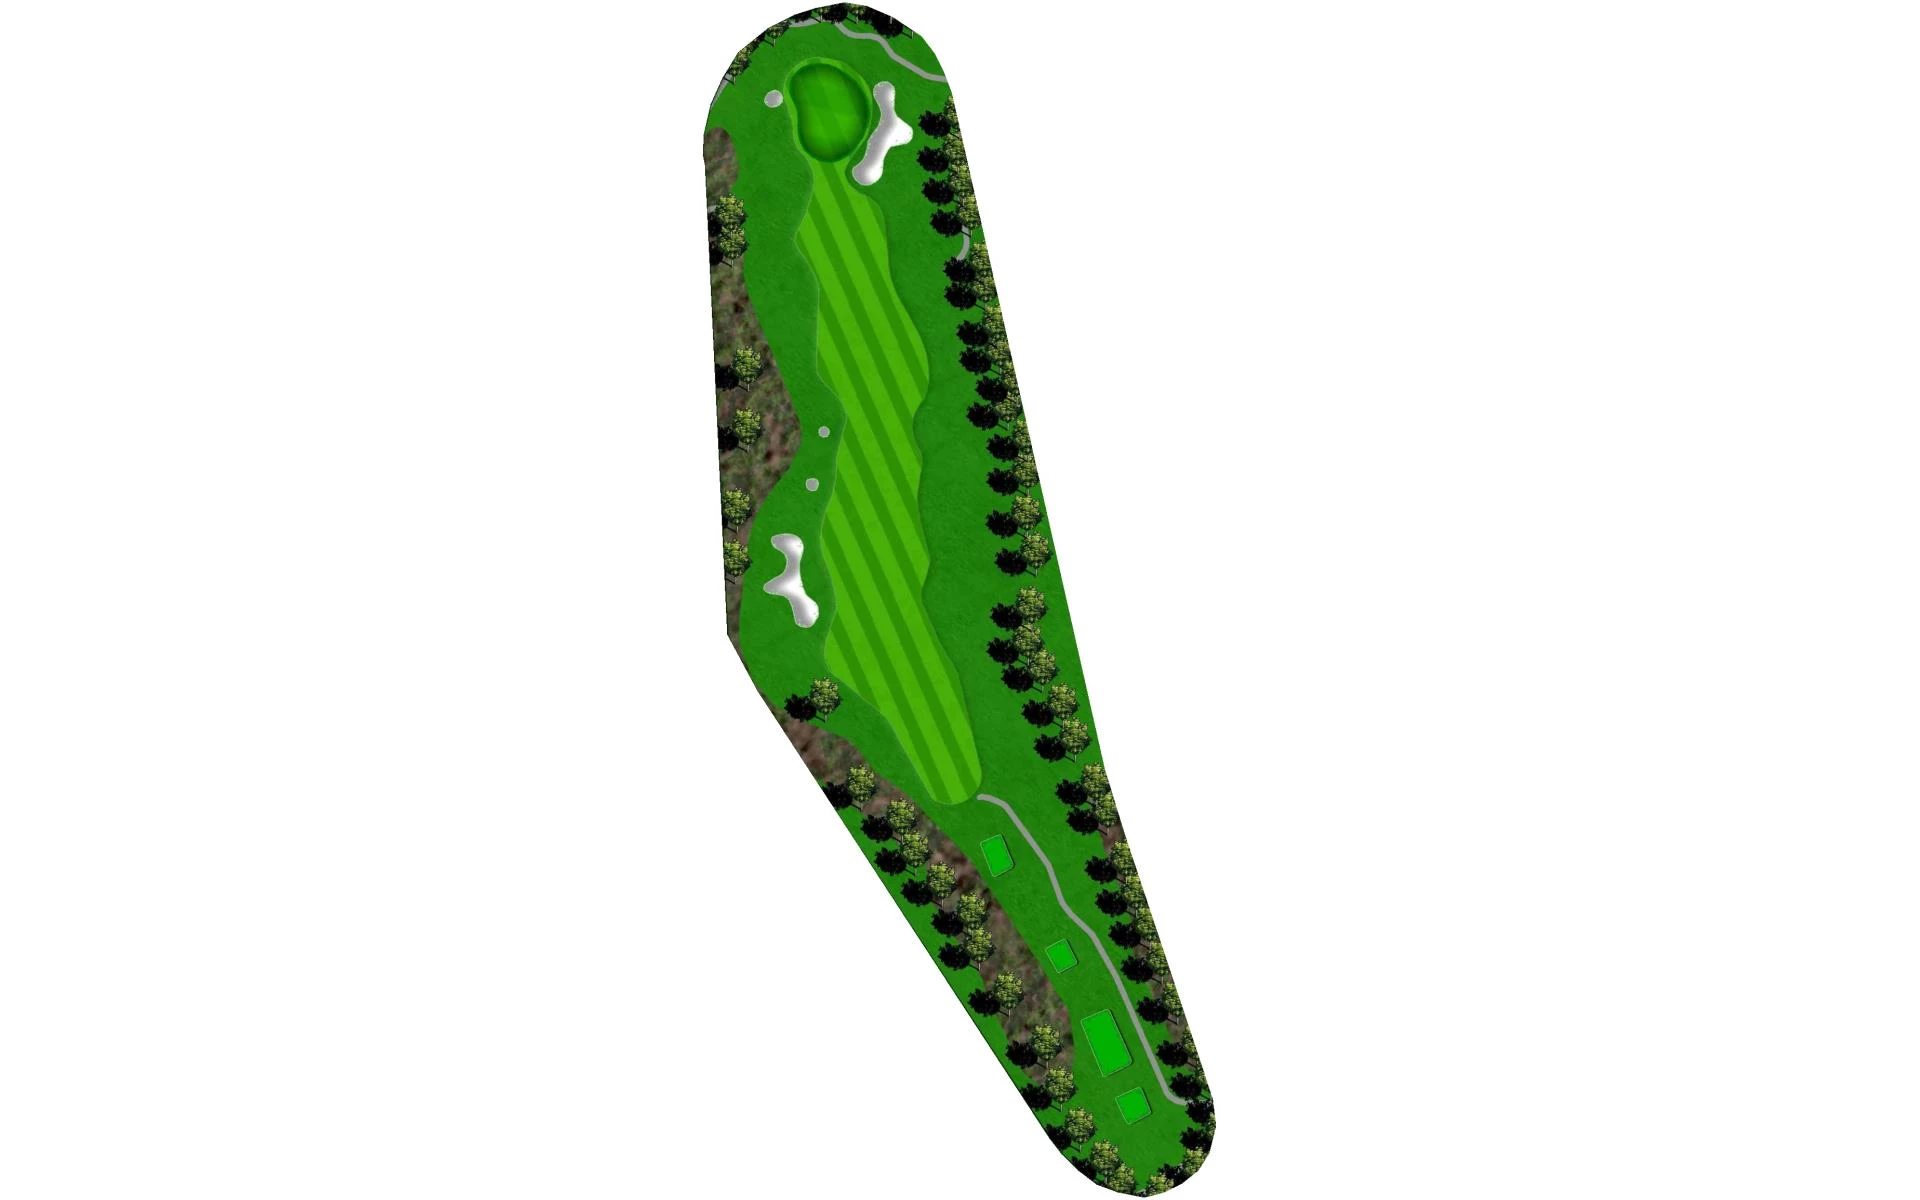
# 17 / Hole #17
Par: 4
Handicaps:
Men's 9
Women's 11
Yardage by Tee:
BLUE 439
GREEN 394
RED 316
REES 439
WHITE 415
Pro Tips
This unique par 4 features fairway mounds that ensure a difficult uphill second shot. The green is large, but protected by a Y-shaped bunker on the right side.
# 18 / Hole #18
Par: 4
Handicaps:
Men's 7
Women's 13
Yardage by Tee:
BLUE 433
GREEN 388
RED 284
REES 451
WHITE 406
Pro Tips
The finishing hole plays uphill and requires a lengthy carry into a prevailing wind. Approach shots will need to avoid the numerous bunkers that surround the large putting surface.