Golf Course
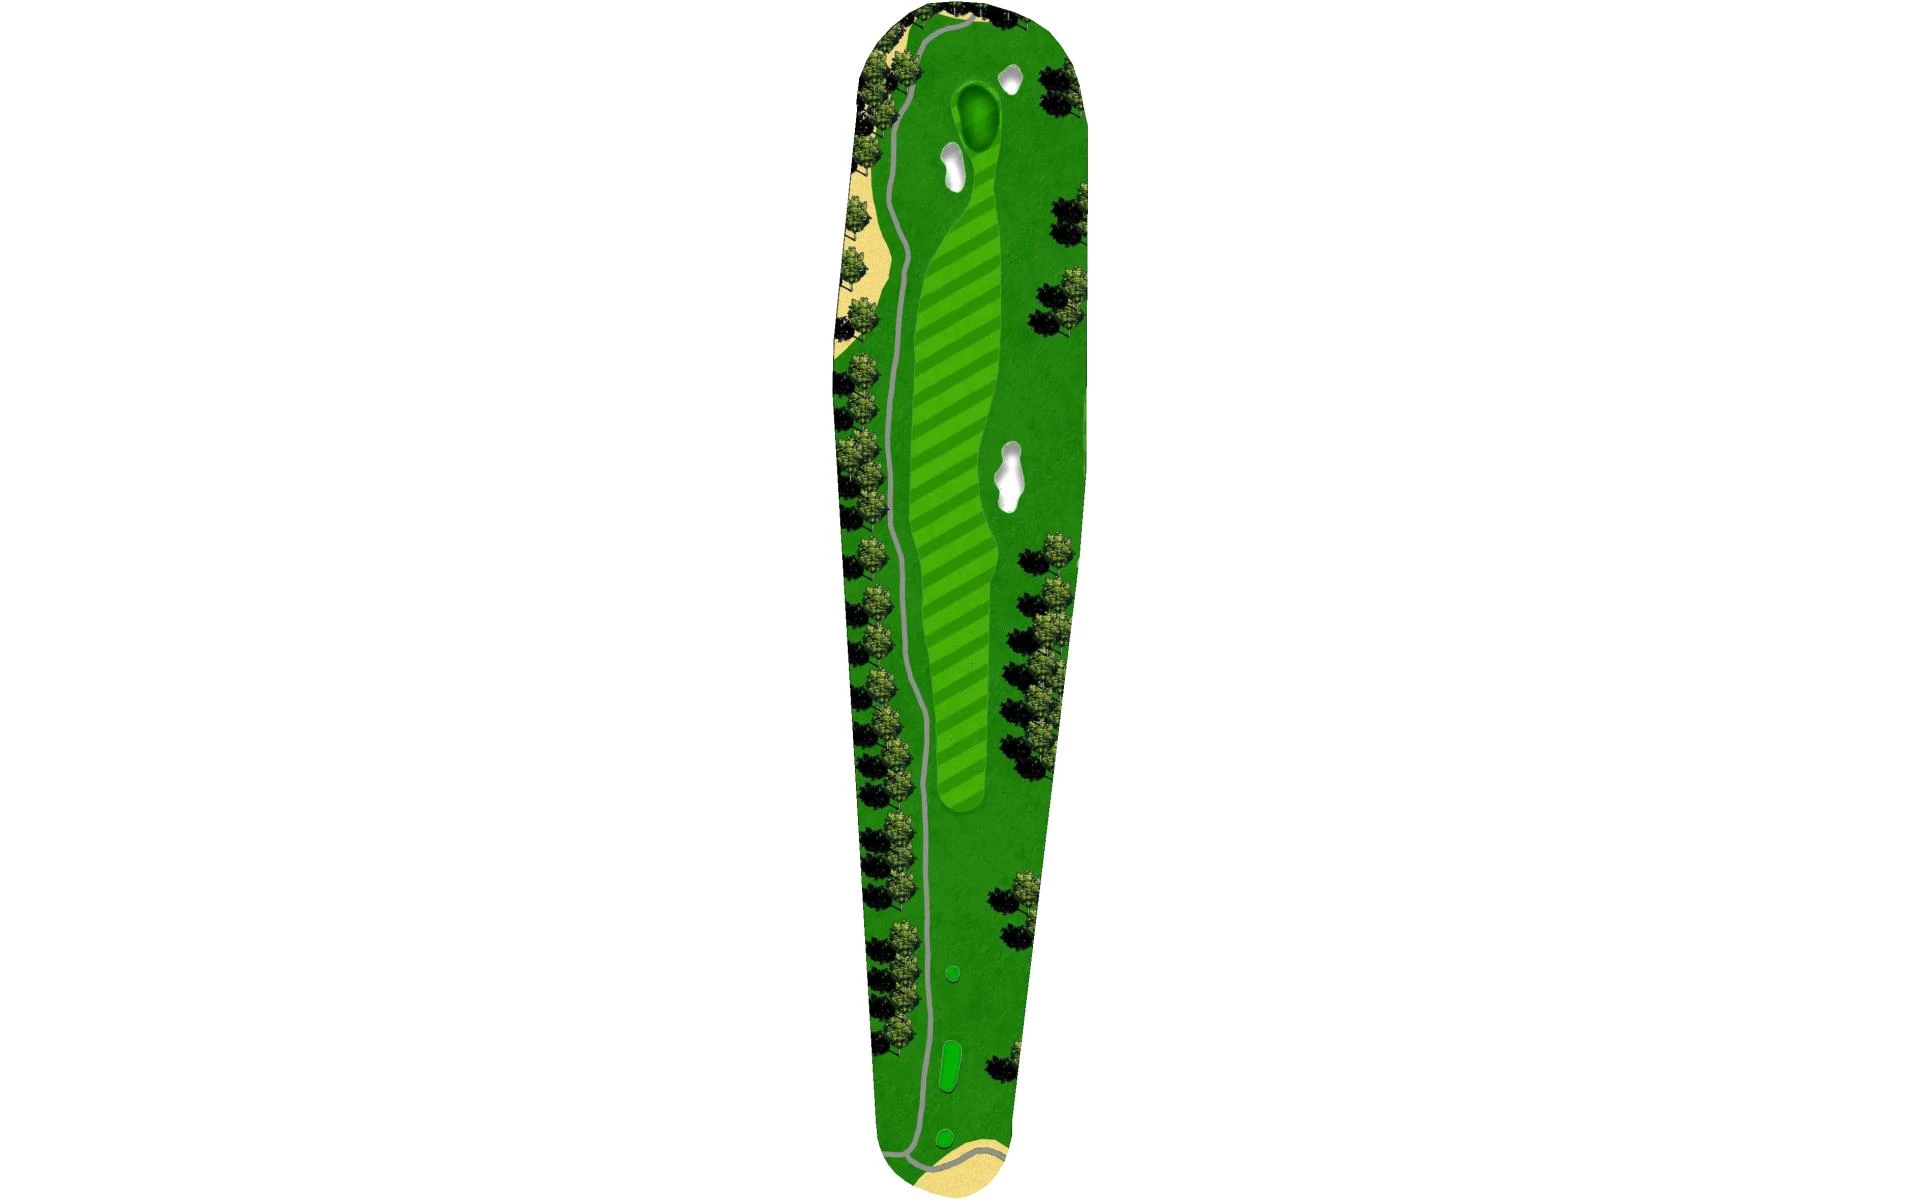
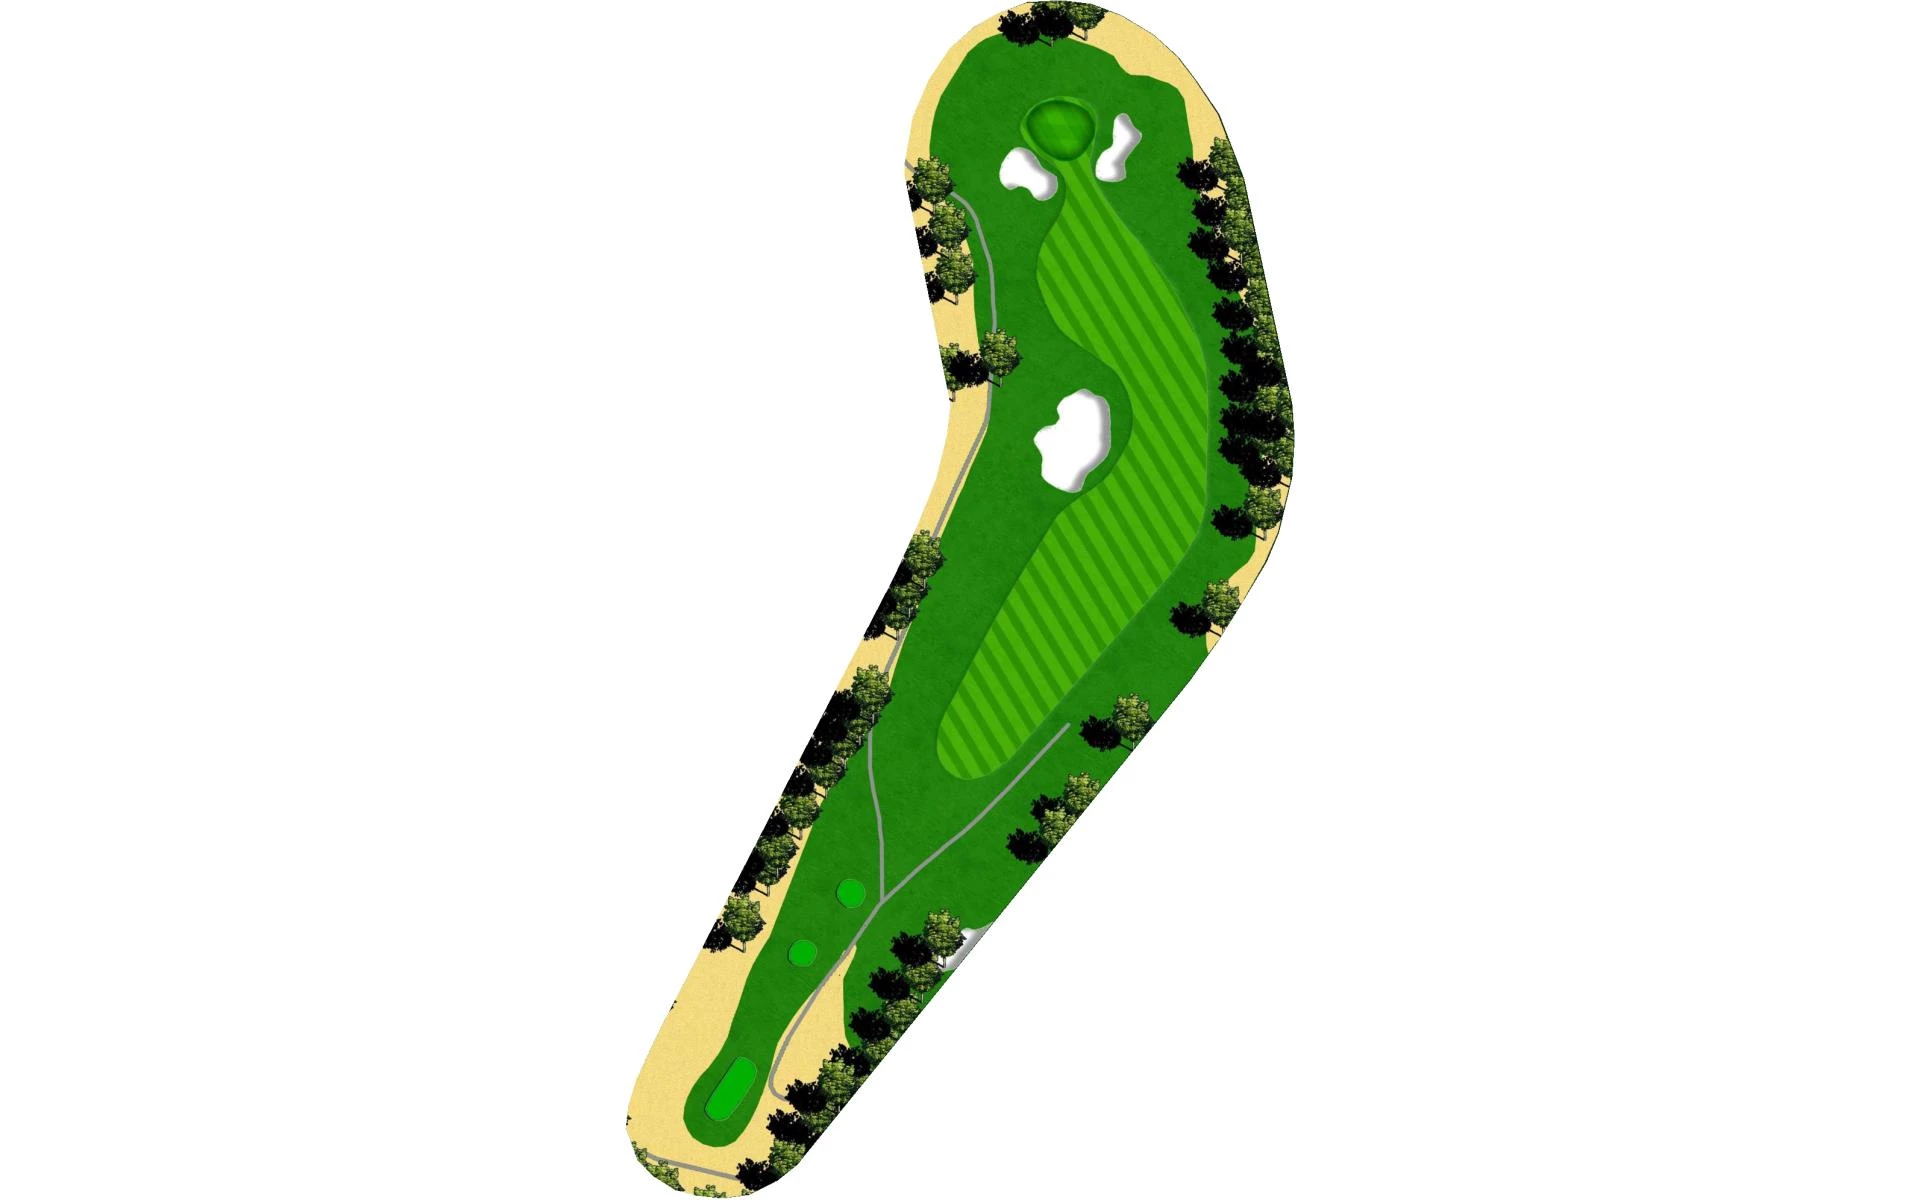
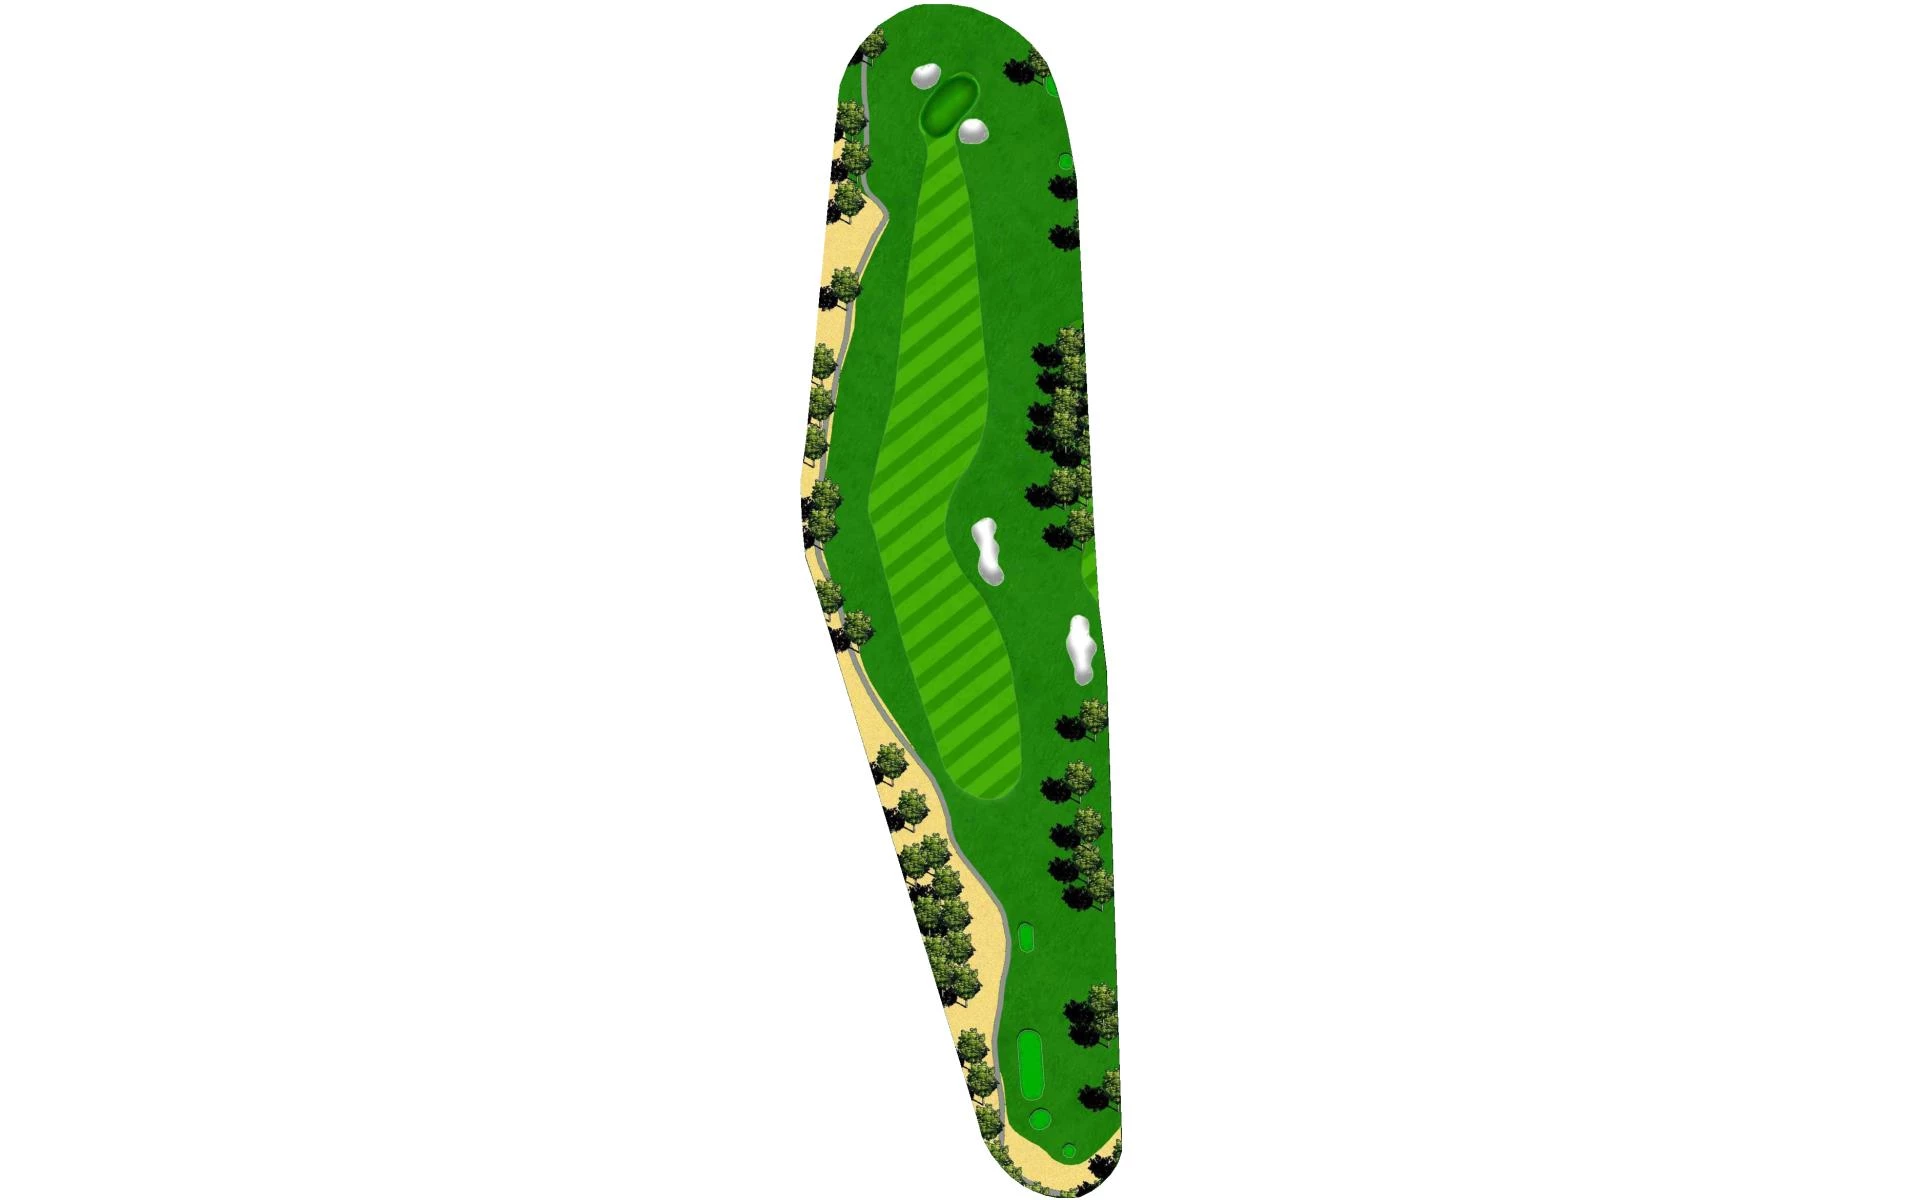
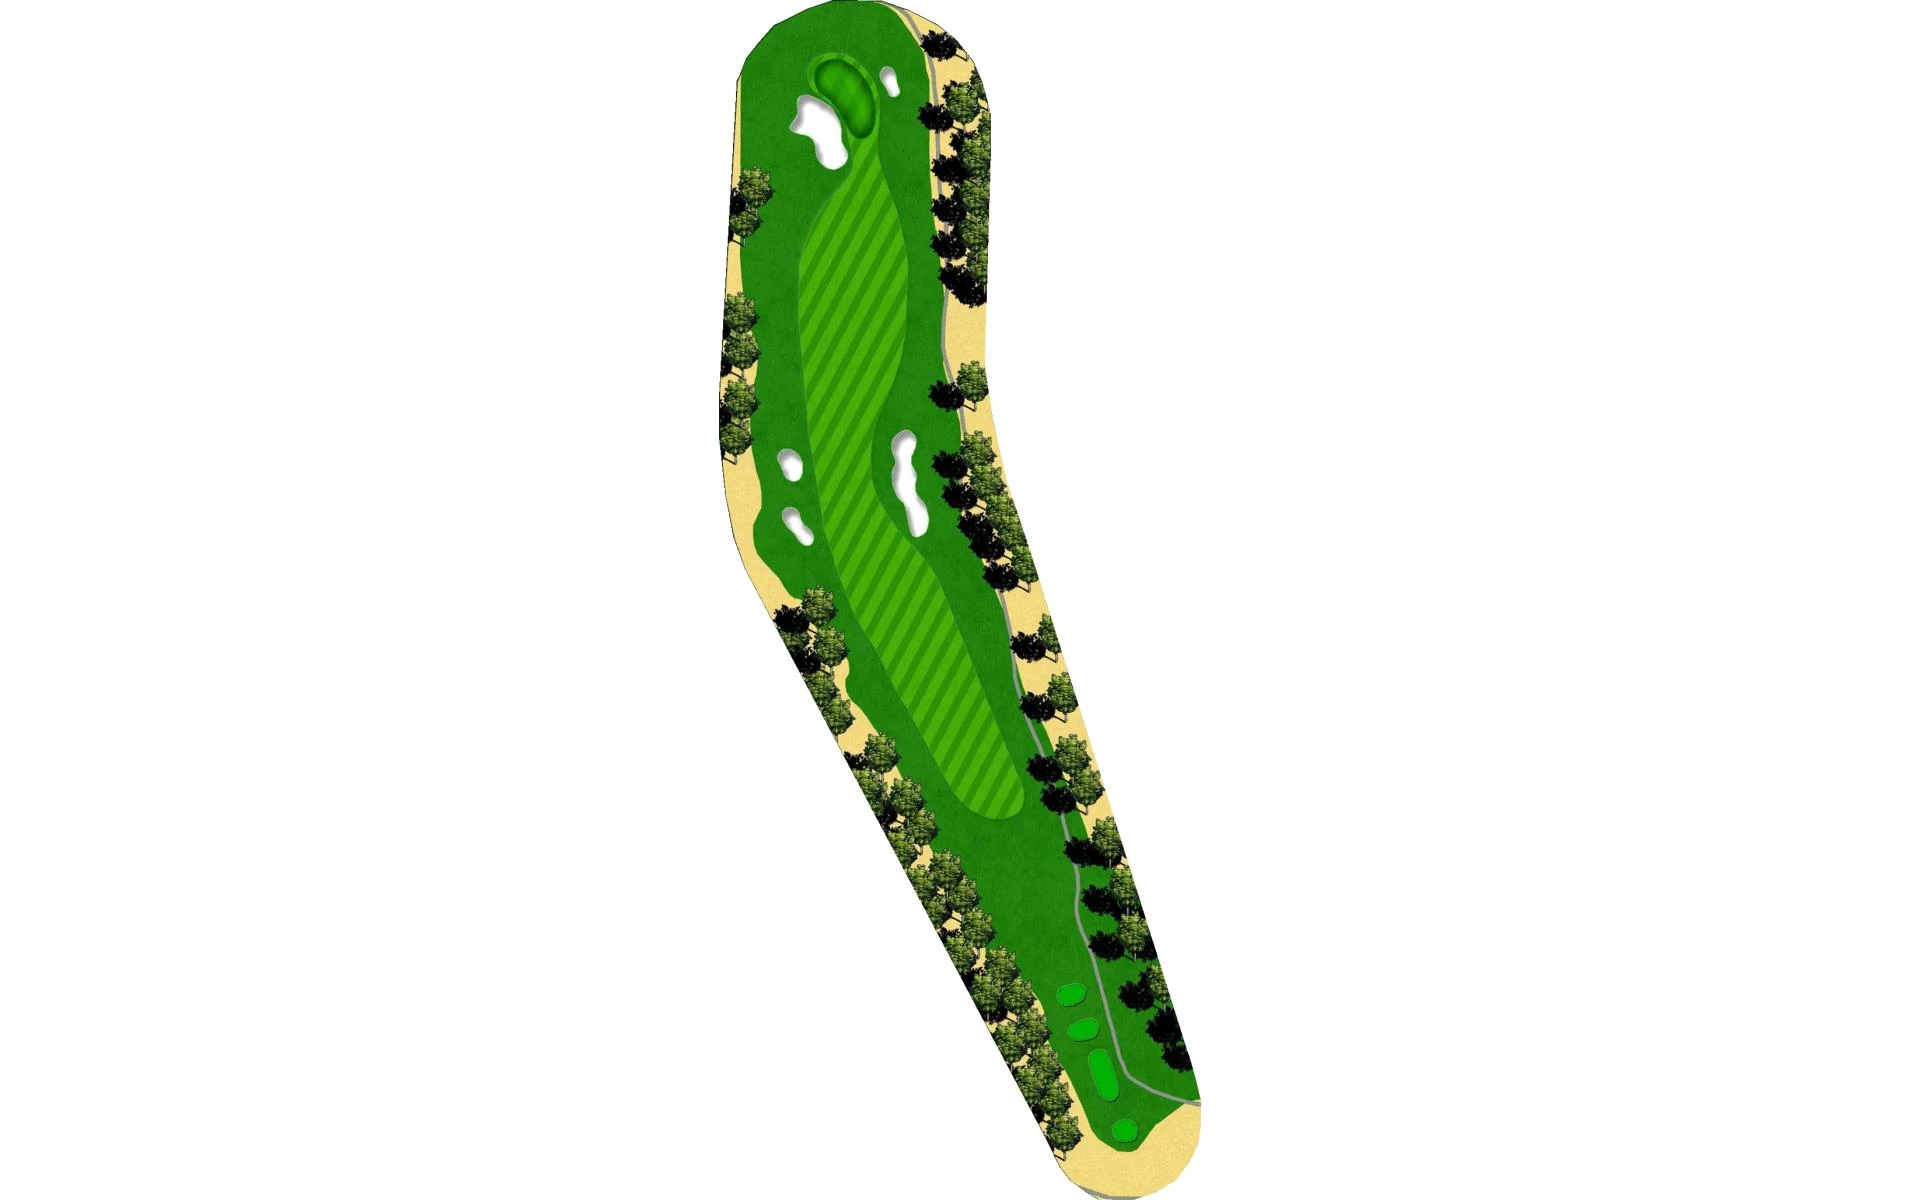
# 1 / Hole #1
Par: 4
Handicaps:
Men's 5
Women's 5
Yardage by Tee:
BLACK 418
BLUE 401
GOLD 353
ORANGE 328
WHITE 391
Slope:
Championship 132 / Long Combo 130 / Regular 128 / Medium Combo 126
Pro Tips
This straight away with a sand bunker tempts golfers to keep their drive to left side of fairway. The small green is well guarded in front with a narrow opening protected by sand on left side.
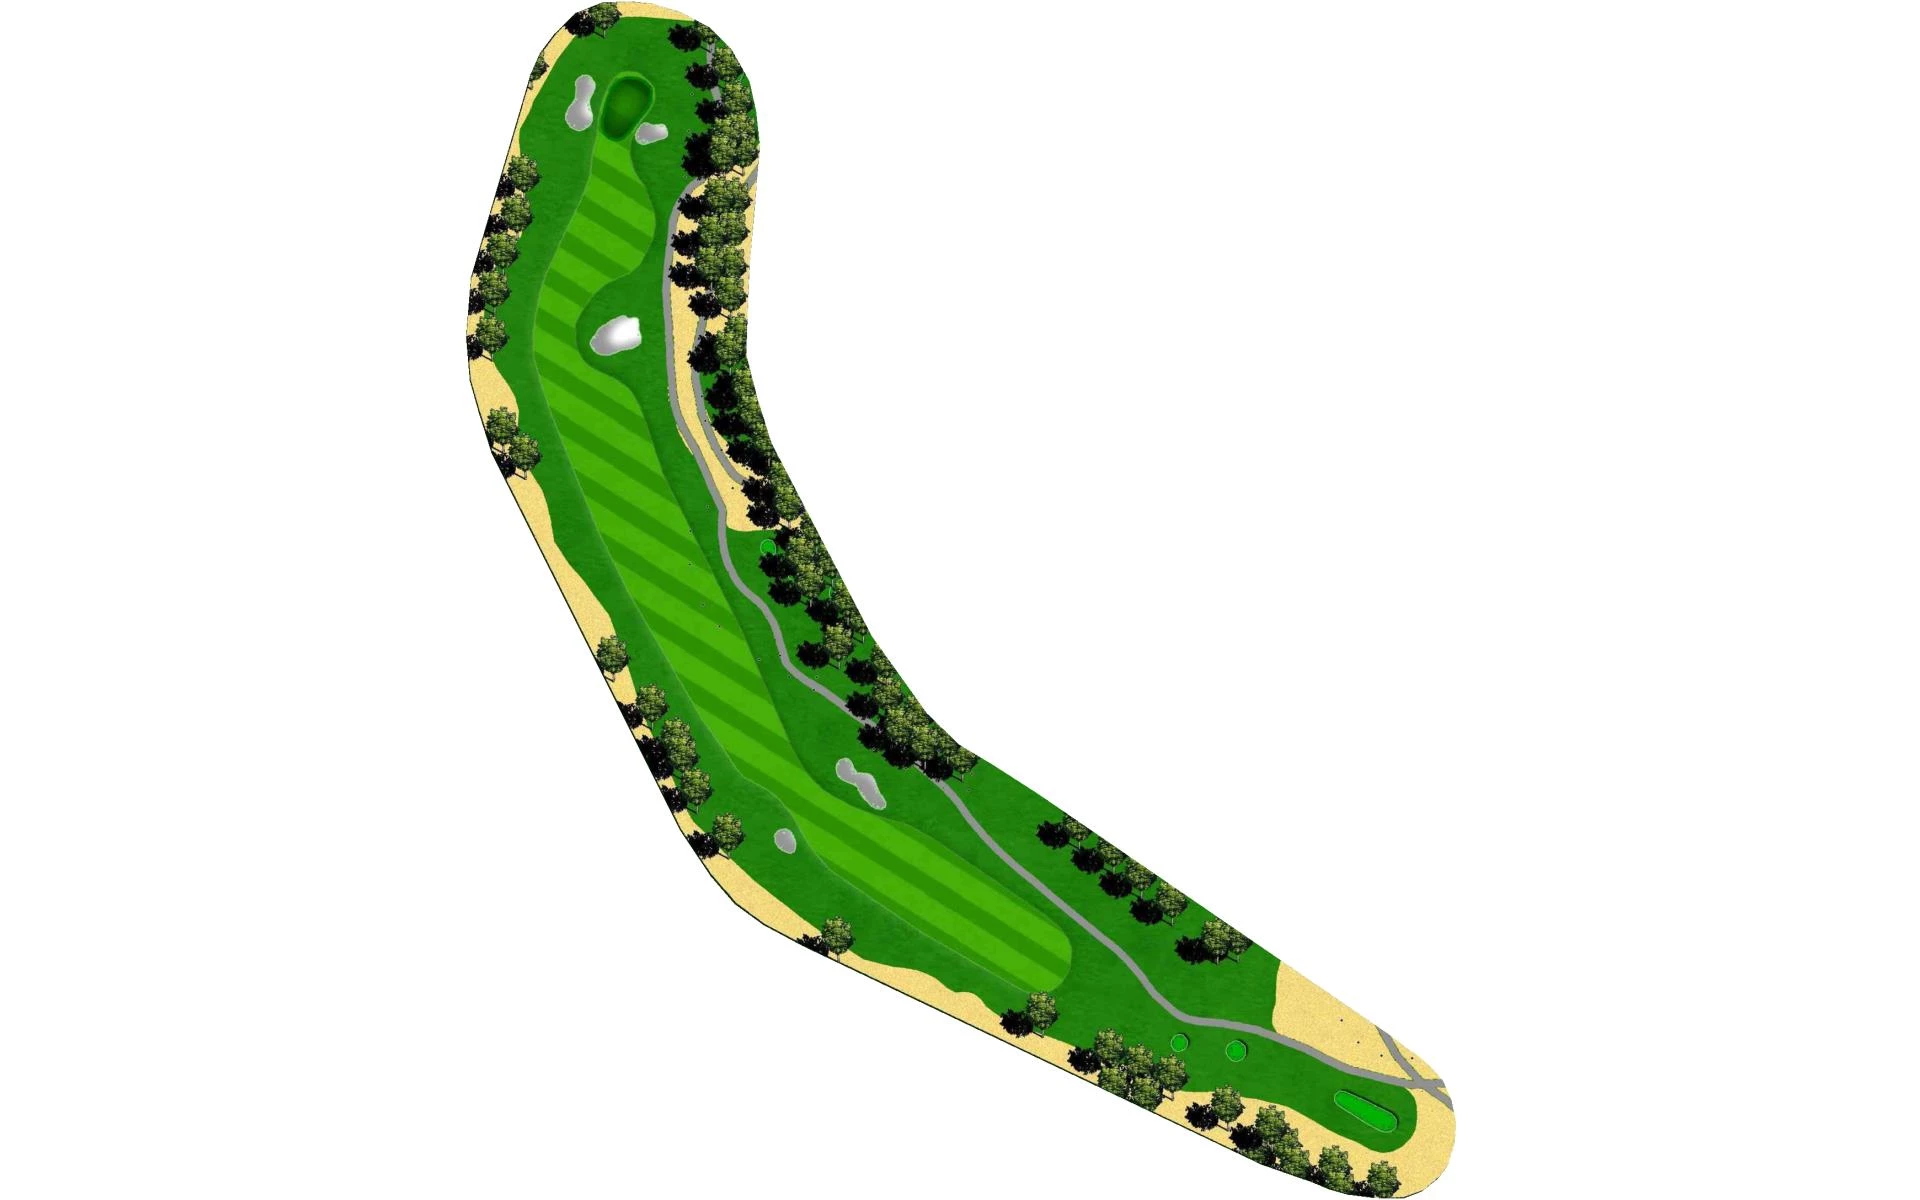
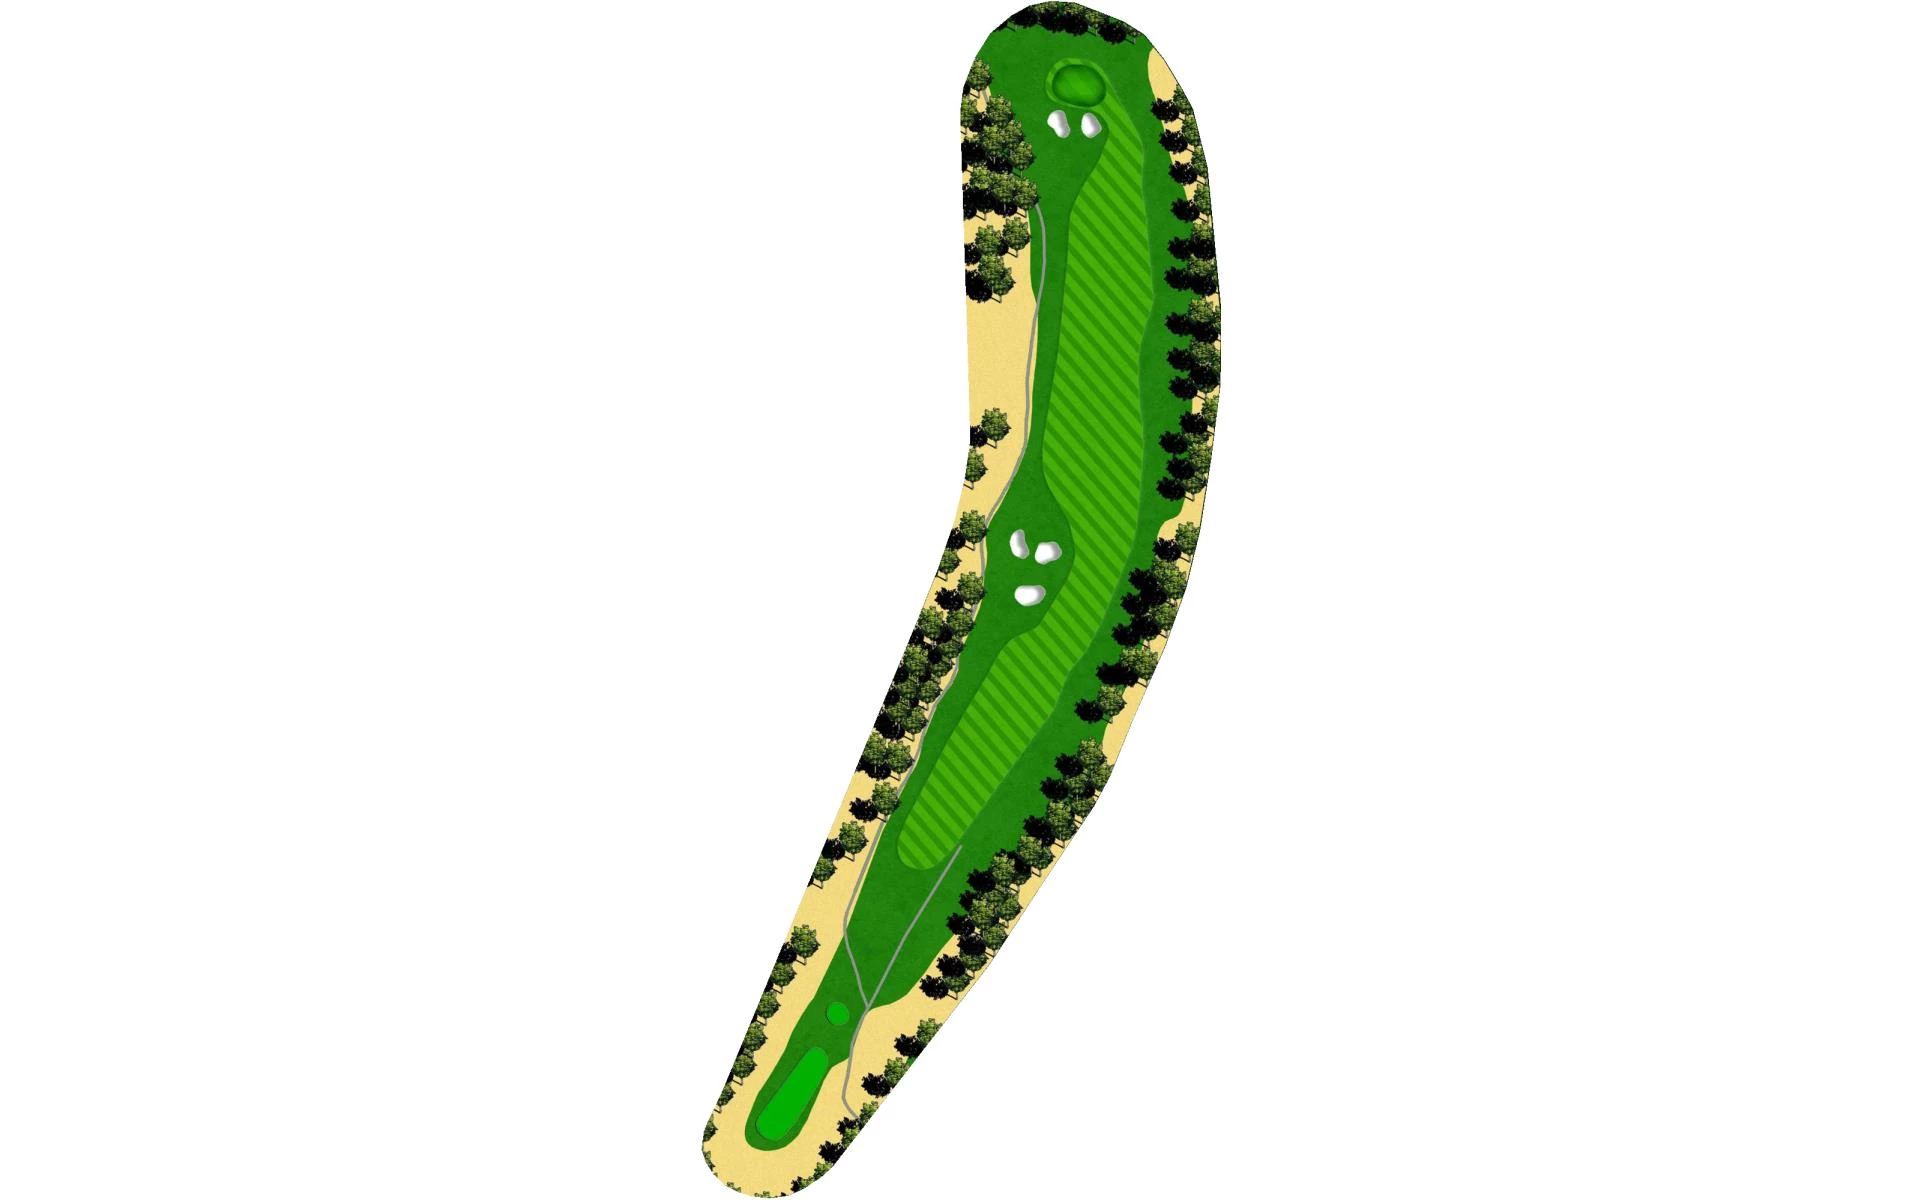
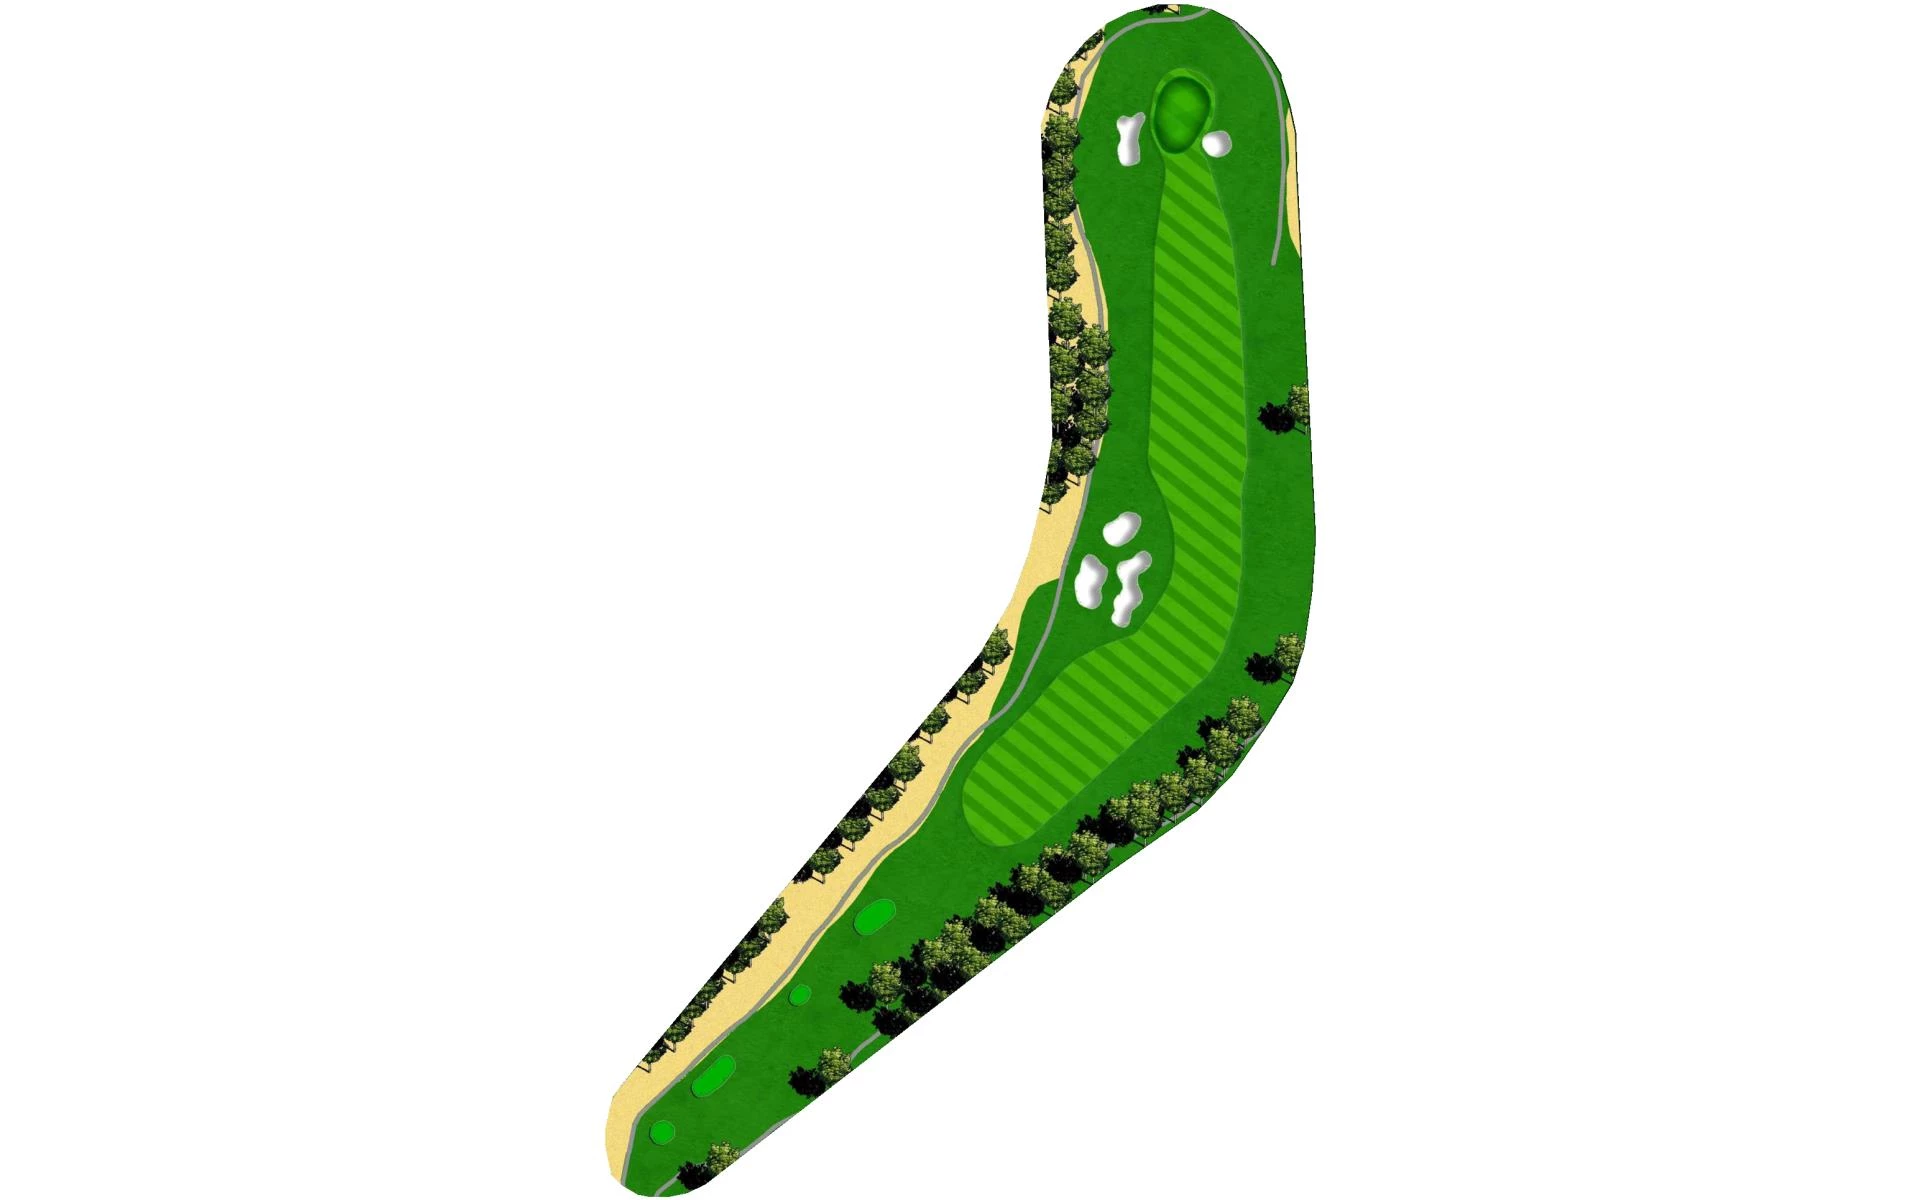
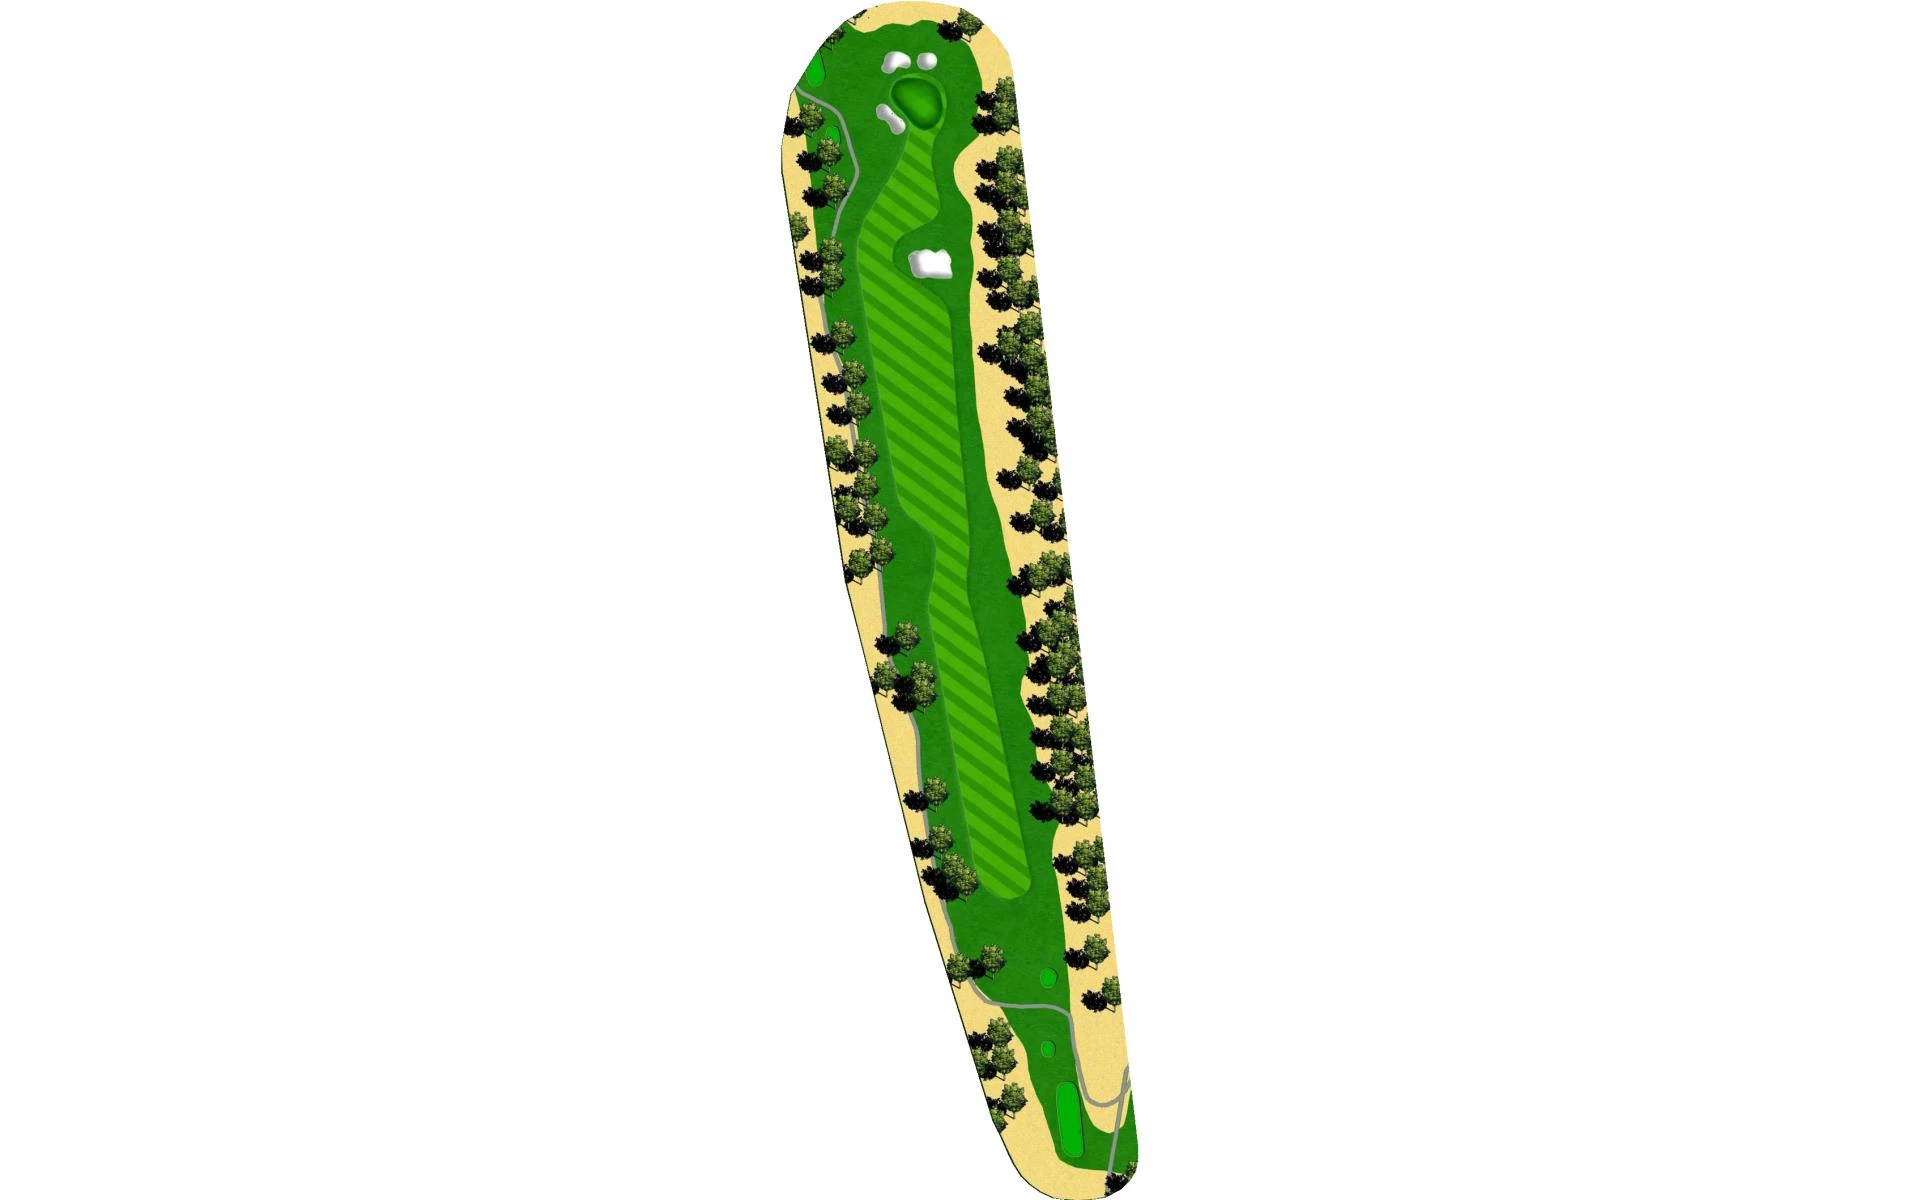
# 2 / Hole #2
Par: 5
Handicaps:
Men's 7
Women's 3
Yardage by Tee:
BLACK 567
BLUE 547
GOLD 477
ORANGE 432
WHITE 501
Slope:
Championship 132 / Long Combo 130 / Regular 128 / Medium Combo 126
Pro Tips
Fairway bunkers on the left and right require accurate an drive to approach the dogleg right on your second shot. A fairway bunker in front of the green and out-of-bounds will catch a bold second shot that does not carry. The flat green is well protected left and right by sand.
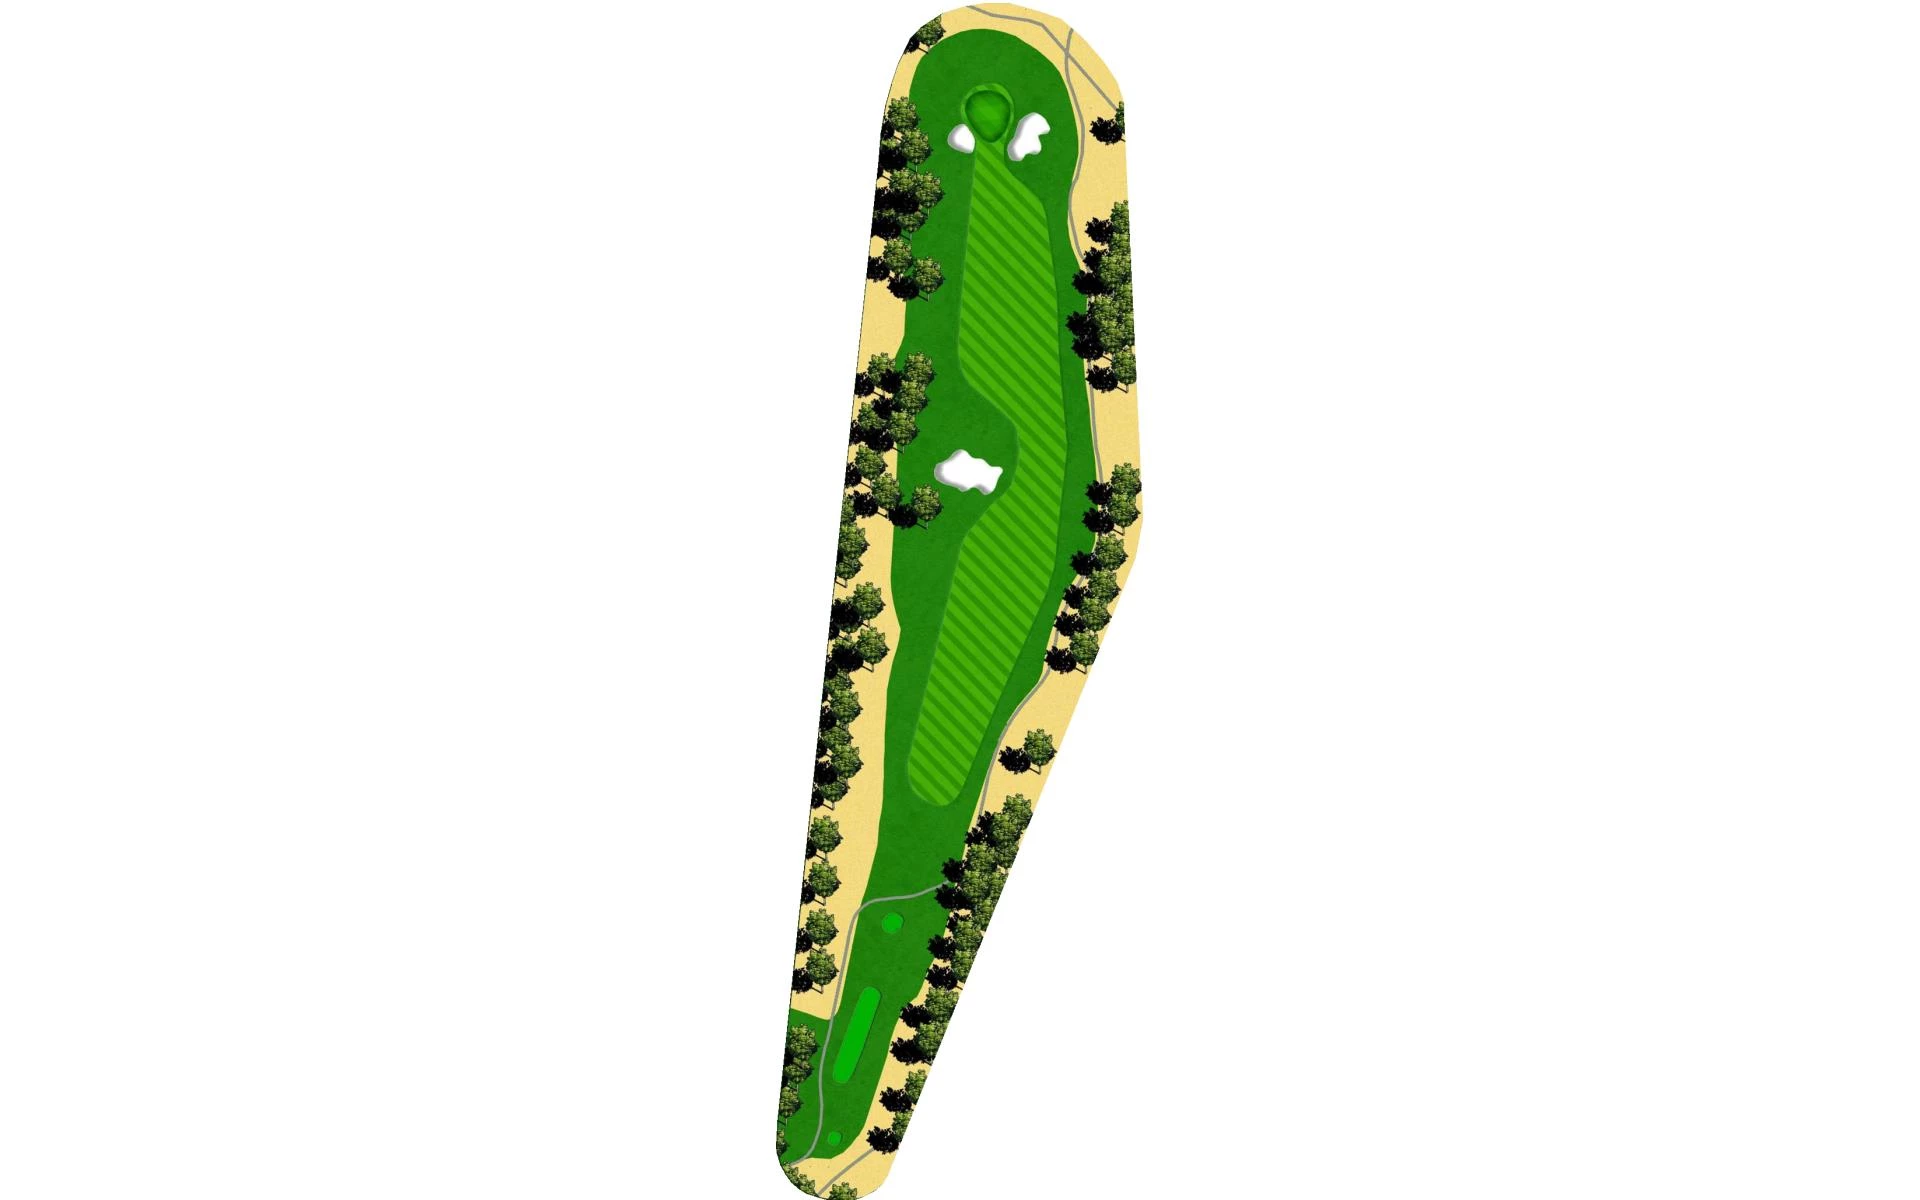
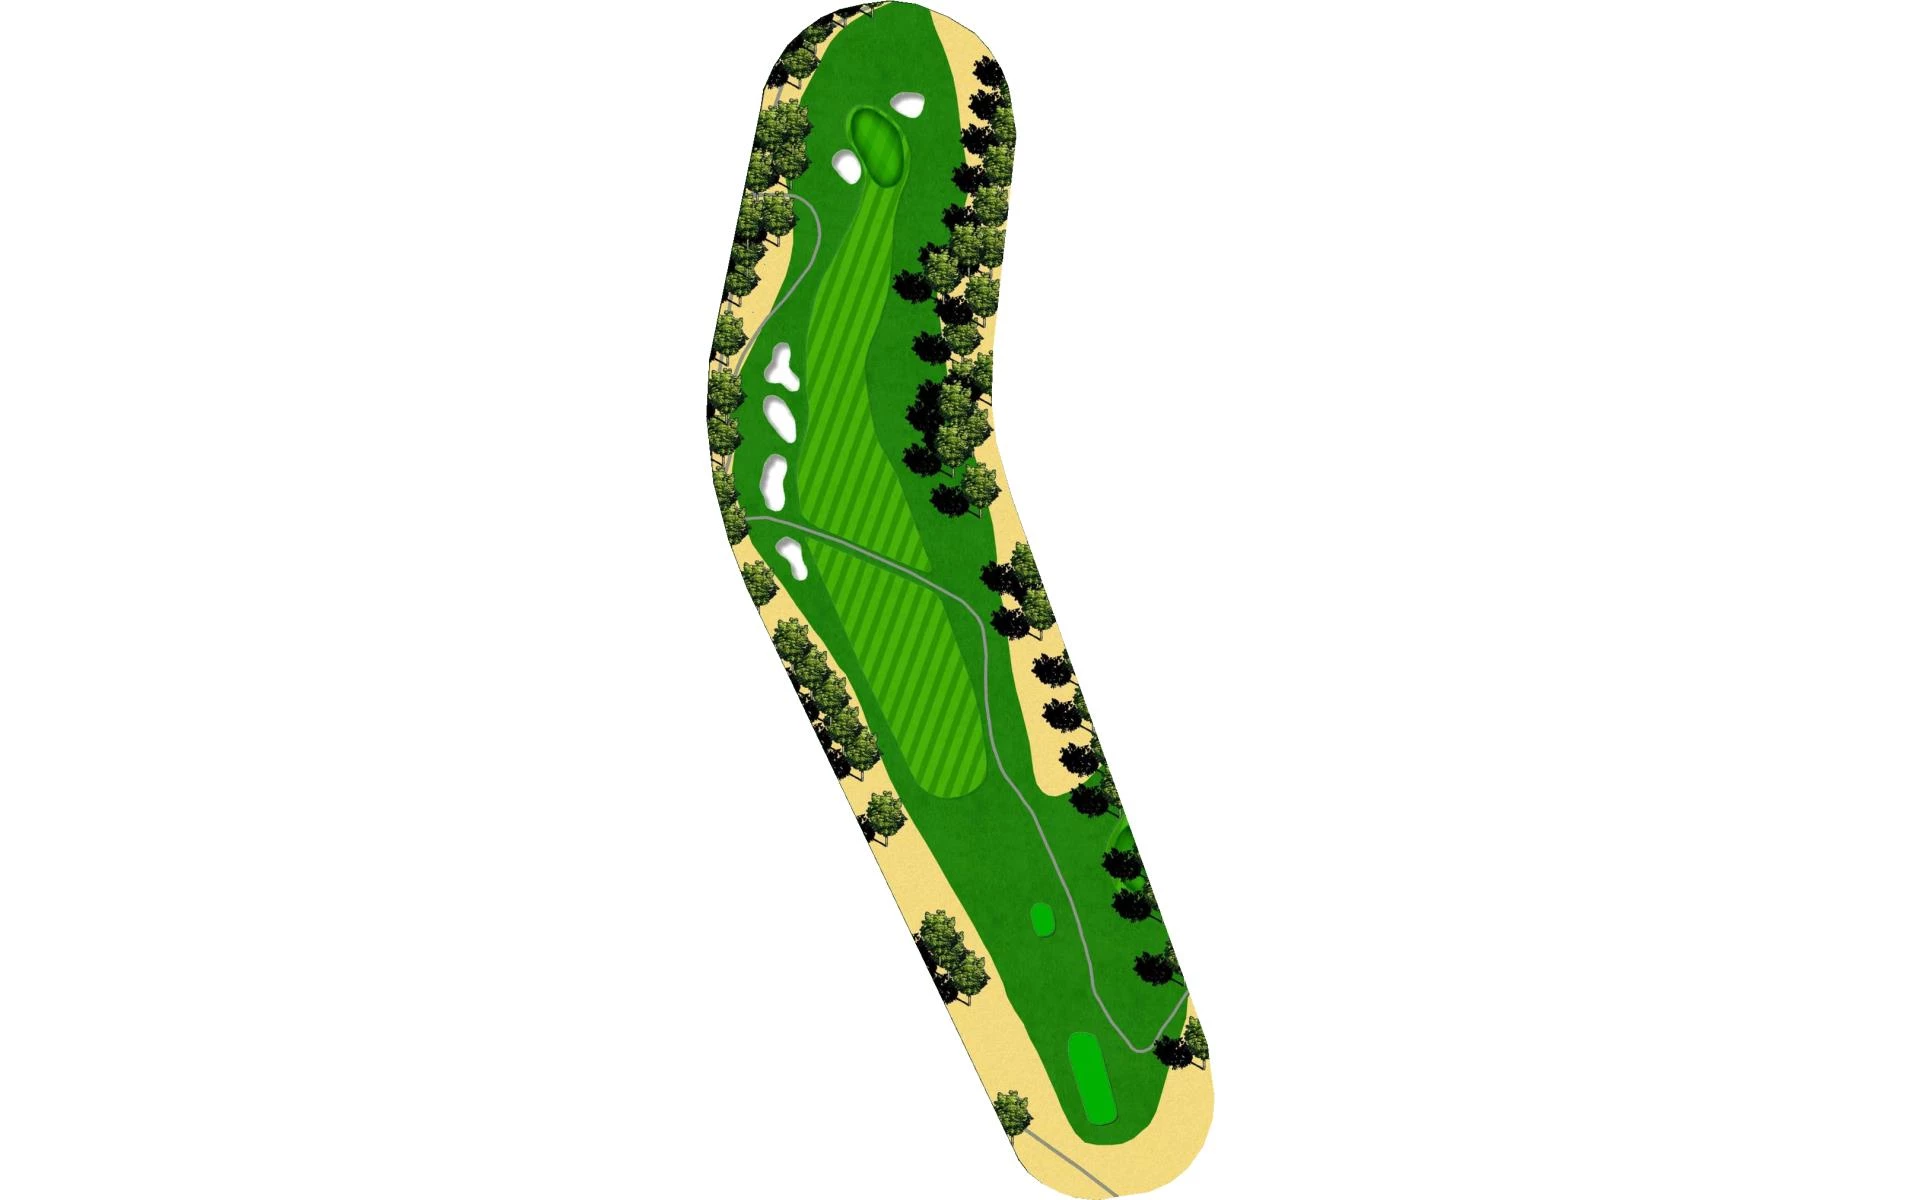
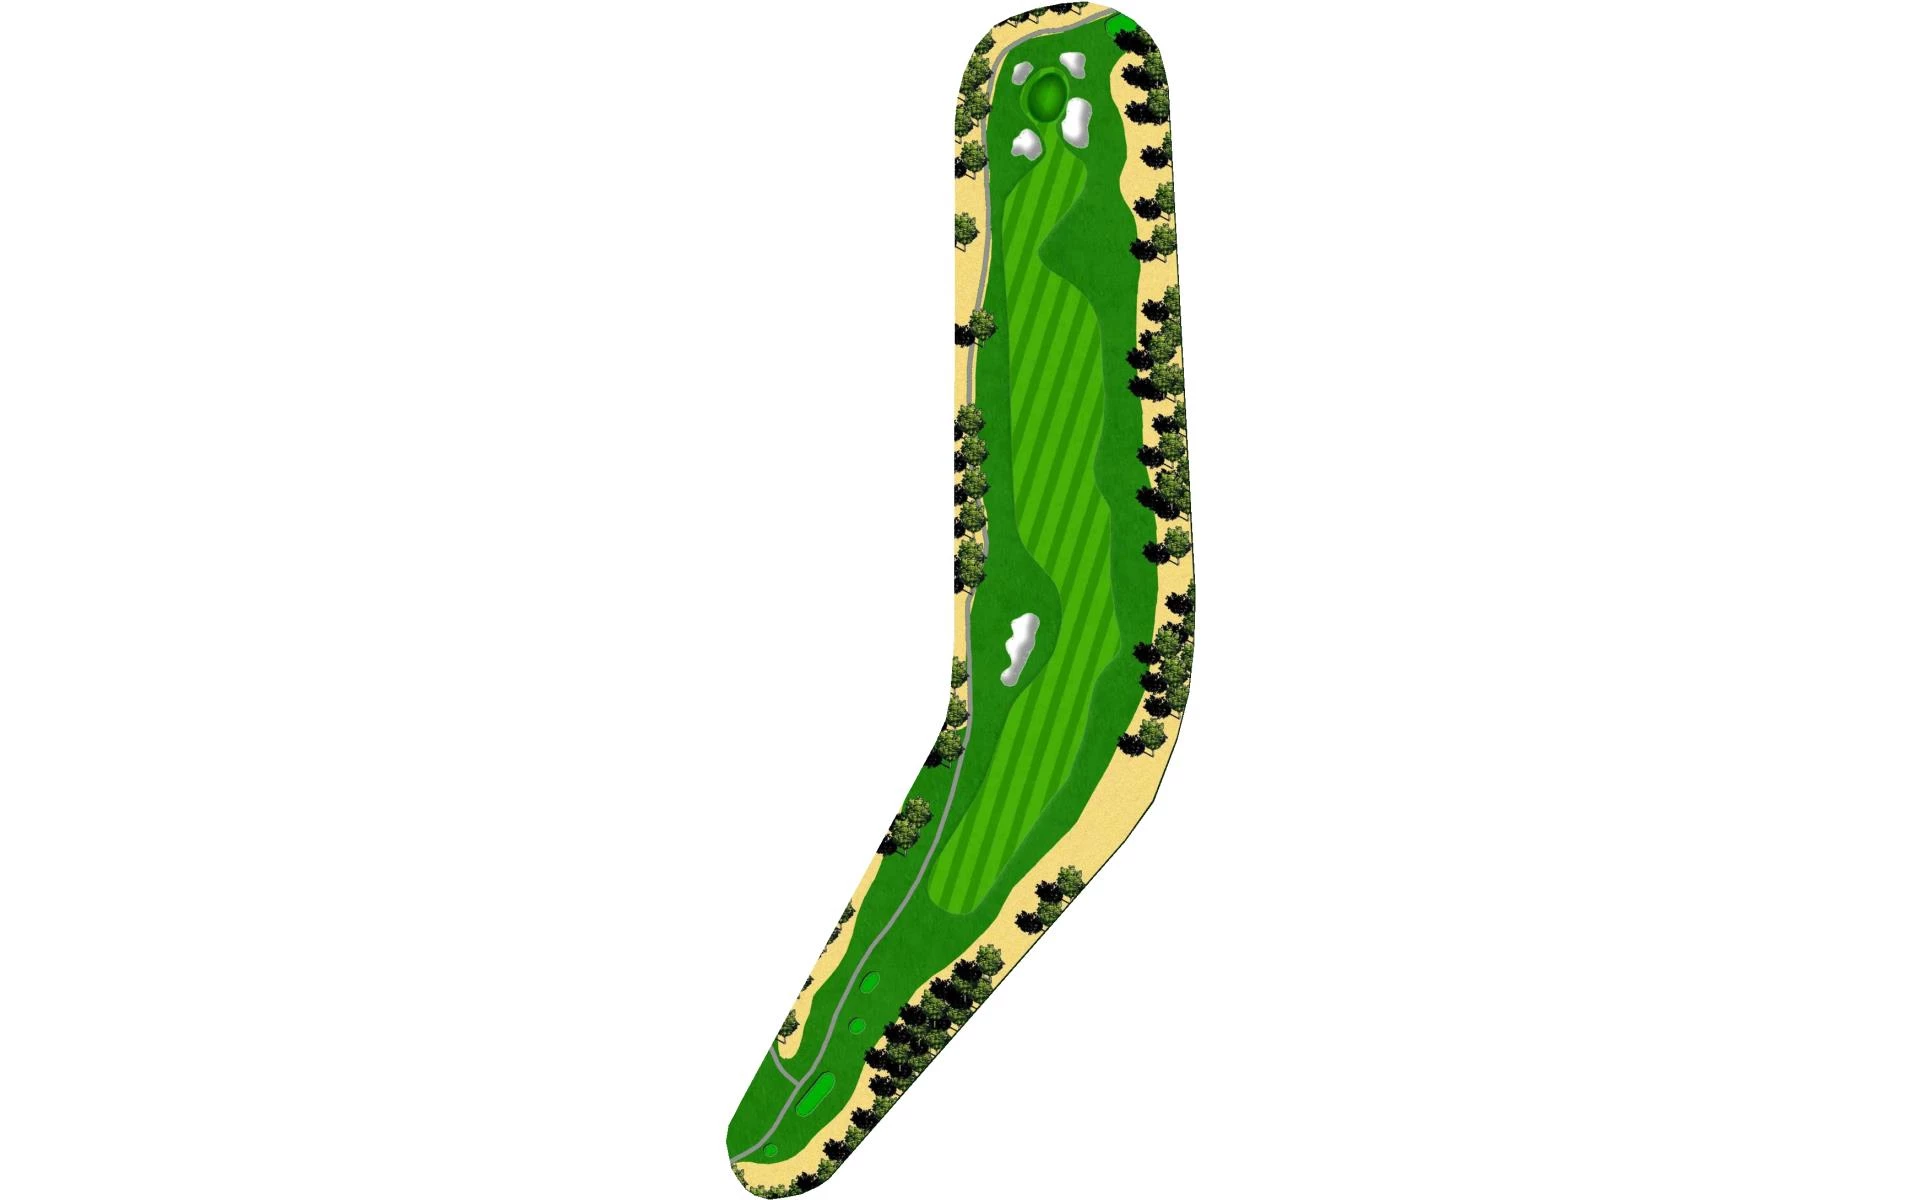
# 3 / Hole #3
Par: 4
Handicaps:
Men's 1
Women's 7
Yardage by Tee:
BLACK 434
BLUE 402
GOLD 344
ORANGE 286
WHITE 378
Slope:
Championship 132 / Long Combo 130 / Regular 128 / Medium Combo 126
Pro Tips
No. 3 is a dogleg left with a steep mounded fairway bunker on the left side at the corner. The green slopes to the fairway with sand on both sides.
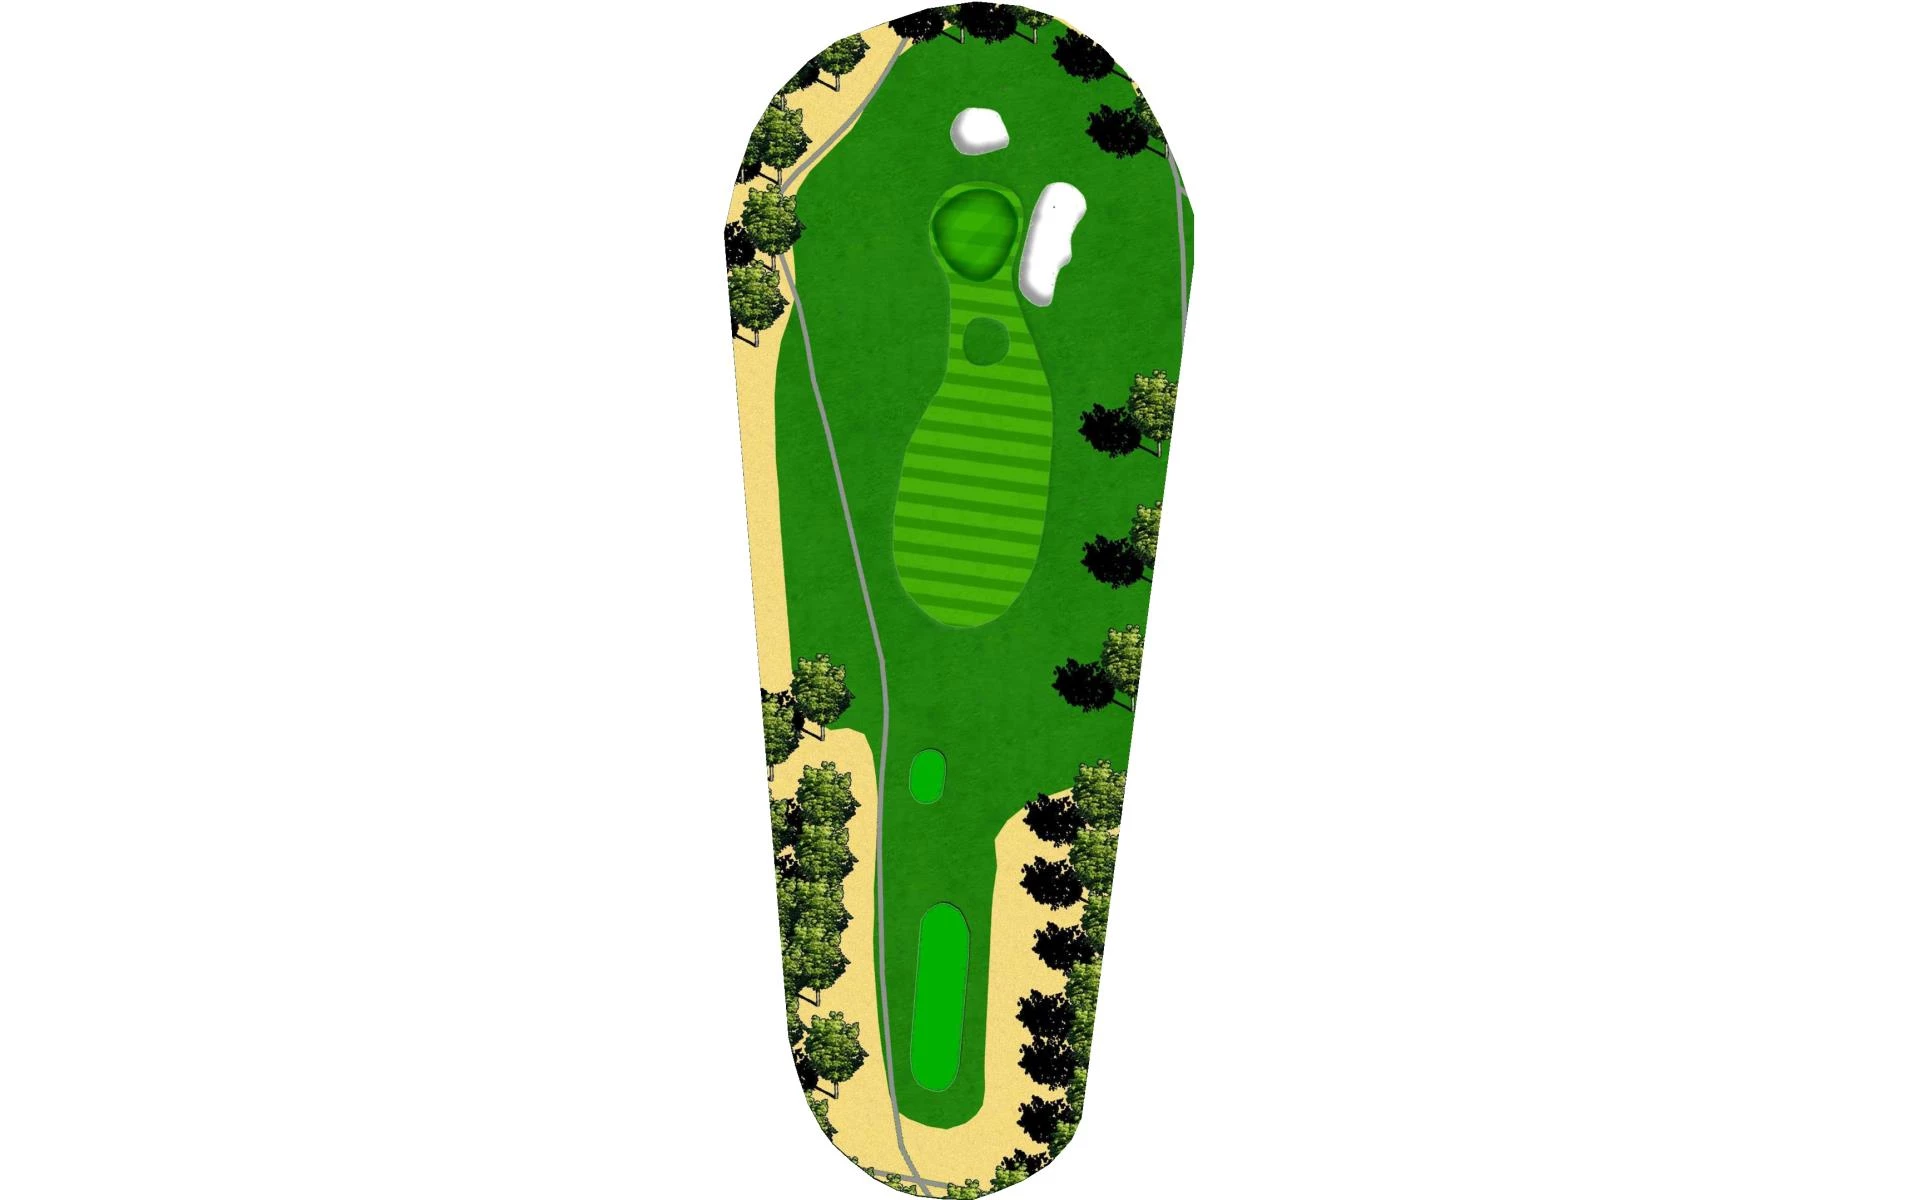
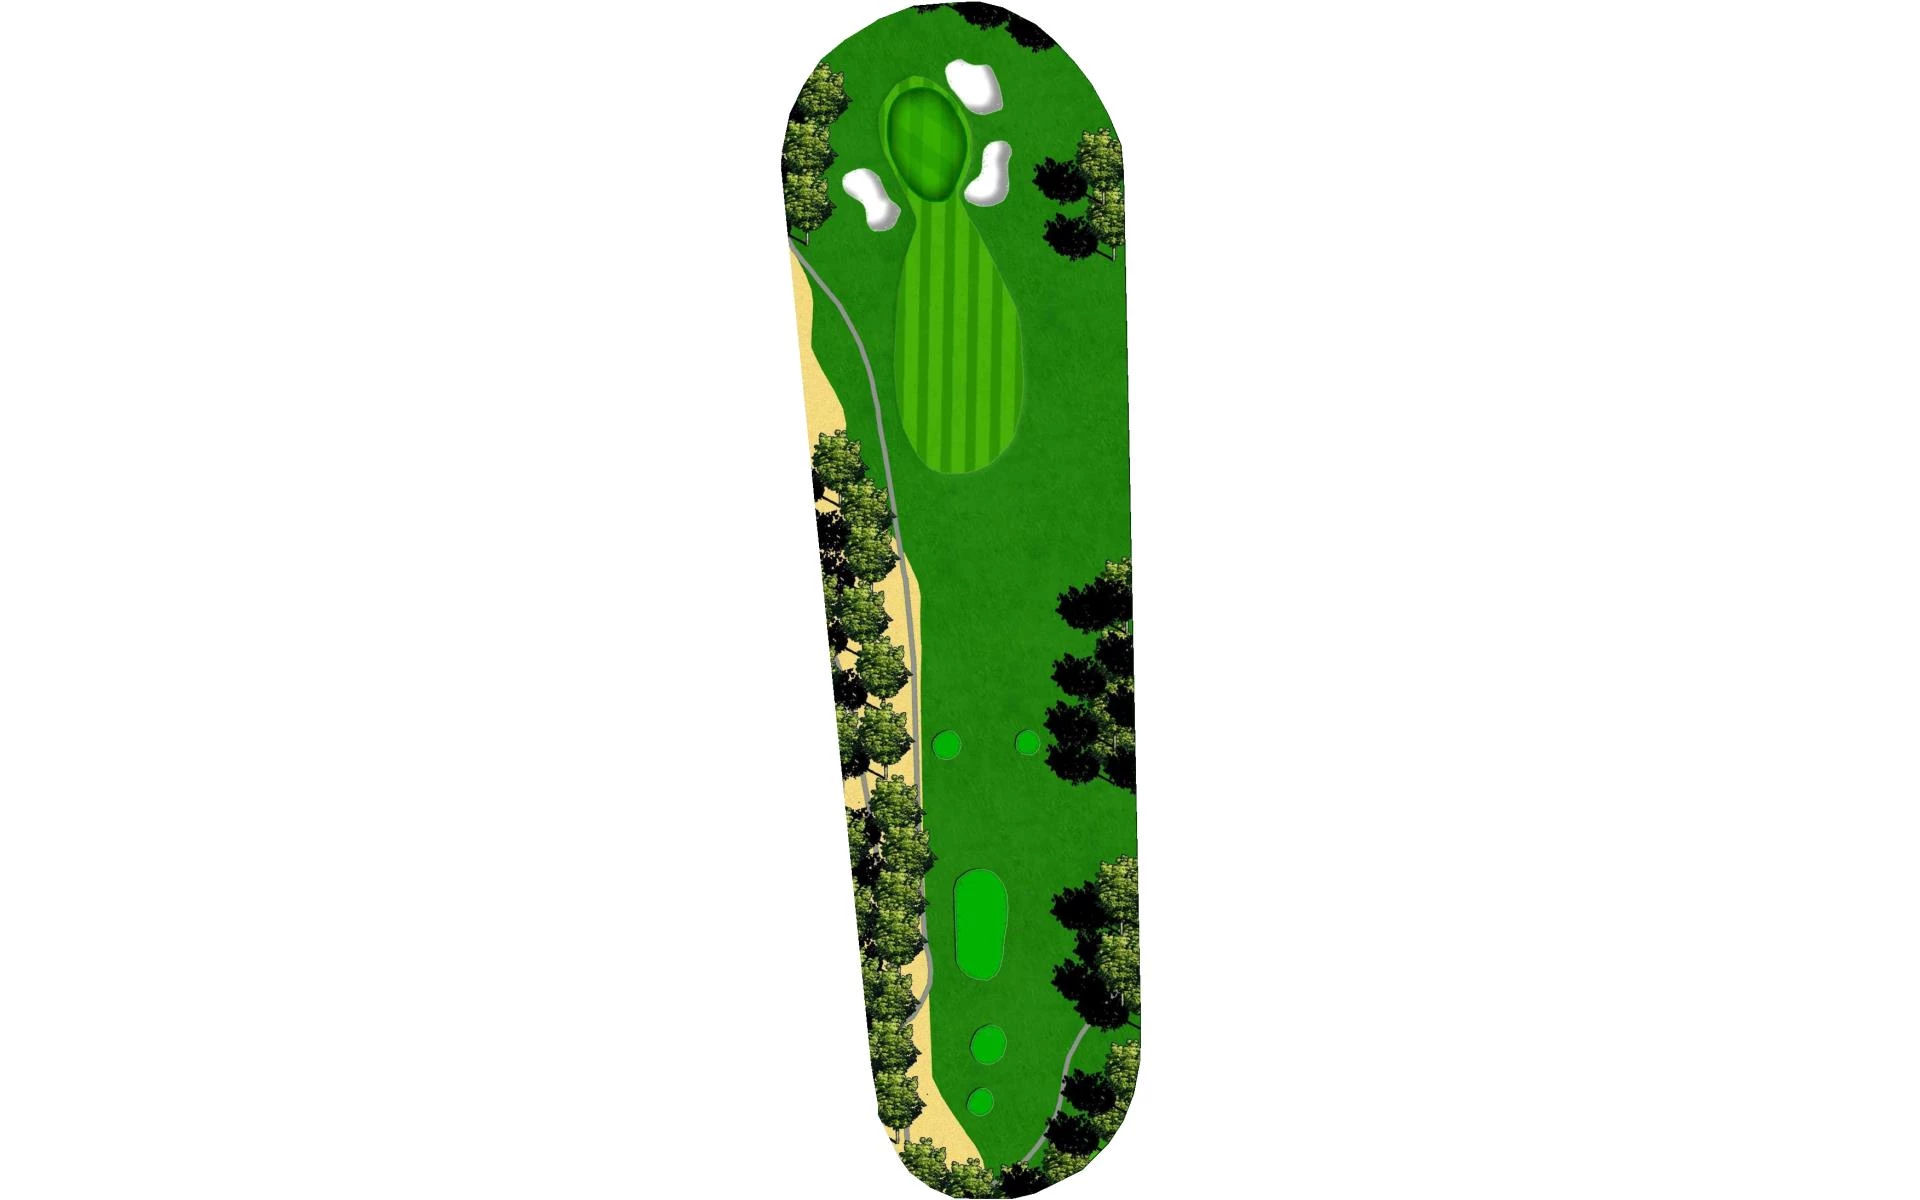
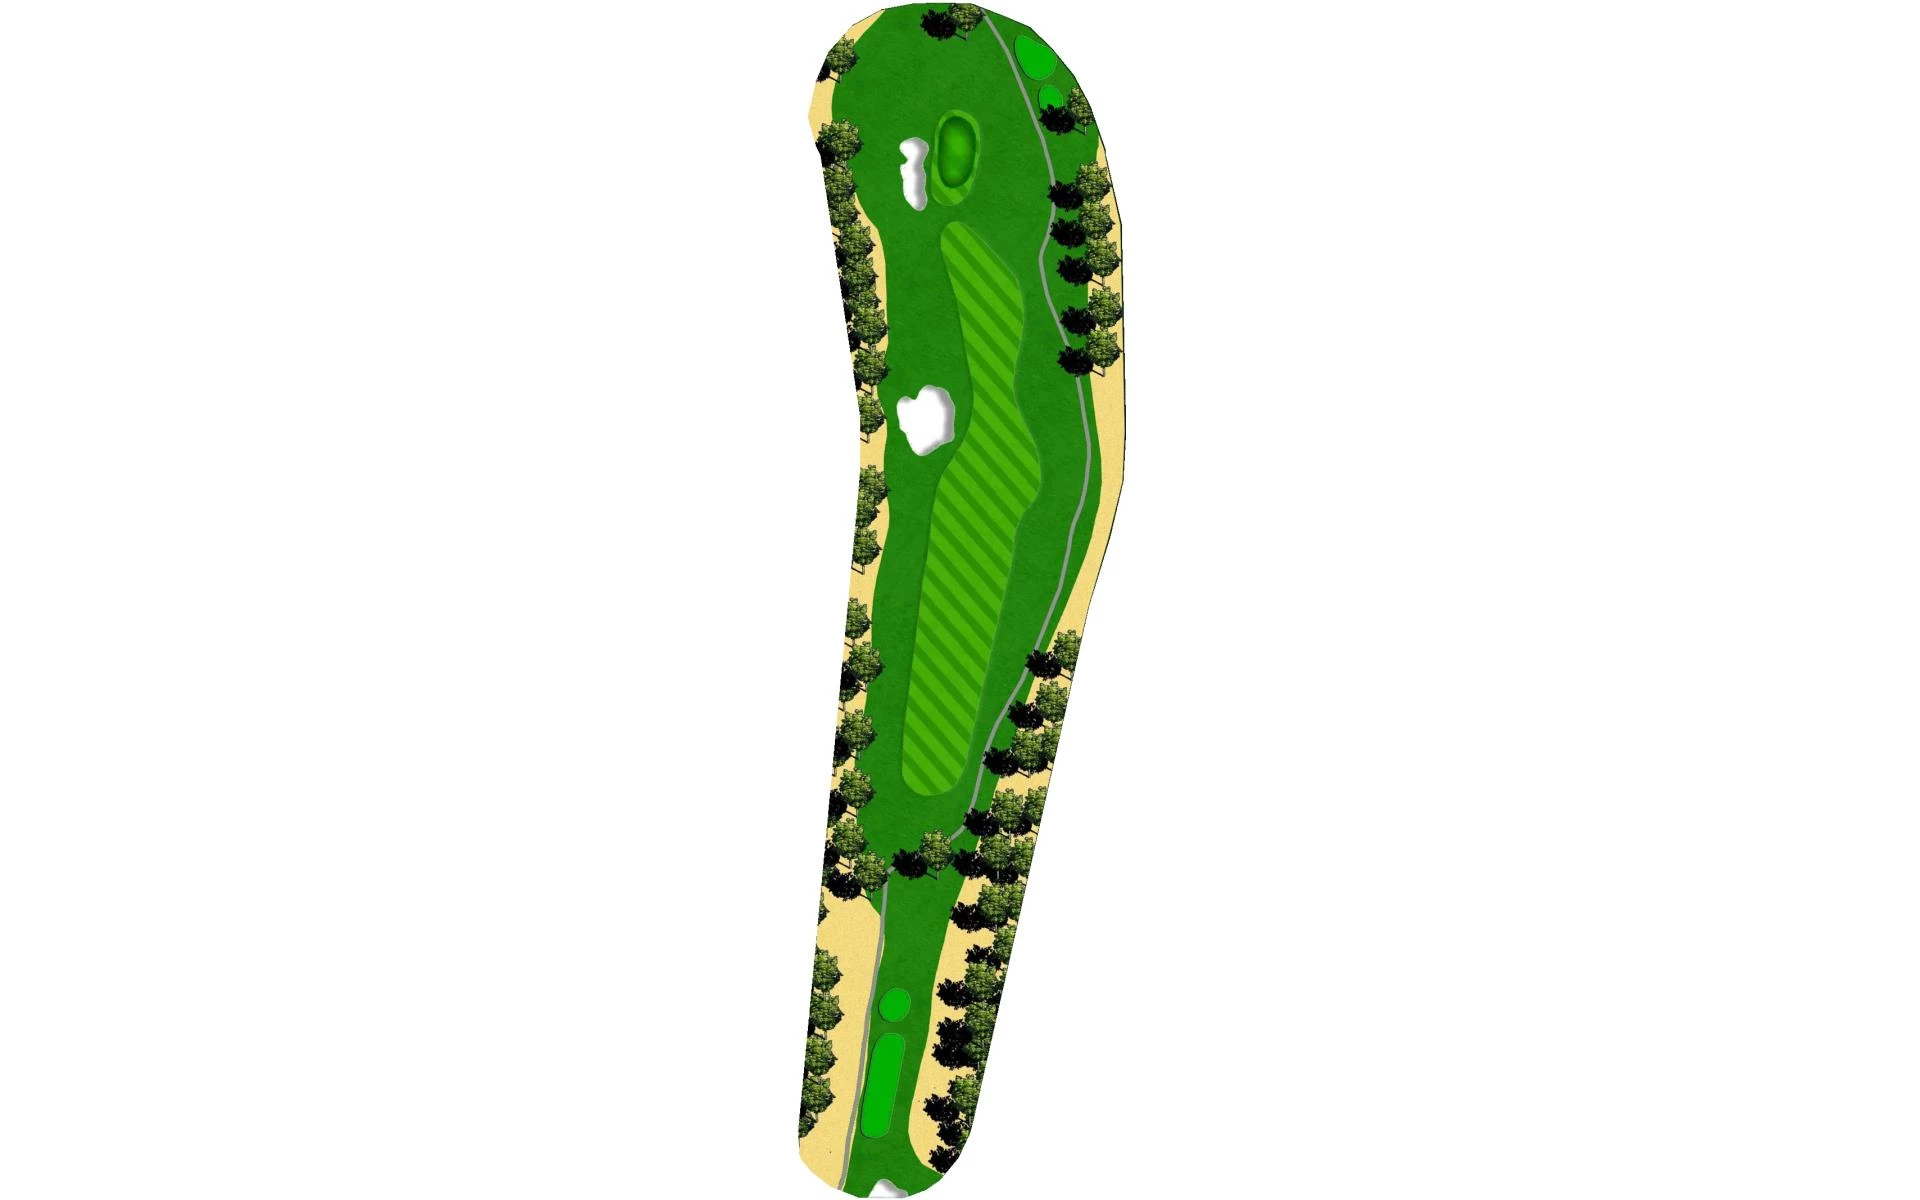
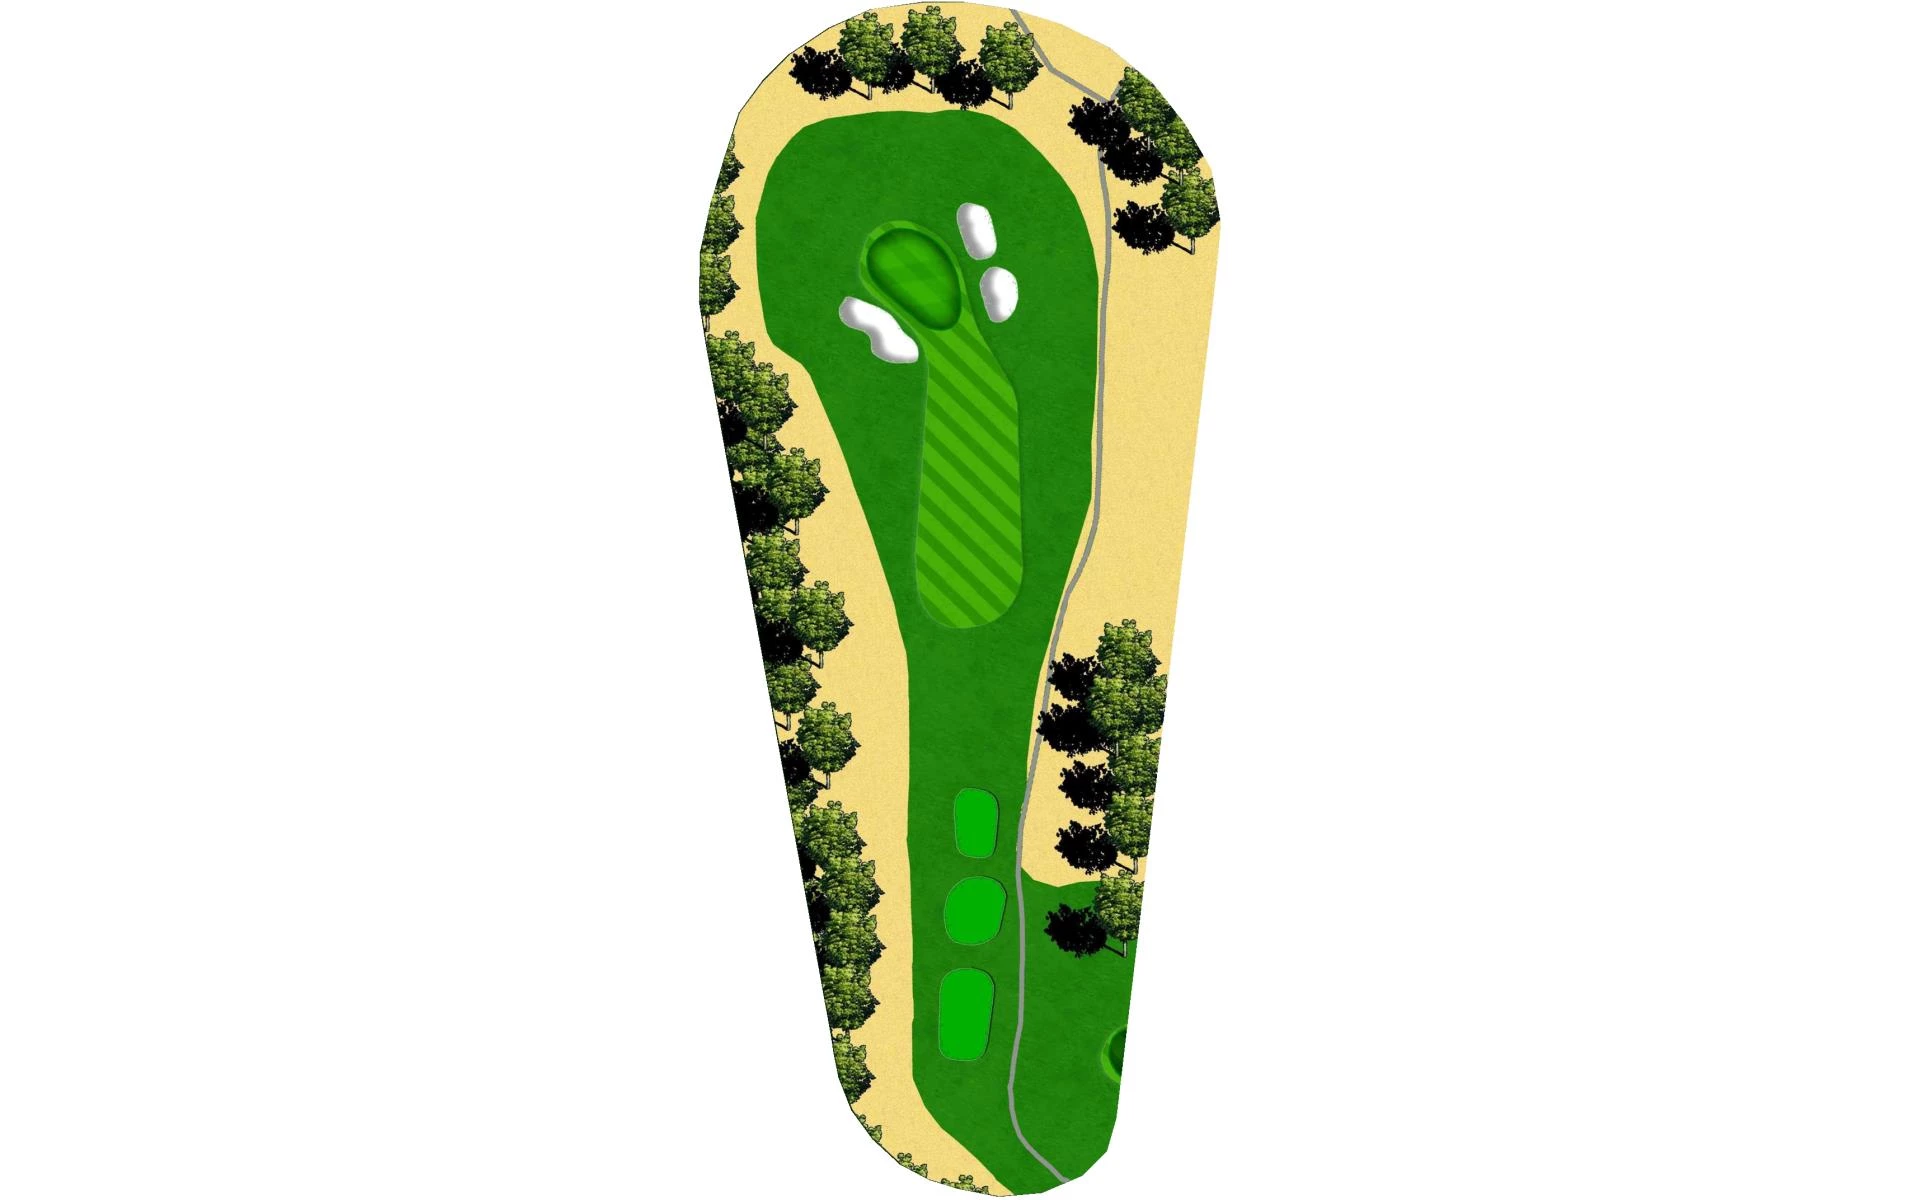
# 4 / Hole #4
Par: 3
Handicaps:
Men's 17
Women's 15
Yardage by Tee:
BLACK 181
BLUE 163
GOLD 119
ORANGE 115
WHITE 154
Slope:
Championship 132 / Long Combo 130 / Regular 128 / Medium Combo 126
Pro Tips
The Catalina Mountains provide the background for this beautiful green with a narrow opening that requires a very straight shot to avoid the many grass mounds and bunkers protecting it.
# 5 / Hole #5
Par: 4
Handicaps:
Men's 11
Women's 9
Yardage by Tee:
BLACK 356
BLUE 344
GOLD 283
ORANGE 263
WHITE 307
Slope:
Championship 132 / Long Combo 130 / Regular 128 / Medium Combo 126
Pro Tips
This short dogleg left tempts you to drive it over the corner. Trees and a large bunker guard the left side of the fairway. One drive over the corner gets you within pitching range of the elevated and double level green.
# 6 / Hole #6
Par: 5
Handicaps:
Men's 15
Women's 1
Yardage by Tee:
BLACK 543
BLUE 498
GOLD 460
ORANGE 405
WHITE 486
Slope:
Championship 132 / Long Combo 130 / Regular 128 / Medium Combo 126
Pro Tips
A slight dogleg left with out-of-bounds on both sides. Bunkers at the dogleg force an accurate tee shot. A well-positioned second shot will let you decide to go for the pin or settle for the center of this flat, small green protected by bunkers in front.
# 7 / Hole #7
Par: 4
Handicaps:
Men's 13
Women's 13
Yardage by Tee:
BLACK 344
BLUE 329
GOLD 274
ORANGE 240
WHITE 317
Slope:
Championship 132 / Long Combo 130 / Regular 128 / Medium Combo 126
Pro Tips
A slight dogleg right forces you to either try for distance plus accuracy to get very close to this green, or lay back to a more open area short of the grove of trees which will allow a full shot with a short iron to the steep green. Beware the out-of-bounds left and right.
# 8 / Hole #8
Par: 3
Handicaps:
Men's 9
Women's 17
Yardage by Tee:
BLACK 235
BLUE 197
GOLD 144
ORANGE 144
WHITE 183
Slope:
Championship 132 / Long Combo 130 / Regular 128 / Medium Combo 126
Pro Tips
Straight into the Western breezes, this hole requires distance and accuracy to reach the green that opens up in front, but is well bunkered, with out-of-bounds on the left.
# 9 / Hole #9
Par: 4
Handicaps:
Men's 3
Women's 11
Yardage by Tee:
BLACK 435
BLUE 419
GOLD 358
ORANGE 313
WHITE 405
Slope:
Championship 132 / Long Combo 130 / Regular 128 / Medium Combo 126
Pro Tips
A great finishing hole for the front nine. A straight drive that favors the left side will let you avoid the bunker about 250 yards off the tee. The small green opens up on the left side and requires a long and accurate second shot to avoid the many mounds and bunkers.
# 10 / Hole #10
Par: 4
Handicaps:
Men's 2
Women's 12
Yardage by Tee:
BLACK 442
BLUE 415
GOLD 334
ORANGE 309
WHITE 371
Slope:
Championship 132 / Long Combo 130 / Regular 128 / Medium Combo 126
Pro Tips
This dogleg left requires a long tee shot, with fairway bunkers to keep you honest. The elevated green has two levels and is very steep.
# 11 / Hole #11
Par: 5
Handicaps:
Men's 10
Women's 2
Yardage by Tee:
BLACK 540
BLUE 507
GOLD 448
ORANGE 413
WHITE 470
Slope:
Championship 132 / Long Combo 130 / Regular 128 / Medium Combo 126
Pro Tips
A dogleg left with a fairway bunker guarding the left corner. An accurate second shot will give an easier approach to the elevated two-level green. Aim left of the fairway to avoid the mounds on the right.
# 12 / Hole #12
Par: 4
Handicaps:
Men's 14
Women's 10
Yardage by Tee:
BLACK 362
BLUE 346
GOLD 316
ORANGE 266
WHITE 334
Slope:
Championship 132 / Long Combo 130 / Regular 128 / Medium Combo 126
Pro Tips
The fairway rolls to the right and favors a drive down the left side. The fairway bunker need not be a problem unless you shorten the hole with a full driver. A narrow, two-level green is very severe from back to front and requires an accurate approach shot to avoid bunkers left and leaving you with a very difficult chip from well below the putting surface.

# 13 / Hole #13
Par: 3
Handicaps:
Men's 16
Women's 14
Yardage by Tee:
BLACK 170
BLUE 153
GOLD 123
ORANGE 118
WHITE 137
Slope:
Championship 132 / Long Combo 130 / Regular 128 / Medium Combo 126
Pro Tips
Golfers must carry the ball to this two-level, well-protected green. Miss this green and all approaches are difficult. Bunkers on the left and a drop-off to the right in the office makes this a very intimidating tee shot.
# 14 / Hole #14
Par: 4
Handicaps:
Men's 8
Women's 6
Yardage by Tee:
BLACK 400
BLUE 379
GOLD 347
ORANGE 305
WHITE 350
Slope:
Championship 132 / Long Combo 130 / Regular 128 / Medium Combo 126
Pro Tips
The bunker here makes you want to keep your drive off the left side of this elevated tee. A small, well-bunkered green makes the second shot more demanding as the green seems very small but is actually long and deep. Out-of-bounds left and right makes this a premier driving hole.
# 15 / Hole #15
Par: 5
Handicaps:
Men's 12
Women's 4
Yardage by Tee:
BLACK 547
BLUE 520
GOLD 457
ORANGE 417
WHITE 493
Slope:
Championship 132 / Long Combo 130 / Regular 128 / Medium Combo 126
Pro Tips
A tree-lined fairway here makes an accurate drive a must to be in position to avoid the fairway bunkers on the second shot. The sloping green is well-guarded on the left and back by sand.

# 16 / Hole #16
Par: 4
Handicaps:
Men's 6
Women's 18
Yardage by Tee:
BLACK 426
BLUE 381
GOLD 302
ORANGE 242
WHITE 354
Slope:
Championship 132 / Long Combo 130 / Regular 128 / Medium Combo 126
Pro Tips
A dogleg left means your drive must be played to the right side to avoid the left fairway bunker. A good drive leaves a mid-iron to this well-bunkered green that is also guarded by severe mounding.
# 17 / Hole #17
Par: 3
Handicaps:
Men's 18
Women's 16
Yardage by Tee:
BLACK 176
BLUE 159
GOLD 117
ORANGE 112
WHITE 137
Slope:
Championship 132 / Long Combo 130 / Regular 128 / Medium Combo 126
Pro Tips
This short, but very challenging par 3 requires perfect club selection. A narrow opening makes an accurate tee shot a must to avoid the sand on both sides of the green. This hole is easy hole if club selection and direction are both on.
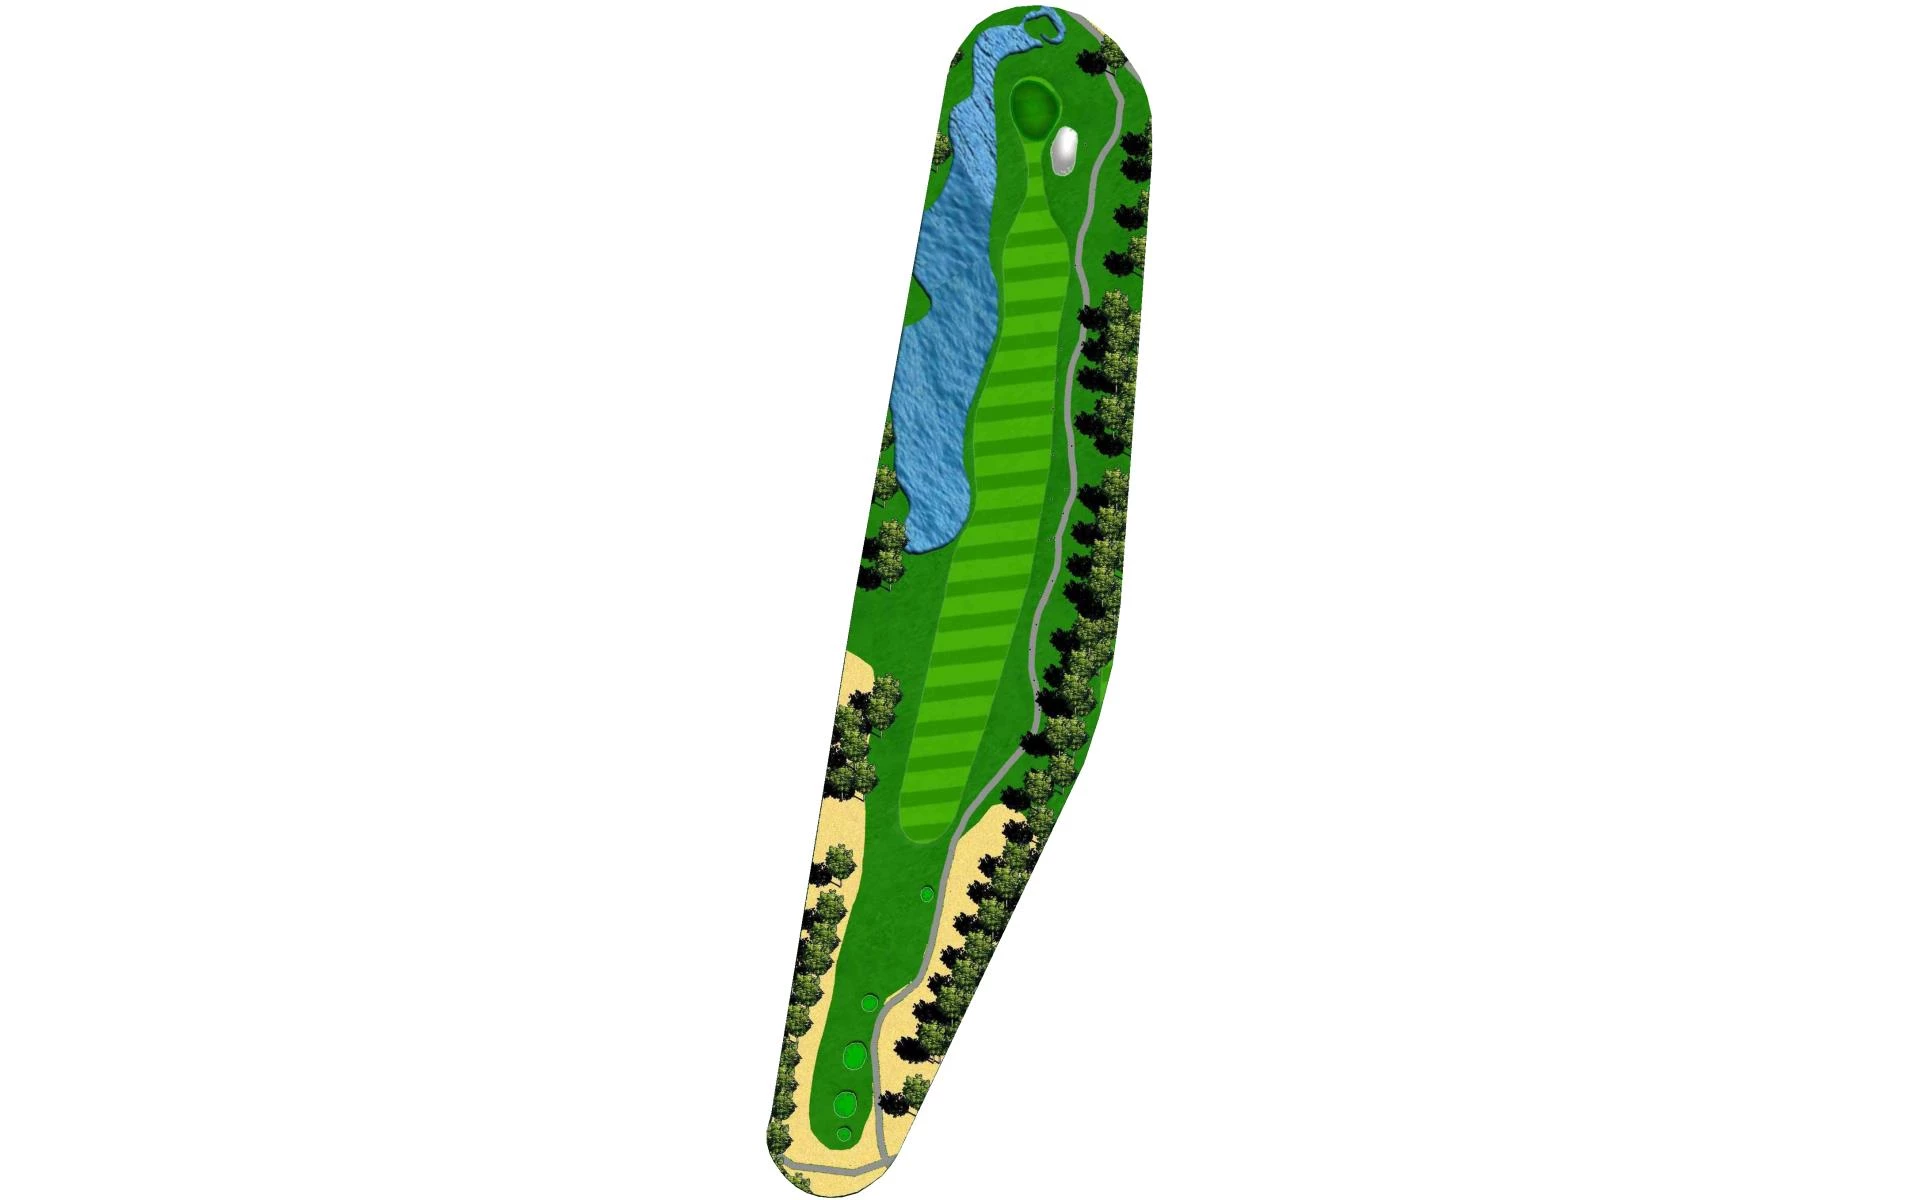
# 18 / Hole #18 / Signature Hole
Par: 4
Handicaps:
Men's 4
Women's 8
Yardage by Tee:
BLACK 449
BLUE 415
GOLD 340
ORANGE 317
WHITE 392
Slope:
Championship 132 / Long Combo 130 / Regular 128 / Medium Combo 126
Pro Tips
Our signature hole. A 1 ½-acre lake guards the left side of the fairway starting about 225 yards off the tee. The lake continues up the left side and closely guards the green. Favoring the right side may find you in the bunker facing the lake.