The Signature Course
Designer: Jack Nicklaus
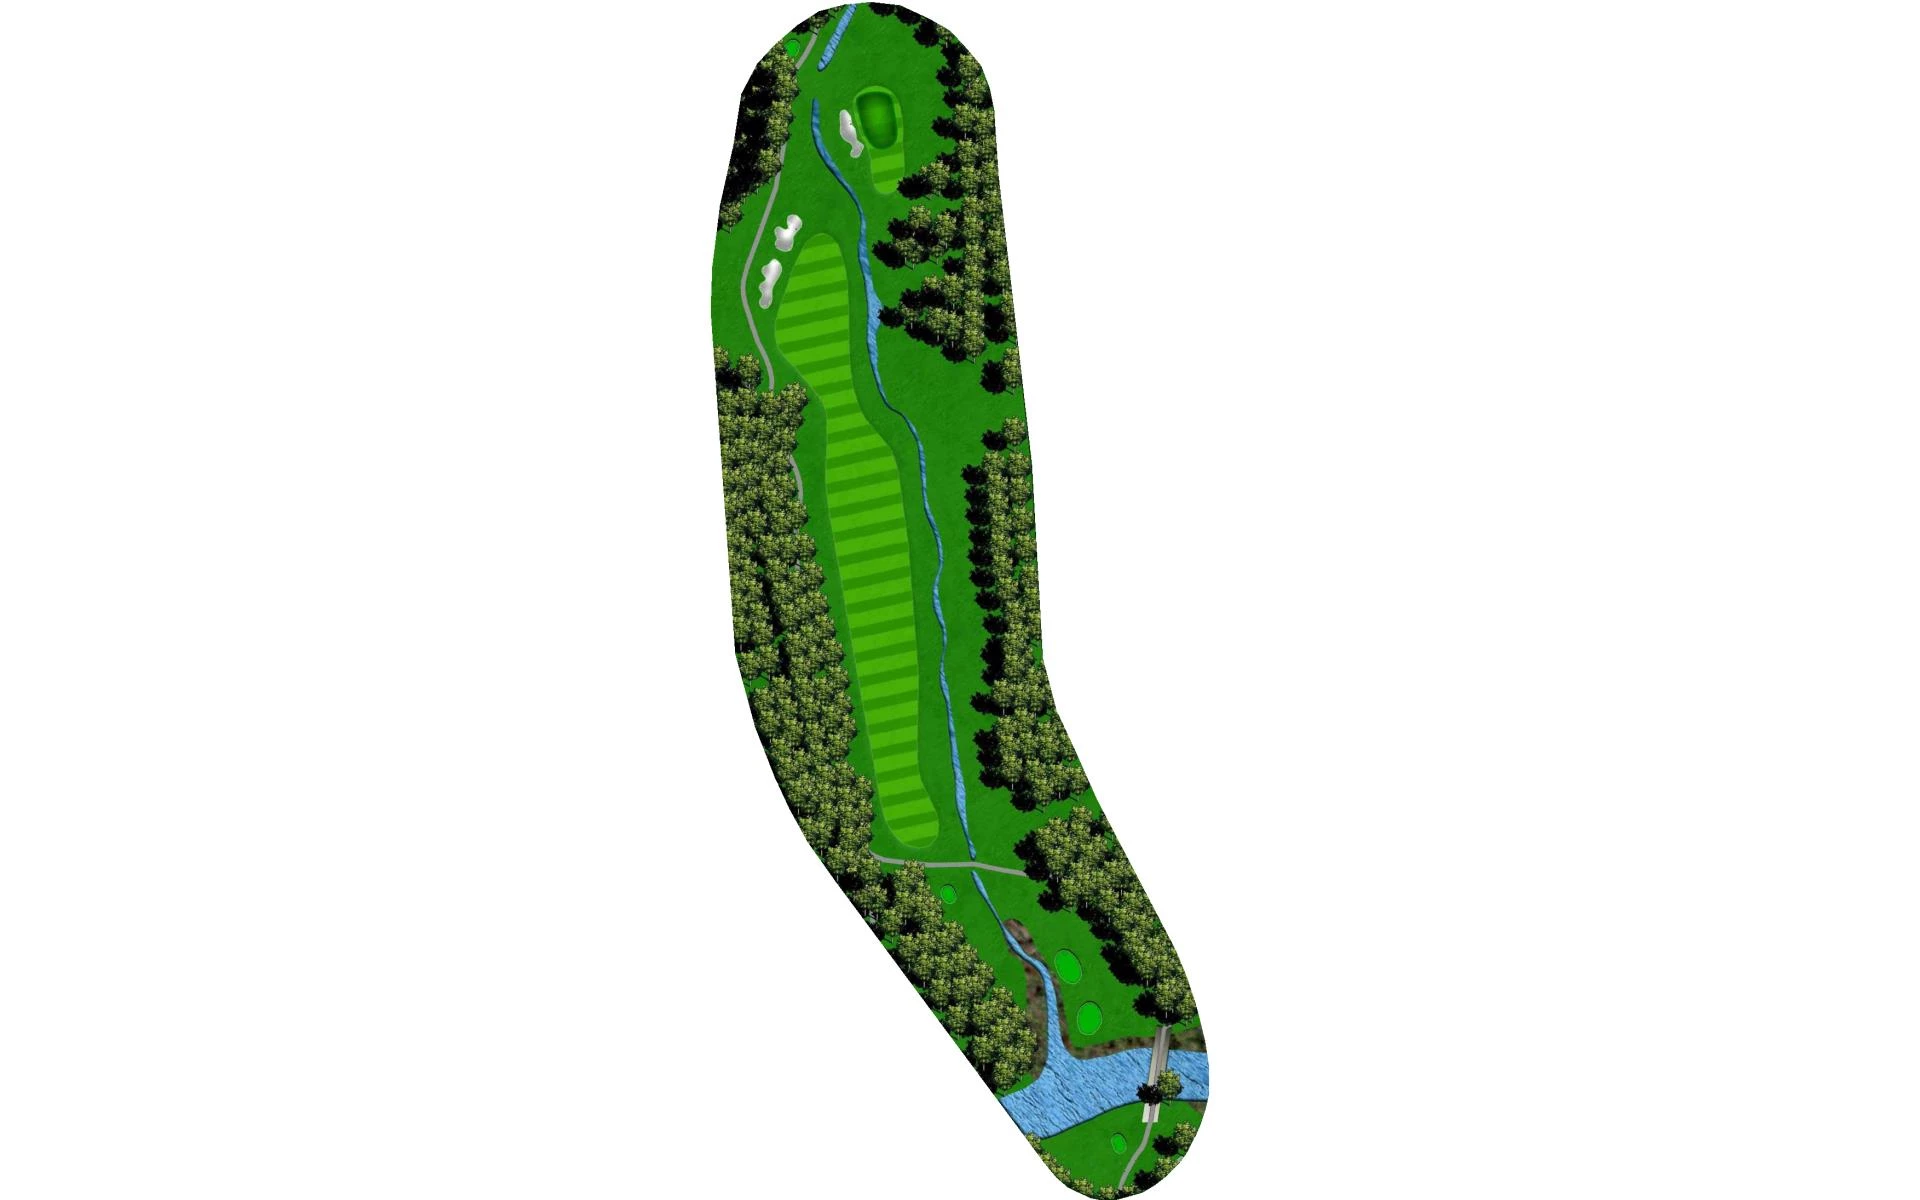
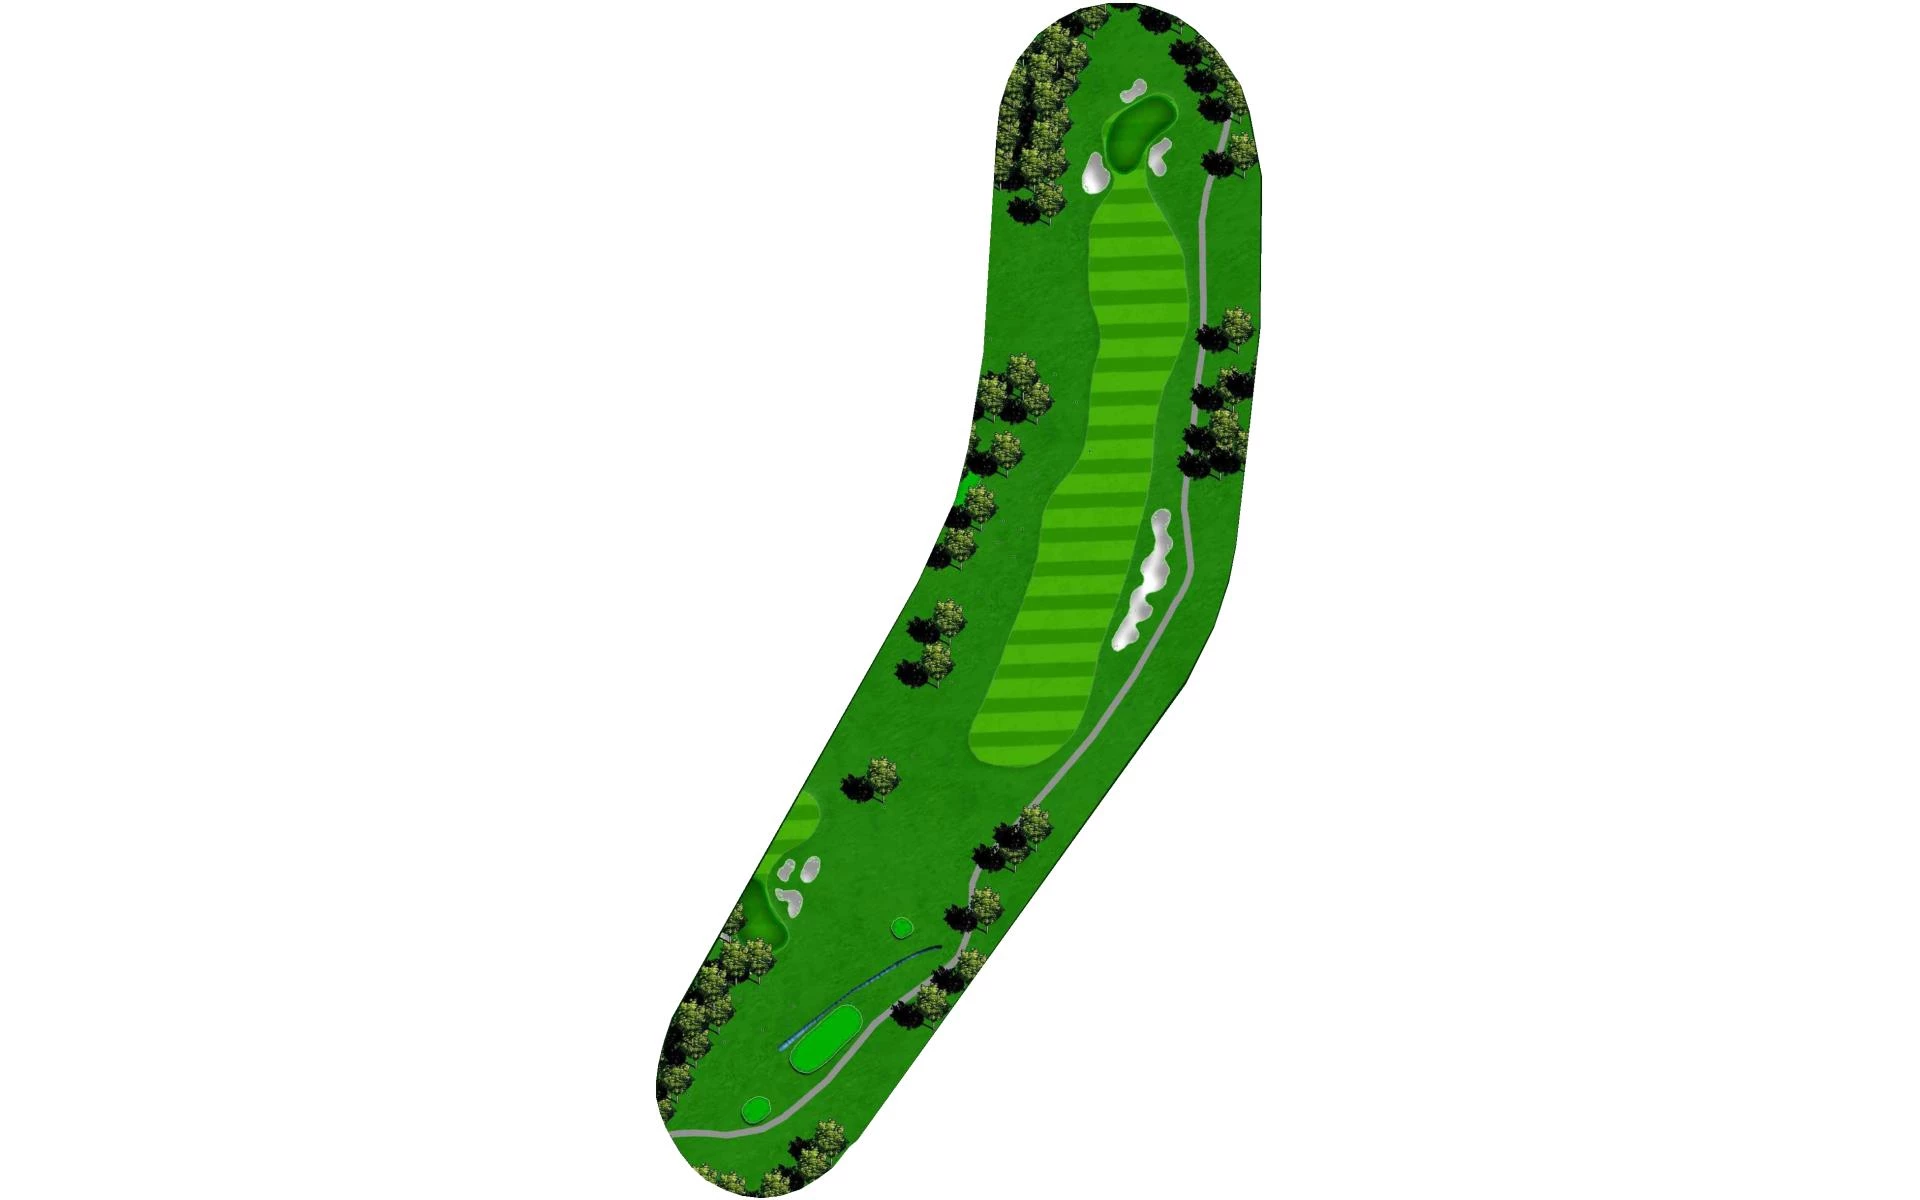
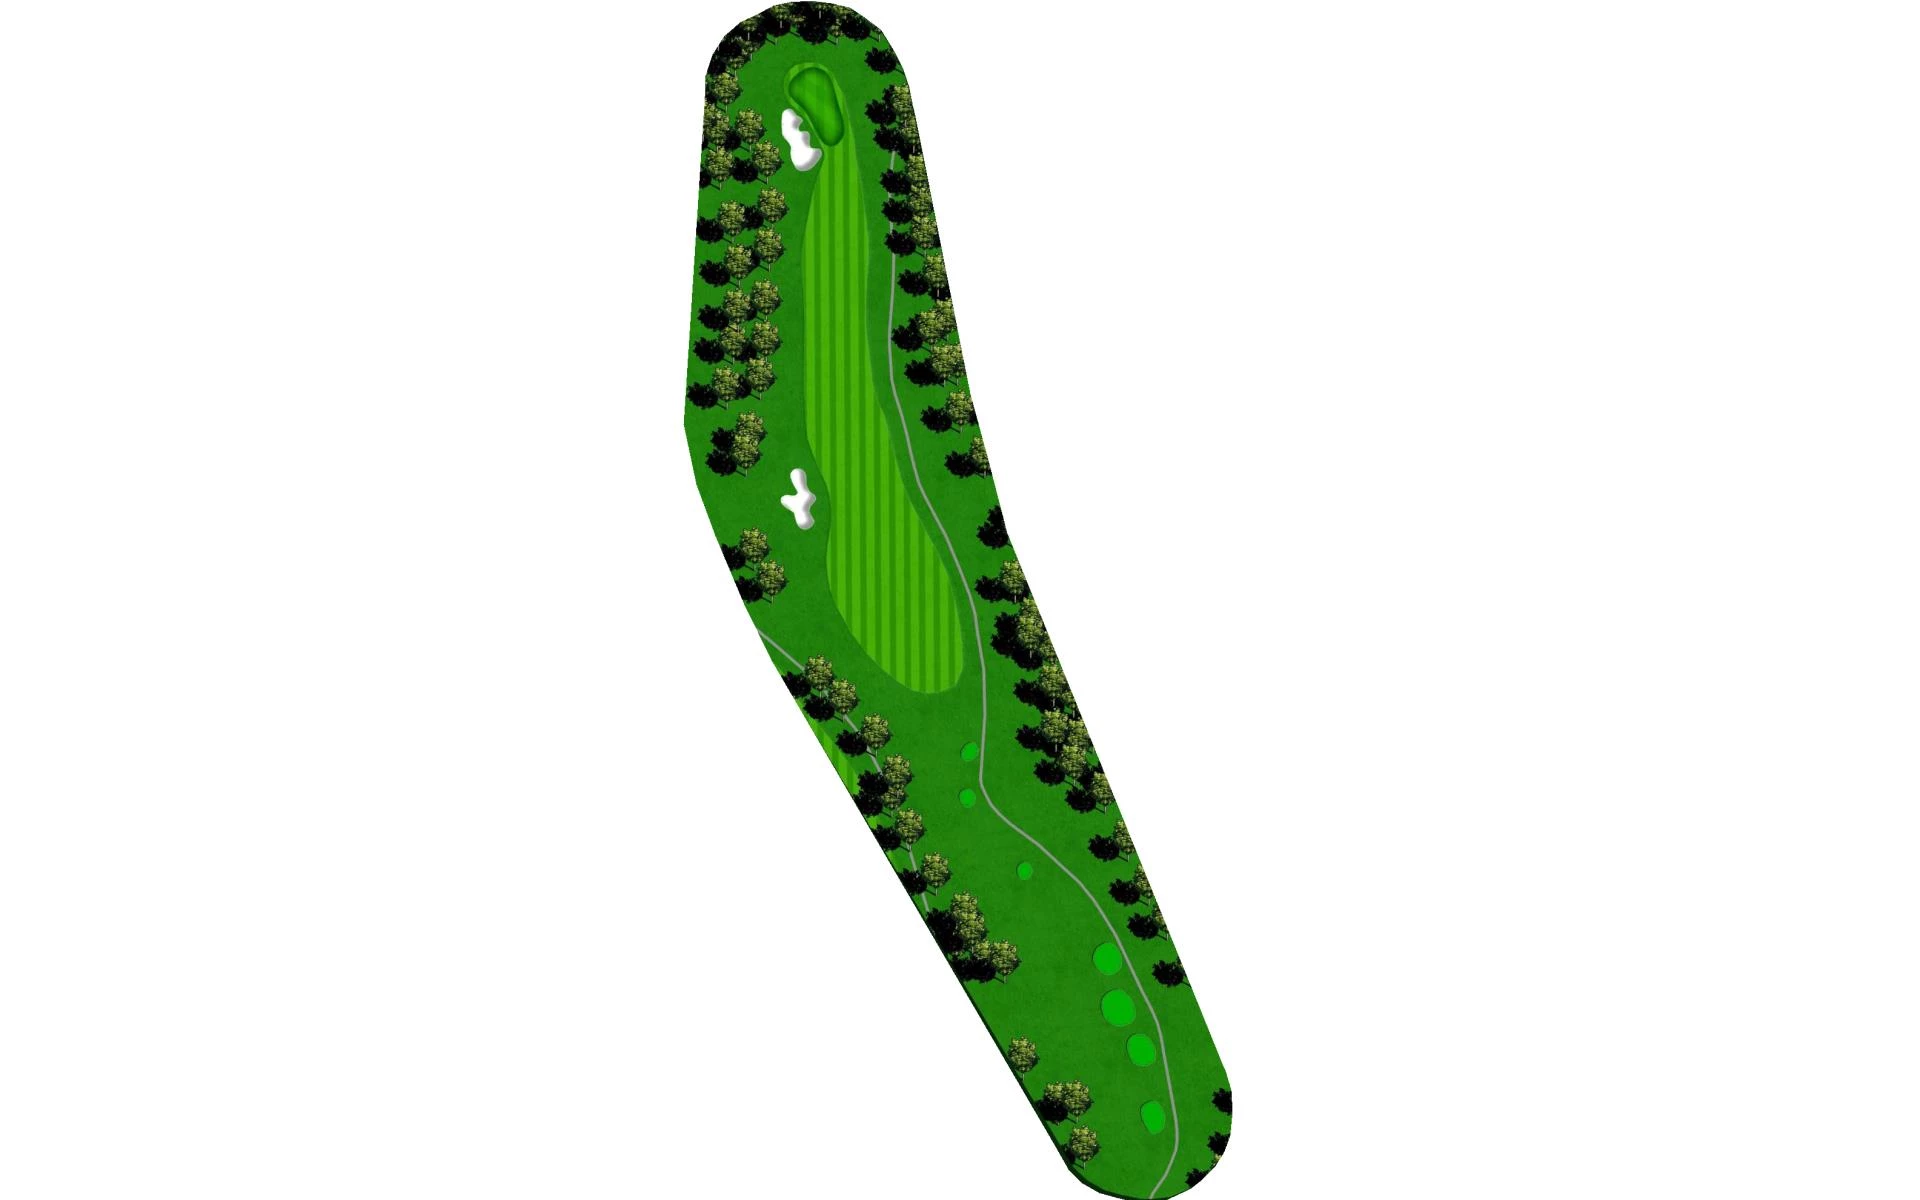
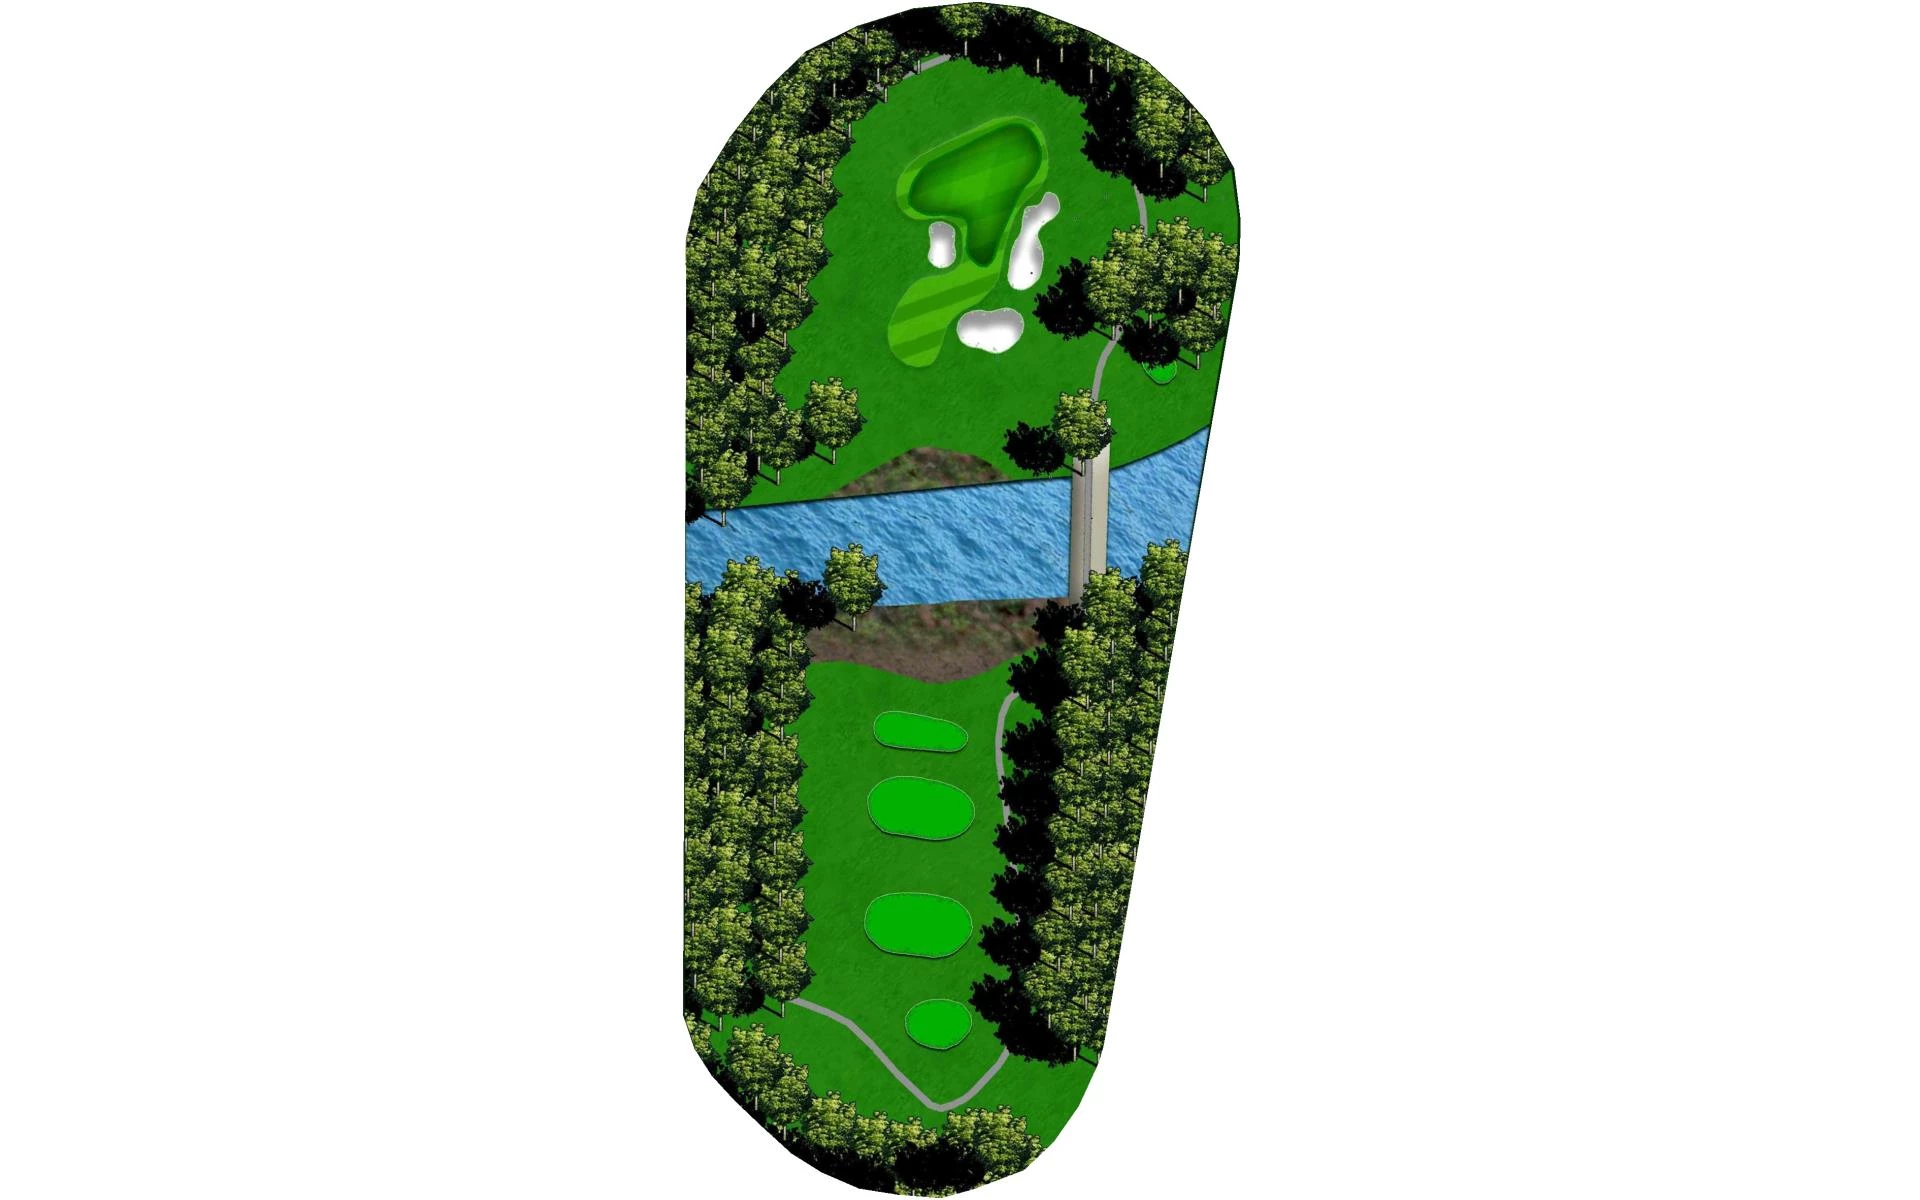
# 1 / Hole 1
Par: 5
Handicaps:
Men's 3
Women's 1
Yardage by Tee:
Black 527
Gold 496
Blue 496
Combo 496
White 471
Red 401
Slope:
Black 74.7/147 | Gold 73.3/144 | Blue 71.9/140 | Combo 69.9/137 | White - M:69.8/134 L:74.4/140 | Red - M:66.5/127 L:70.2/131
Pro Tips
Favor the left side with your tee shot to avoid the creek running the entire right side of this fairway on this Par 5. Your target for your second shot is just to the right of the last tree on the left and allow the natural terrain to move the ball right on the ground. Your approach should be 140 to 100 yards to a very undulating green. Keep your ball below the hole.
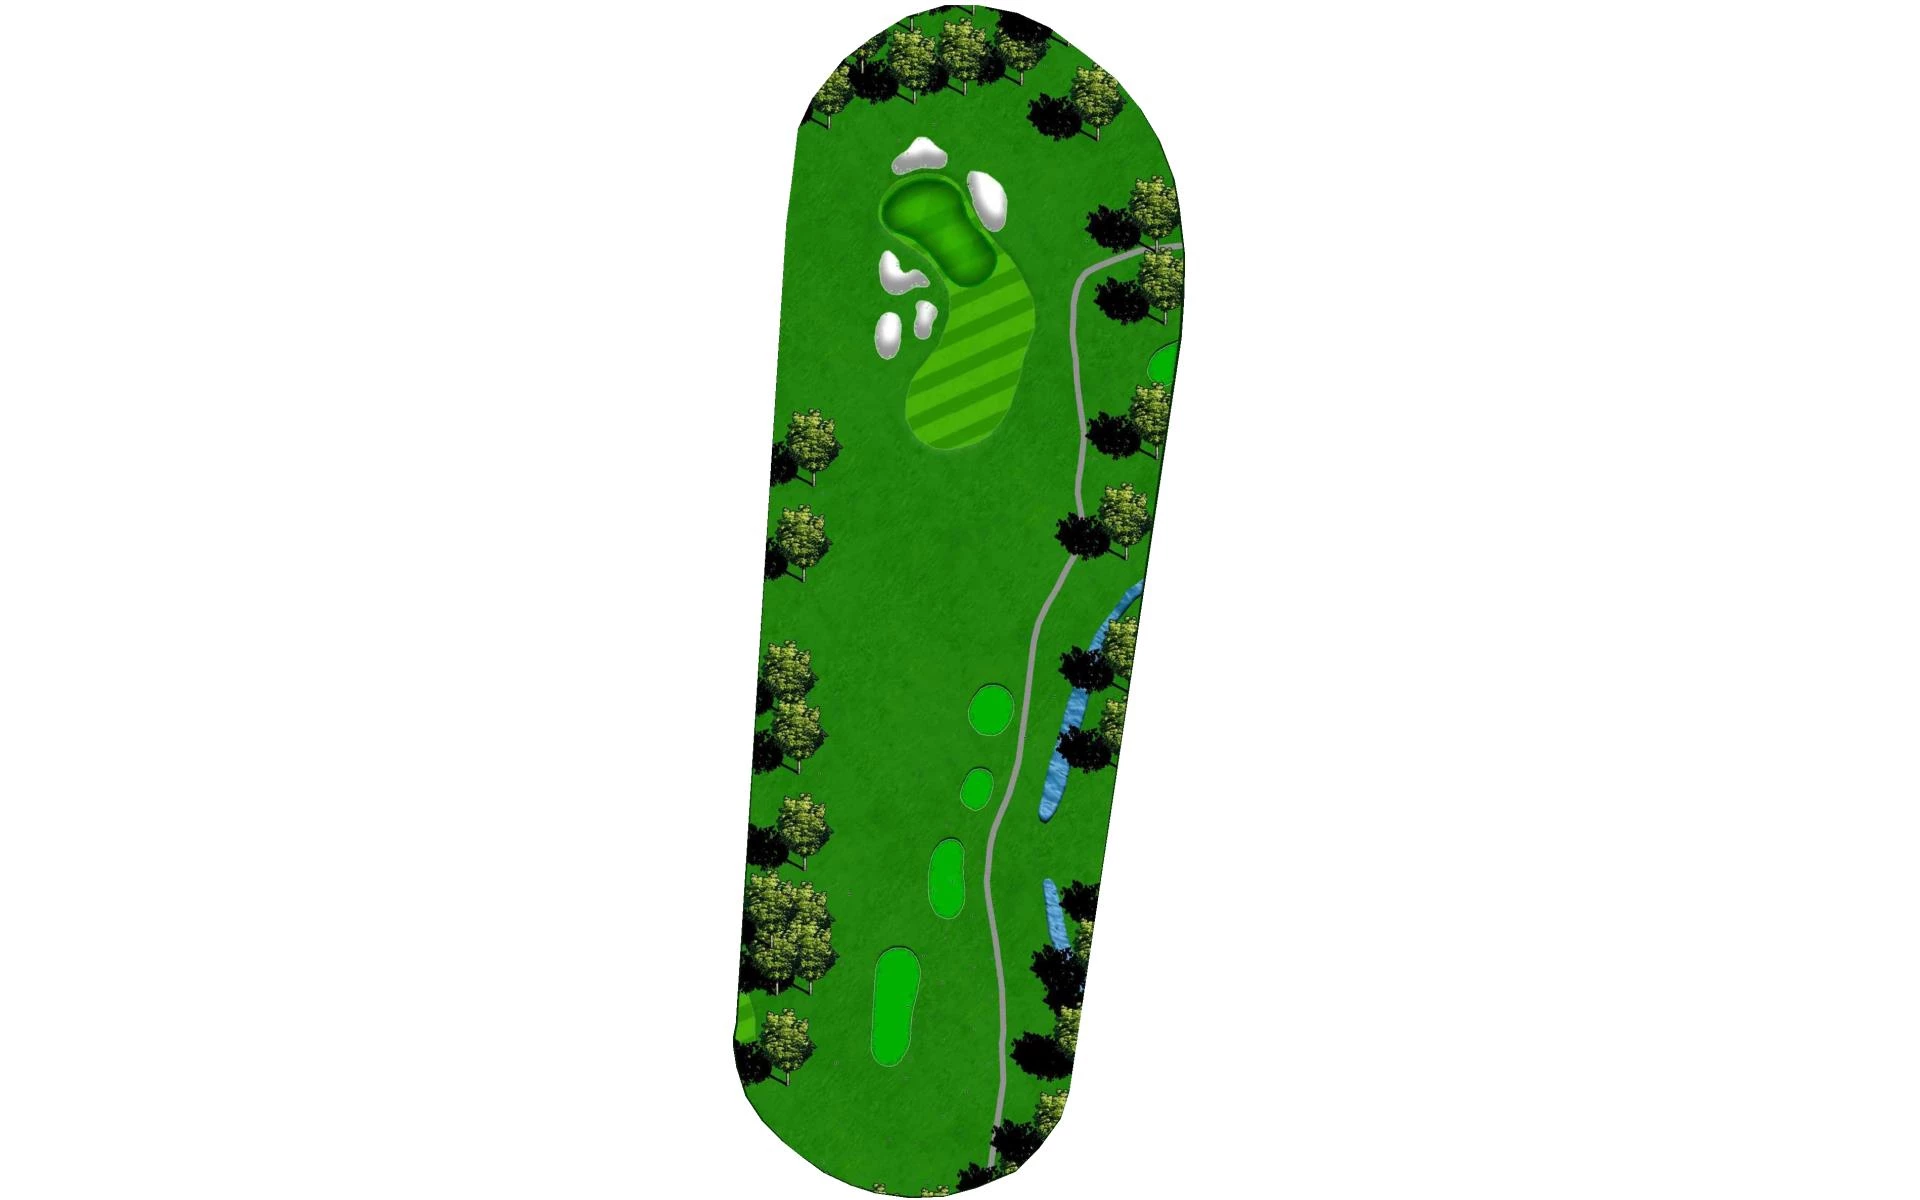
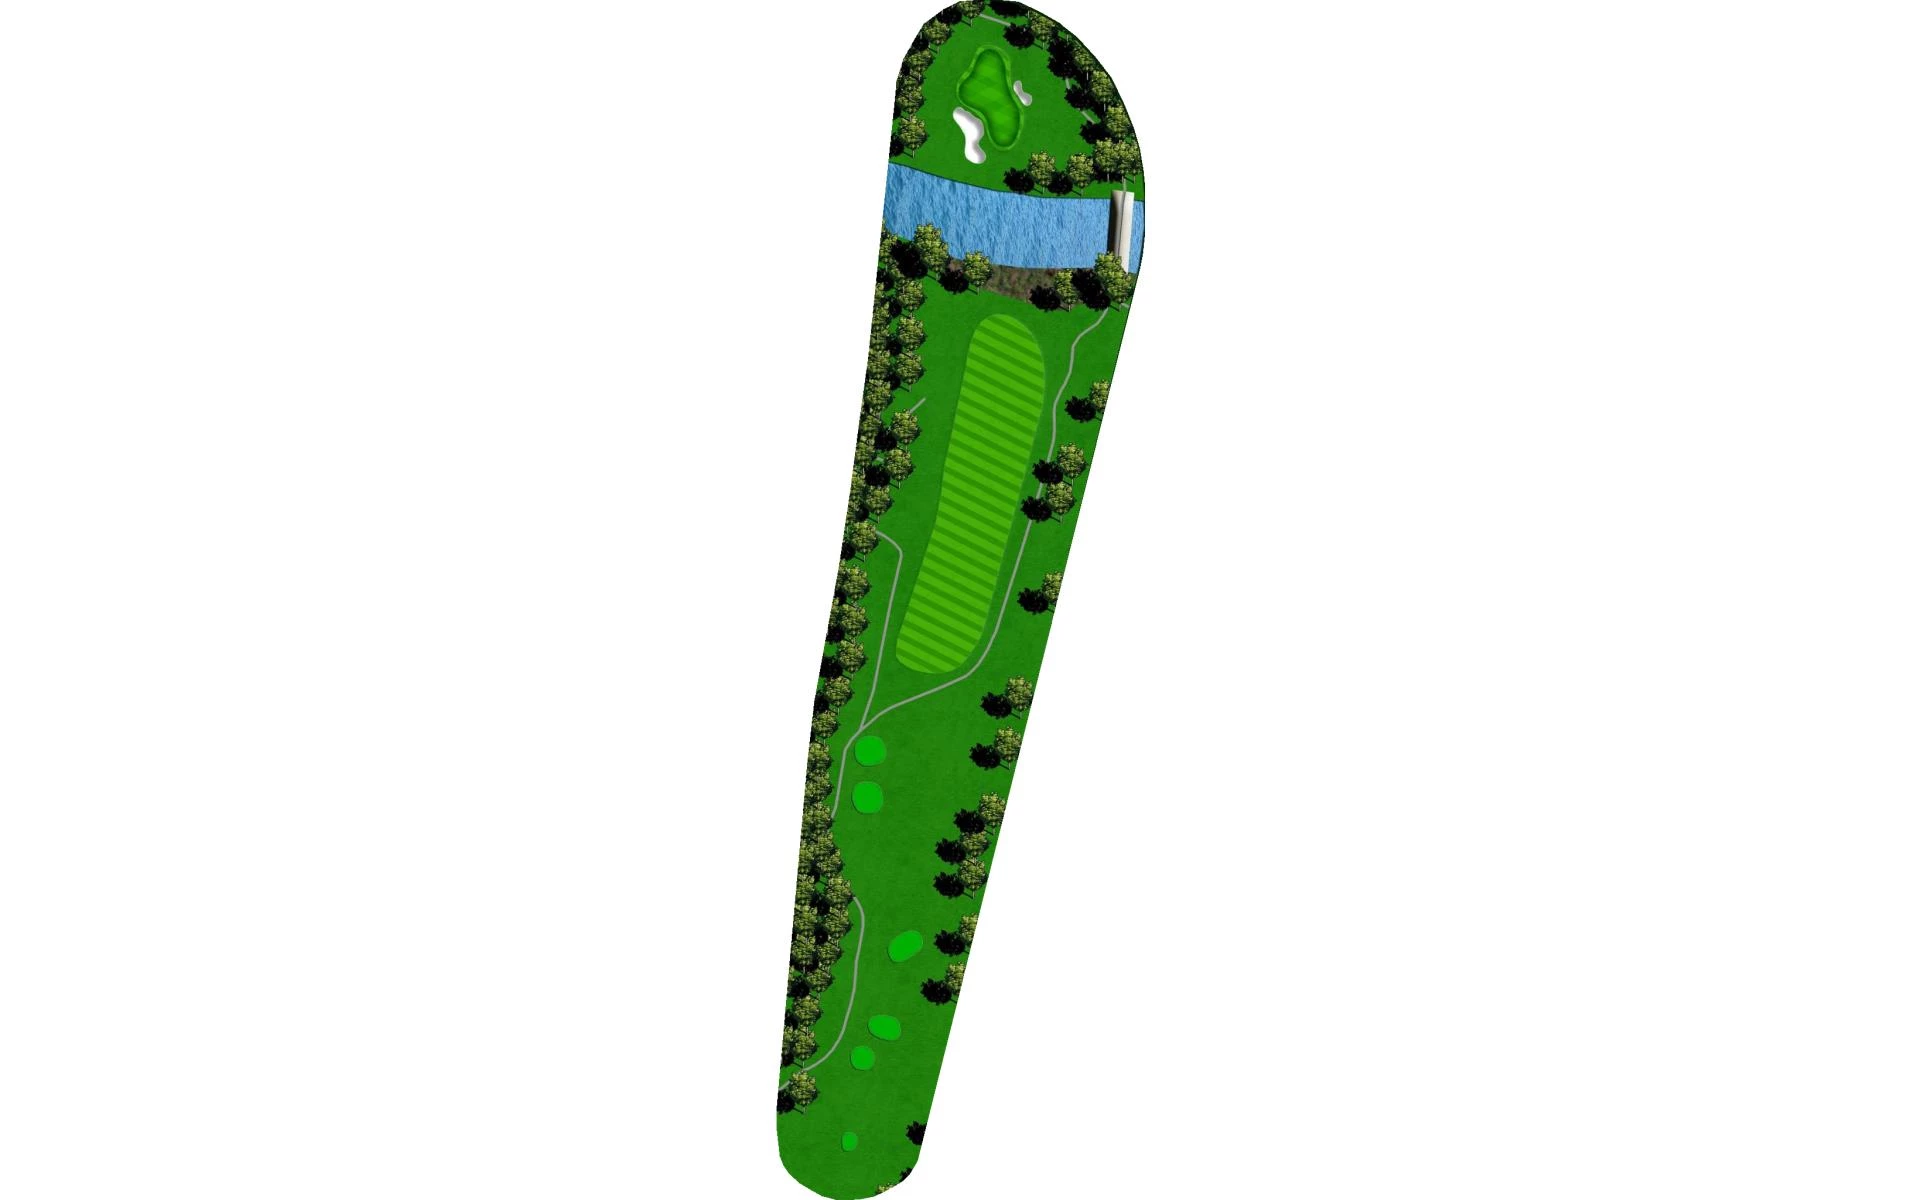
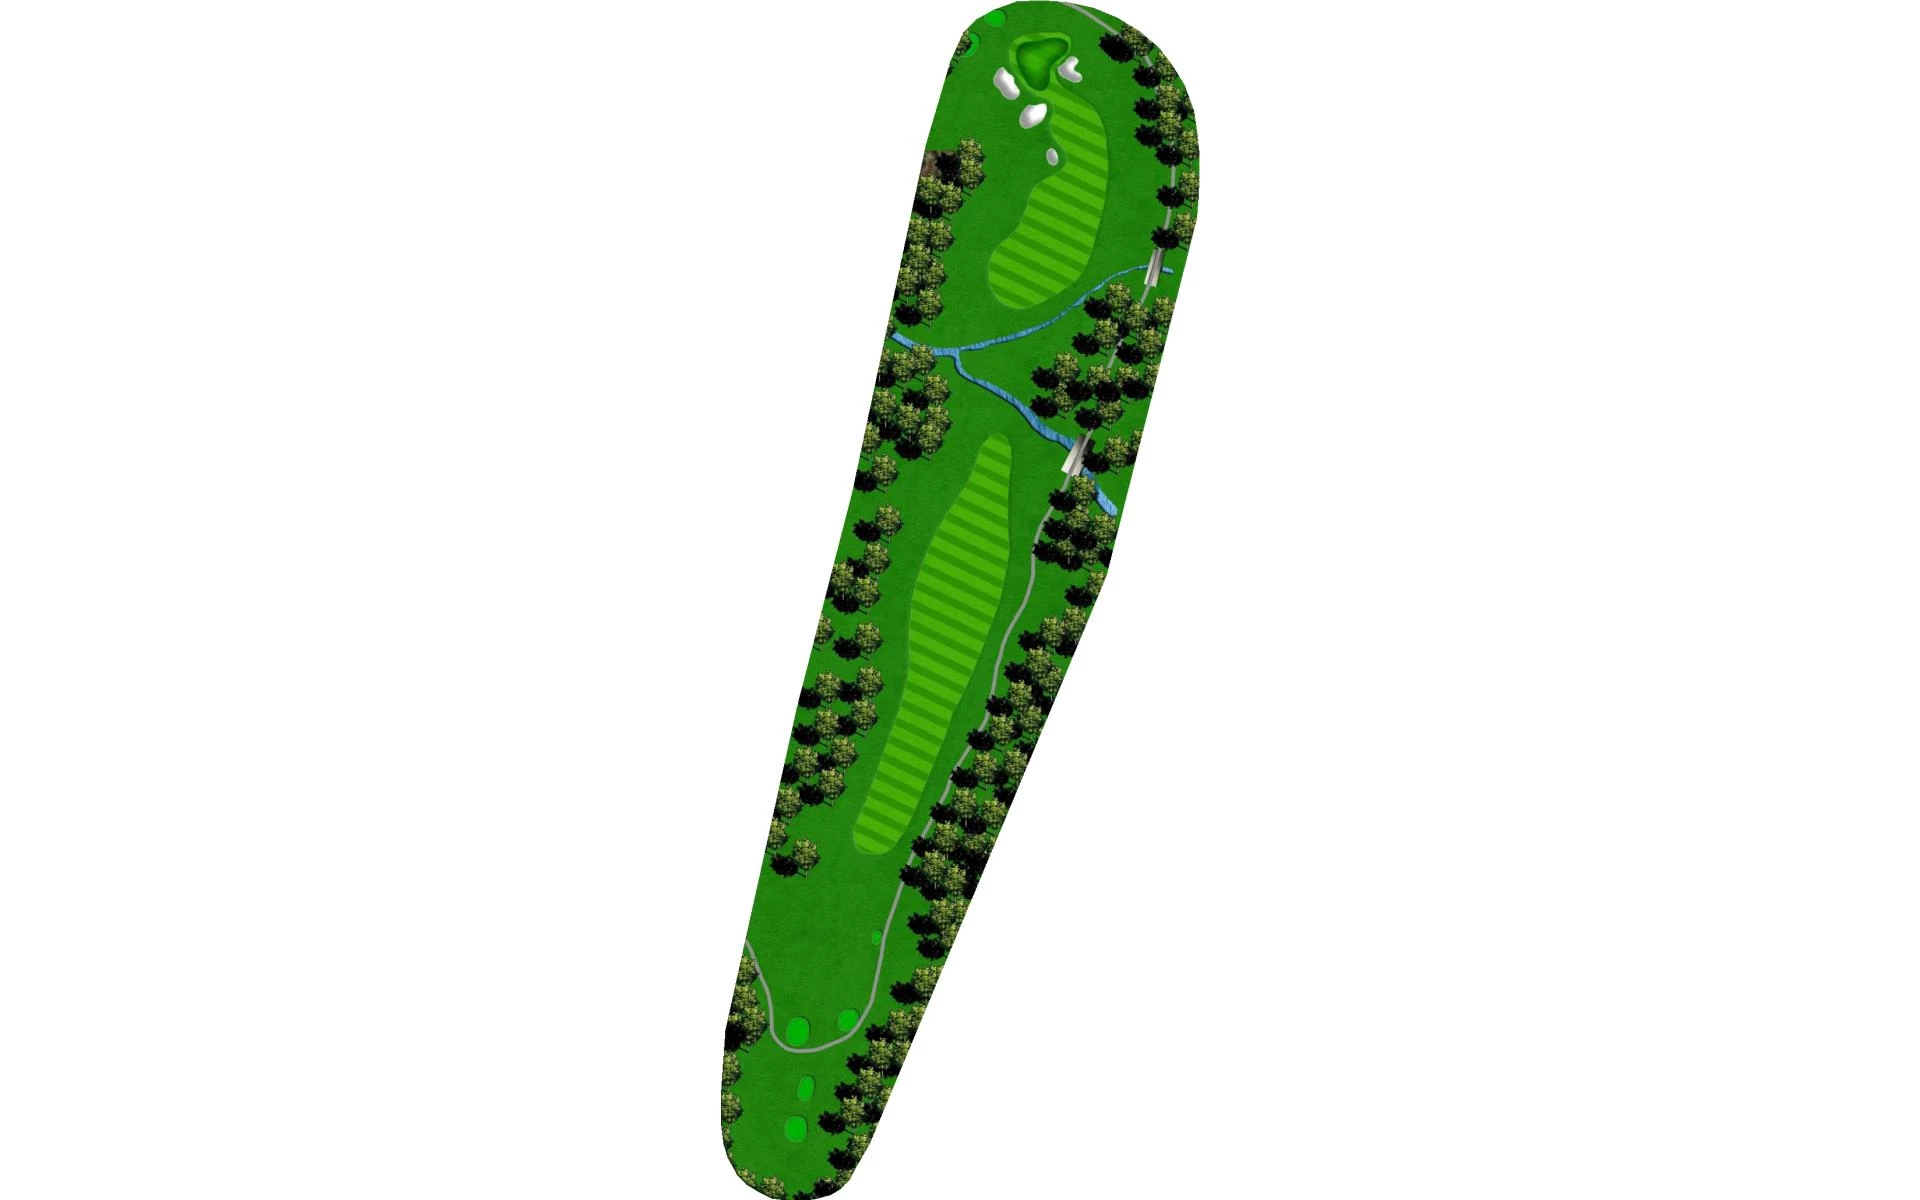
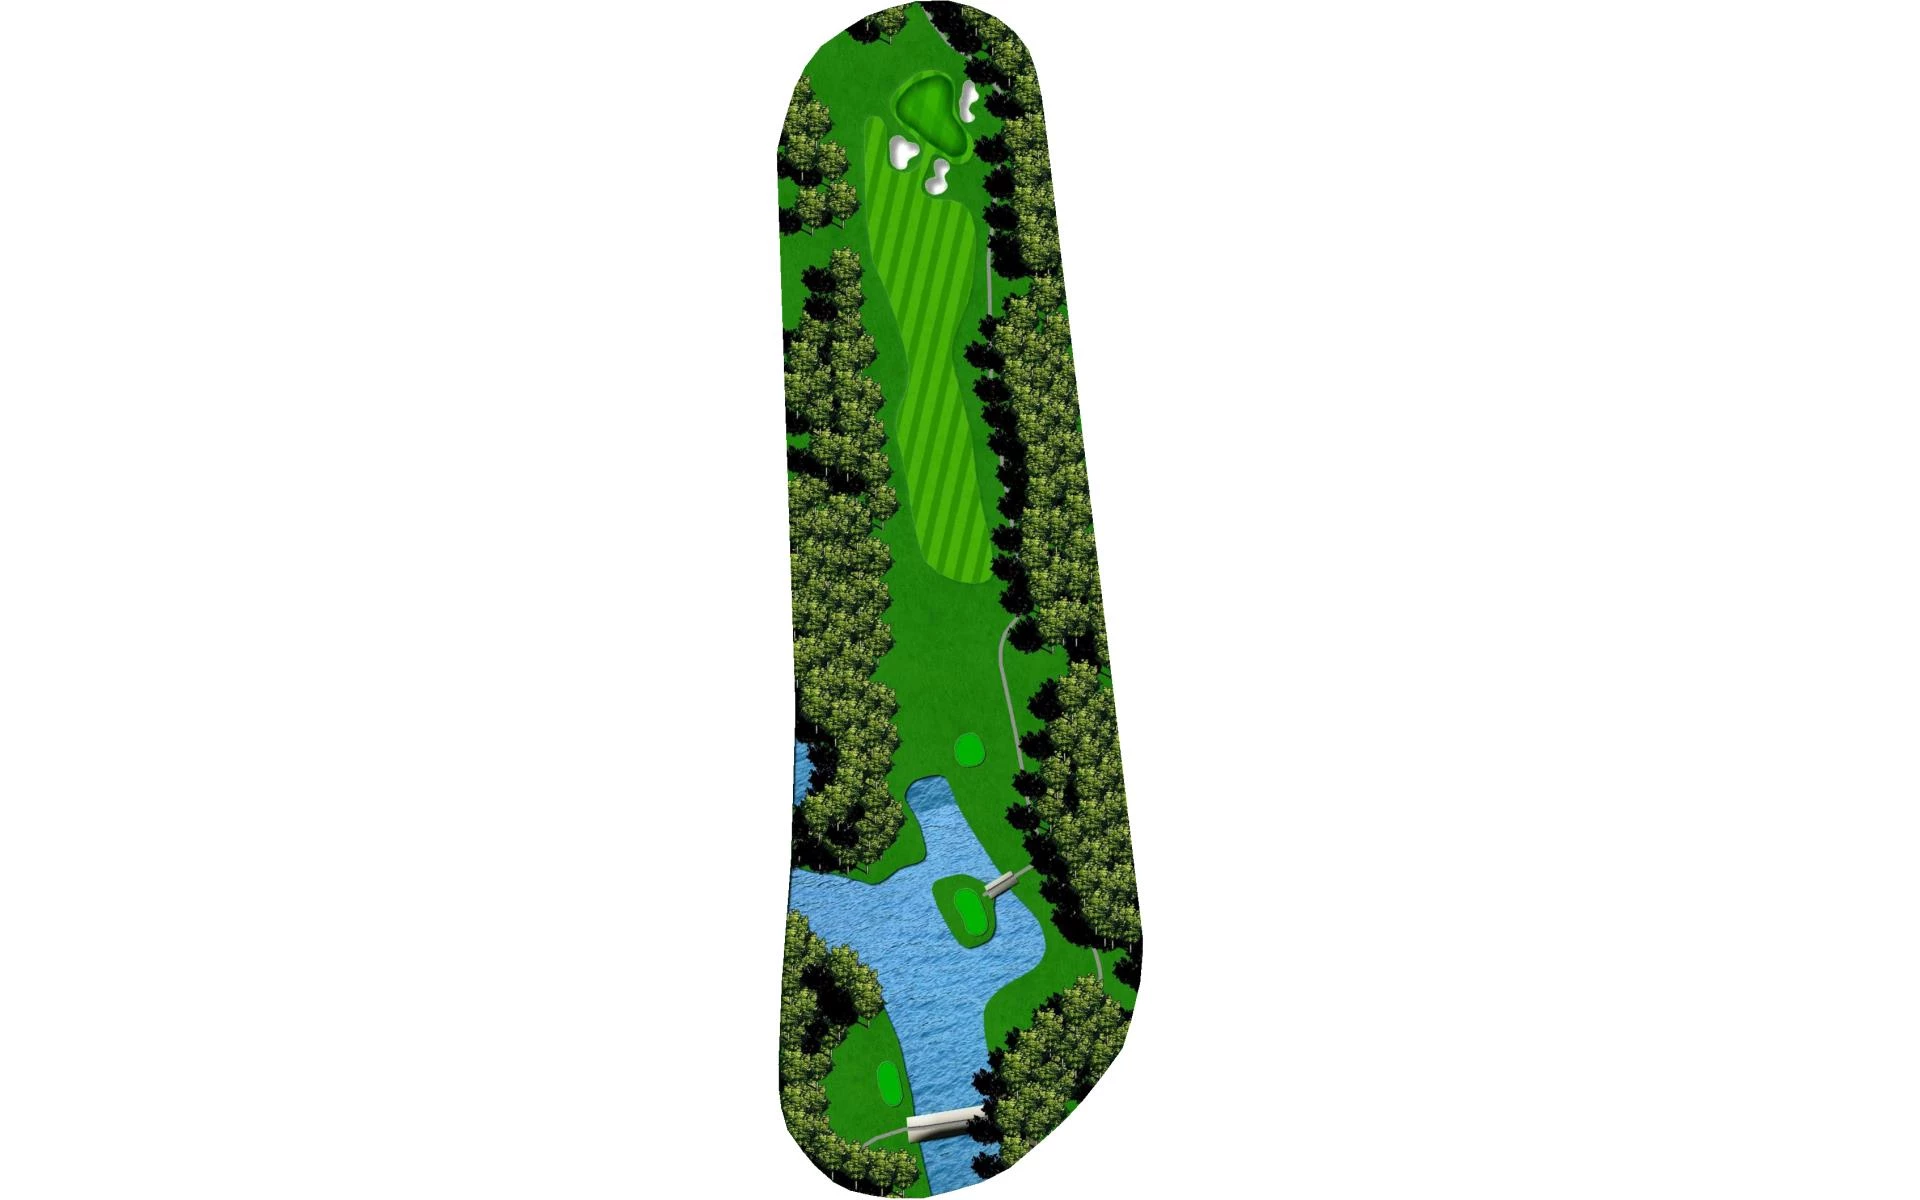
# 2 / Hole 2
Par: 3
Handicaps:
Men's 17
Women's 17
Yardage by Tee:
Black 197
Gold 180
Blue 162
Combo 135
White 135
Red 116
Slope:
Black 74.7/147 | Gold 73.3/144 | Blue 71.9/140 | Combo 69.9/137 | White - M:69.8/134 L:74.4/140 | Red - M:66.5/127 L:70.2/131
Pro Tips
This is a challenging slightly uphill 168-yard Par 3 that is very well guarded. Do not hesitate to take another club. If the pin is right of center and you carry past the pin you will be off the green. The natural tendency is for the ball to go right to left.
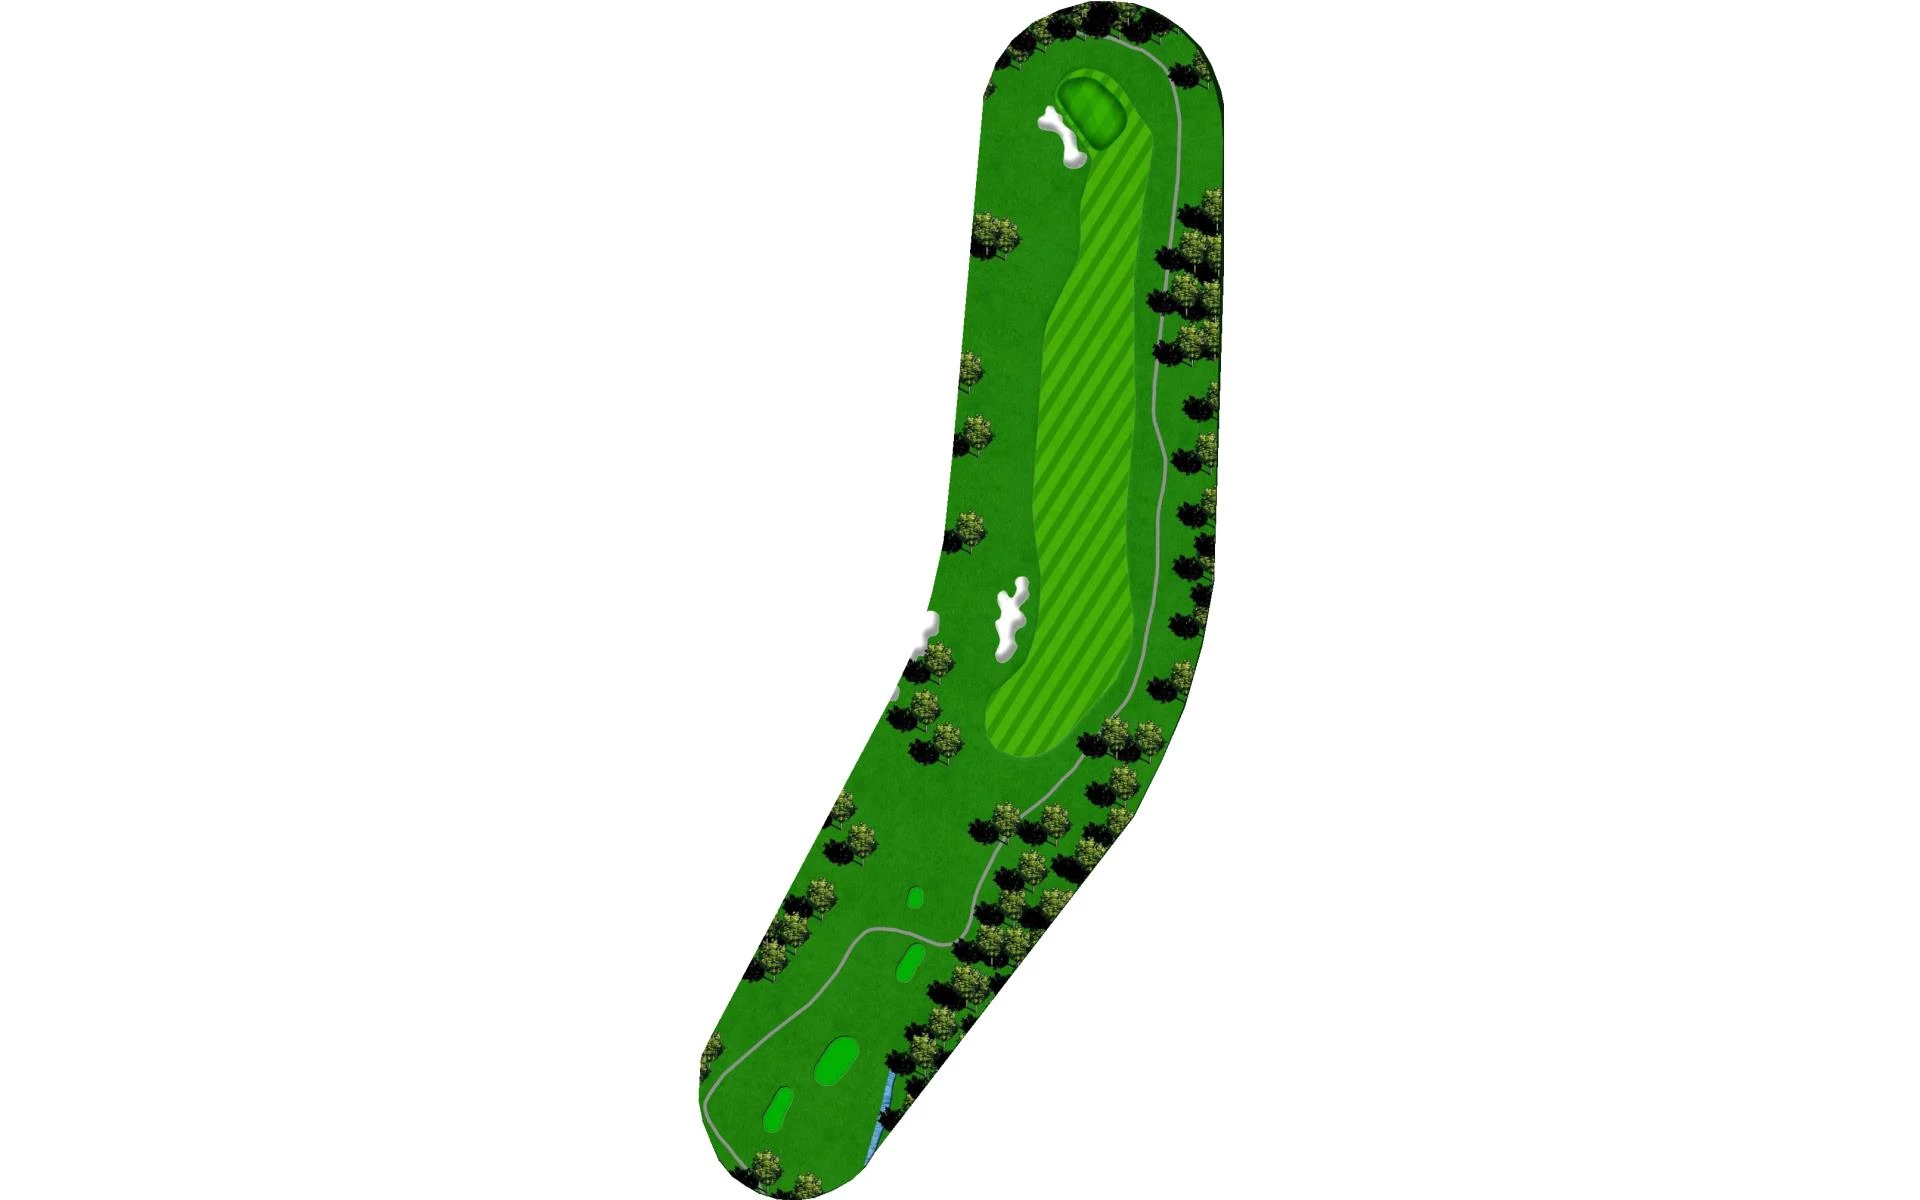
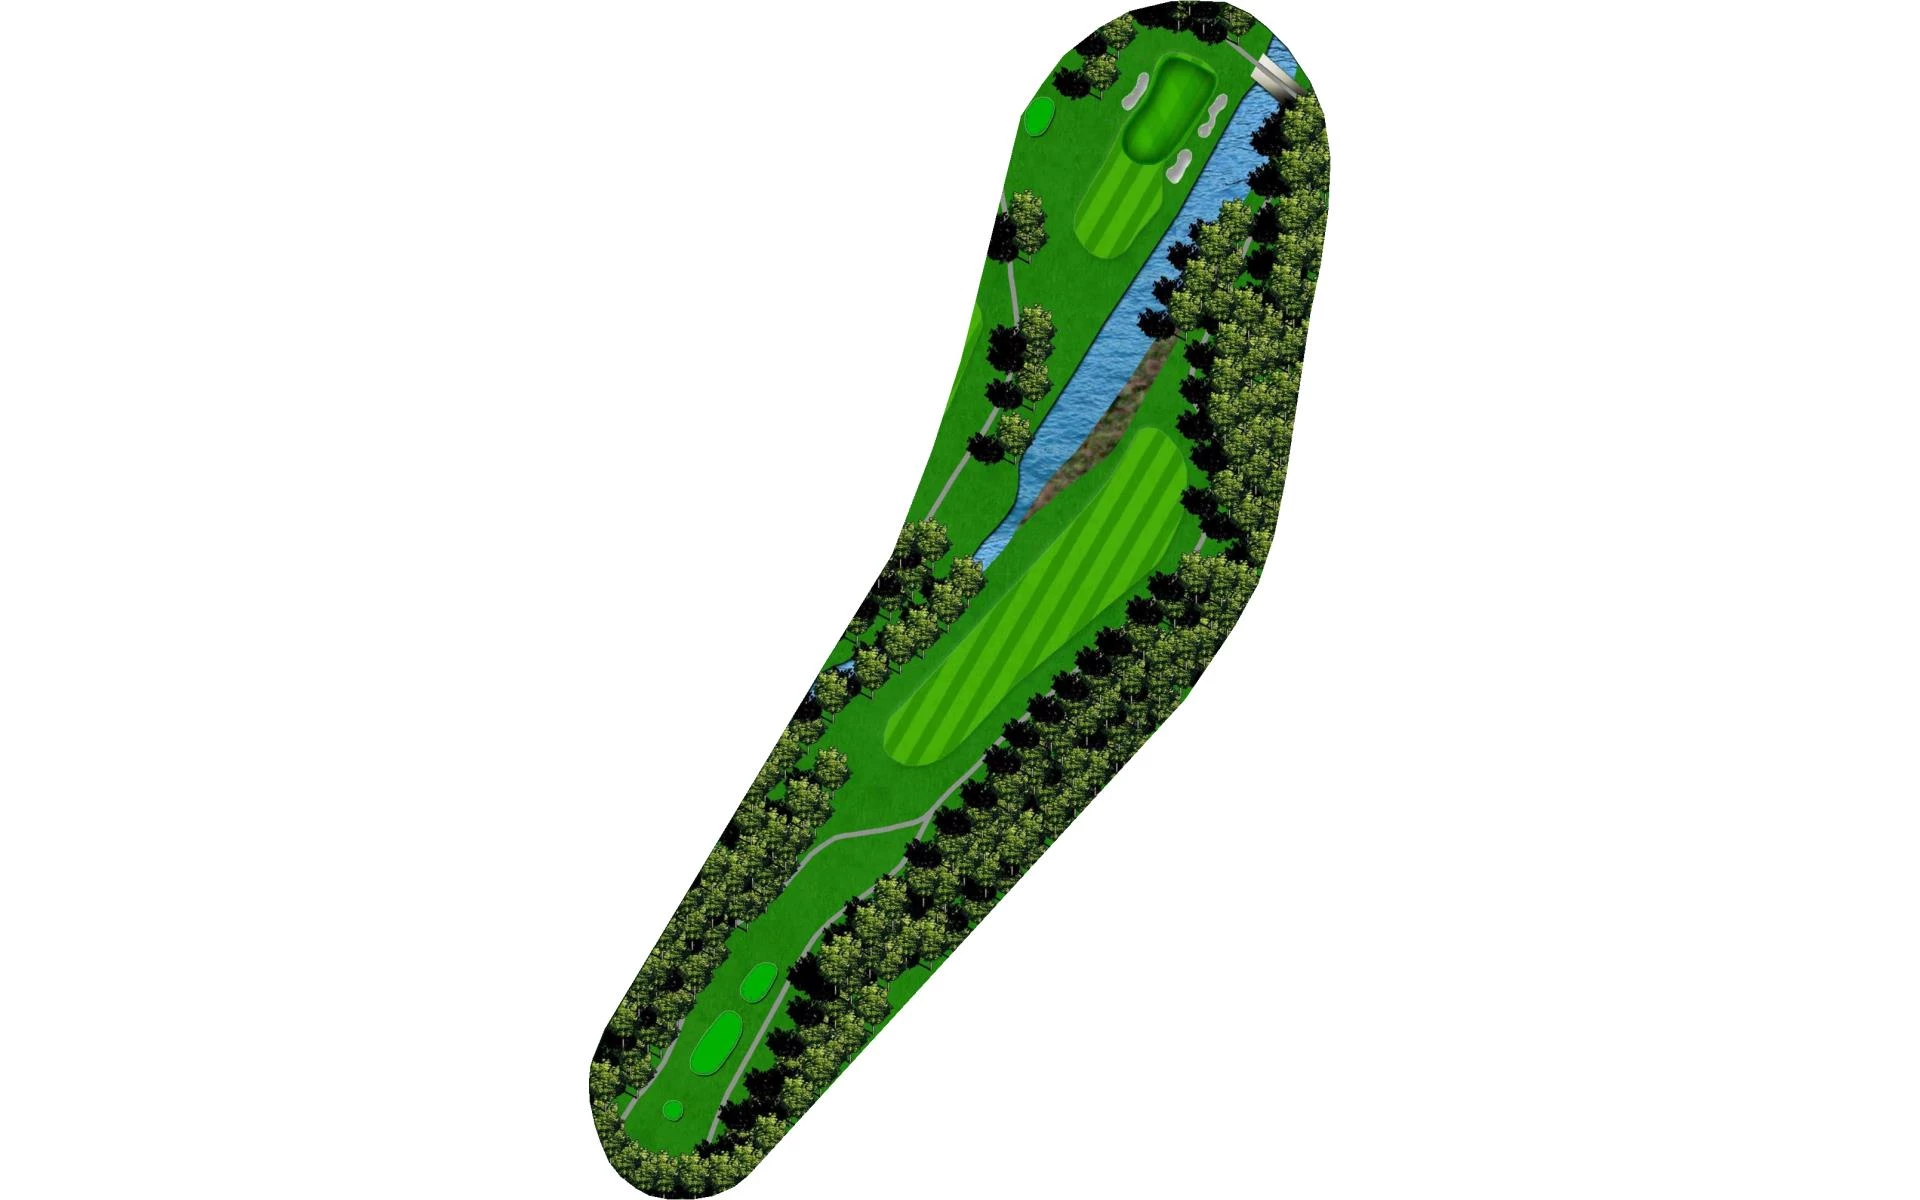
# 3 / Hole 3
Par: 4
Handicaps:
Men's 7
Women's 7
Yardage by Tee:
Black 463
Gold 425
Blue 425
Combo 381
White 381
Red 352
Slope:
Black 74.7/147 | Gold 73.3/144 | Blue 71.9/140 | Combo 69.9/137 | White - M:69.8/134 L:74.4/140 | Red - M:66.5/127 L:70.2/131
Pro Tips
If you are a long hitter then you can take the ball over the right corner of the trap. If not, then play between the bunker and the big Oak on the right. This should leave you between 180 and 200 yards to a very undulating green. Again, make sure that you leave your ball below the hole.
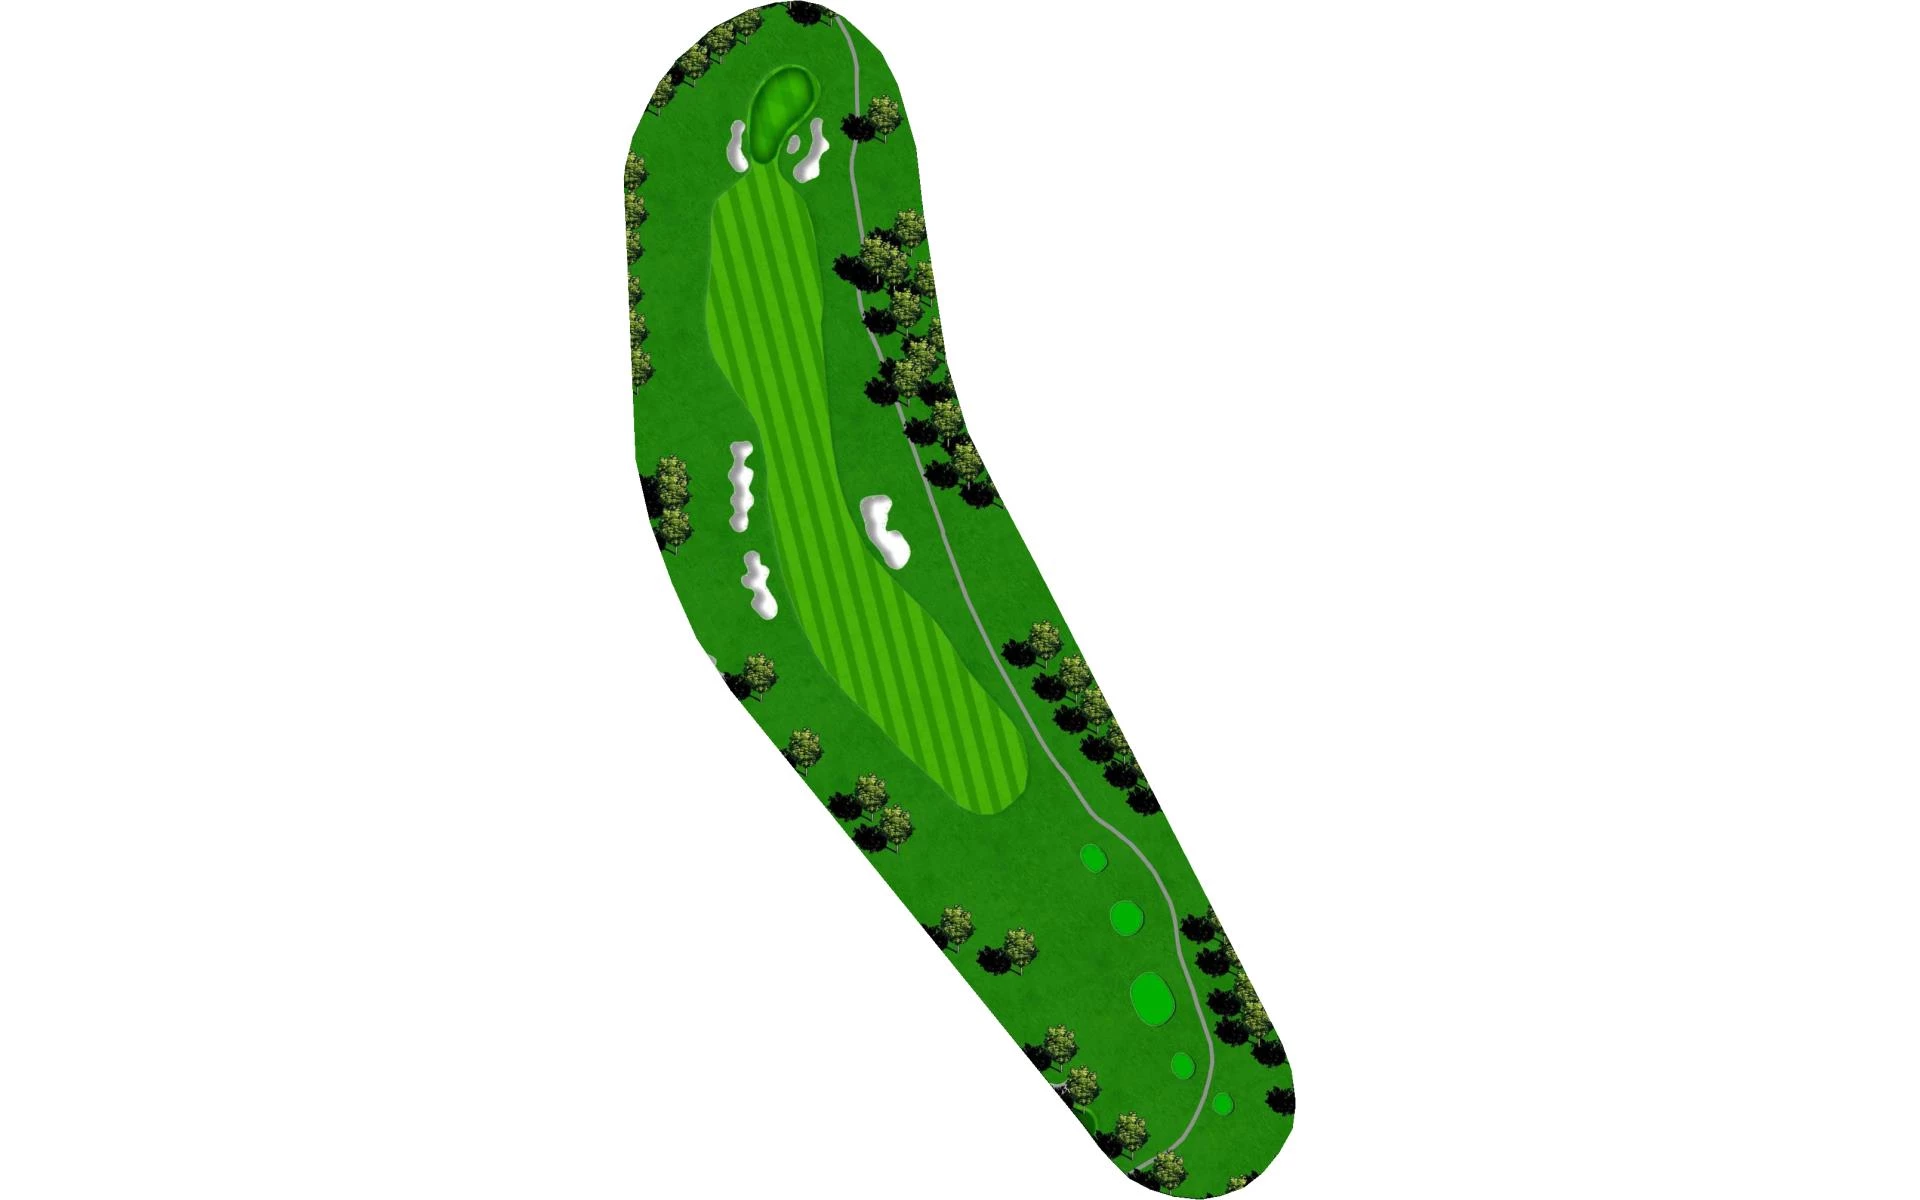
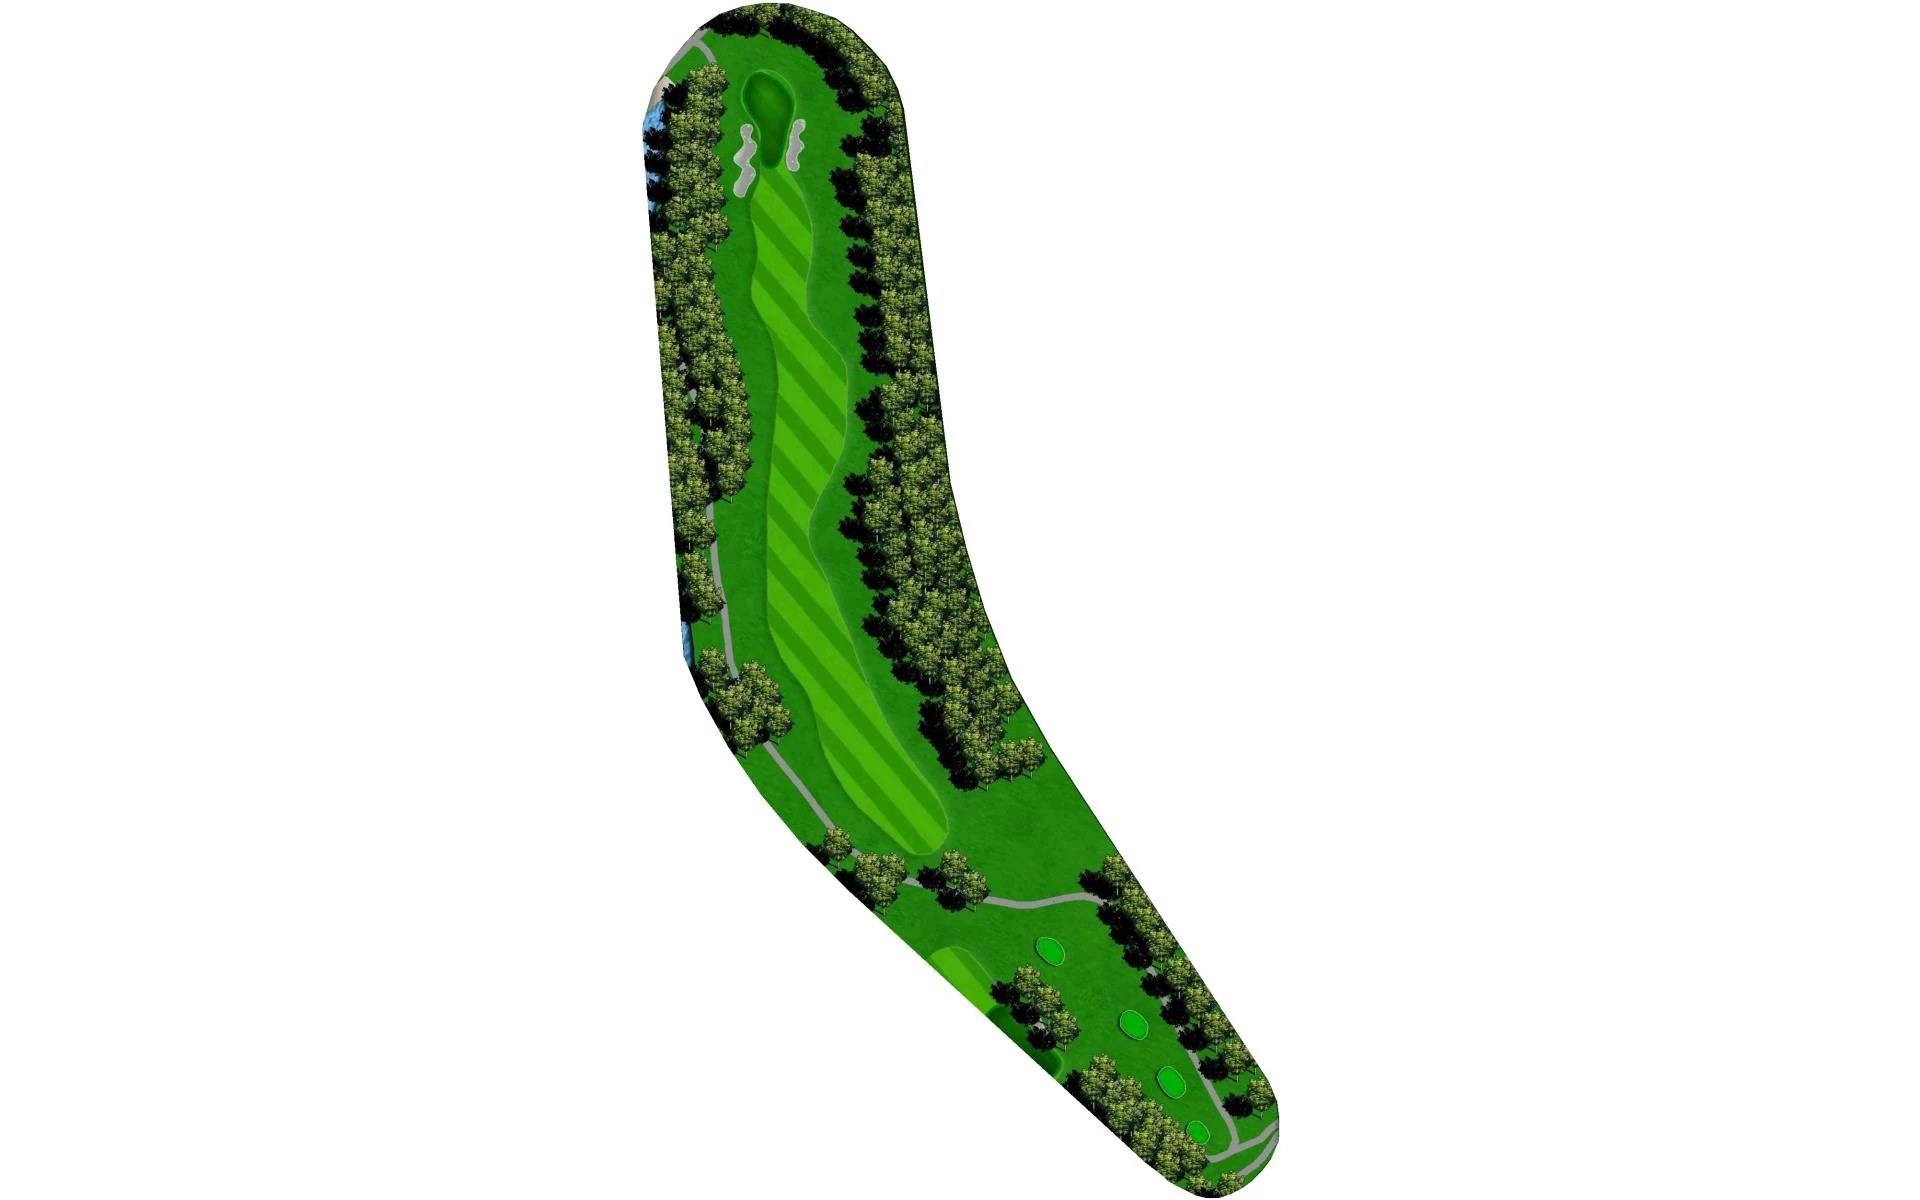
# 4 / Hole 4
Par: 4
Handicaps:
Men's 11
Women's 13
Yardage by Tee:
Black 436
Gold 418
Blue 400
Combo 400
White 368
Red 340
Slope:
Black 74.7/147 | Gold 73.3/144 | Blue 71.9/140 | Combo 69.9/137 | White - M:69.8/134 L:74.4/140 | Red - M:66.5/127 L:70.2/131
Pro Tips
This hole is a dog leg right and guarded on both sides with bunkers. The big hitter can take it over the right with a draw, but the best shot is a fade down the center. This will leave you with a 150-to-125-yard approach shot. Depending on where the flag is, your ball should be below the hole. It will break right and is slightly uphill.
# 5 / Hole 5
Par: 4
Handicaps:
Men's 13
Women's 11
Yardage by Tee:
Black 424
Gold 424
Blue 399
Combo 399
White 383
Red 334
Slope:
Black 74.7/147 | Gold 73.3/144 | Blue 71.9/140 | Combo 69.9/137 | White - M:69.8/134 L:74.4/140 | Red - M:66.5/127 L:70.2/131
Pro Tips
This hole is a slight dog leg left. It is hard to believe that Jack Nicklaus would layout a dogleg left. Off the tee the target is the last group of trees on the right as the ball will drift left once it hits the ground. The green sits higher than the fairway and the bunkers are very intimidating as you look at your approach shot. The green tends to break from left to right.
# 6 / Hole 6
Par: 4
Handicaps:
Men's 5
Women's 5
Yardage by Tee:
Black 455
Gold 418
Blue 402
Combo 309
White 309
Red 293
Slope:
Black 74.7/147 | Gold 73.3/144 | Blue 71.9/140 | Combo 69.9/137 | White - M:69.8/134 L:74.4/140 | Red - M:66.5/127 L:70.2/131
Pro Tips
From the tee you want to hit your drive about 200 yards. This would leave you an approach shot from 140 to 100 yards to a well-protected green. If you get above the pin, you could have an extremely fast downhill putt. Undulation does not do this green justice when describing it.

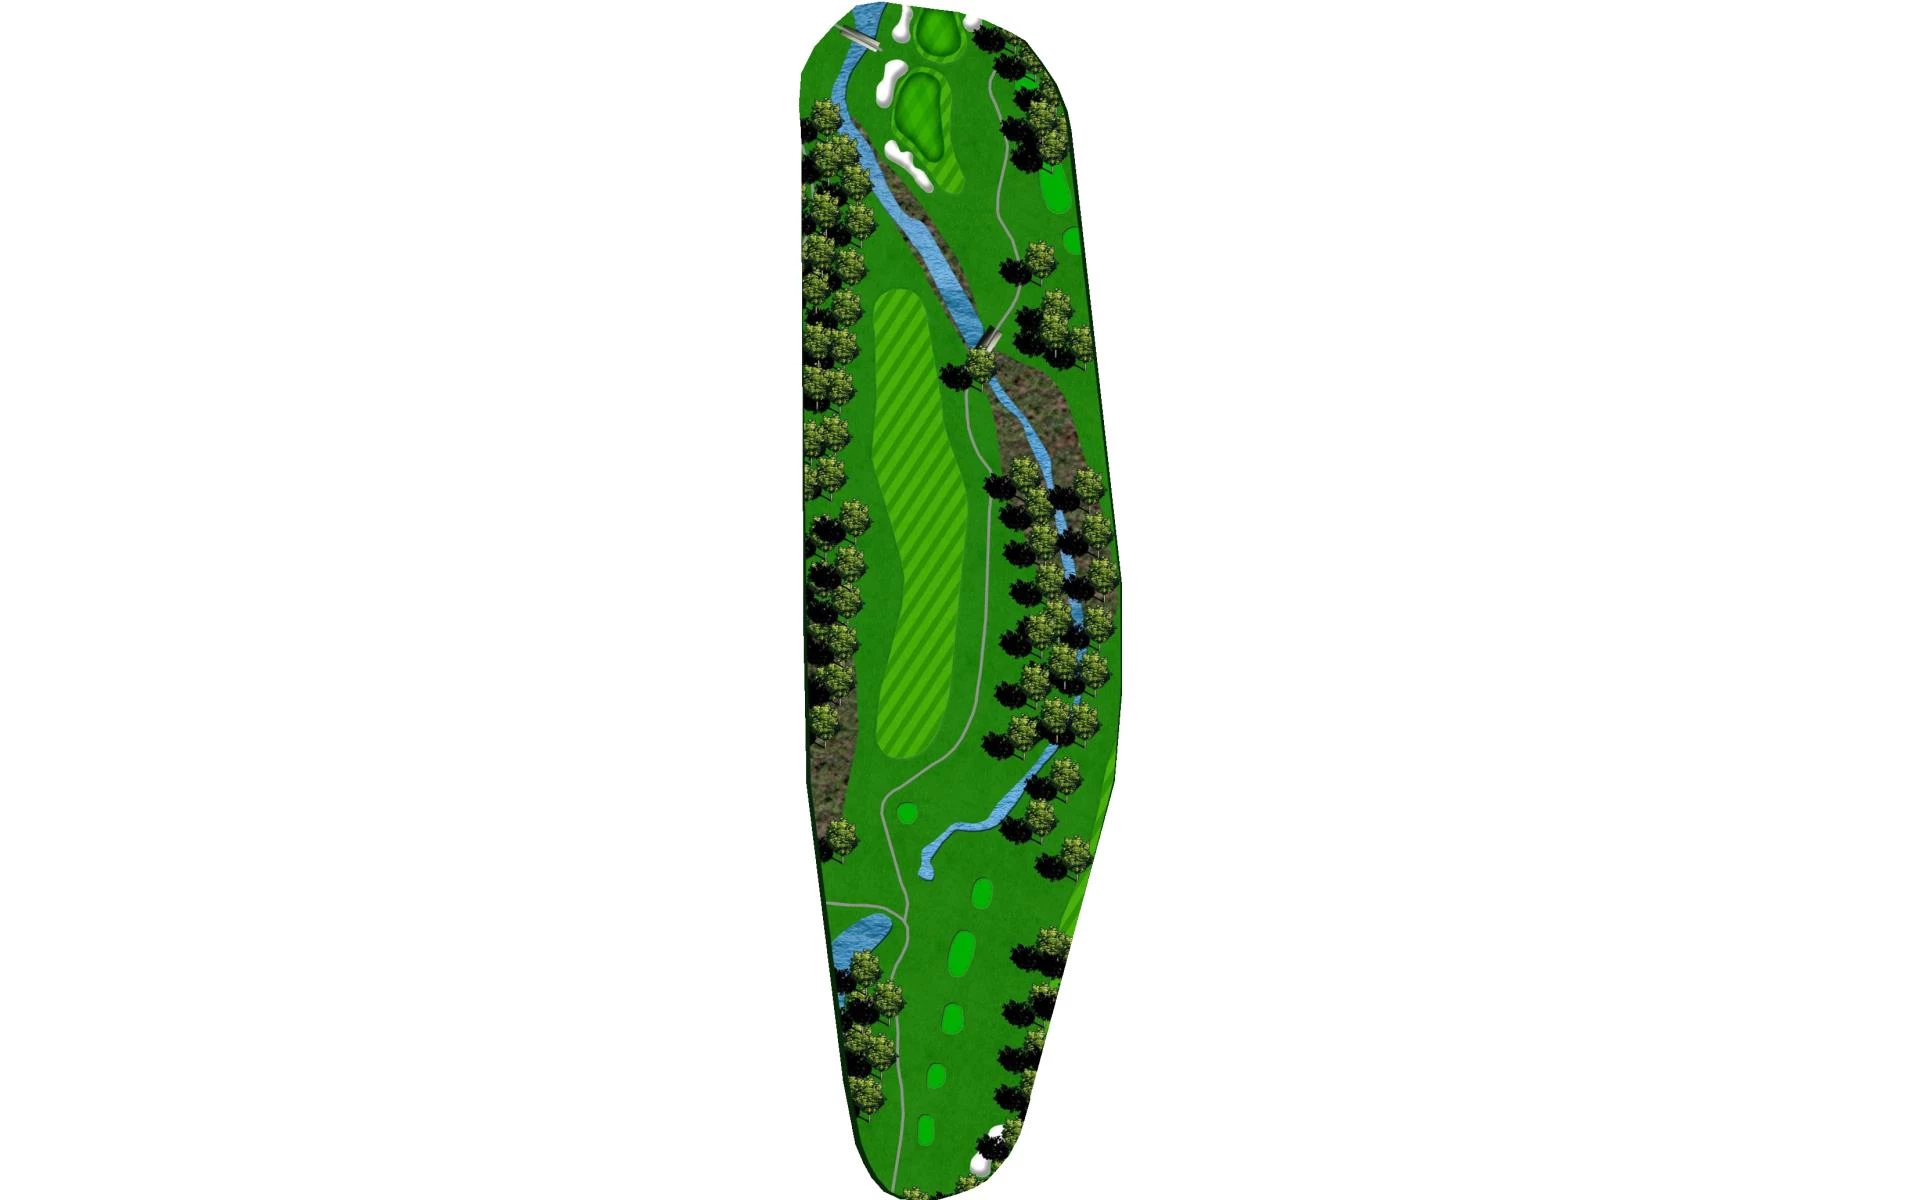
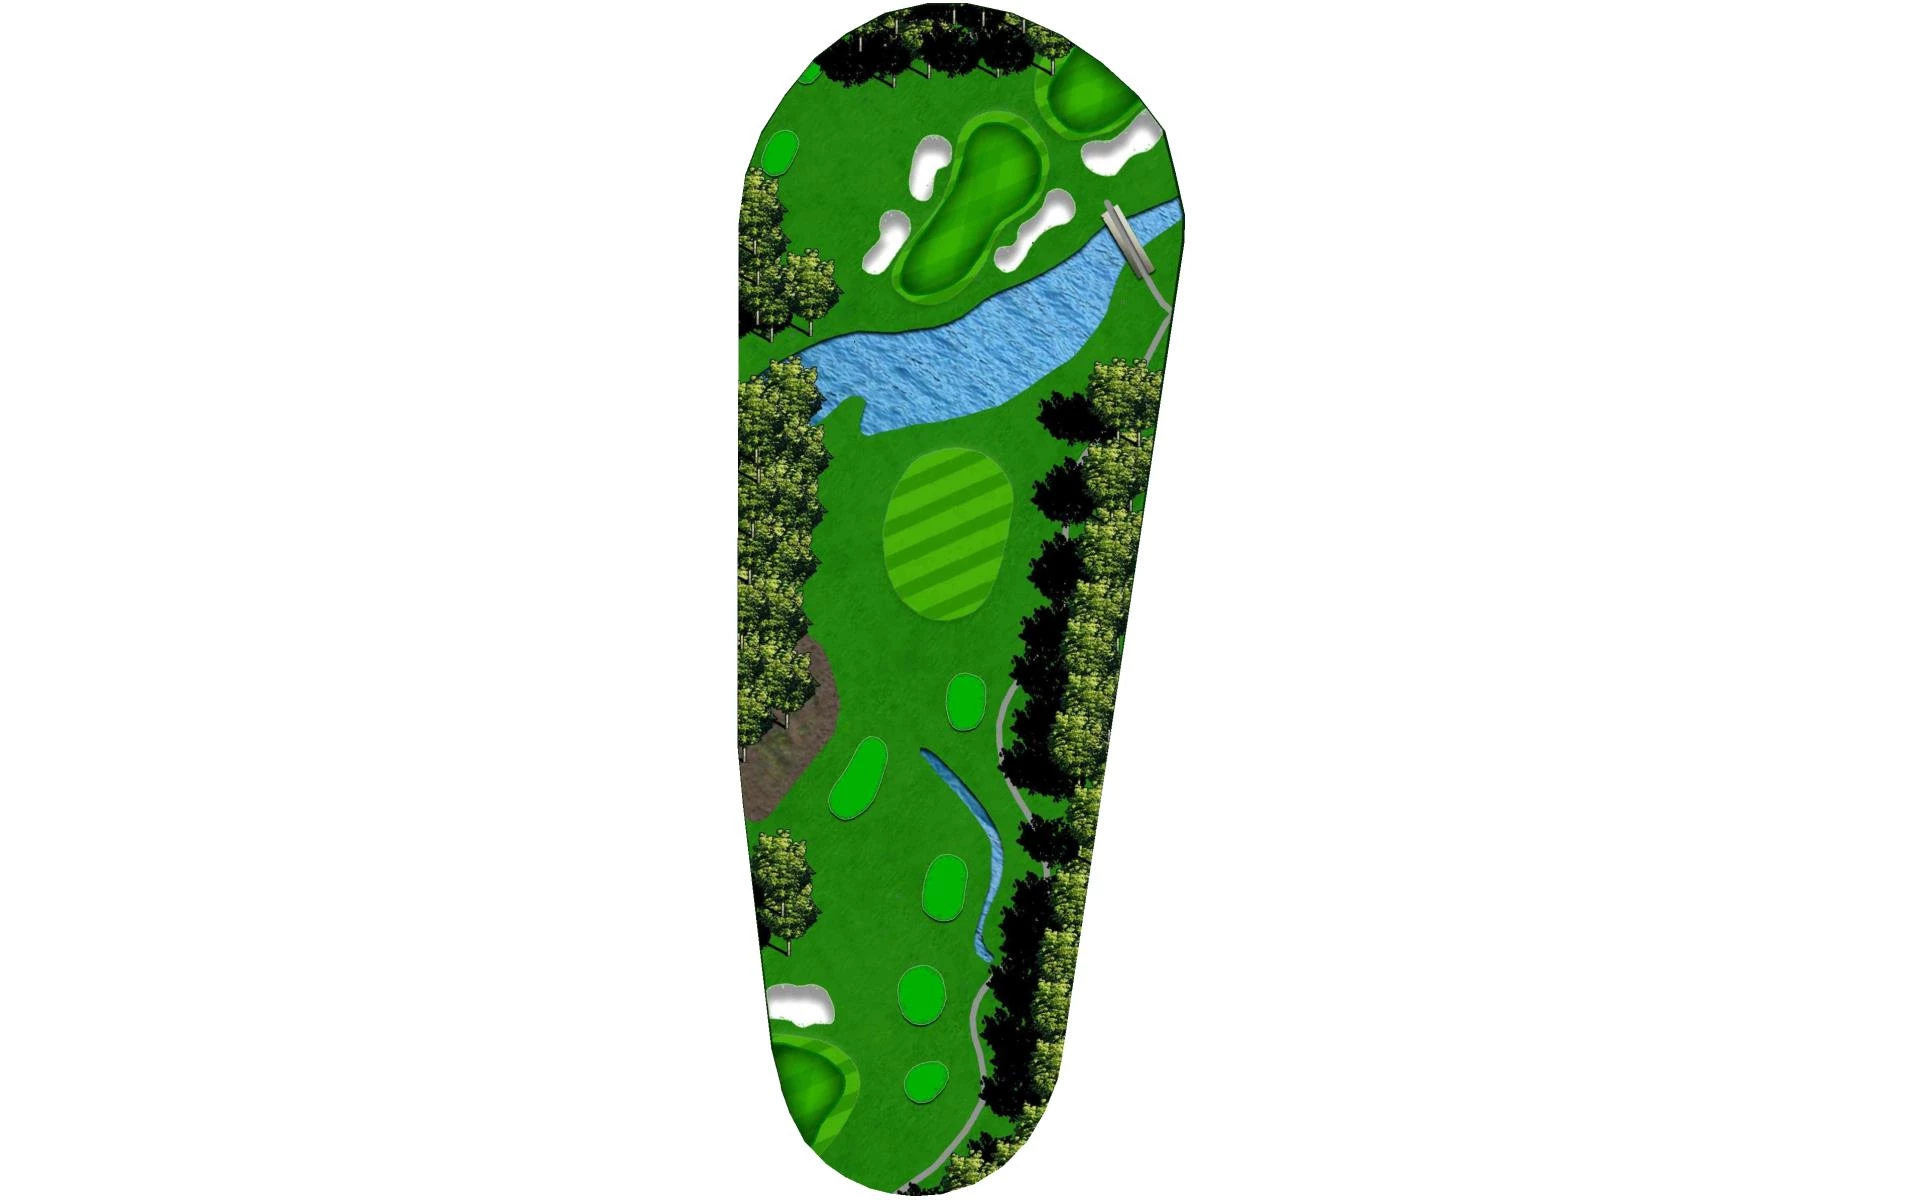
# 7 / Hole 7
Par: 3
Handicaps:
Men's 15
Women's 15
Yardage by Tee:
Black 184
Gold 170
Blue 152
Combo 134
White 134
Red 89
Slope:
Black 74.7/147 | Gold 73.3/144 | Blue 71.9/140 | Combo 69.9/137 | White - M:69.8/134 L:74.4/140 | Red - M:66.5/127 L:70.2/131
Pro Tips
This is a gorgeous hole that is our Signature Hole. From the blue tee the yardage is approximately 168 yards to the center of the green, but the key is the wind. If the wind is behind, you then take one club less depending on where the pin is. If the wind is blowing against you then make sure you have another ball in your pocket.
# 8 / Hole 8
Par: 4
Handicaps:
Men's 1
Women's 3
Yardage by Tee:
Black 410
Gold 380
Blue 380
Combo 360
White 360
Red 277
Slope:
Black 74.7/147 | Gold 73.3/144 | Blue 71.9/140 | Combo 69.9/137 | White - M:69.8/134 L:74.4/140 | Red - M:66.5/127 L:70.2/131
Pro Tips
This is our narrowest fairway, and the key is to hit the center. This will leave you a 180-to-150-yard approach shot to a double green. Make sure that you pick the right flag. This is a well bunkered green that slopes from right to left.
# 9 / Hole 9
Par: 5
Handicaps:
Men's 9
Women's 9
Yardage by Tee:
Black 543
Gold 523
Blue 497
Combo 497
White 482
Red 431
Slope:
Black 74.7/147 | Gold 73.3/144 | Blue 71.9/140 | Combo 69.9/137 | White - M:69.8/134 L:74.4/140 | Red - M:66.5/127 L:70.2/131
Pro Tips
This is a very reachable Par 5. The perfect tee shot is a slight fade which gives you a better angle for your second shot. You could have 240 to 250 left but the fairway near the green is hard and will get some roll. Beware of the bunker on the right. Keep your ball below the hole on your approach shot.
# 10 / Hole 10
Par: 4
Handicaps:
Men's 8
Women's 10
Yardage by Tee:
Black 454
Gold 425
Blue 403
Combo 374
White 374
Red 303
Slope:
Black 74.7/147 | Gold 73.3/144 | Blue 71.9/140 | Combo 69.9/137 | White - M:69.8/134 L:74.4/140 | Red - M:66.5/127 L:70.2/131
Pro Tips
This hole is a slight dog leg right and the fade is the perfect shot. Make sure that your drive is in the middle of the fairway to avoid the overhanging trees on the right side of the green for your approach. This green slopes from right to left. Stay below the hole with your approach.
# 11 / Hole 11
Par: 5
Handicaps:
Men's 2
Women's 2
Yardage by Tee:
Black 520
Gold 497
Blue 473
Combo 473
White 461
Red 444
Slope:
Black 74.7/147 | Gold 73.3/144 | Blue 71.9/140 | Combo 69.9/137 | White - M:69.8/134 L:74.4/140 | Red - M:66.5/127 L:70.2/131
Pro Tips
This Par 5 requires a drive in the middle of the fairway for a good layup or if you are going for it. Avoid the bunkers around this sloping green.
# 12 / Hole 12
Par: 3
Handicaps:
Men's 14
Women's 16
Yardage by Tee:
Black 188
Gold 184
Blue 167
Combo 167
White 142
Red 107
Slope:
Black 74.7/147 | Gold 73.3/144 | Blue 71.9/140 | Combo 69.9/137 | White - M:69.8/134 L:74.4/140 | Red - M:66.5/127 L:70.2/131
Pro Tips
Make sure that you pick the right club for this Par 3. If the wind is in your face take one extra club. The green slopes towards the tee.
# 13 / Hole 13
Par: 4
Handicaps:
Men's 16
Women's 14
Yardage by Tee:
Black 356
Gold 338
Blue 311
Combo 311
White 294
Red 268
Slope:
Black 74.7/147 | Gold 73.3/144 | Blue 71.9/140 | Combo 69.9/137 | White - M:69.8/134 L:74.4/140 | Red - M:66.5/127 L:70.2/131
Pro Tips
Now you can breathe. This is the shortest Par 4 on the course. The issue is not the tee shot, but the approach. Everything goes left and the bunkers are there for a reason.
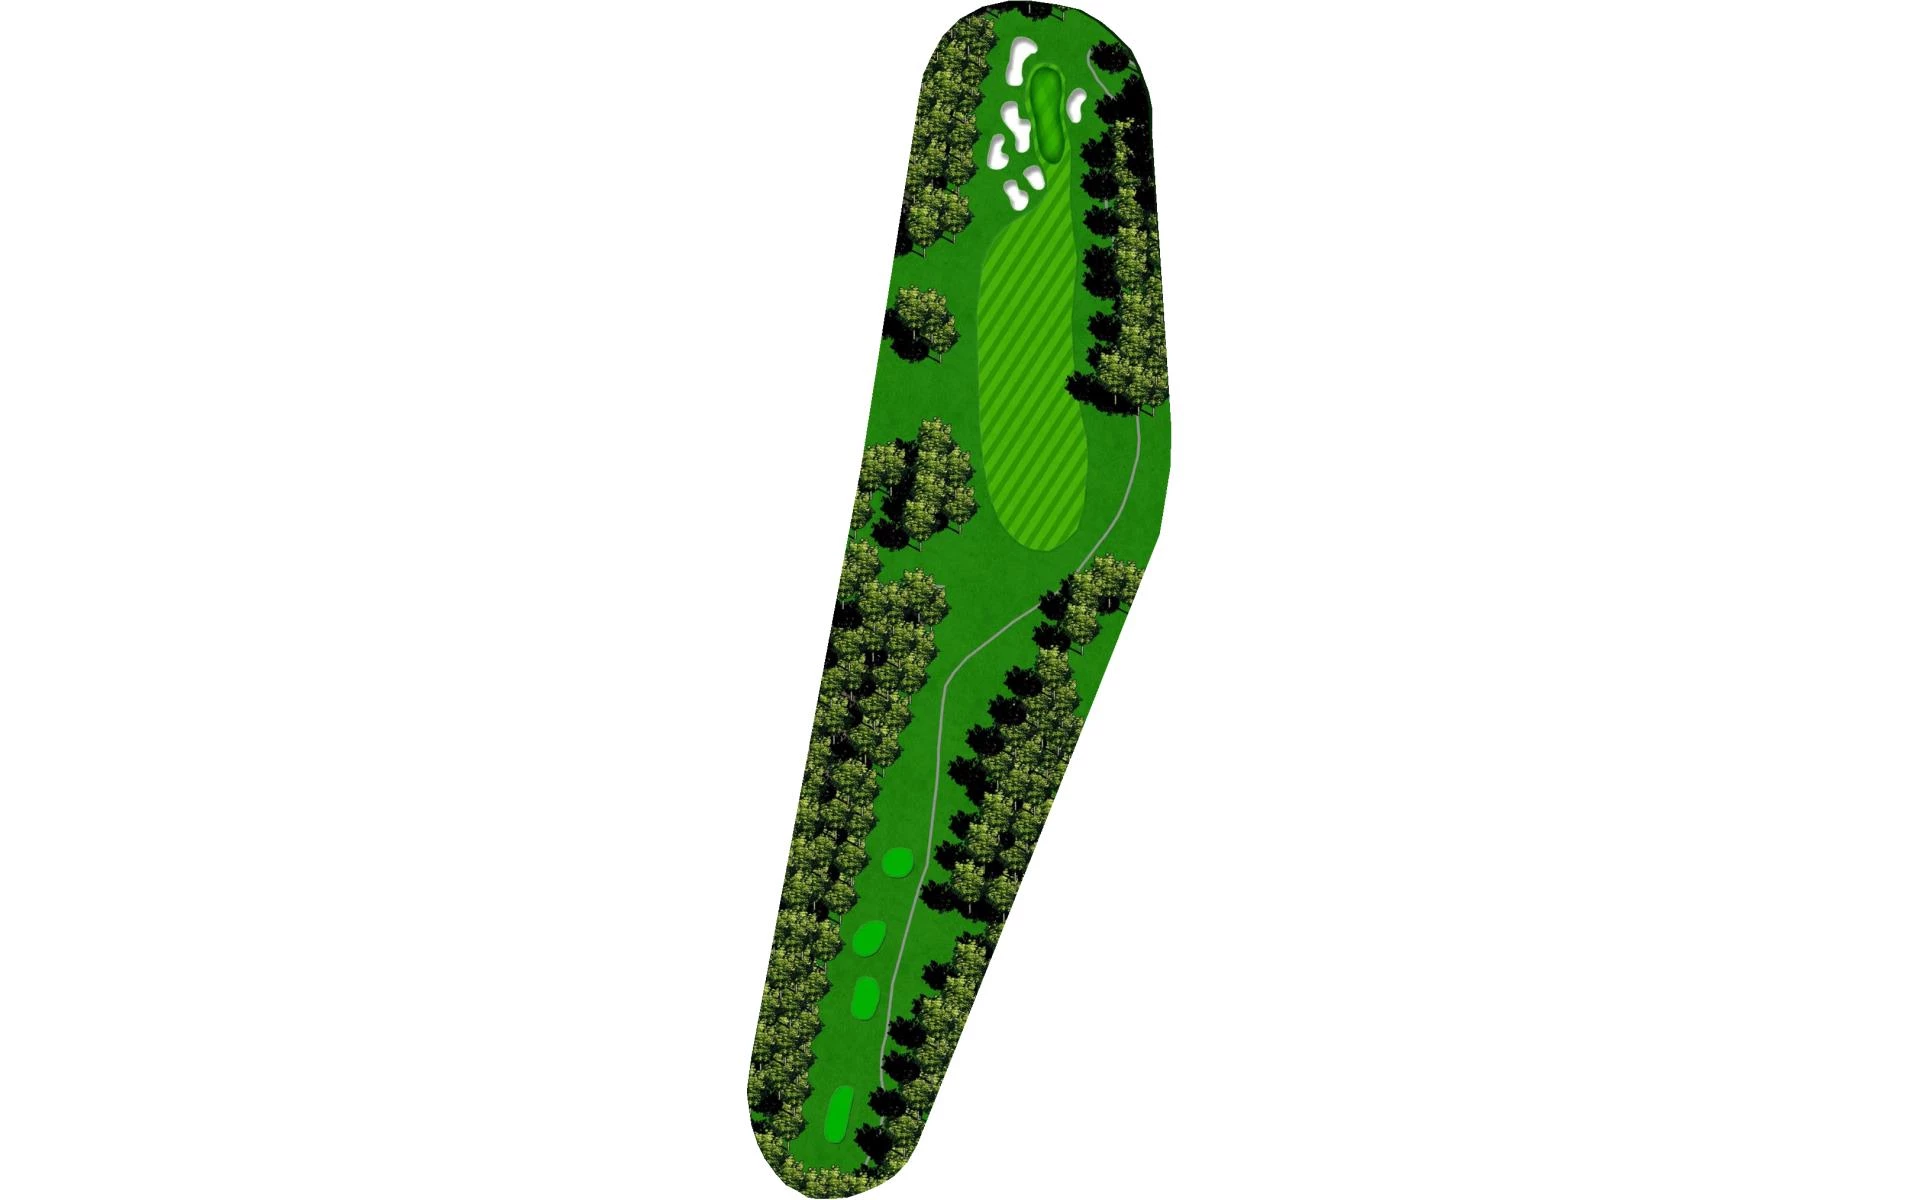
# 14 / Hole 14
Par: 3
Handicaps:
Men's 18
Women's 18
Yardage by Tee:
Black 181
Gold 181
Blue 158
Combo 158
White 133
Red 118
Slope:
Black 74.7/147 | Gold 73.3/144 | Blue 71.9/140 | Combo 69.9/137 | White - M:69.8/134 L:74.4/140 | Red - M:66.5/127 L:70.2/131
Pro Tips
This is a gorgeous Par 3. It does play a little shorter than what the card says. The tee shot is just the start. Where you put that tee shot will determine your score or better yet how many putts you will have. Try to stay below the hole.
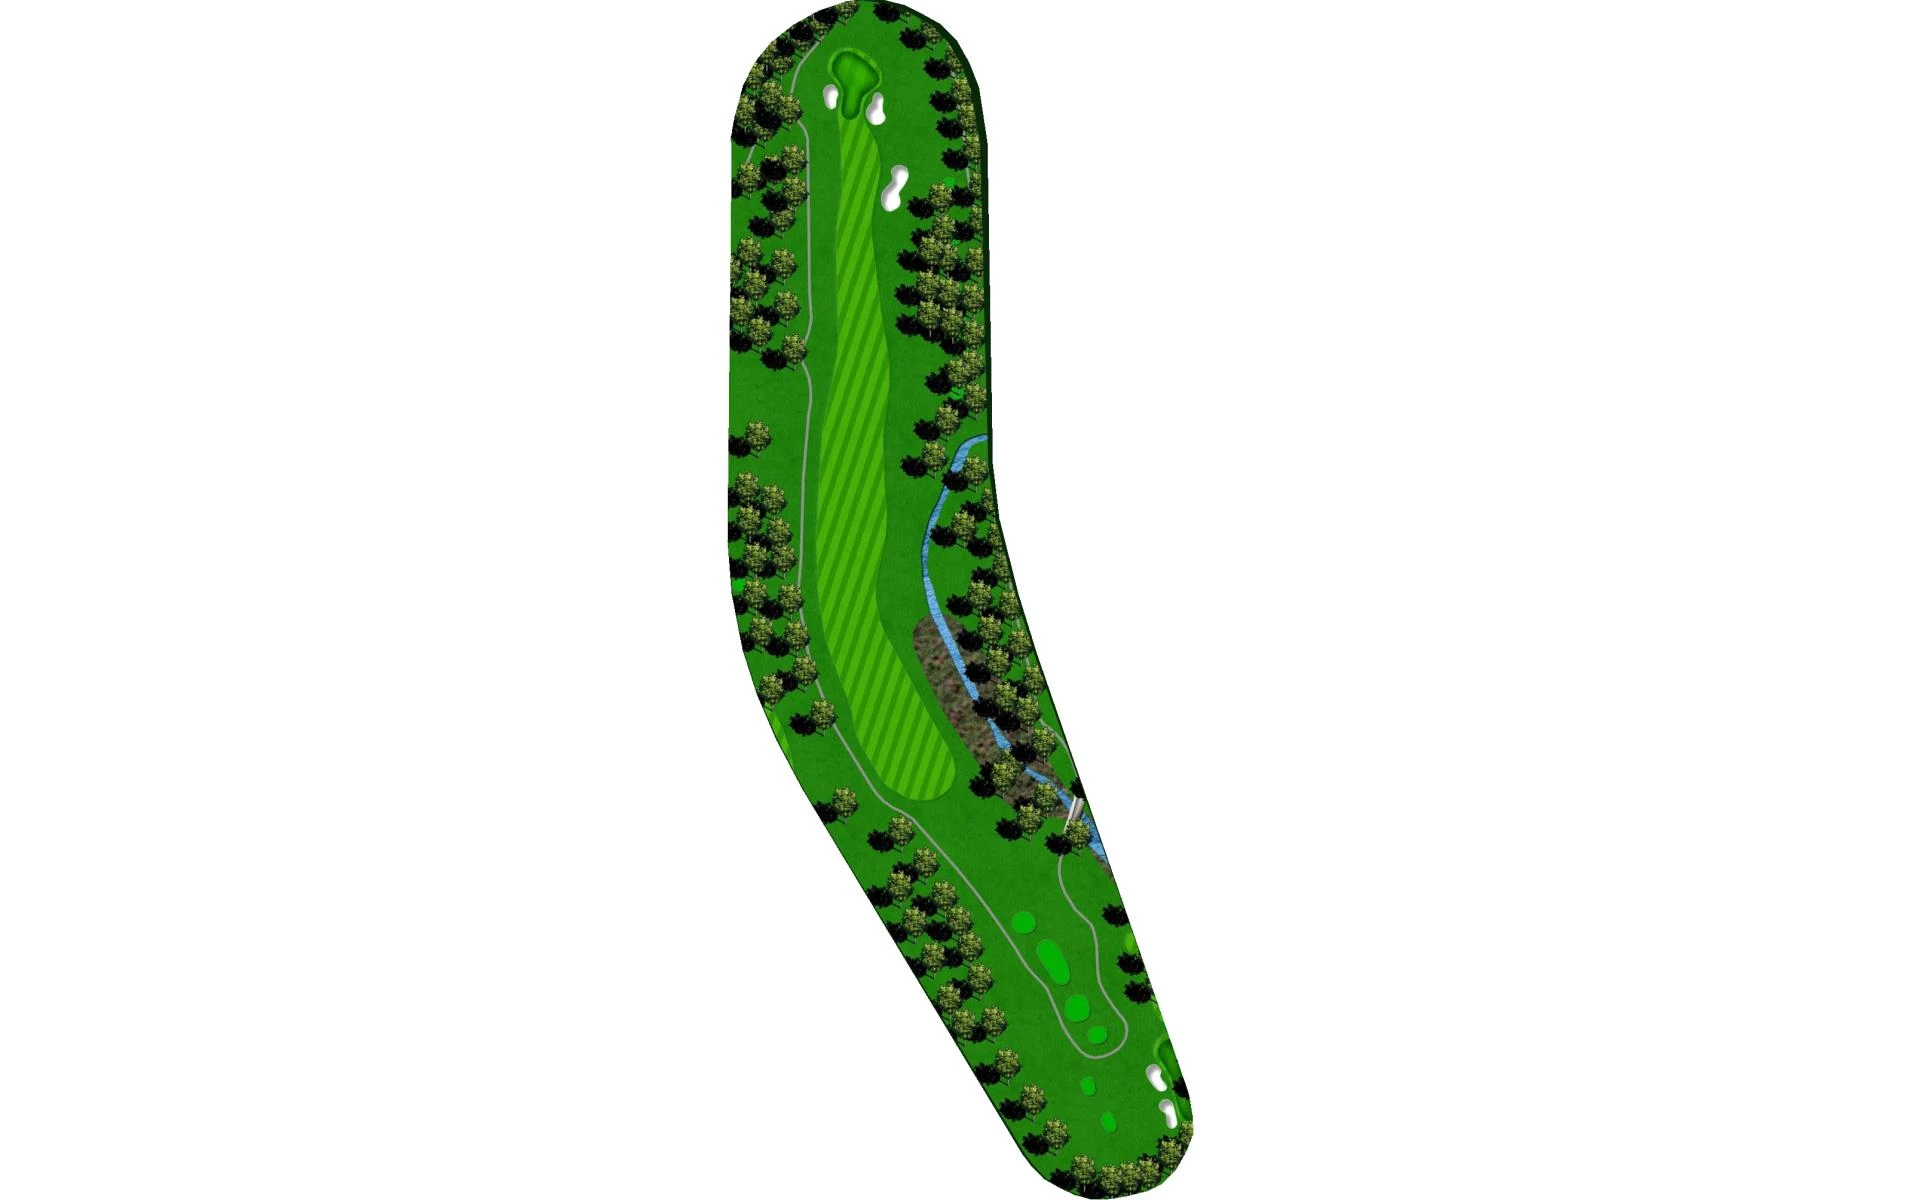
# 15 / Hole 15
Par: 4
Handicaps:
Men's 12
Women's 12
Yardage by Tee:
Black 368
Gold 389
Blue 310
Combo 310
White 247
Red 247
Slope:
Black 74.7/147 | Gold 73.3/144 | Blue 71.9/140 | Combo 69.9/137 | White - M:69.8/134 L:74.4/140 | Red - M:66.5/127 L:70.2/131
Pro Tips
This is a straight away Par 4 that can be reached by a big hitter. Whatever you do hit it straight. Your approach shot is within 100 yards. It is birdie time.
# 16 / Hole 16
Par: 4
Handicaps:
Men's 4
Women's 4
Yardage by Tee:
Black 409
Gold 389
Blue 379
Combo 379
White 351
Red 326
Slope:
Black 74.7/147 | Gold 73.3/144 | Blue 71.9/140 | Combo 69.9/137 | White - M:69.8/134 L:74.4/140 | Red - M:66.5/127 L:70.2/131
Pro Tips
The big hitter can leave the Driver in the bag. Three or five woods will leave you within 150 yards of this undulating green. Take aim at the pin.
# 17 / Hole 17
Par: 5
Handicaps:
Men's 10
Women's 8
Yardage by Tee:
Black 505
Gold 485
Blue 481
Combo 451
White 451
Red 403
Slope:
Black 74.7/147 | Gold 73.3/144 | Blue 71.9/140 | Combo 69.9/137 | White - M:69.8/134 L:74.4/140 | Red - M:66.5/127 L:70.2/131
Pro Tips
This could be your most important drive of the day as you must fade the ball around the corner to have a chance at birdie on this Par 5. This green slopes from back to front.

# 18 / Hole 18
Par: 4
Handicaps:
Men's 6
Women's 6
Yardage by Tee:
Black 442
Gold 423
Blue 394
Combo 356
White 356
Red 276
Slope:
Black 74.7/147 | Gold 73.3/144 | Blue 71.9/140 | Combo 69.9/137 | White - M:69.8/134 L:74.4/140 | Red - M:66.5/127 L:70.2/131
Pro Tips
The home hole. Avoid the big tree on the right and the bunker on the left by ripping it down the middle. With a good drive you could have 190 to 150 yards for your approach. This is the biggest green on the course. Your approach is so important to this undulating green.