Atlanta National Golf Club Golf Course
Designer: Pete and P.B. Dye
The golf course at Atlanta National Golf Club was designed by legendary golf course architect, Pete Dye and his son, P.B. It features all of…
The golf course at Atlanta National Golf Club was designed by legendary golf course architect, Pete Dye and his son, P.B. It features all of his classic design elements, including an island green, deep bunkers, and undulating greens. This memorable course will challenge golfers of all skill levels, every time they play.
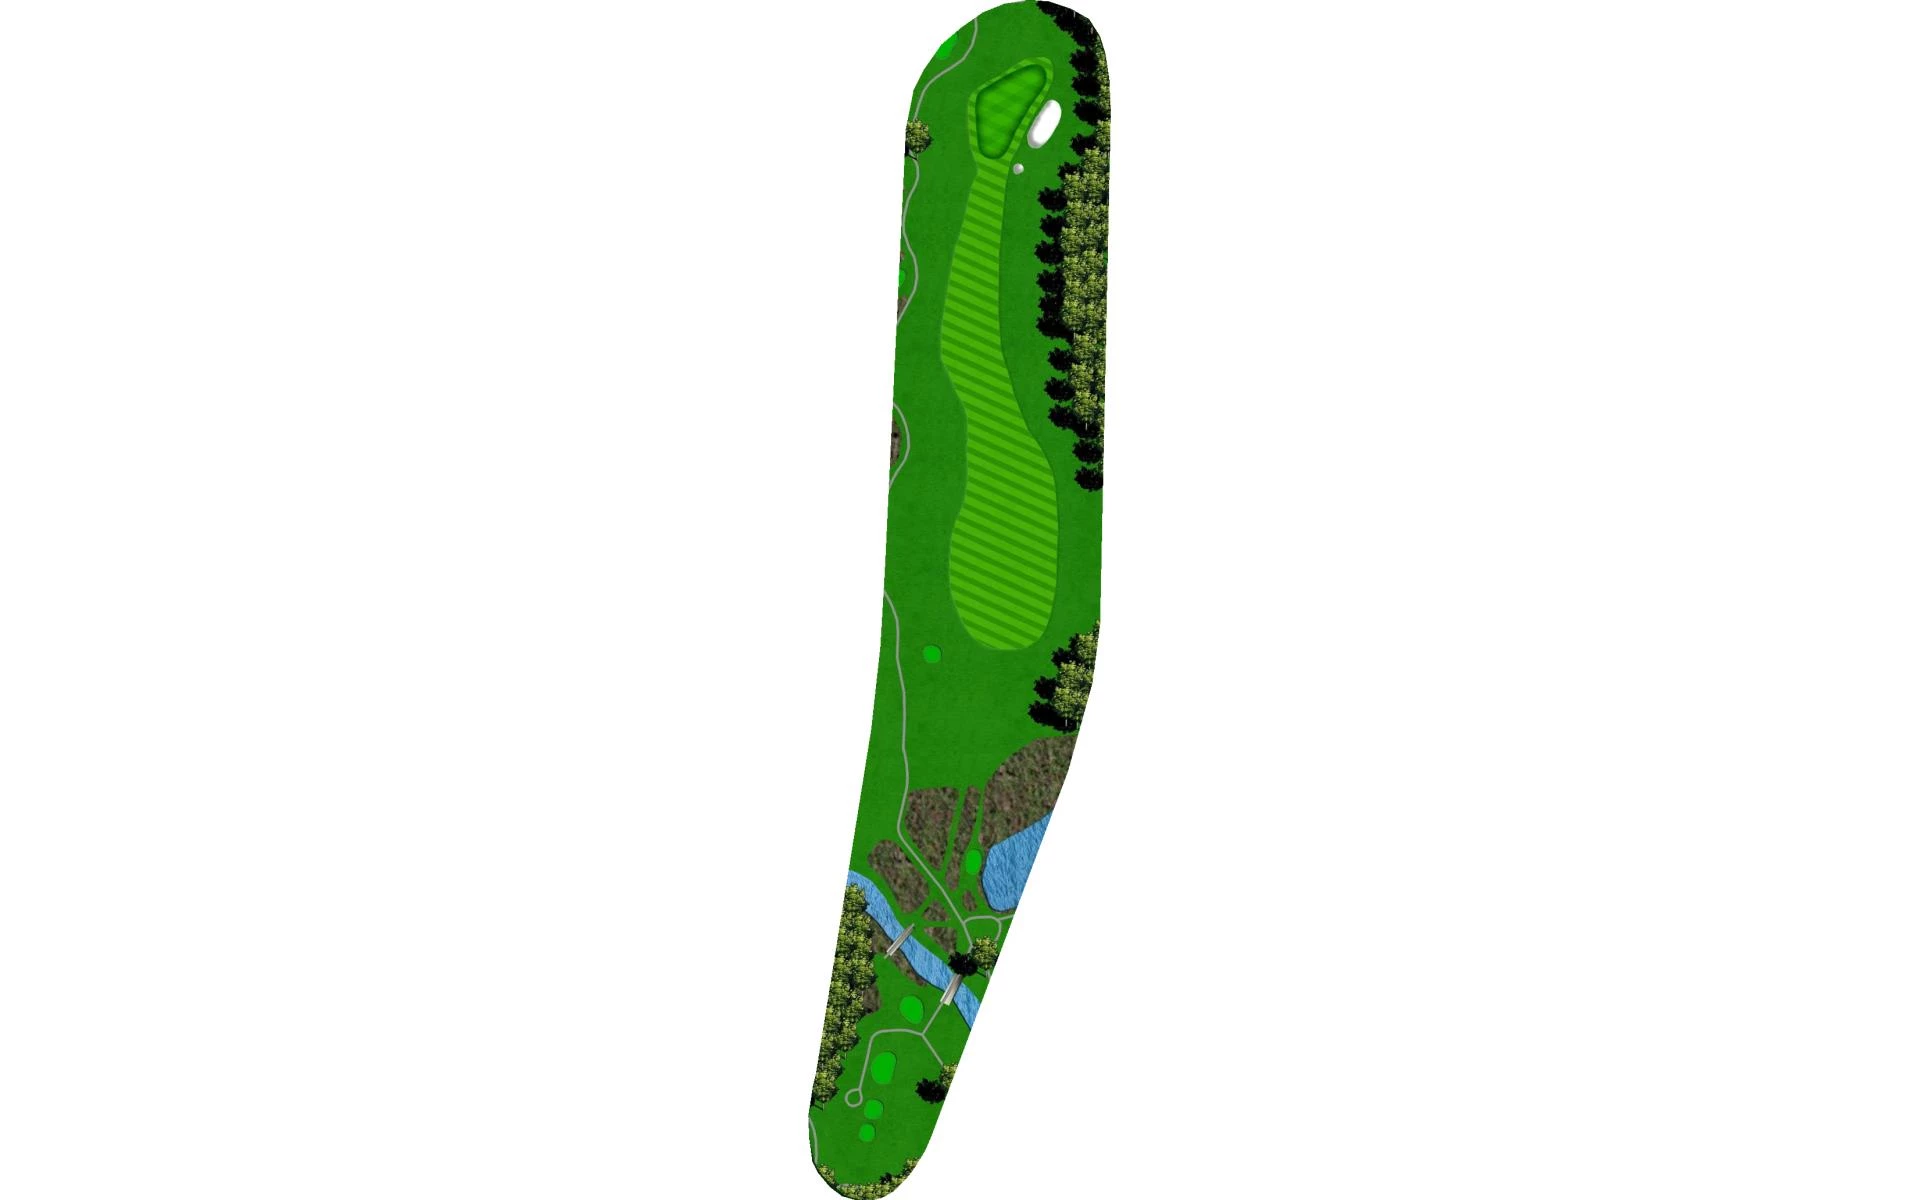
# 1 /
Par: 4
Handicaps:
Men's 15
Women's 11
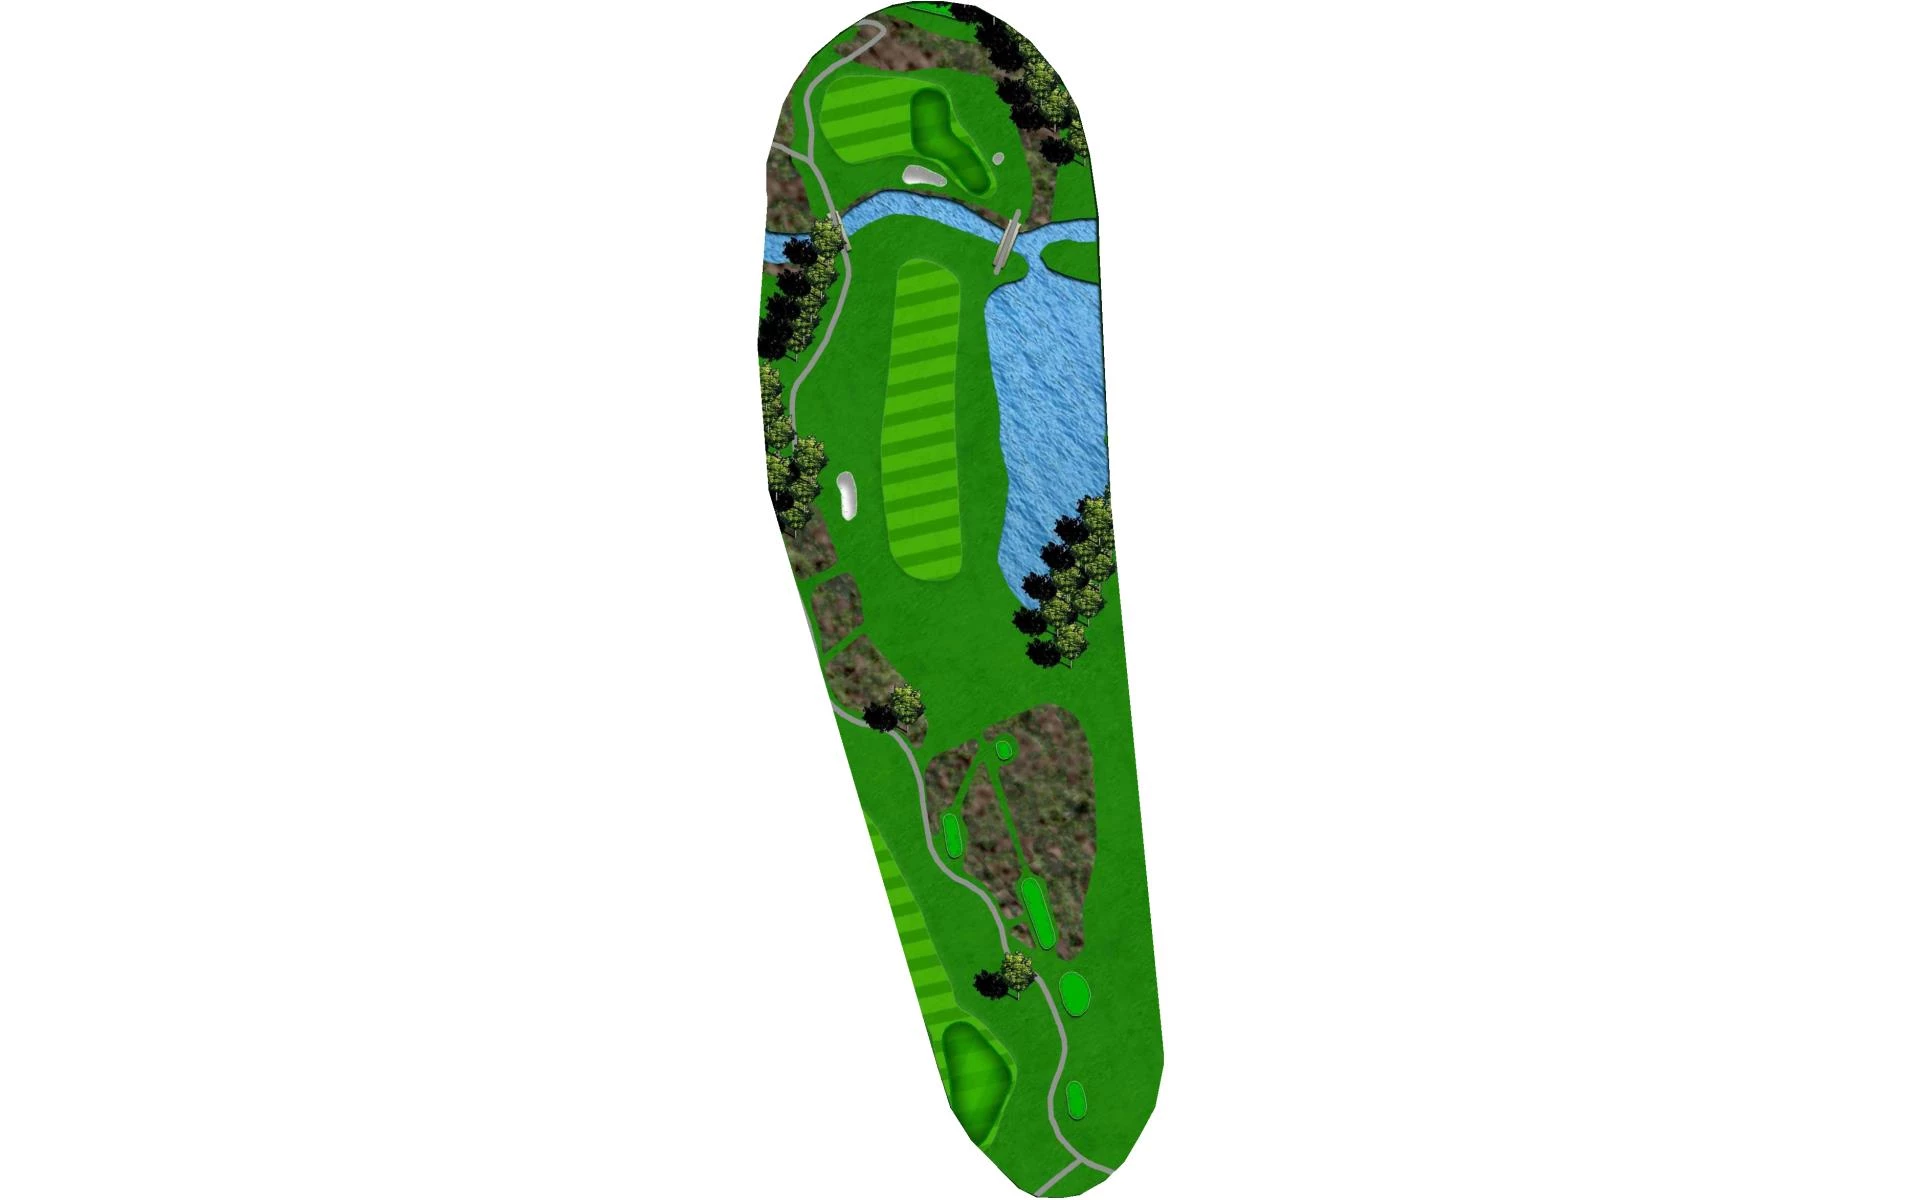
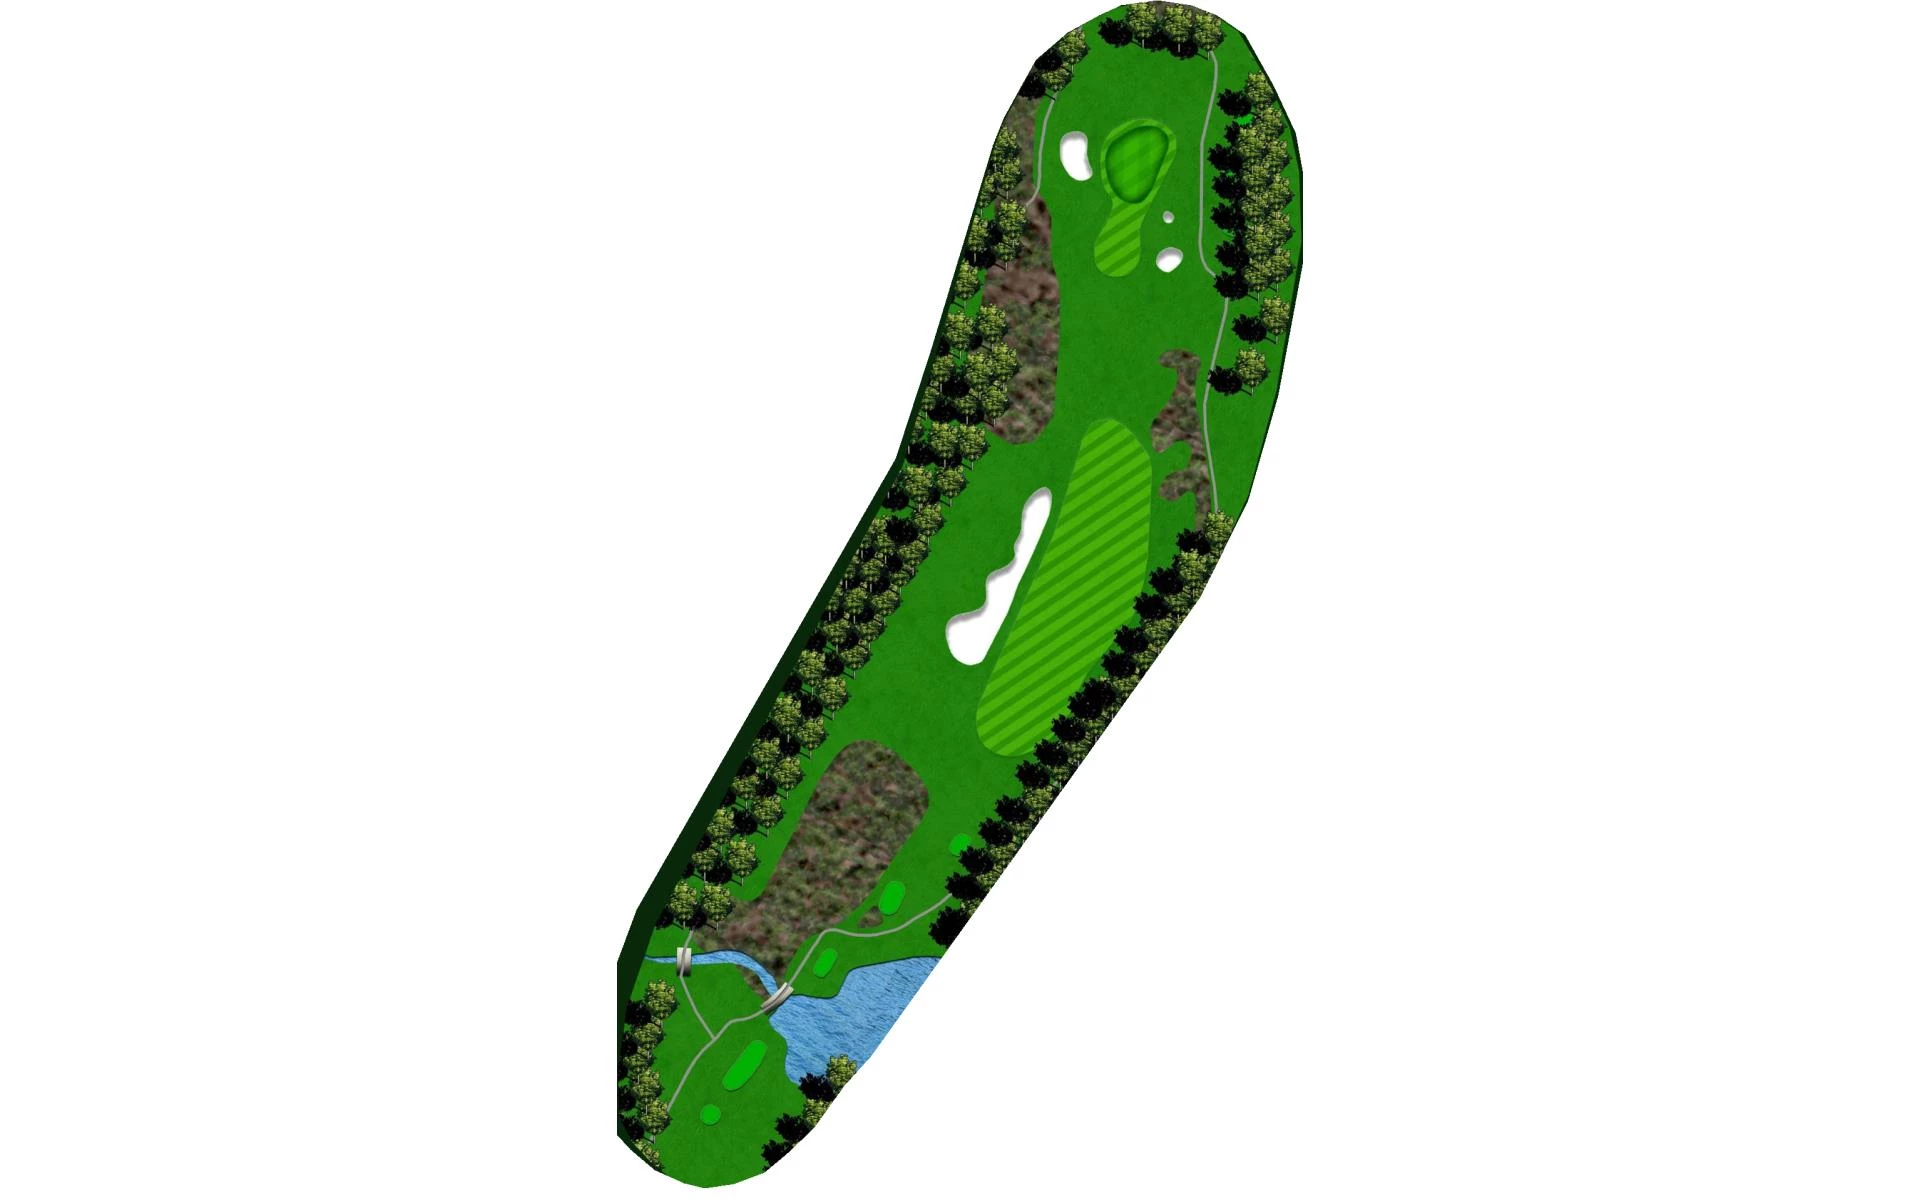
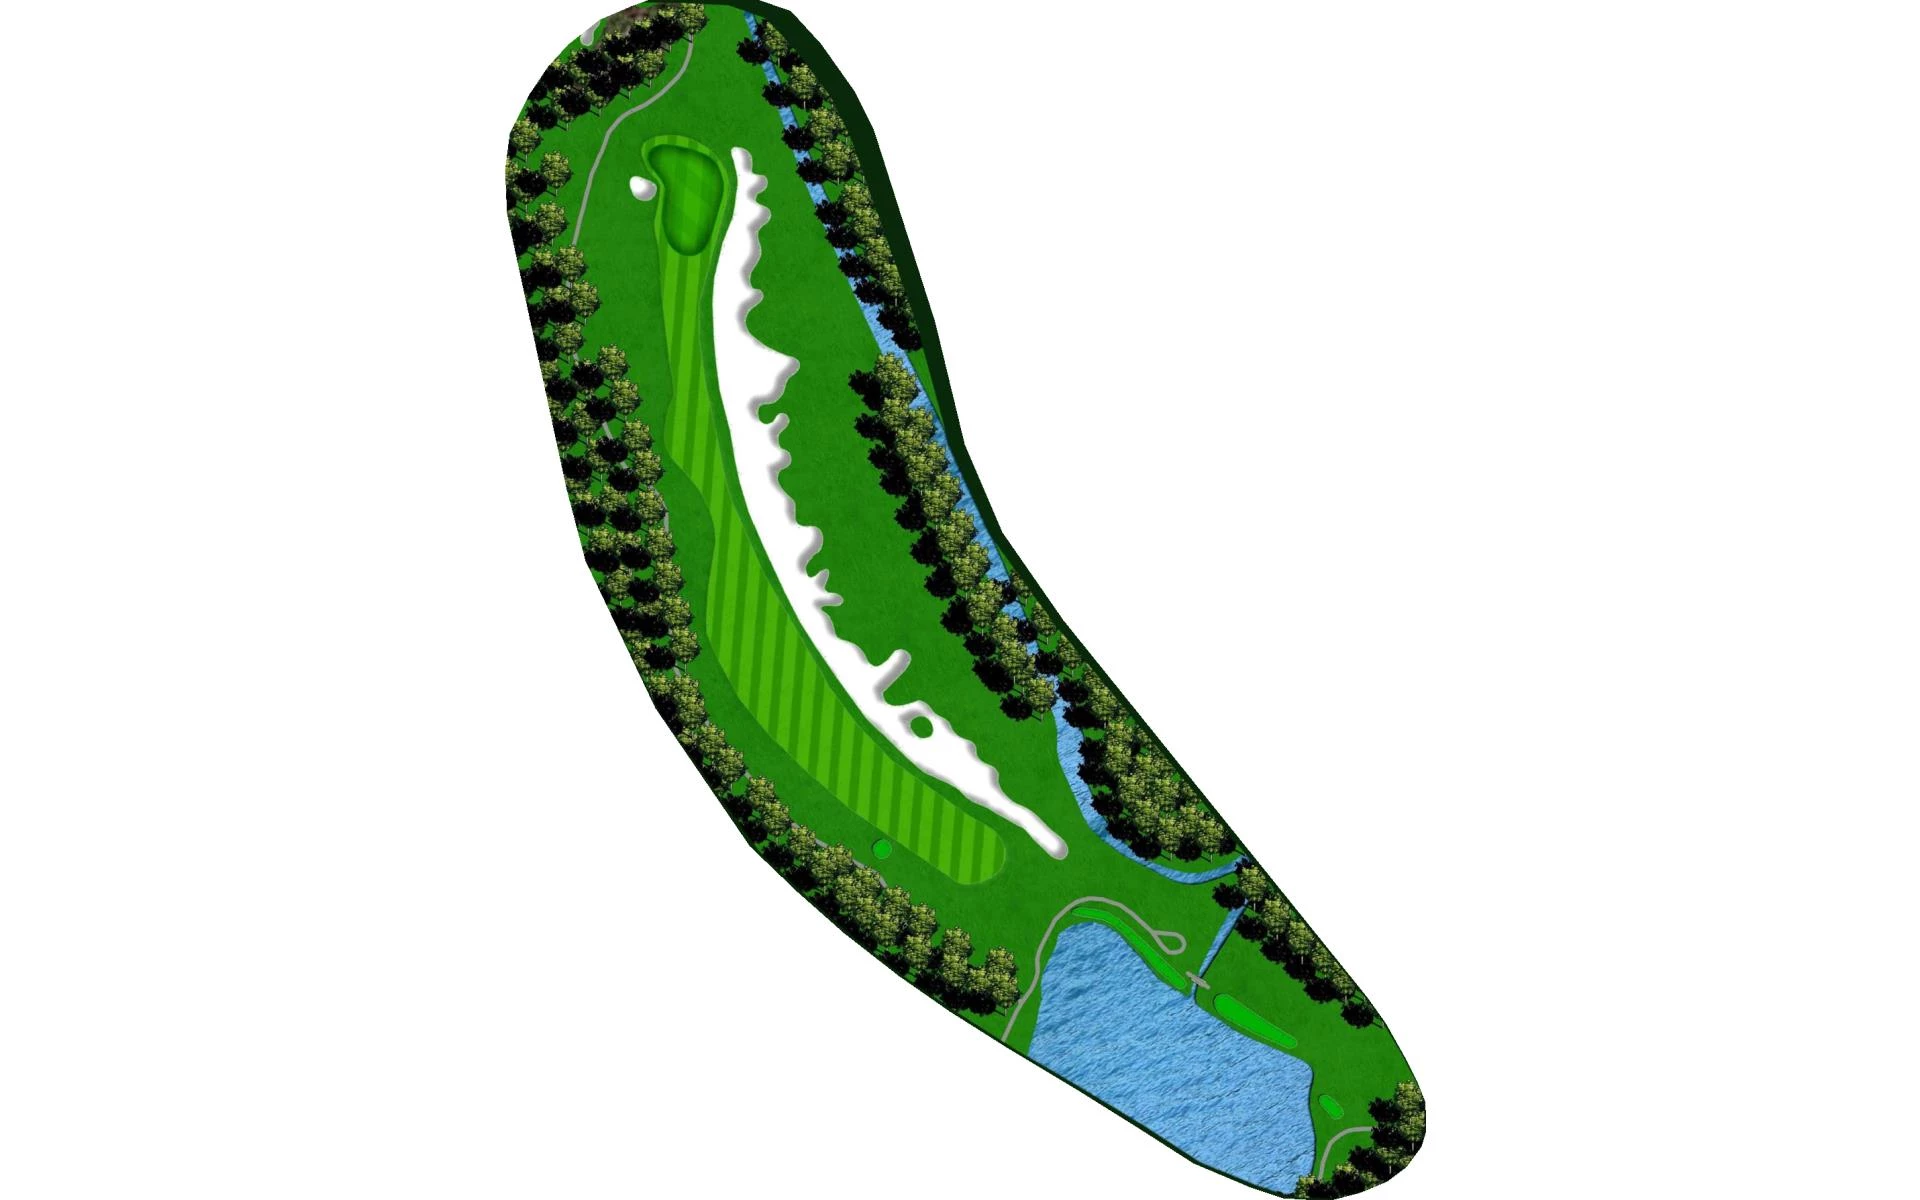
The opening hole is a short par 4 that’s guarded by water down the right side. Player’s approach shot will have to carry Chicken Creek to a …
The opening hole is a short par 4 that’s guarded by water down the right side. Player’s approach shot will have to carry Chicken Creek to a green protected by two bunkers.
Yardage by Tee:
BLACK 370
BURGUNDY 332
BLUE 300
SILVER 264
GOLD 235
# 2 /
Par: 3
Handicaps:
Men's 11
Women's 7
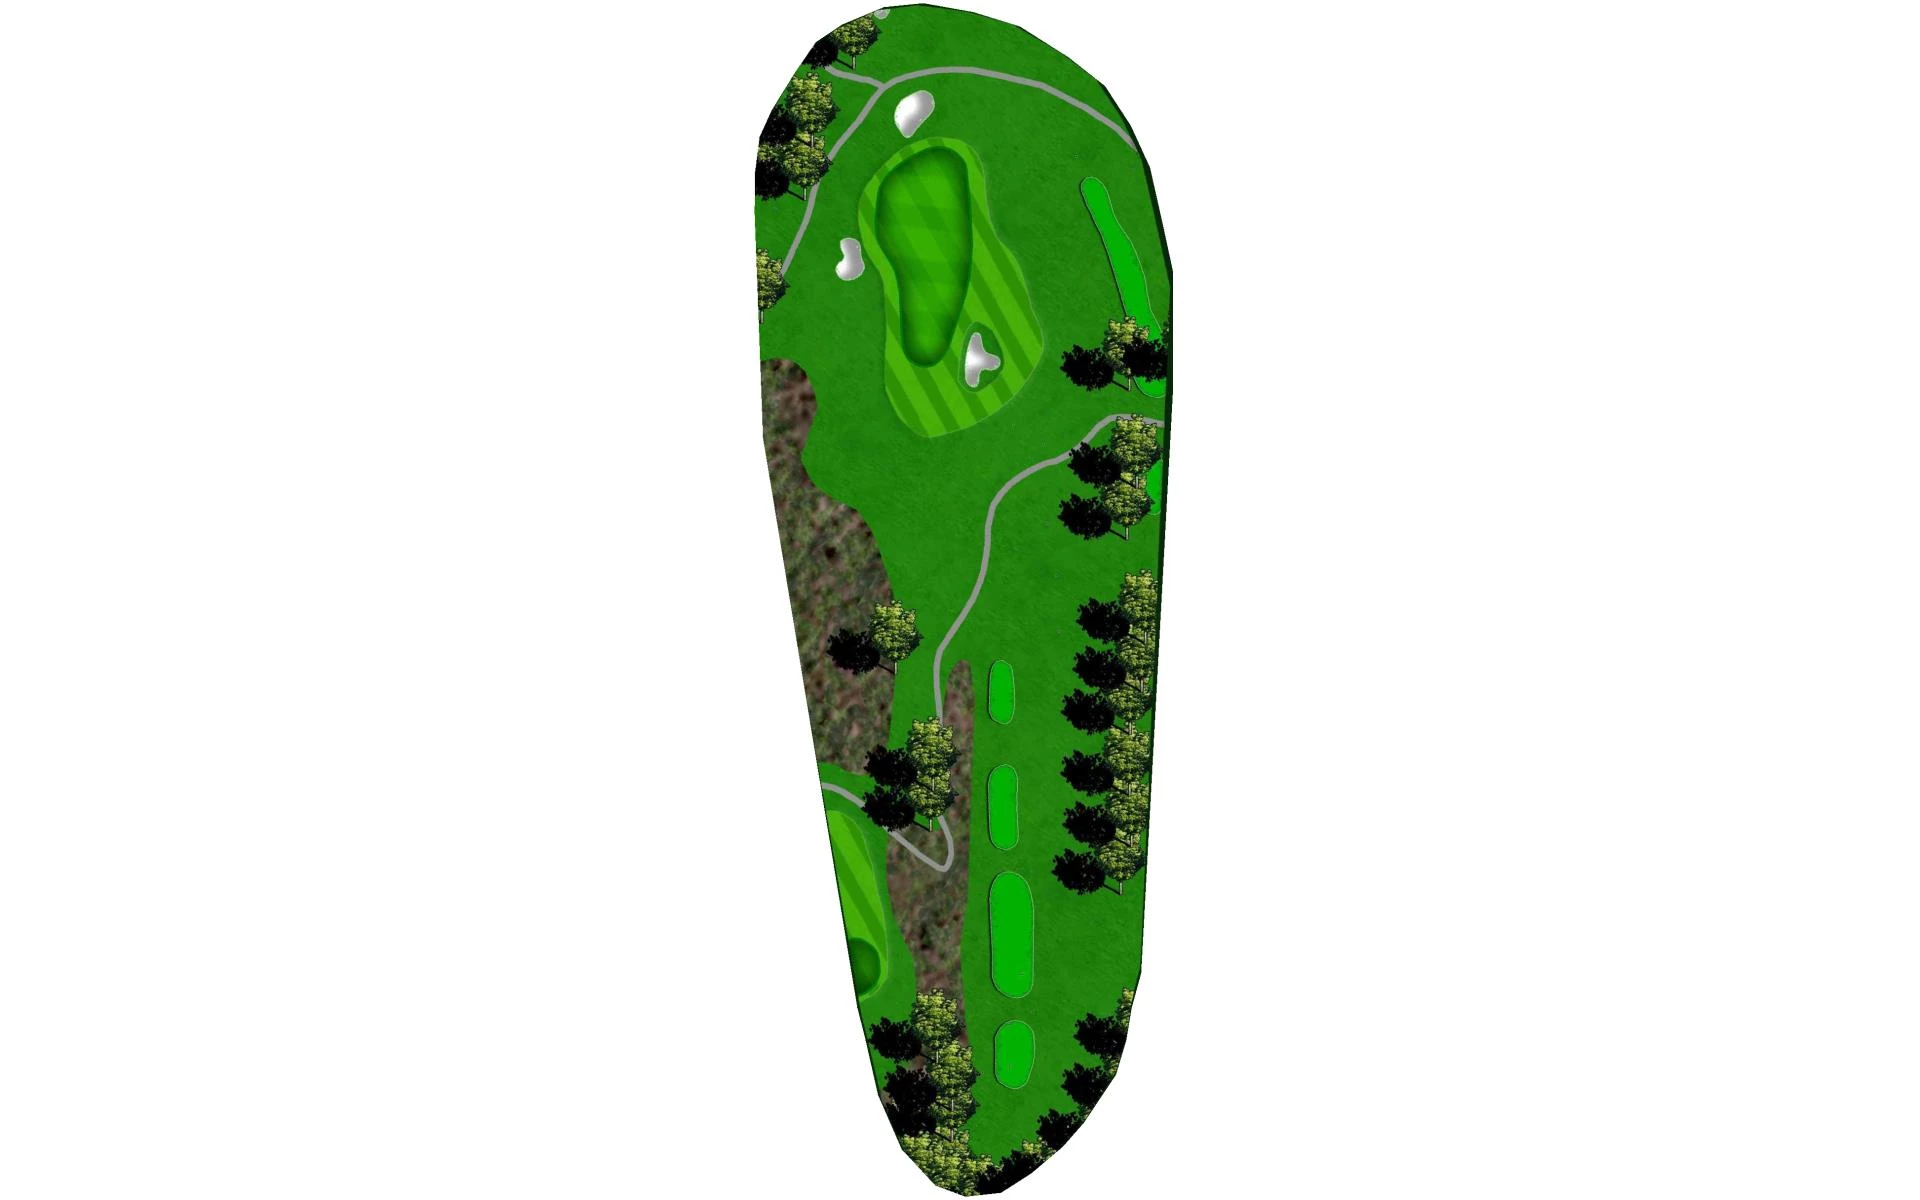
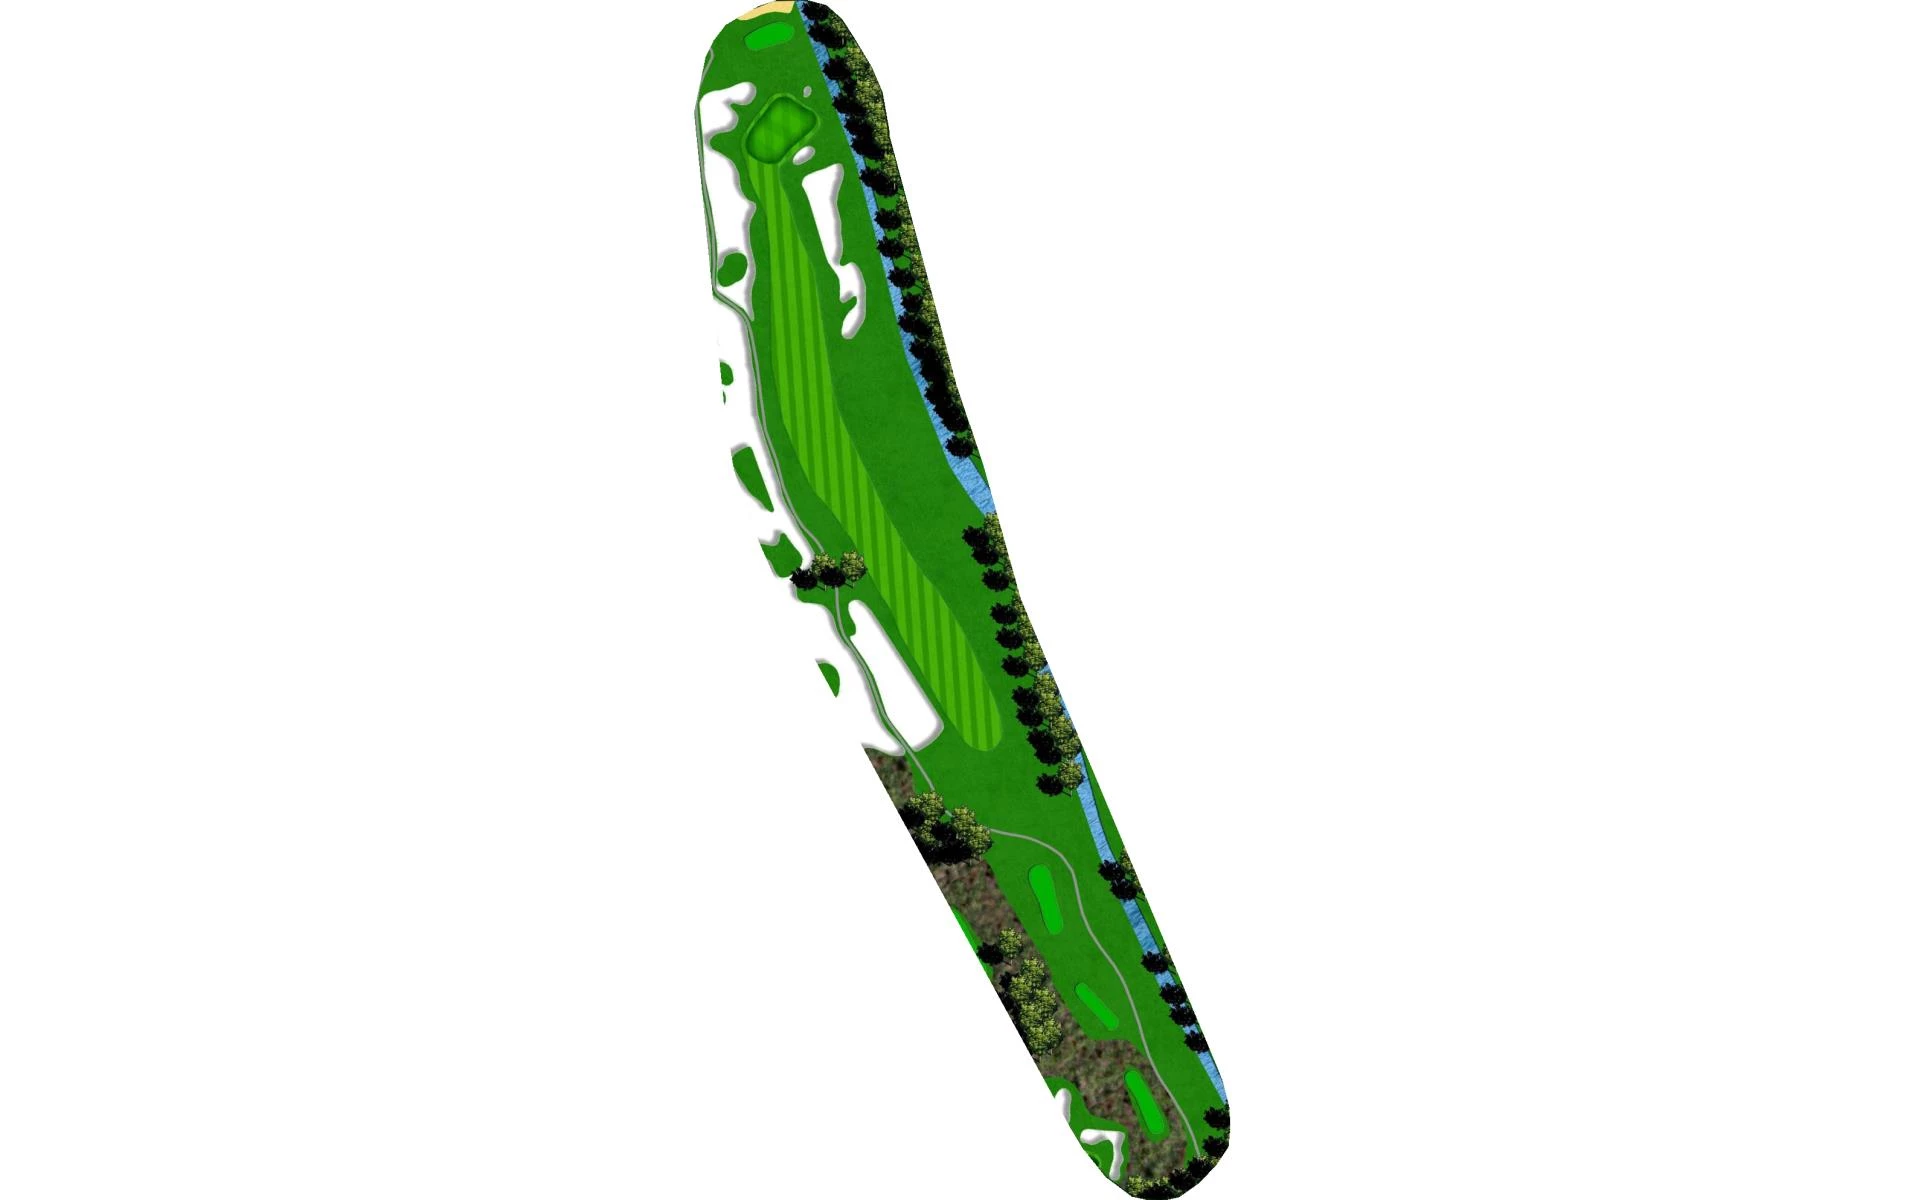
The second hole is a tough par 3 with an elevated, two-tiered green that falls off on both the right and left. A good shot is one that finds…
The second hole is a tough par 3 with an elevated, two-tiered green that falls off on both the right and left. A good shot is one that finds the center of the putting surface.
Yardage by Tee:
BLACK 197
BURGUNDY 171
BLUE 142
SILVER 133
GOLD 111
# 3 /
Par: 5
Handicaps:
Men's 7
Women's 3
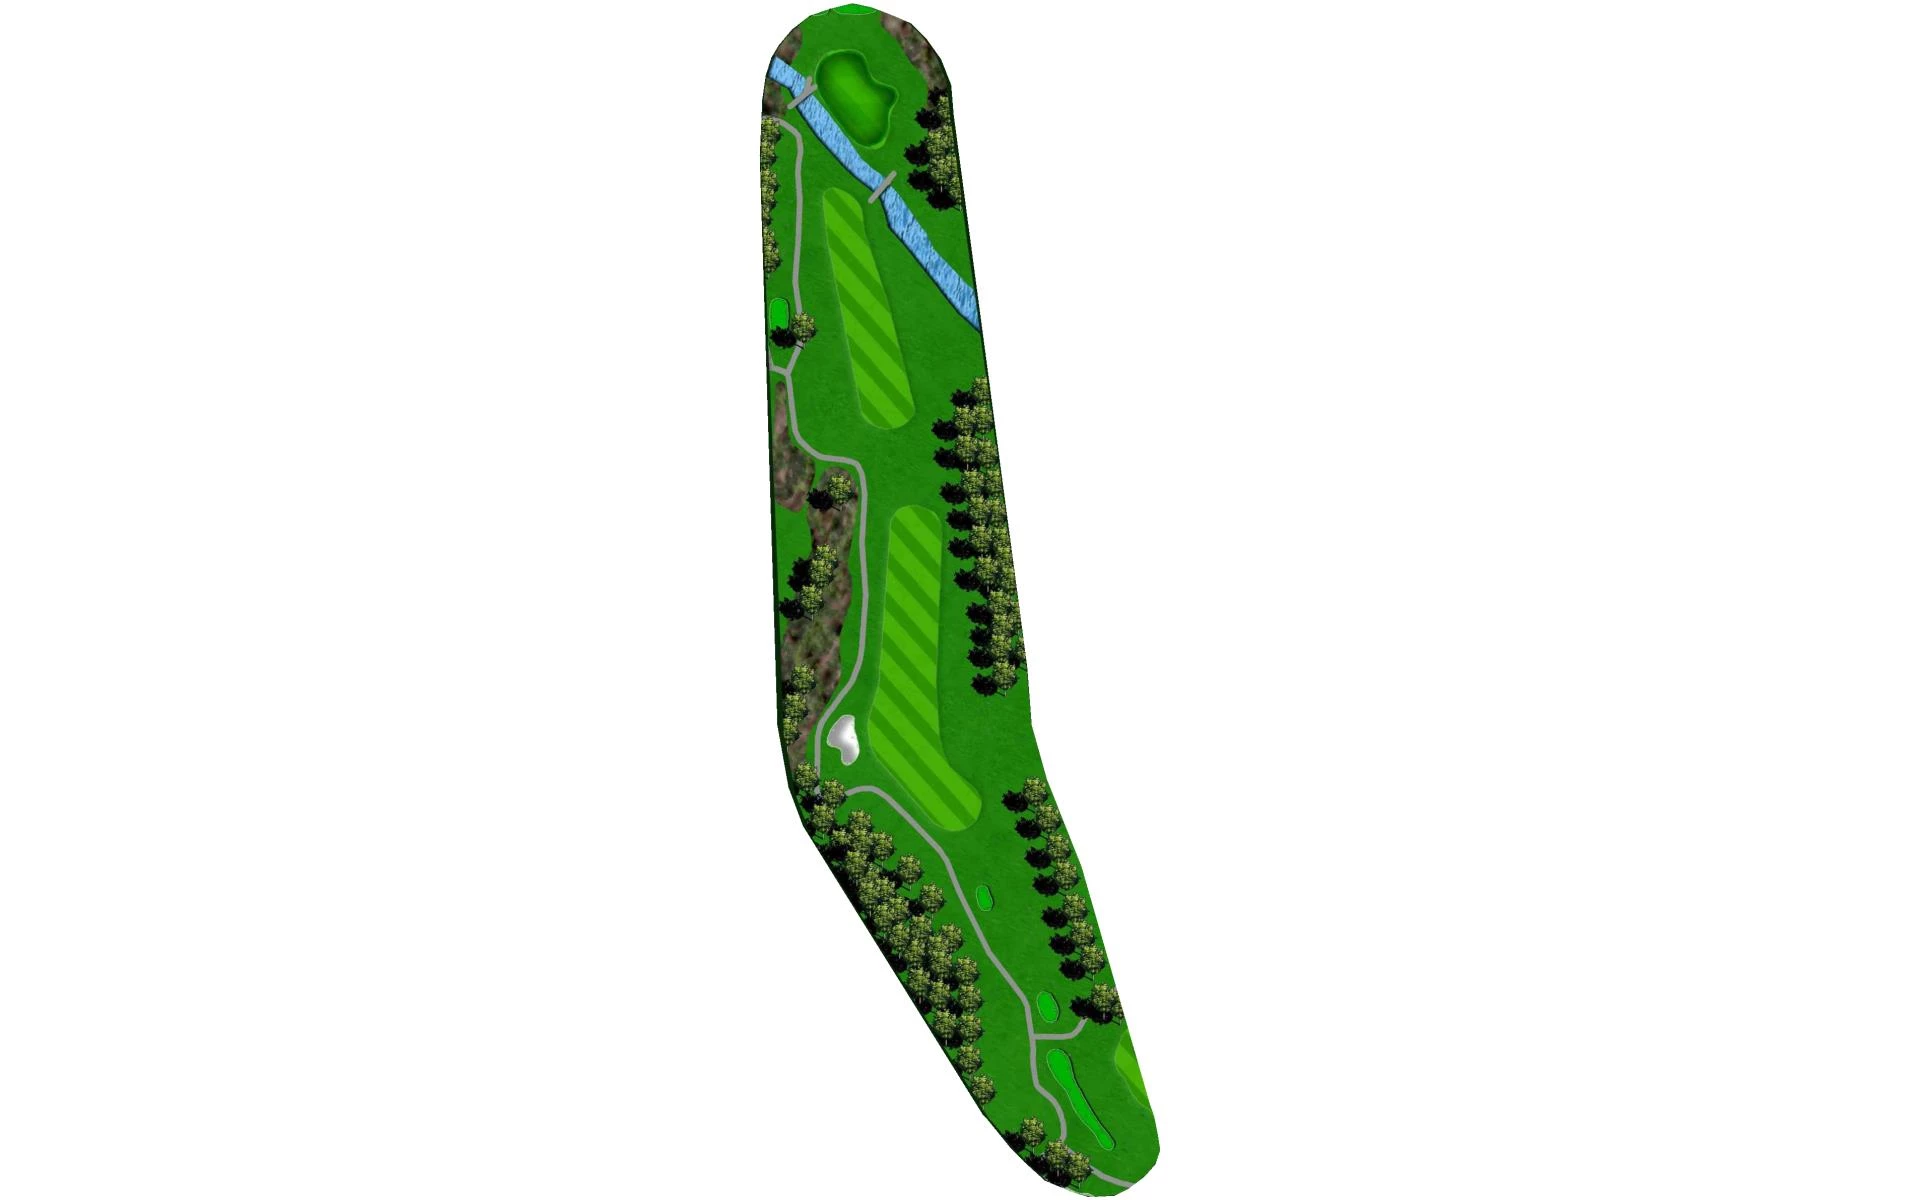
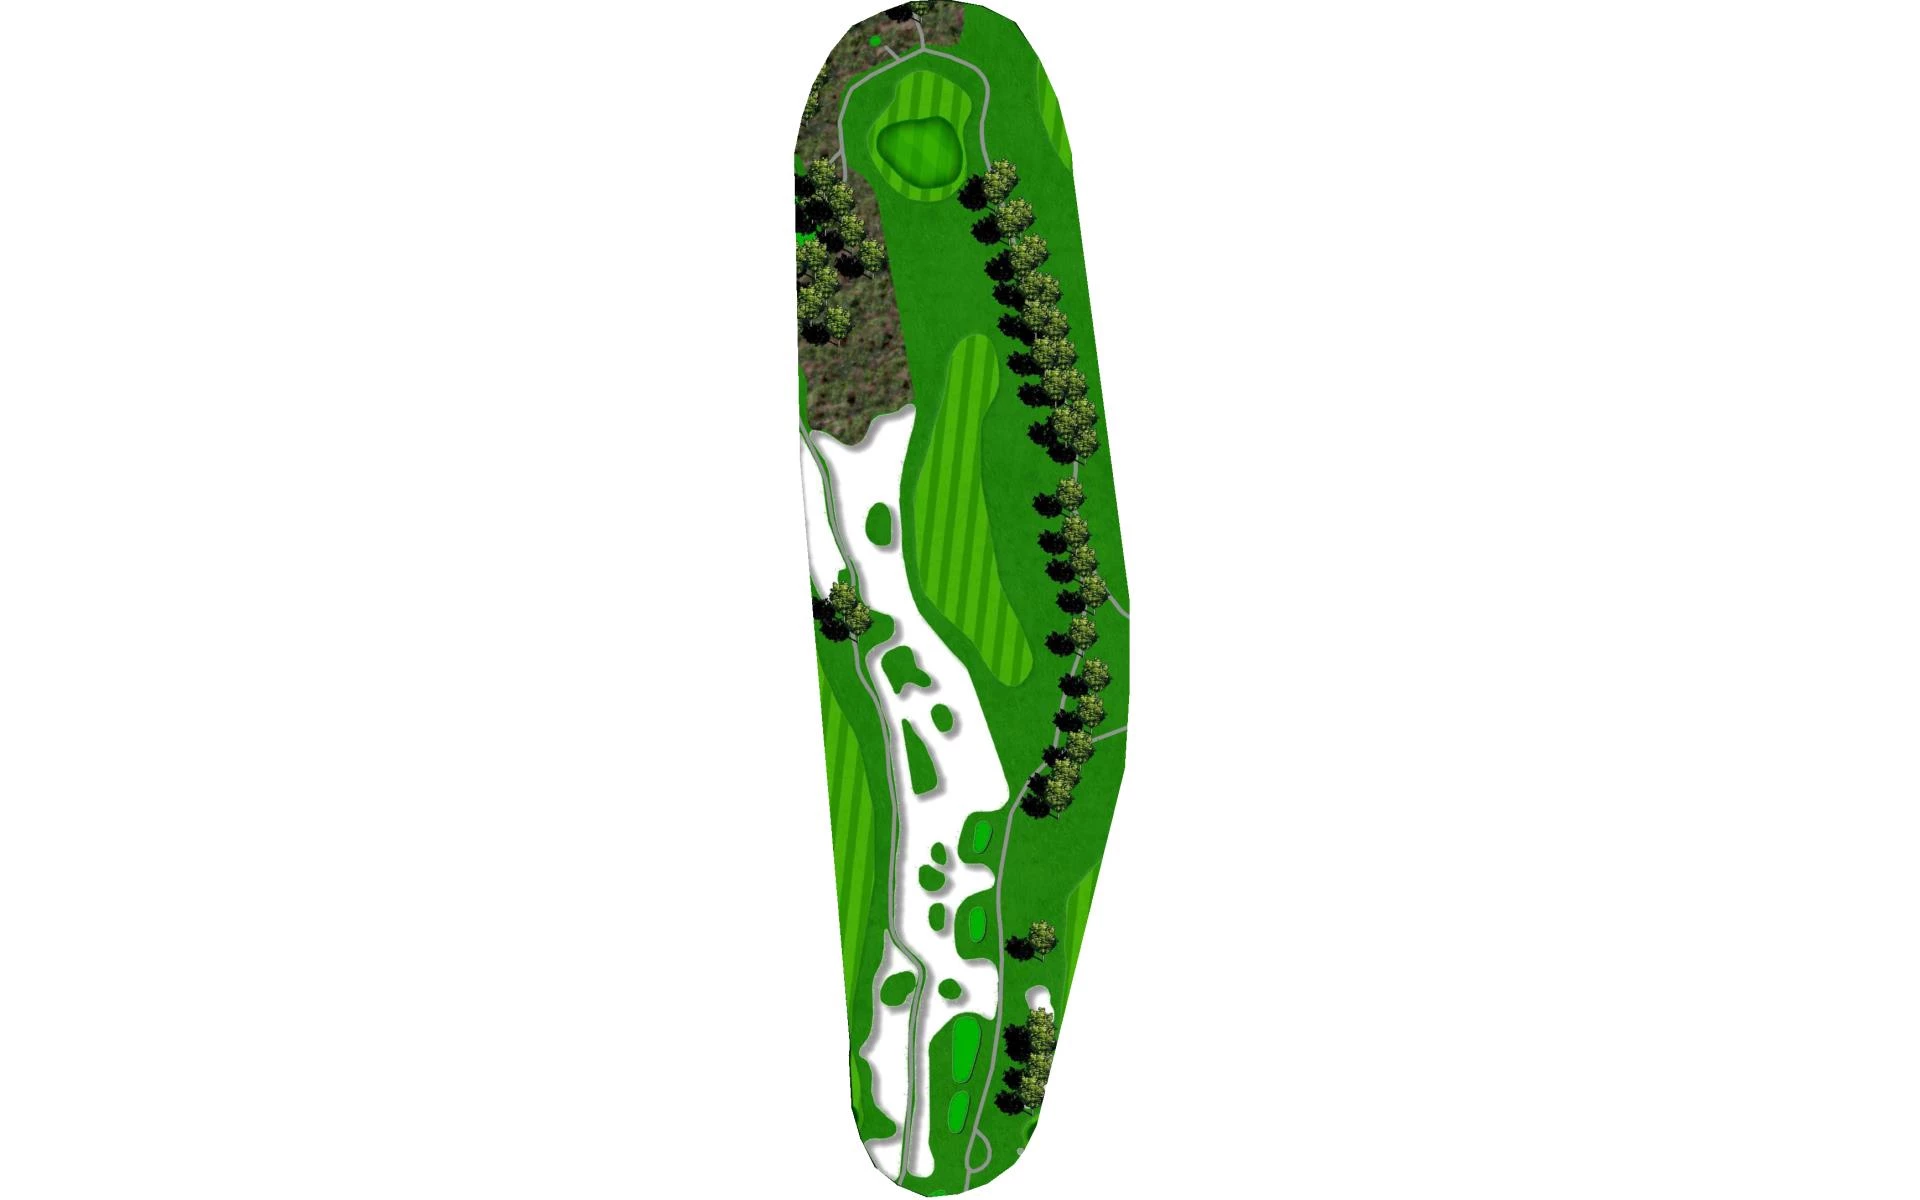
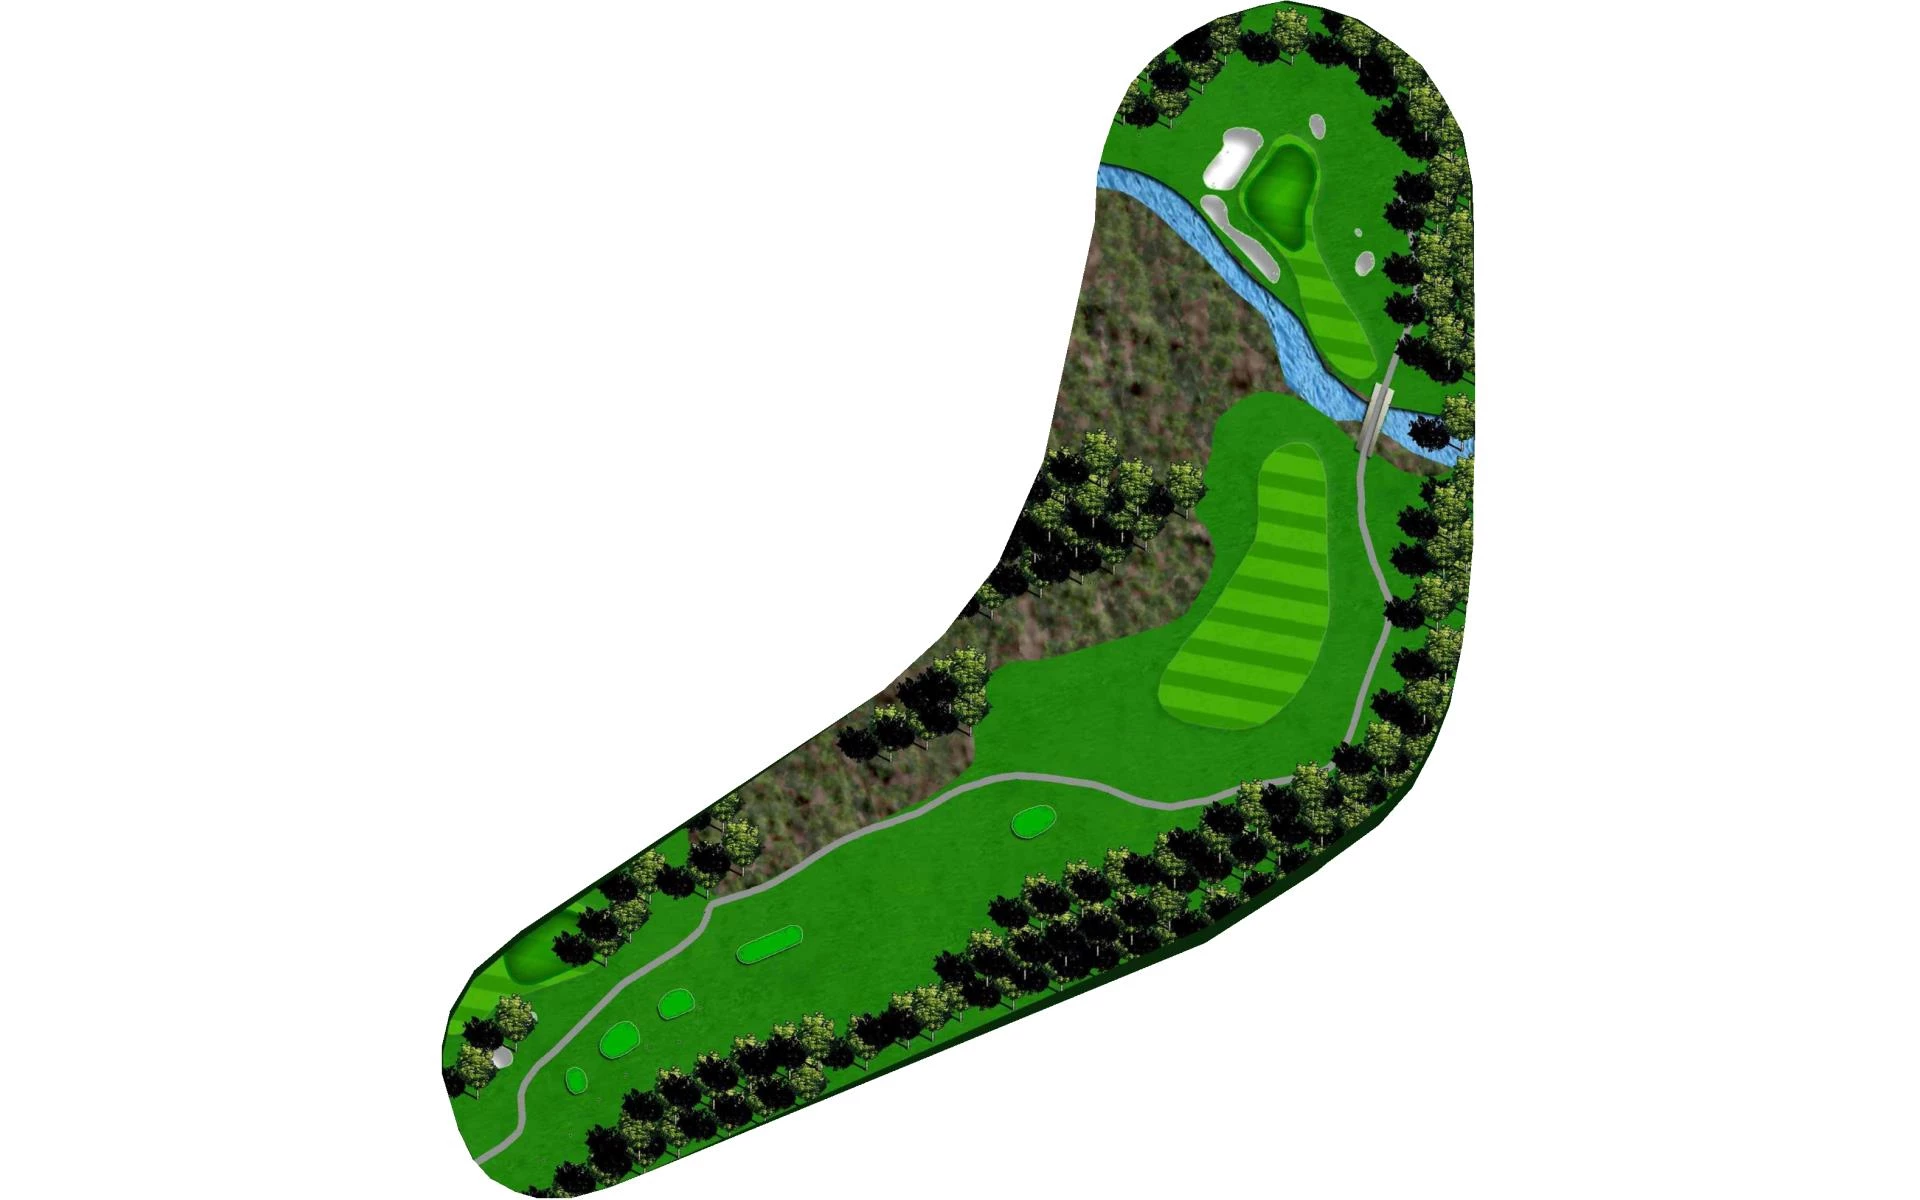
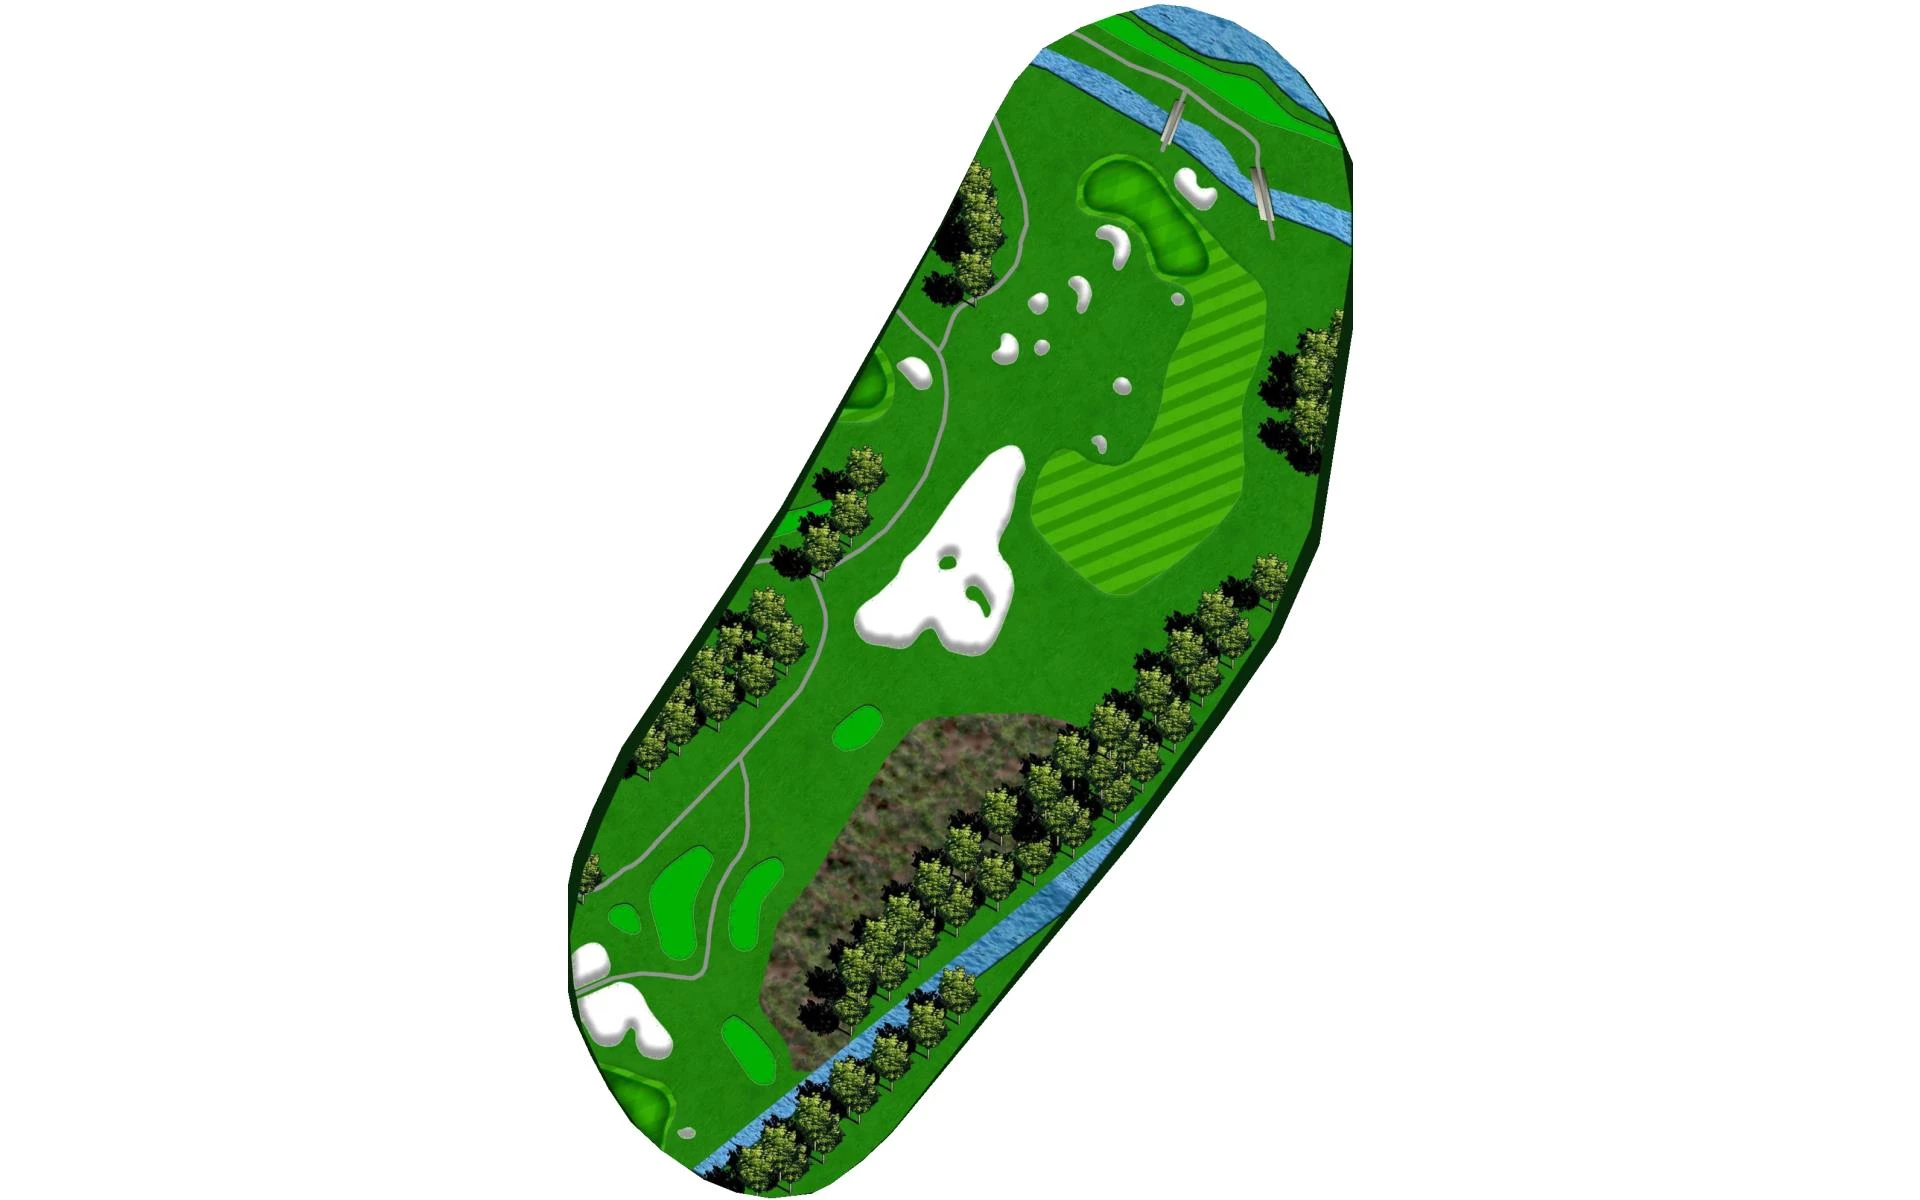
This par 5 is reachable in two for longer hitters. A good drive will stay right of the tall trees and beyond the elevated blind fairway. The…
This par 5 is reachable in two for longer hitters. A good drive will stay right of the tall trees and beyond the elevated blind fairway. The lay-up is to the left-center of the lower fairway, which will leave a short approach into the green. Any balls coming up short will find Chicken Creek.
Yardage by Tee:
BLACK 531
BURGUNDY 513
BLUE 495
SILVER 463
GOLD 404
# 4 /
Par: 4
Handicaps:
Men's 9
Women's 13
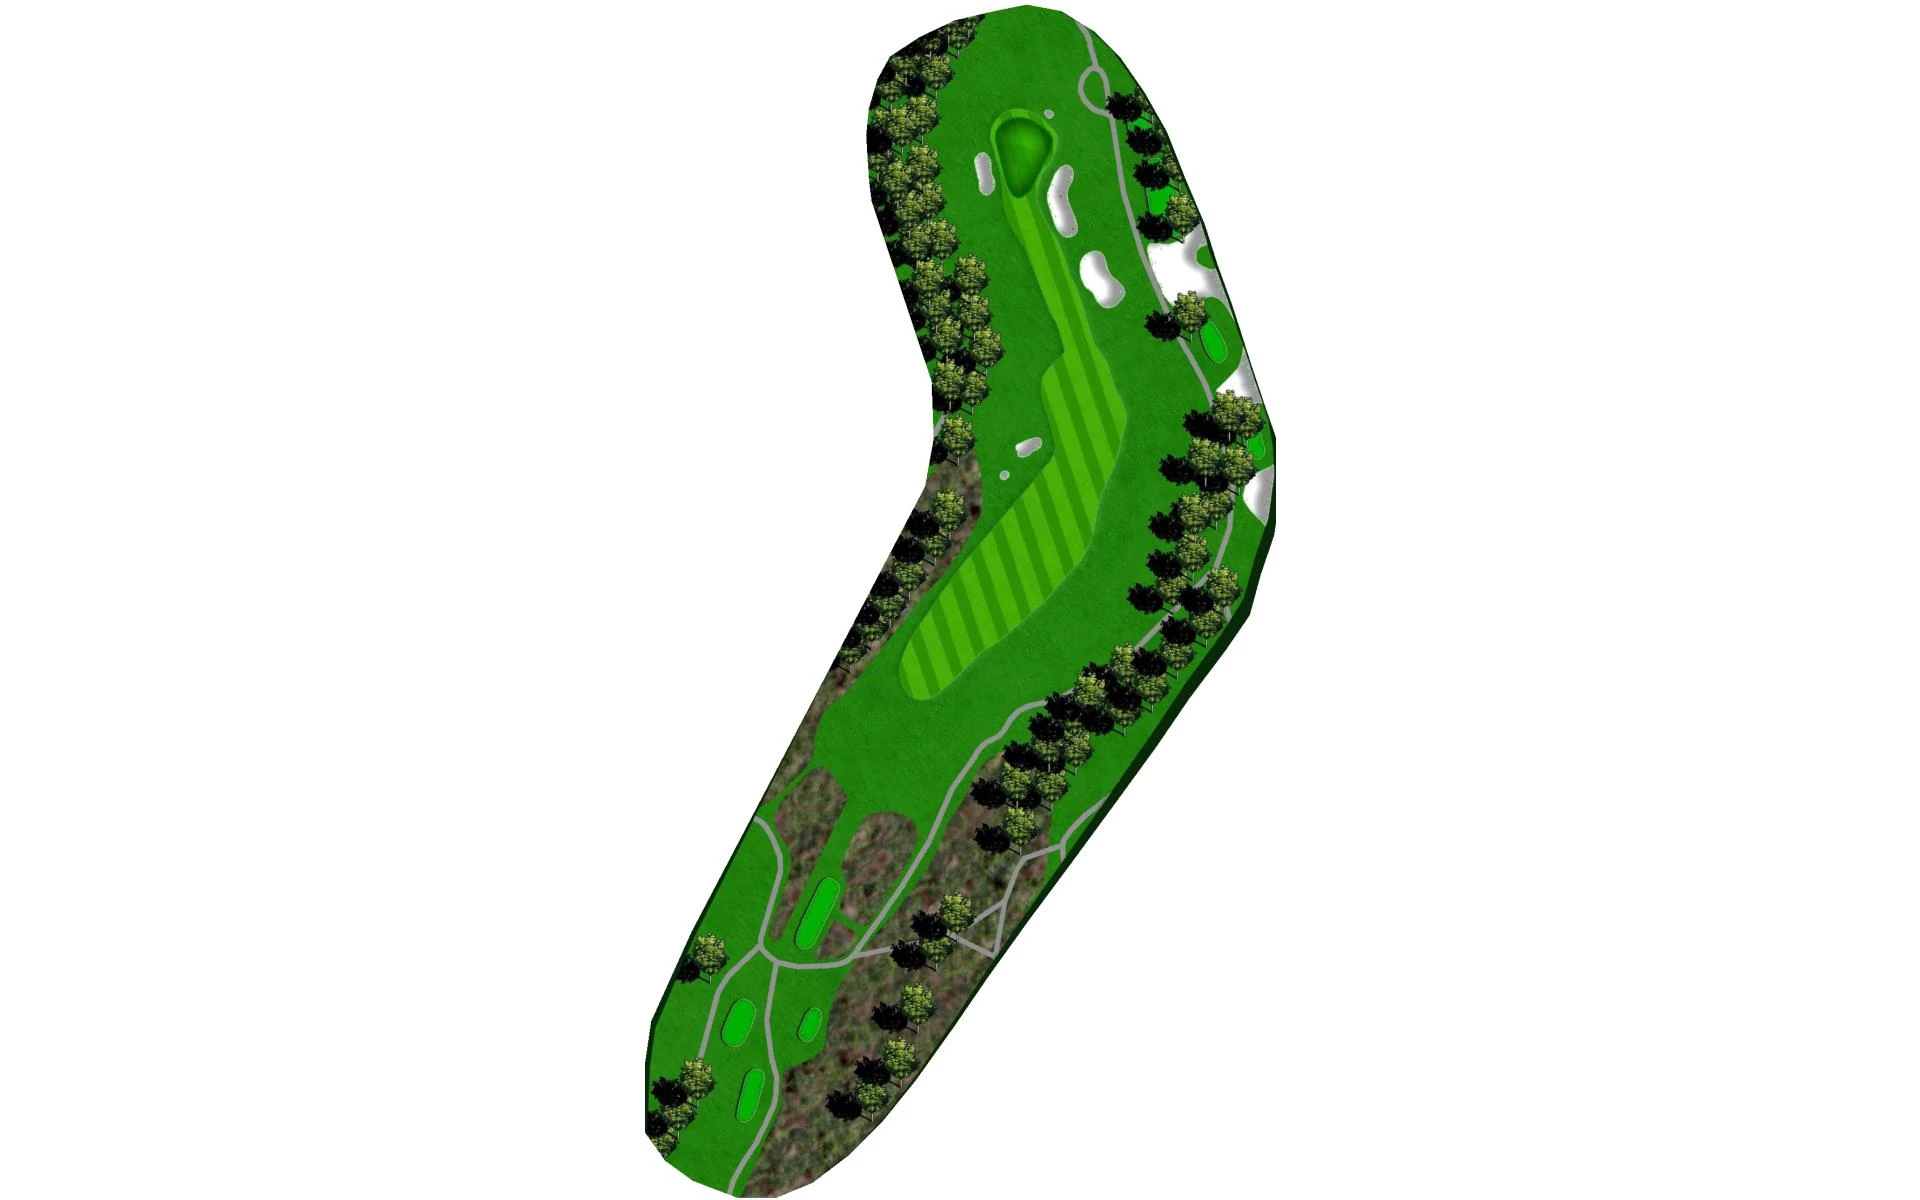
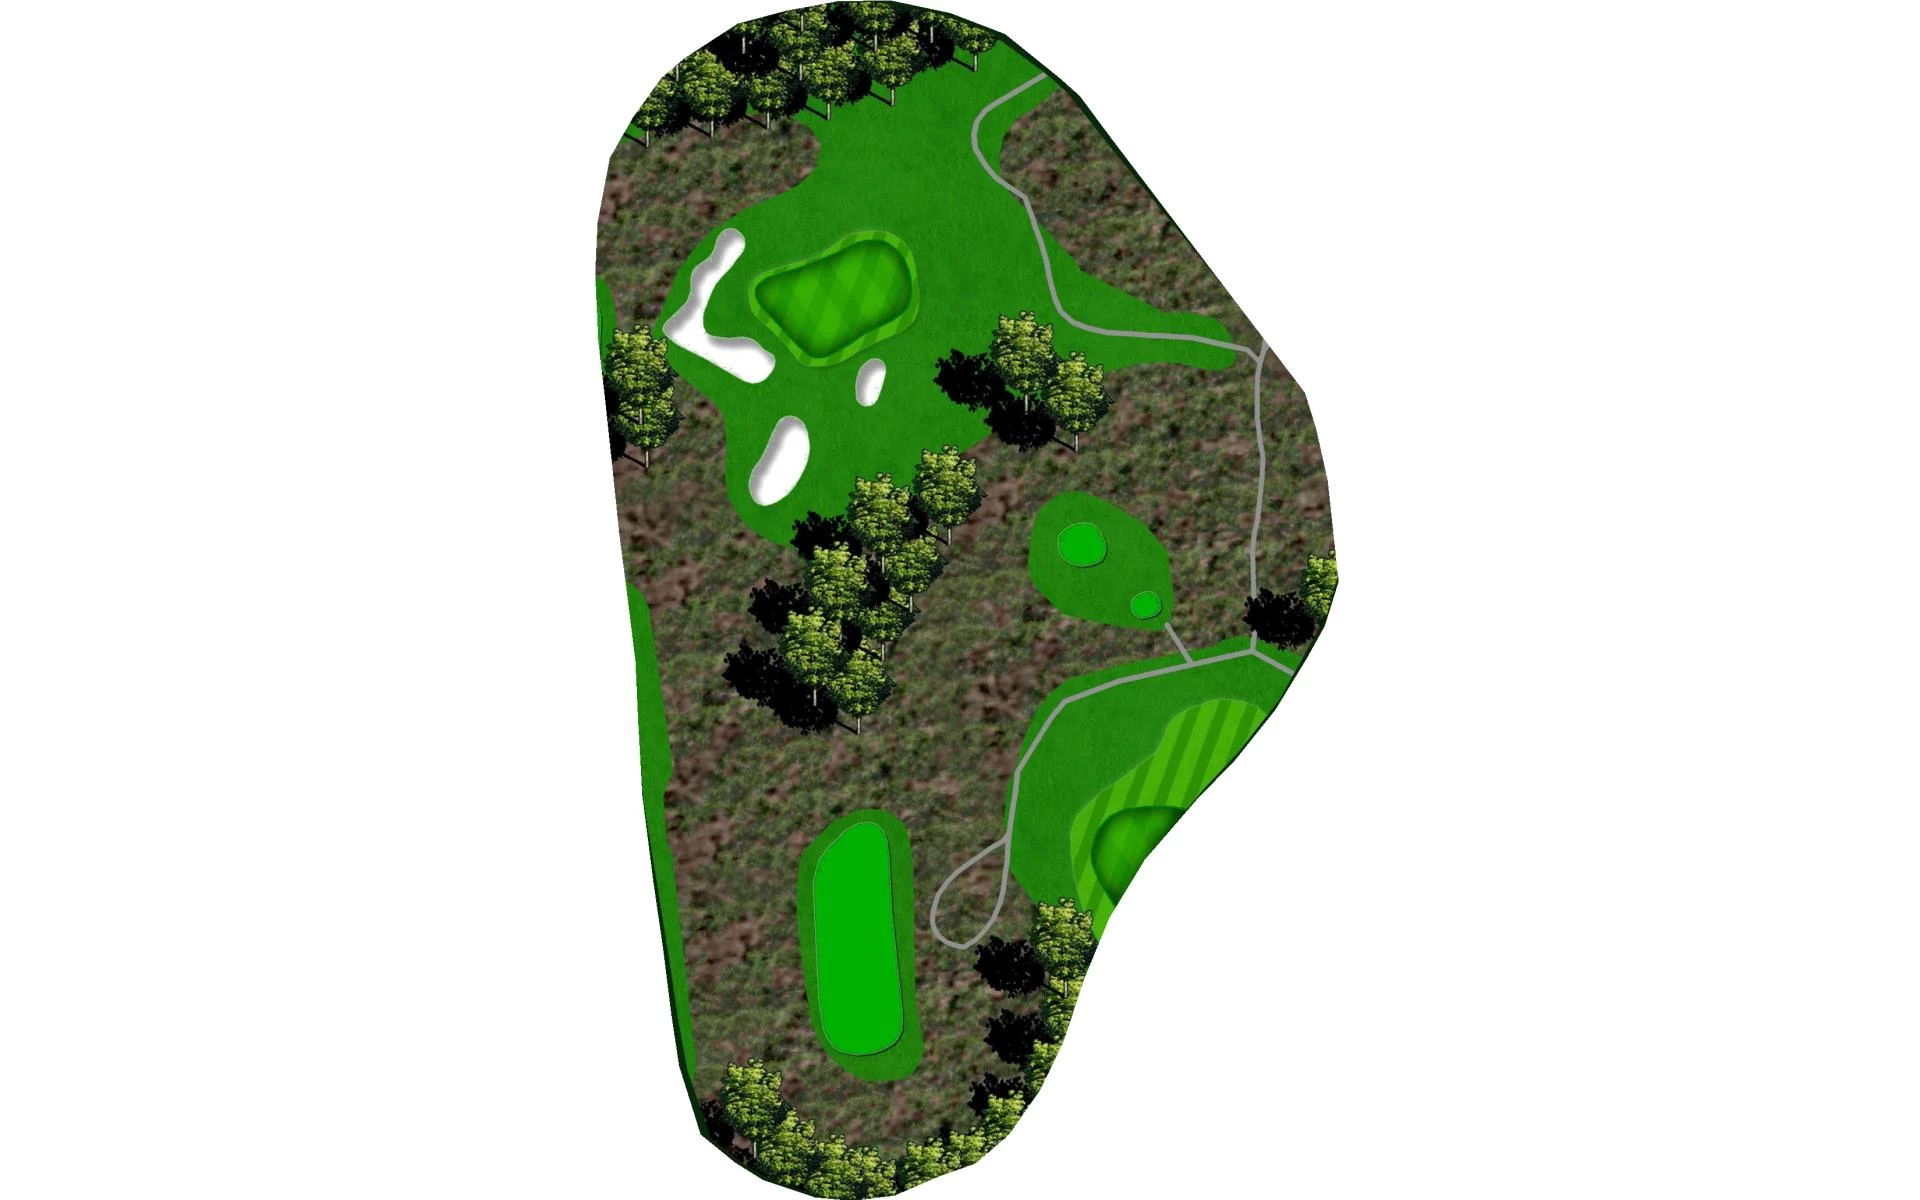
The fourth hole is a dogleg left par 4. A good line off the tee is just right of the fairway bunkers and any drives left will be blocked out…
The fourth hole is a dogleg left par 4. A good line off the tee is just right of the fairway bunkers and any drives left will be blocked out from approaching the small, but fairly flat green.
Yardage by Tee:
BLACK 413
BURGUNDY 375
BLUE 352
SILVER 339
GOLD 298
# 5 /
Par: 4
Handicaps:
Men's 1
Women's 1
This straightaway, long par 4 is the hardest hole on the golf course. The second shot plays dramatically uphill to a two-tiered green.
Yardage by Tee:
BLACK 427
BURGUNDY 397
BLUE 345
SILVER 310
GOLD 307
# 6 /
Par: 3
Handicaps:
Men's 17
Women's 17
The sixth hole is a short par 3 over a valley of native grass. It’s important to check the wind before taking dead aim. If the pin is in the…
The sixth hole is a short par 3 over a valley of native grass. It’s important to check the wind before taking dead aim. If the pin is in the bowl, players can land their ball on the slope to get it close.
Yardage by Tee:
BLACK 137
BURGUNDY 128
BLUE 119
SILVER 110
GOLD 101

# 7 /
Par: 4
Handicaps:
Men's 5
Women's 15
The ideal tee shot on this par 4 is down the left-center of the fairway to provide players the best look into the green. The approach shot p…
The ideal tee shot on this par 4 is down the left-center of the fairway to provide players the best look into the green. The approach shot plays downhill into a two-tiered green. Any balls that miss the green will be left with a difficult up-and-down.
Yardage by Tee:
BLACK 425
BURGUNDY 497
BLUE 381
SILVER 377
GOLD 293
# 8 /
Par: 4
Handicaps:
Men's 3
Women's 5
Tee shots on this dogleg right par 4 should avoid the large tee and waste area that guards the fairway. The approach will require a long-iro…
Tee shots on this dogleg right par 4 should avoid the large tee and waste area that guards the fairway. The approach will require a long-iron over Chicken Creek to a large green that’s protected by multiple bunkers.
Yardage by Tee:
BLACK 438
BURGUNDY 410
BLUE 380
SILVER 335
GOLD 290
# 9 /
Par: 4
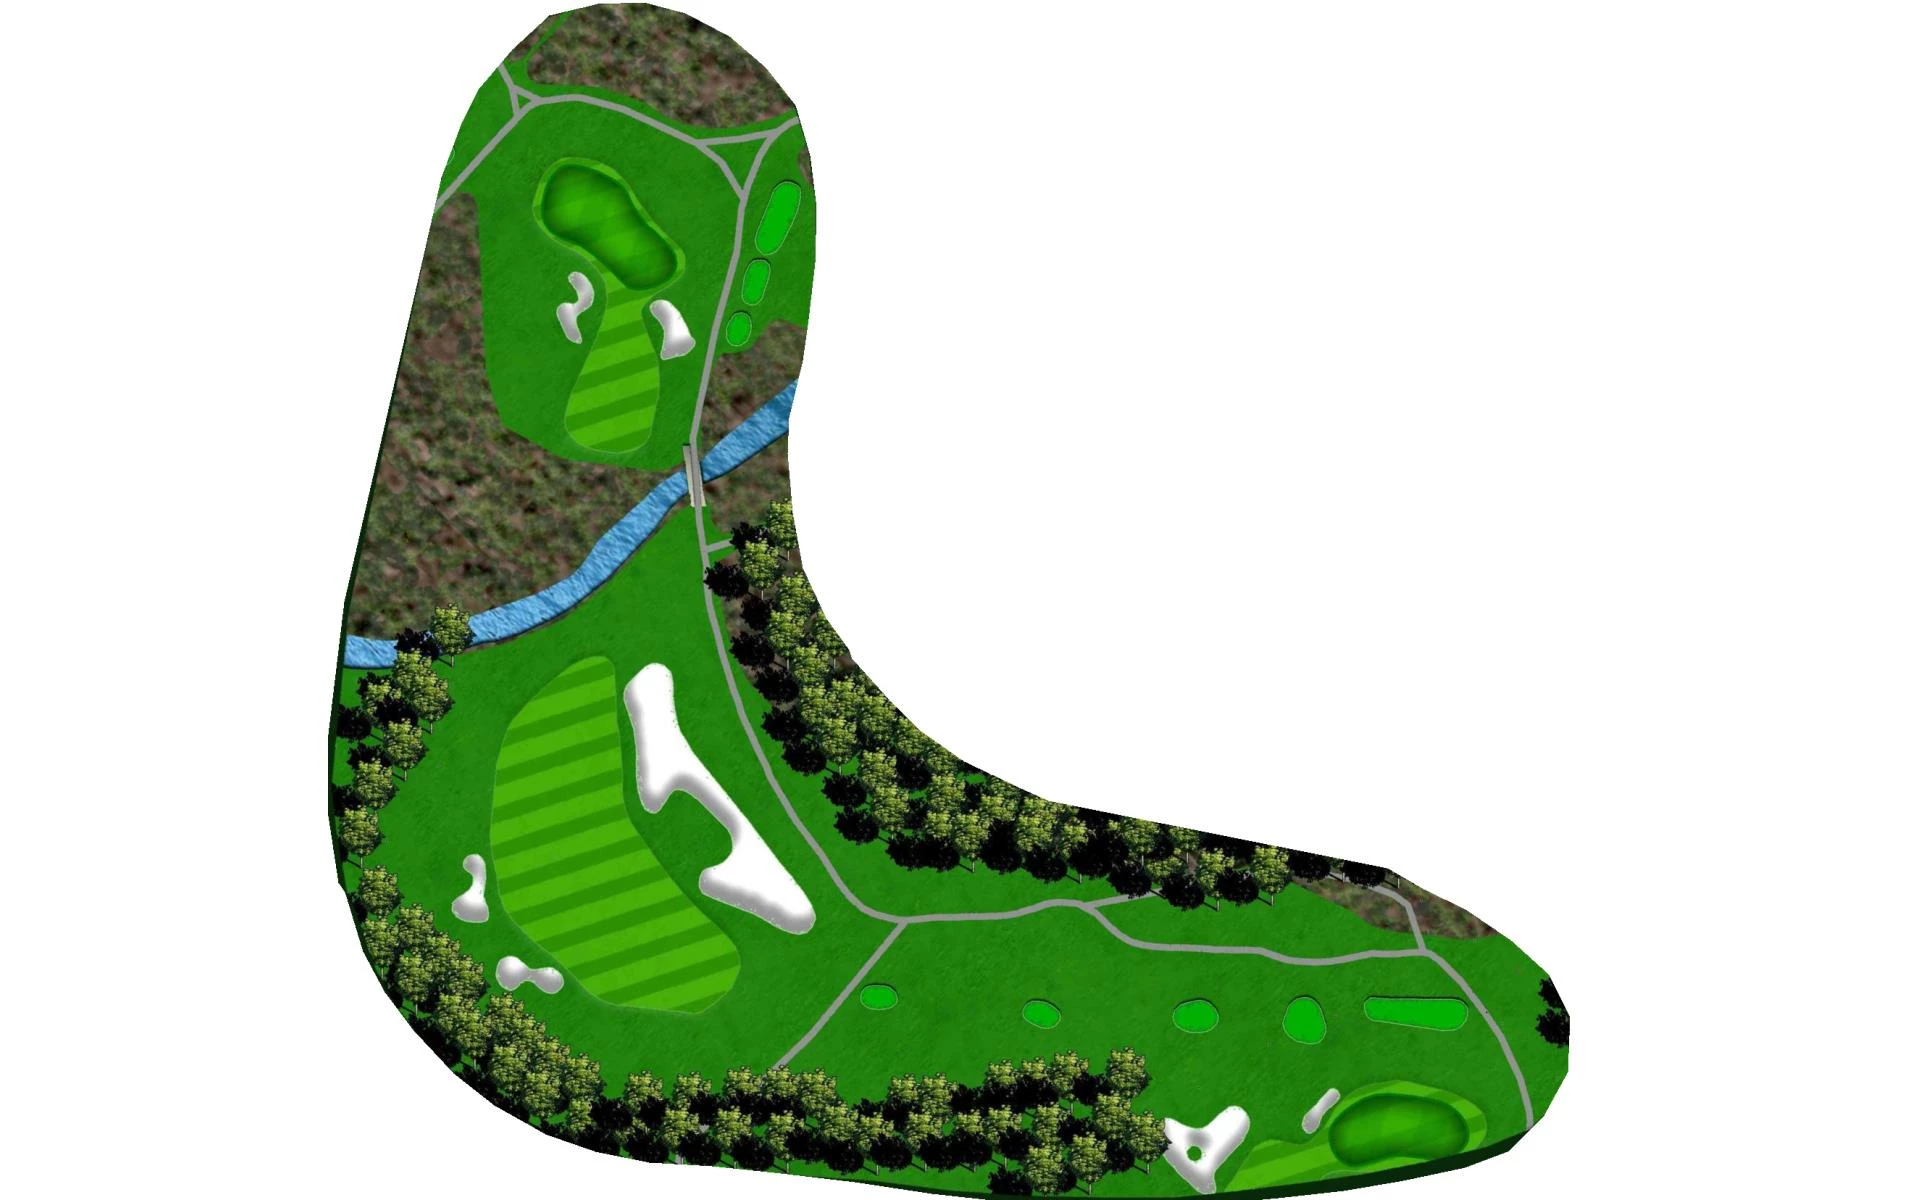
The final hole on the front nine is a par 5 that features a double fairway that’s split by a deep waste area. Longer hitters will have a cha…
The final hole on the front nine is a par 5 that features a double fairway that’s split by a deep waste area. Longer hitters will have a chance to reach the green in two. A creek and wetlands guard the front of the green and eight bunkers lurk behind the putting surface to snatch up any balls that go long.
Yardage by Tee:
BLACK 517
BLUE 437
GOLD 359
BURGUNDY 476
SILVER 386
# 10 /
Par: 4
A waste areas guards the left side of the tenth fairway as it bends slightly to the left. An ideal drive will travel down the left-center to…
A waste areas guards the left side of the tenth fairway as it bends slightly to the left. An ideal drive will travel down the left-center to set up a shorter second shot. Any approach shots that miss long or left will leave players an extremely difficult up-and-down from below the green.
Yardage by Tee:
BLACK 414
BLUE 337
GOLD 271
BURGUNDY 387
SILVER 302
# 11 /
Par: 4
The eleventh hole is a dogleg left par 4 that begins from an elevated tee box. Players who find the fairway will have an easier approach sho…
The eleventh hole is a dogleg left par 4 that begins from an elevated tee box. Players who find the fairway will have an easier approach shot that must carry Chicken Creek. The green is elevated with two tiers and surrounded by bunkers.
Yardage by Tee:
BLACK 403
BLUE 360
GOLD 249
BURGUNDY 382
SILVER 323
# 12 /
Par: 4
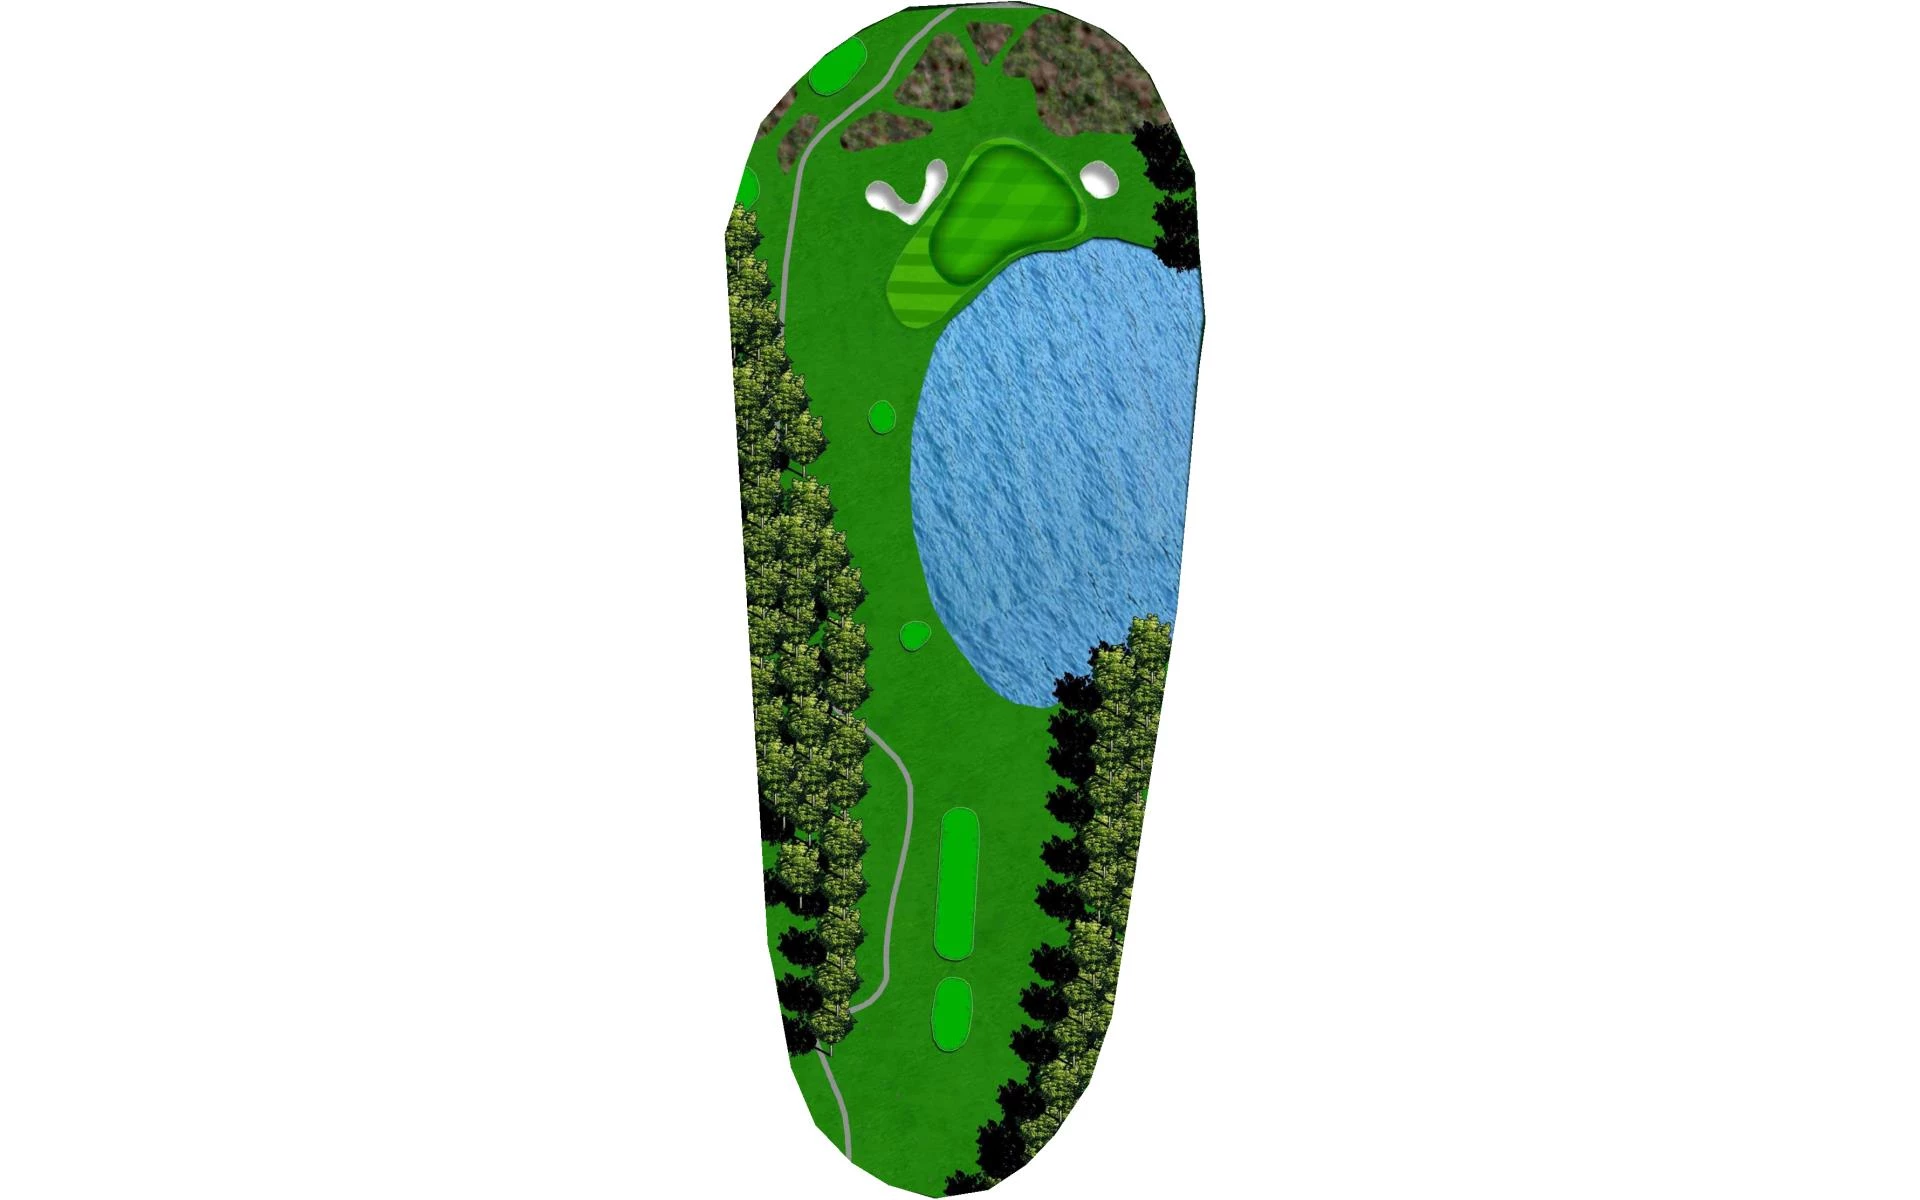
The picturesque twelfth hole is a par 3 over water that requires a long-iron or utility club off the tee. Two deep bunkers tend to catch any…
The picturesque twelfth hole is a par 3 over water that requires a long-iron or utility club off the tee. Two deep bunkers tend to catch any wayward shots that go long of the green.
Yardage by Tee:
BLACK 213
BLUE 168
GOLD 120
BURGUNDY 188
SILVER 125
# 13 /
Par: 4
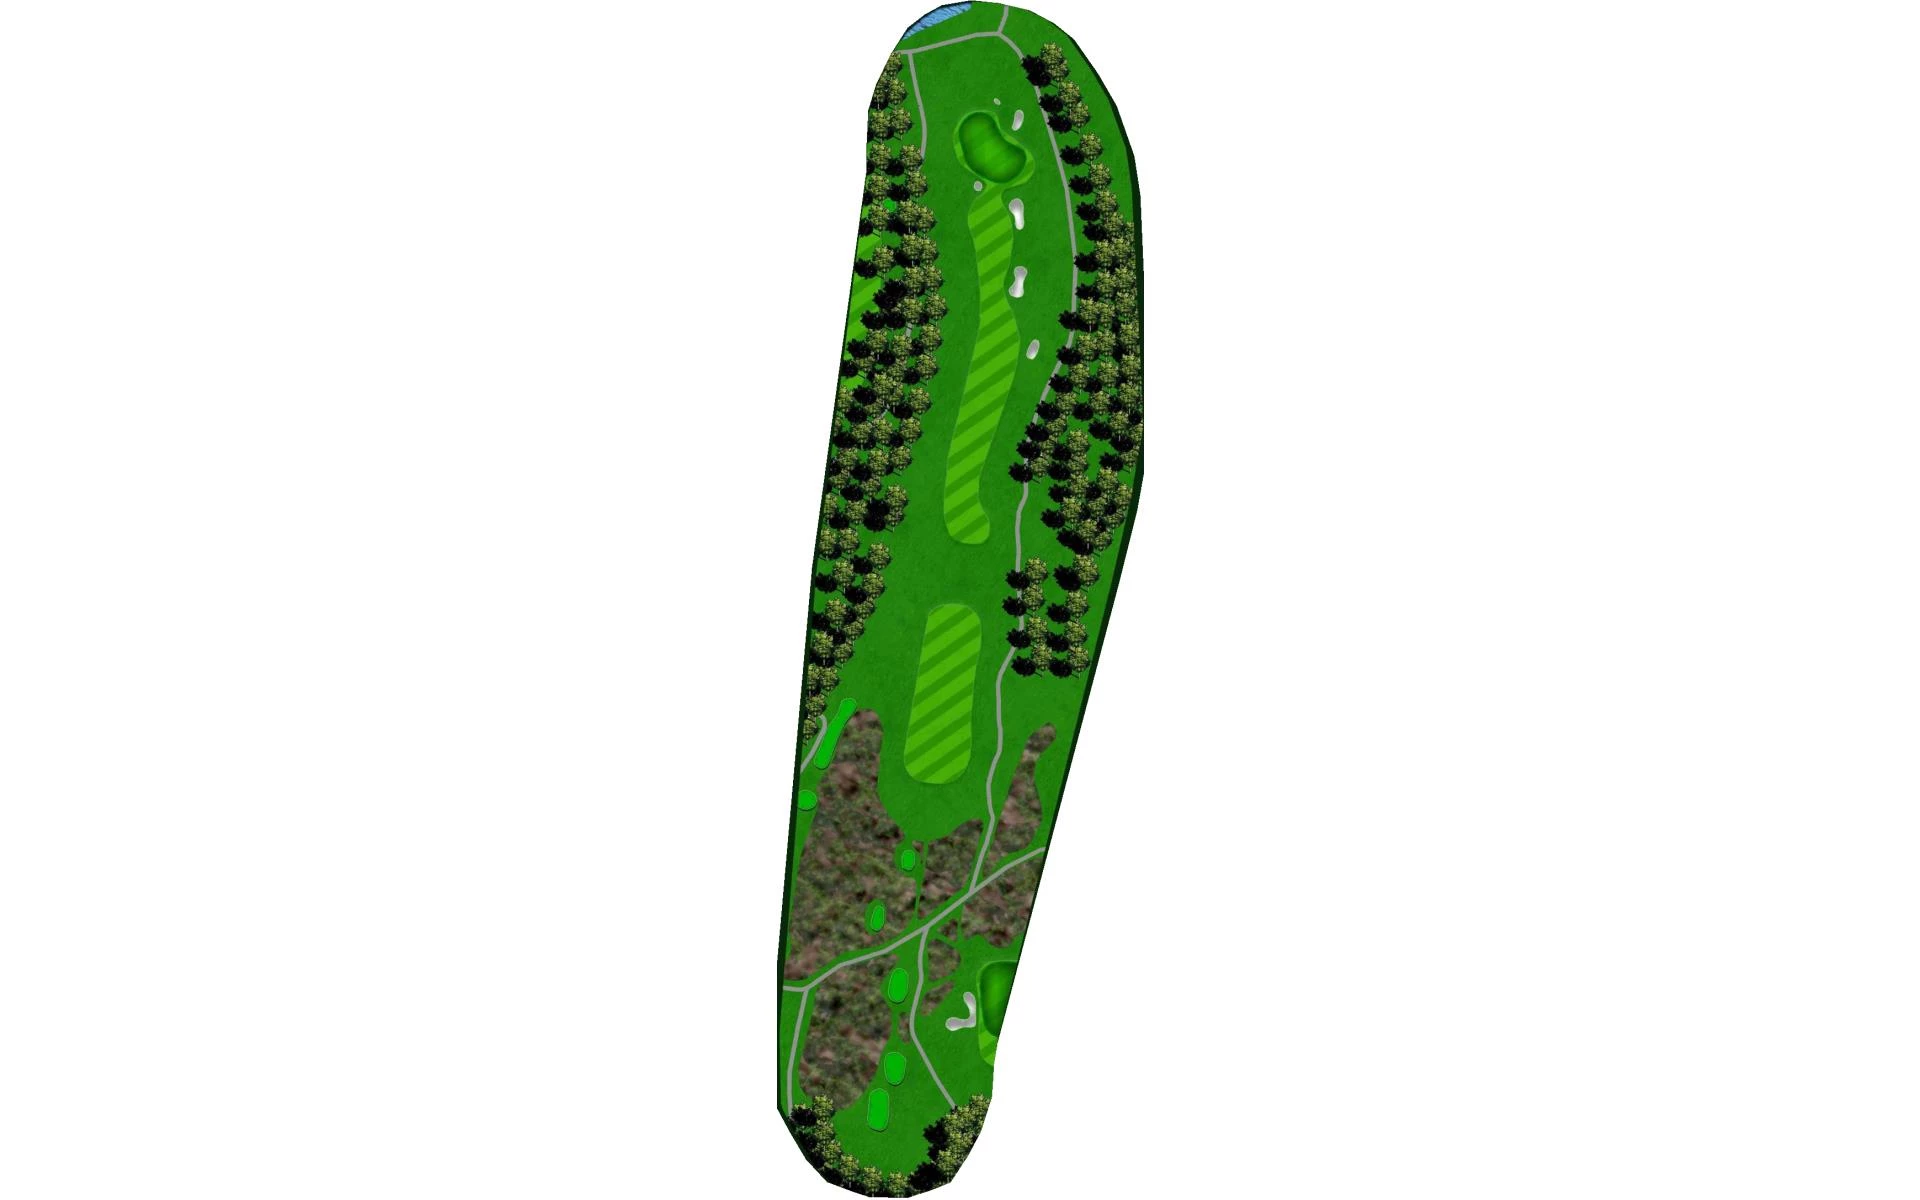
This risk-reward par 5 typically requires three shots to get home. The fairway ends 260 yards from the back tee, where it’ll leave another 2…
This risk-reward par 5 typically requires three shots to get home. The fairway ends 260 yards from the back tee, where it’ll leave another 260 yards into the green. Longer hitters can carry their ball down a steep slope, leaving around 200 yards left. Bunkers line the right side of the fairway and trees left, so lay-up shots must be accurate. Players must be careful not to go long of this undulated green.
Yardage by Tee:
BLACK 526
BLUE 459
GOLD 386
BURGUNDY 498
SILVER 451
# 14 /
Par: 4
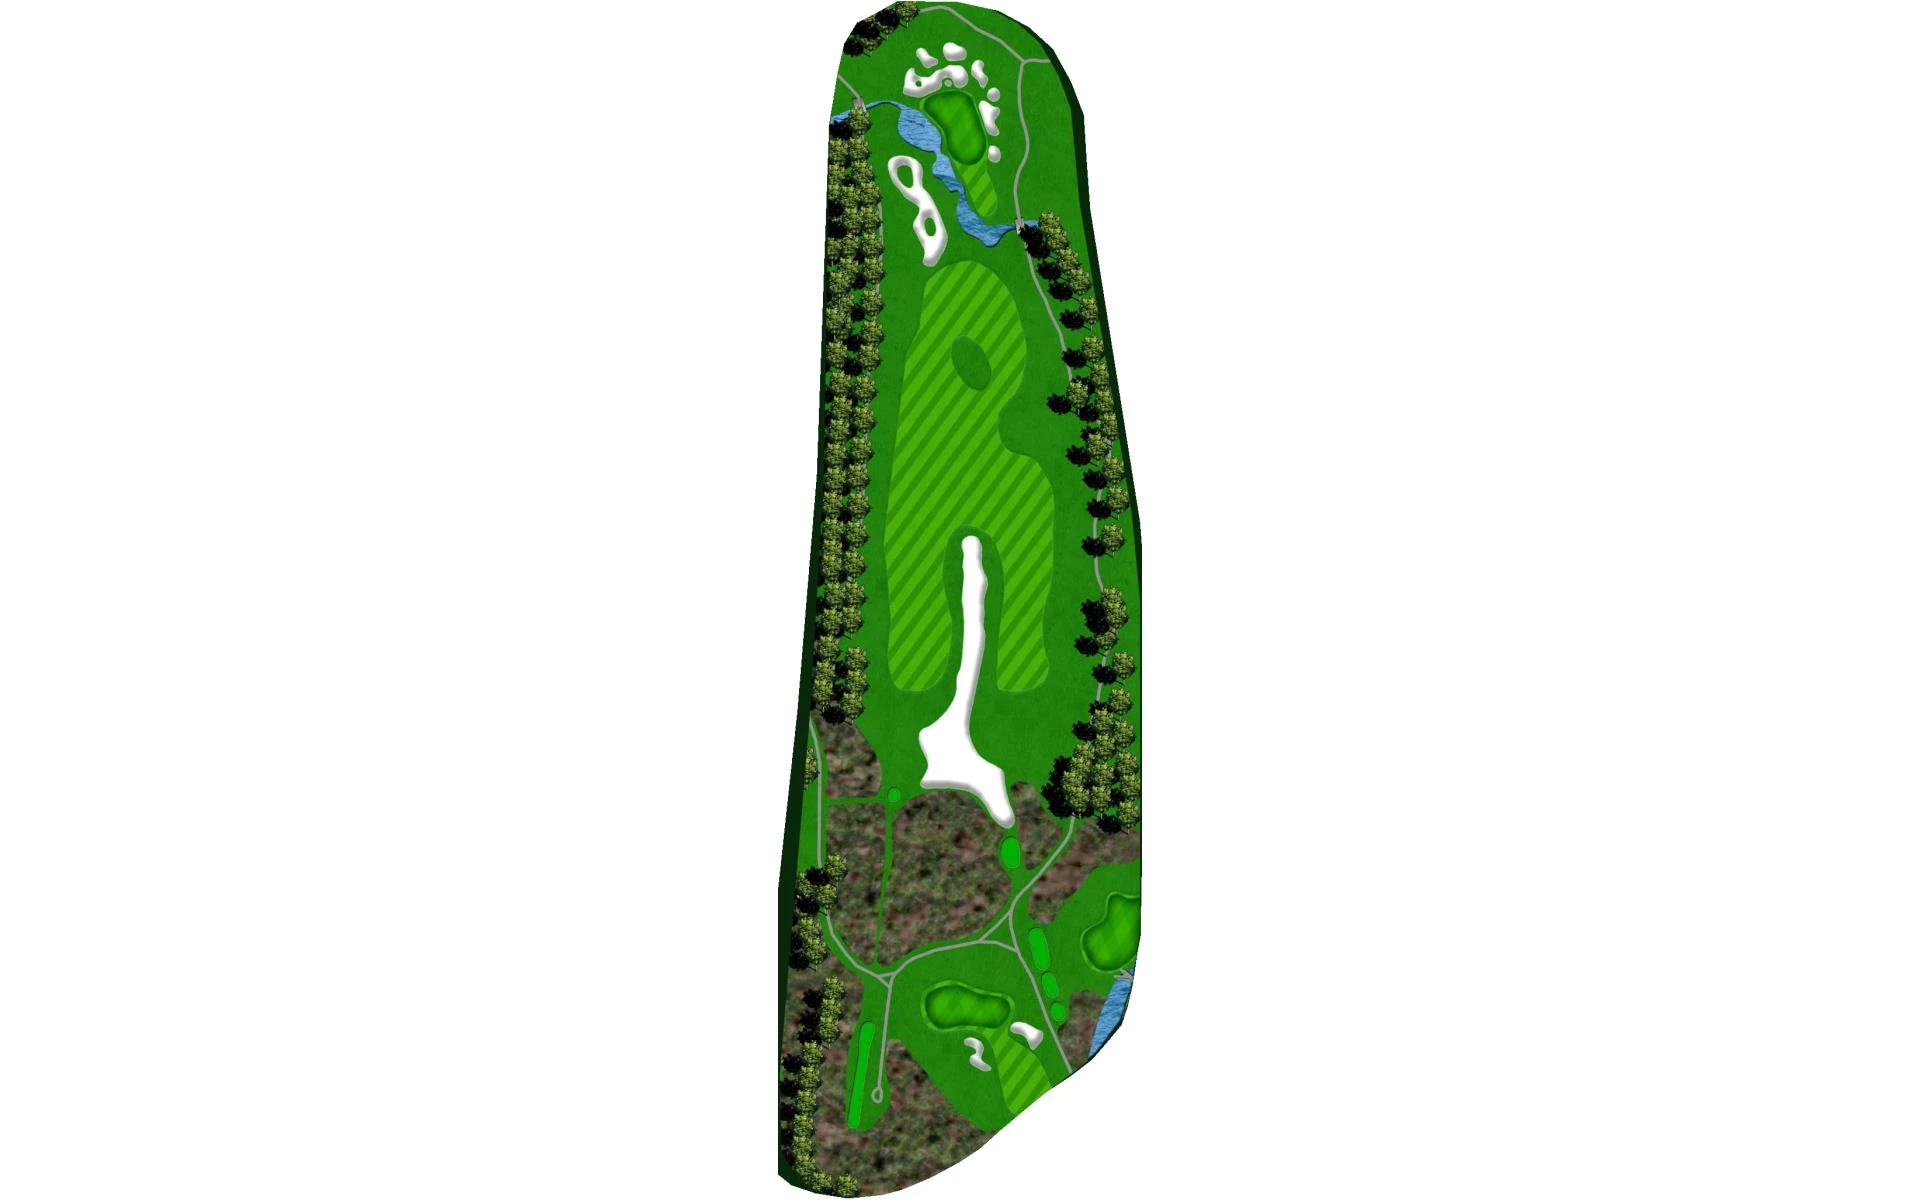
The fourteenth is a long par 4 guarded by a waste area, contained by Pete Dye’s signature railroad ties, that runs the length of the hole. A…
The fourteenth is a long par 4 guarded by a waste area, contained by Pete Dye’s signature railroad ties, that runs the length of the hole. A mid-long iron will be left into this large green that’s protected by a bunker left and waste area right.
Yardage by Tee:
BLACK 485
BLUE 388
GOLD 281
BURGUNDY 440
SILVER 283
# 15 /
Par: 4
The final par 5 is a narrow one that’s guarded by a large waste area down the left side of the hole and Little River on the right. A lay-up …
The final par 5 is a narrow one that’s guarded by a large waste area down the left side of the hole and Little River on the right. A lay-up down the left-center of the fairway will leave players a short iron or wedge into this two-tiered green.
Yardage by Tee:
BLACK 513
BLUE 451
GOLD 379
BURGUNDY 493
SILVER 401
# 16 /
Par: 4
The ideal tee shot on this risk-reward par 4 will find its way on to the hour-glass-shaped green. Avoiding the multiple pot bunkers strategi…
The ideal tee shot on this risk-reward par 4 will find its way on to the hour-glass-shaped green. Avoiding the multiple pot bunkers strategically placed around the hole is a challenge. The safe play is a long-iron off the tee to the right of the fairway bunkers, which will leave a wedge in.
Yardage by Tee:
BLACK 306
BLUE 275
GOLD 206
BURGUNDY 287
SILVER 262
# 17 /
Par: 4
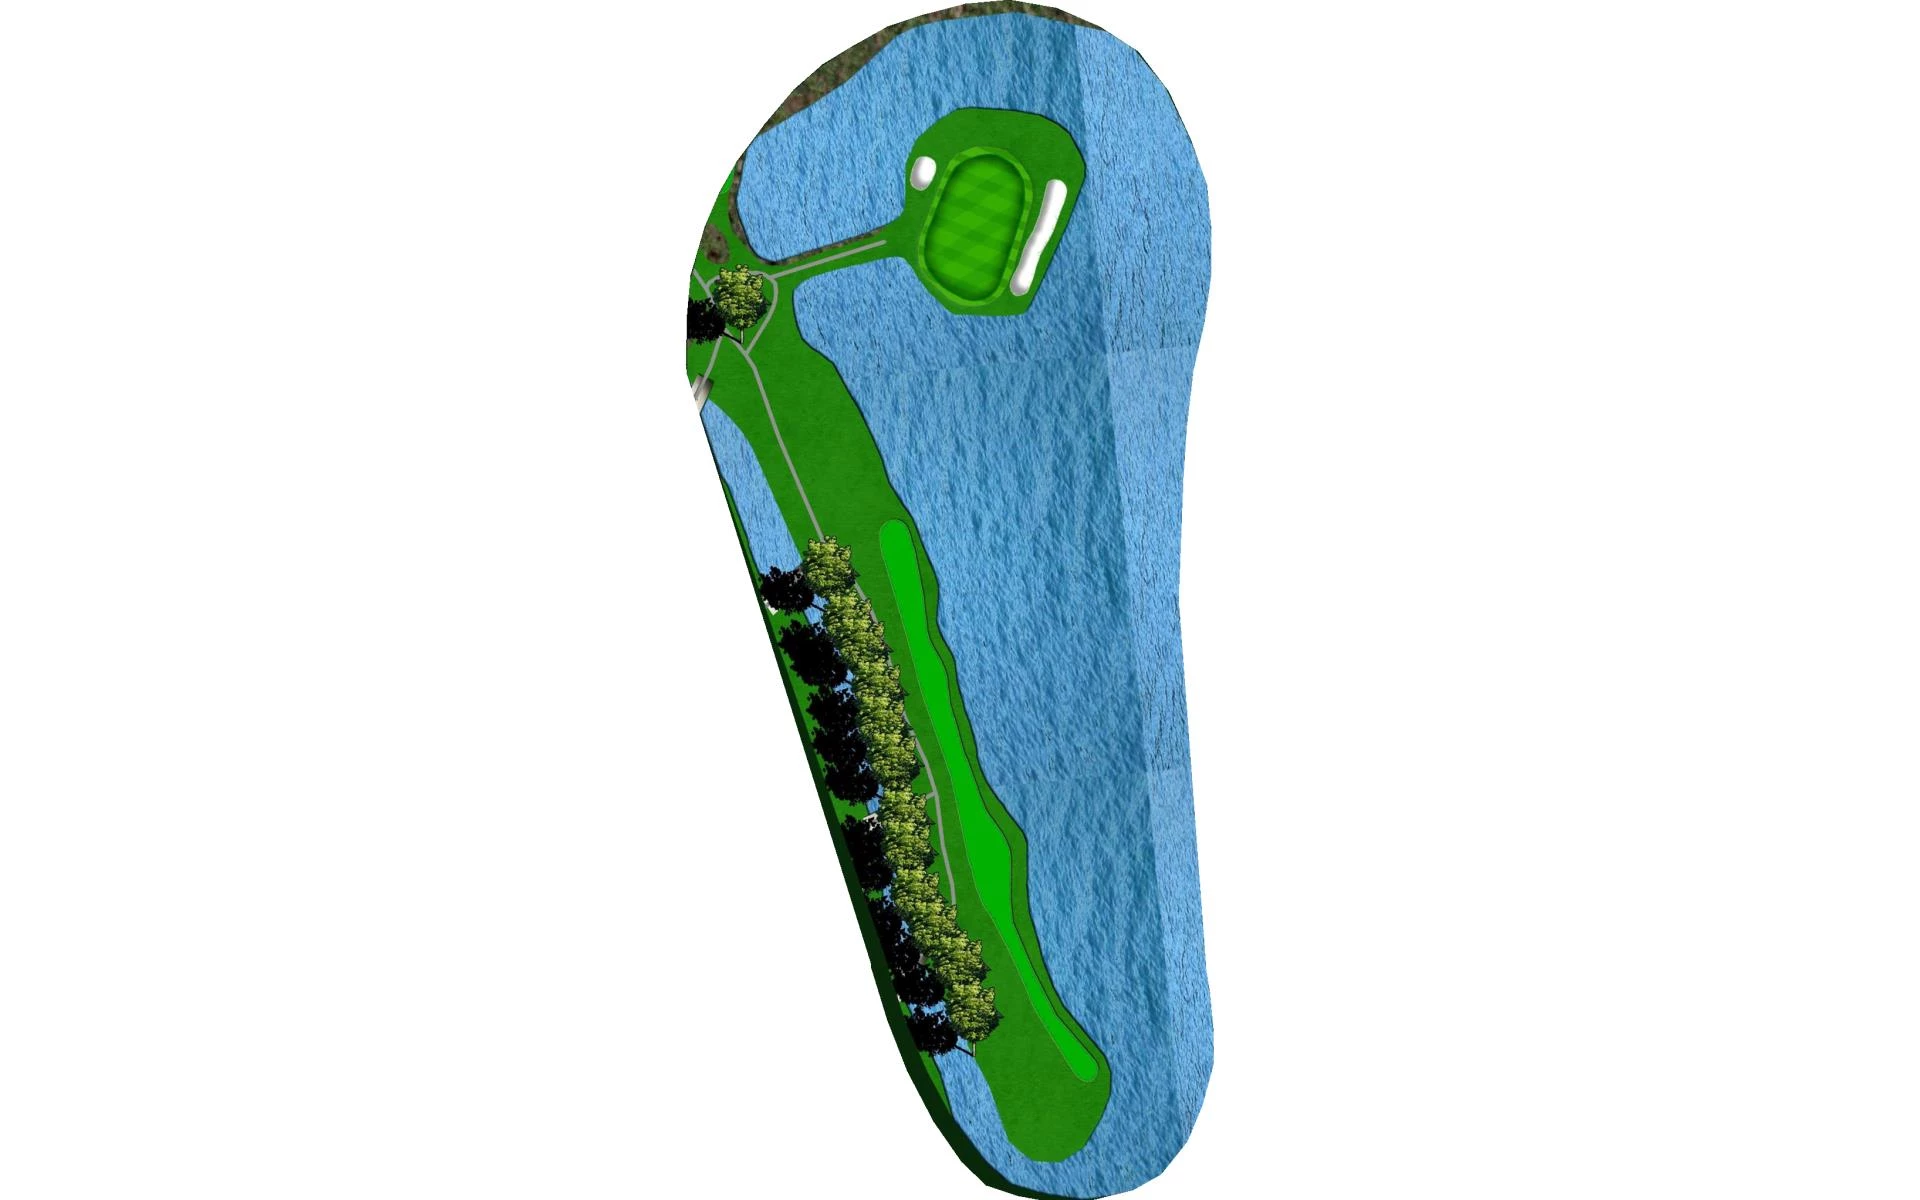
The seventeenth is the last par 3 and features a two-tiered, island green.
Yardage by Tee:
BLACK 190
BLUE 131
GOLD 82
BURGUNDY 149
SILVER 106
# 18 /
Par: 4
The closing hole is a difficult par 4. After a solid drive, players will still face a long-iron approach into an undulated green that drops …
The closing hole is a difficult par 4. After a solid drive, players will still face a long-iron approach into an undulated green that drops off on all sides. A deep bunker short and right also protects the putting surface.
Yardage by Tee:
BLACK 461
BLUE 397
GOLD 206
BURGUNDY 432
SILVER 334